2. <Operation on this unit>
While pressing the “TAP” key, turn the power switch
to ON position and keep pressing the “TAP” key.
When the LED display lights, press the “TAP” key 5
times before the LED display turns off.
The update mode is activated in about 6 seconds
and “U” is shown on the LED display.
Note:
The update mode is not activated when the LED
display turns off before pressing the “TAP” key 5
times. In such a case, turn the power switch to
OFF position once, and retry above operation.
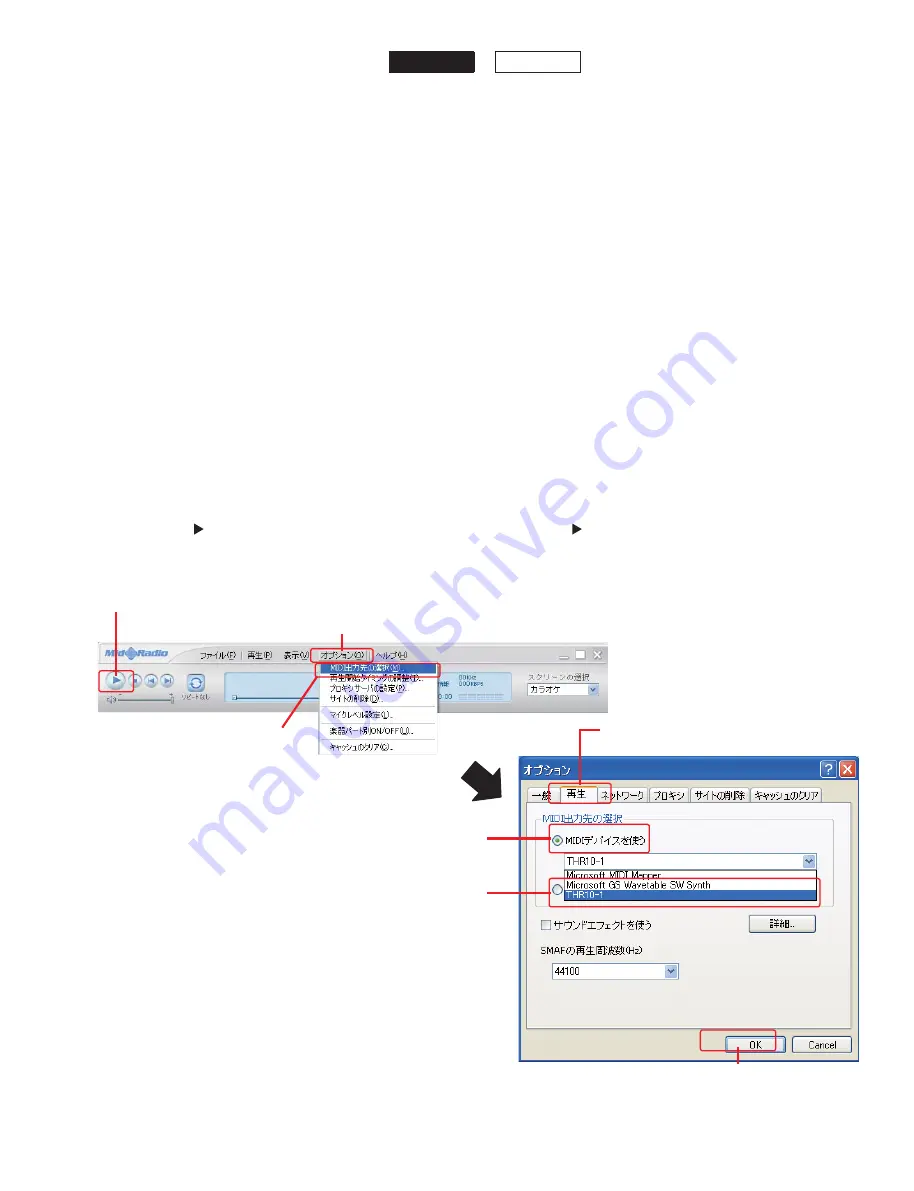
3. <Operation on the PC>
3-1 Click
“
オプション
”.
3-2 Click
“
MIDI 出力先の選択
”.
3-3 Click
“
再生
” tag.
3-4 Click
“
MIDI デバイスを使う
”
3-5 Select
“THR10-1”.
3-6 Click
“OK”.
3-7 Click
“ ”.
Writing of the firmware starts.
2. <本機の操作>
TAP キーを押しながら電源スイッチを ON にし、
さらに TAP キーを押し続けます。LED ディス
プレイが点灯したら、消灯する前に TAP
キー
を 5 回押します。
約 6 秒後、アップデートモードが起動し、LED ディ
スプレイに U が表示されます。
注:
TAP キーを 5 回押す前に LED ディスプレイ
が消灯した場合、アップデートモードは起動し
ません。そのときは、一度電源スイッチを OFF
にした後、上記の操作をやり直してください。
3. < PC の操作>
3-1 オプション をクリックします。
3-2 MIDI 出力先の選択 をクリックします。
3-3 再生 タグをクリックします。
3-4 MIDI デバイスを使う をクリックします。
3-5 THR10-1 を選択します。
3-6 OK をクリックします。
3-7
をクリックするとアップデートが開始します。
3-6 Click
3-5 Select
THR10
THR5
3-1 Click
Means “Option”
3-7 Click
Means “Play”
3-3 Click
Means “Play”
3-2 Click
Means “MIDI output target selection”
3-4 Click
Means “Use MIDI device”
THR10/THR5
39
Содержание THR10
Страница 3: ... SPECIFICATIONS THR10 THR5 THR10 THR5 3 ...
Страница 4: ... 仕様 THR10 THR5 THR10 THR5 4 ...
Страница 23: ...2NA WZ25890 THR10 2NA WZ25900 THR5 THR10 THR5 MAIN Circuit Board A A A A Pattern side パターン側 THR10 THR5 23 ...
Страница 35: ...Click Click Click Click Connect the USB cable to the PC and click NEXT THR10 THR5 Click THR10 THR5 35 ...


