background image

ELEMENT ENVELOPE

26

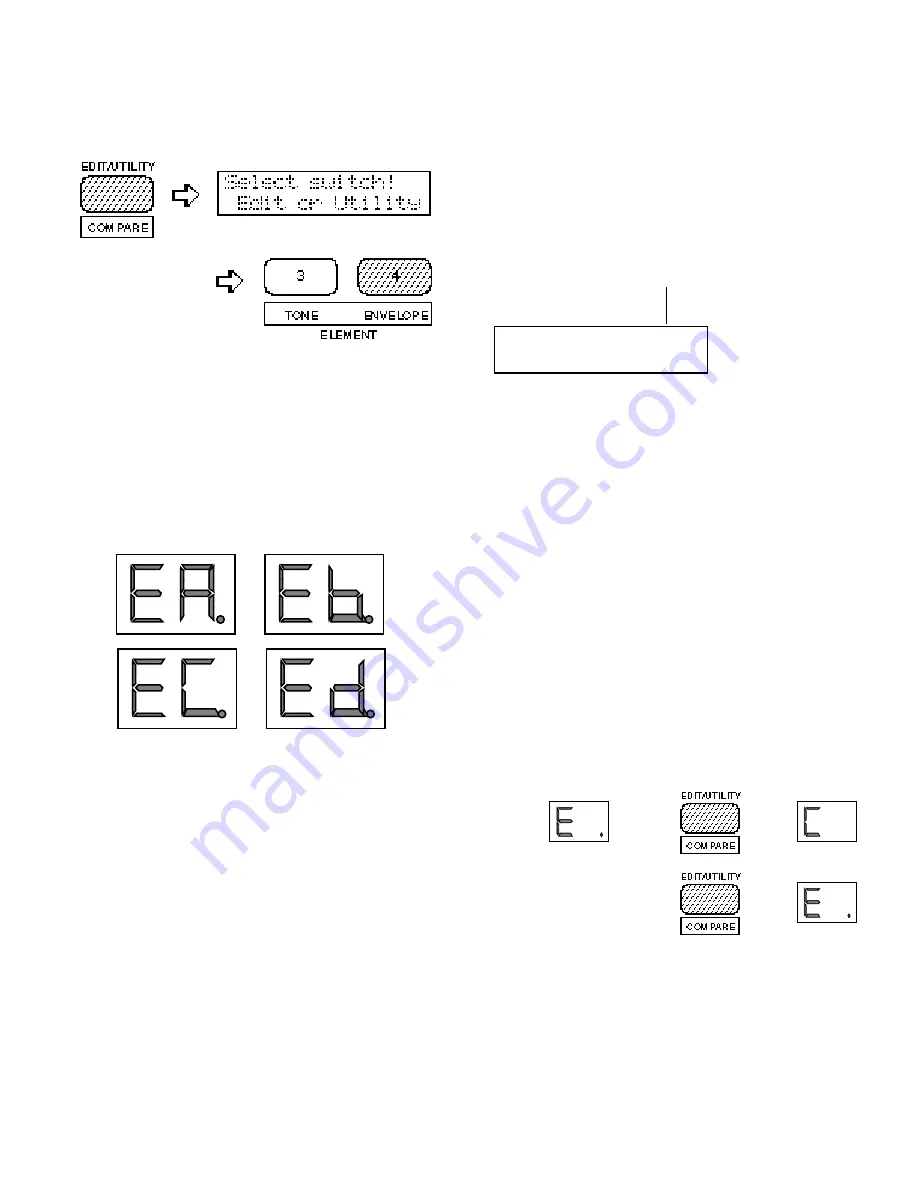
Selecting the ELEMENT ENVELOPE Edit Mode

From the VOICE or MULTI mode:

From another edit or utility mode simply press
[ELEMENT ENVELOPE].
An “E” will appear to the left of the LED dis-
play to indicate that an  edit  mode  is  selected,
and the element selected for editing will be dis-
played to the right of the display — “A”, “b”,
“C”, or “d”. A dot will appear to the right of
the element character as soon as any parameter
has been edited.

Different elements can be selected for editing by
pressing the appropriate [ELEMENT SELECT]
key — [A], [B], [C] or [D]. If a 2-element voice
is being edited, only elements A and B can be
selected.
Any of the available elements can also be turned
on  or  off  by  pressing  the  appropriate
[ELEMENT ON/OFF] key. Each key alternately
turns the associated element on and off, and the
on/off  status  of  the  elements  is  shown  to  the
right  of  the  upper  LCD  line.  If  the  element
character is showing, the  associated  element  is

ON, if a dash appears in place of the  element
character,  that  element  is  OFF.  The  ability  to
turn elements on or off while editing makes it
easier to hear the effect of parameter changes on
a single element. The currently selected element
is also shown on the LCD as a reversed (white on
black) character.


In this example elements A, B and D are ON, while 
element C is OFF. Element A is currently selected 
for editing.

ET@TYPE

ÅB-D

USER

Selecting the  ELEMENT  ENVELOPE  Edit  Mode
Functions

The various ELEMENT ENVELOPE edit mode
functions can be selected in sequence by press-
ing  the  [ELEMENT  ENVELOPE]  key,  or  by
using the [–1/NO] and [+1/YES] keys when the
cursor  (

6

)is  located  immediately  before  the

function name on the upper display line.

The COMPARE Function

You can compare the sound of the edited voice
with the sound of the voice before it was edited
by pressing the [EDIT/COMPARE] key to acti-
vate  the  COMPARE  function.  A  “ C ”   will
appear on the LED display while the COMPARE
function is active, and the  sound  of  the  voice
prior to editing will be heard when you play the
keyboard.  Press  the  [EDIT/COMPARE]  key
again to return to the edit mode.


Ô

Ô

Ô

Ô

Содержание SY-35

Страница 1: ......

Страница 2: ......

Страница 3: ......

Страница 4: ...Element ON OFF 28 INITIAL LEVEL 28 ATTACK Level Rate 29 DECAY 1 Level Rate 29 DECAY 2 Level Rate 29 RELEASE RATE 30 LEVEL SCALING 30 RATE SCALING 31 MULTI 33 NAME 35 EFFECT Type Depth 35 VOICE NUMBER...

Страница 5: ...ILITY SETUP Page 39 7 UTILITY RECALL Page 47 8 UTILITY MIDI Page 51 We recommend that you start by going through the Getting Started manual in order to become familiar with the SY35 and the way it wor...

Страница 6: ...VOICE COMMON 1 Feature Reference Manual...

Страница 7: ...VOICE COMMON 2...

Страница 8: ...whole Detailed programming of individual elements is provided by the ELEMENT TONE and ELEMENT ENVELOPE edit modes NAME 5 CONFIGURATION 5 EFFECT Type Depth 5 PITCH BEND 6 WHEEL Amplitude Pitch Modulati...

Страница 9: ......

Страница 10: ...it something like PianOrg When selecting characters scrolling will pause at the beginning of each character group capitals lower case numbers and symbols CONFIGURATION VC CONFIGURATION A B C D Summar...

Страница 11: ...maximum pitch bend of plus or minus one octave while a setting of 4 allows a maximum pitch bend of plus or minus a major third This range may be more limited in some cases An exclamation mark will ap...

Страница 12: ...presents a semitone A setting of 0 pro duces no pitch bend A setting of 12 allows a maximum upward pitch bend of one octave while a setting of 4 allows a maximum downward pitch bend of a major third W...

Страница 13: ...ELEMENT LEVEL or DETUNE Press the 6 to move the cursor to Y N then press the 1 YES key to generate random values of the select type A new set of random values is gen erated each time the 1 YES key is...

Страница 14: ...edit mode allows recording and fine editing of dynamic level and detune vectors LEVEL SPEED Vector Rate 11 LEVEL RECORD 11 LEVEL EDIT Step X axis Y axis Time 11 DETUNE SPEED Vector Rate 13 DETUNE RECO...

Страница 15: ......

Страница 16: ...ummary Allows recording of a dynamic level vector Settings STBY REC PLAY Procedure Use the 4 and 6 cursor keys to place the underline cursor under STBY The vector control LEVEL mode will be automatica...

Страница 17: ...lement while a setting of 31 places it as far as possible toward the A element In both axes a setting of 0 places the step at center position C A B D 31 0 31 31 31 X axis Y axis l Time VV L ED A B C D...

Страница 18: ...as you play a key on the key board When you release the key or when all 50 steps have been recorded See DETUNE SPEED above recording will end and the cur sor will move to the PLAY position You can now...

Страница 19: ...step at center position A B C D 31 0 31 31 31 X axis Y axis l Time VV D ED A B C D 1 X 0 Y 0 End Summary Multiplies the vector rate setting of the current detune vector step only Also allows vectors t...

Страница 20: ...B C and D in a 4 element voice WAVE TYPE 17 ELEMENT COPY 19 FREQUENCY SHIFT 19 VOLUME 20 PAN 20 VELOCITY SENSITIVITY 20 AFTER TOUCH SENSITIVITY 21 TONE FM Elements B and D Only 21 LFO Low Frequency O...

Страница 21: ...N if a dash appears in place of the element character that element is OFF The ability to turn elements on or off while editing makes it easier to hear the effect of parameter changes on a single eleme...

Страница 22: ...h 55 56 57 58 59 60 61 62 63 SynPad Harmonic SynLead1 SynLead2 Bell Mix Sweep HumanAtk Noise 1 Noise 2 Category No Name Synth 64 PopsHit SFX 65 66 67 68 69 70 71 72 73 NoisPad1 NoisPad2 NoisPad3 Coin...

Страница 23: ...ve 3 Move 4 Move 5 Move 6 Move 7 Syn D 125 126 127 128 129 130 131 132 133 134 135 136 137 138 139 140 141 142 Decay 1 Decay 2 Decay 3 Decay 4 Decay 5 Decay 6 Decay 7 Decay 8 Decay 9 Decay 10 Decay 11...

Страница 24: ...he copy operation has finished Details In this display the source bank and number parameters are shown in the standard SY35 voice number format P12 for example is preset bank 1 number 2 I35 is interna...

Страница 25: ...with L representing left and R repre senting right As you edit the pan parameter the position indicator will appear at the corre sponding position on the graphic display A total of five different posi...

Страница 26: ...ngs produce the opposite effect lower level in response to higher pressure A setting of 0 results in no level variation 0 No response 1 Narrow change between medium high and high pressure 2 Broader ch...

Страница 27: ...Modulation Depth ET LFO ABCD AM 0 PM 0 Summary Determines the maximum amount of pitch modulation that can be applied to the selected element by the modulation wheel or keyboard after touch Settings 0...

Страница 28: ...rate of LFO fade in for the selected element when the WHEEL and AFTER TOUCH parameters in the VOICE COMMON edit mode are both turned off Settings 0 99 Procedure Use the 4 and 6 cursor keys to select t...

Страница 29: ...ELEMENT TONE 24...

Страница 30: ...ws detailed programming of the amplitude envelopes for each element in the selected voice TYPE 27 ENVELOPE COPY 28 DELAY Delay Rate ON OFF 28 INITIAL LEVEL 28 ATTACK Level Rate 29 DECAY 1 Level Rate 2...

Страница 31: ...t is ON if a dash appears in place of the element character that element is OFF The ability to turn elements on or off while editing makes it easier to hear the effect of parameter changes on a single...

Страница 32: ...sed For example if the current uses a guitar wave corresponding guitar envelope will be selected When PIANO GUITAR PLUCK BRASS STRINGS or ORGAN is selected a generic envelope of the appropriate type i...

Страница 33: ...ure Use the 4 and 6 cursor keys to move the cursor to the Rate parameter Use the 1 NO and 1 YES keys to select the desired delay rate Press the 6 cursor key one more time to move to the on off mode pa...

Страница 34: ...ettings D1L Decay 1 Level 0 99 D1R Decay 1 Rate 0 99 Procedure Use the 4 and 6 cursor keys to move the cursor to the D1L or D1R parameter Use the 1 NO and 1 YES keys to set the selected level or rate...

Страница 35: ......

Страница 36: ......

Страница 37: ...ELEMENT ENVELOPE 32...

Страница 38: ...sequence recorder or other controller If a number of these channel voice parts are assigned to the MIDI transmit channel of the SY35 they can all be played simultaneously from the SY35 keyboard Indiv...

Страница 39: ......

Страница 40: ...Selects one of sixteen digital effects and sets the depth of the selected effect for the cur rent multi play setup Settings Effect type Rev Hall Reverb Hall Rev Room Reverb Room Rev Plate Reverb Plate...

Страница 41: ...he desired multi play part Use the 6 cursor key to move the cursor to the lower display line The 1 NO and 1 YES keys are used to select the desired MIDI channel or turn MIDI reception for that part of...

Страница 42: ...the low and high note limits for the selected multi play part Settings C 2 G8 Procedure Press the NUMBER MULTI PART SELECT key corresponding to the desired multi play part Use the 4 and 6 cursor keys...

Страница 43: ...YES keys to select the desired degree of note shift Details A setting of 12 for example shifts the pitch of the selected voice down by one octave a setting of 4 shifts the pitch up by a major third T...

Страница 44: ...ccess to a range of basic utility functions that are essential for general operation of the SY35 MASTER TUNE 41 TRANSPOSE 41 MEMORY CARD Save Load Format Bank 41 VOICE INITIALIZE 43 MULTI INITIALIZE 4...

Страница 45: ......

Страница 46: ...tails A setting of 12 for example trans poses down by one octave a setting of 4 transposes up by a major third MEMORY CARD Save Load Format Bank l Save SU CARD SAVE Summary Saves all internal voice an...

Страница 47: ...y replaced by the loaded data l Format SU CARD FORMAT Summary Formats MCD64 or MCD32 Memory Cards so that they can be used by the SY35 to save and load voice and multi play data Settings FORMAT Proced...

Страница 48: ...e is executed the voice parameters are initialized to the following values INITIAL VOICE COMMON VOICE NAME CONFIGURATION EFFECT Dep PITCH BEND WHEEL AM PM AFTER TOUCH AM PM Pit Lev ENVELOPE AR RR Init...

Страница 49: ...I display press the 6 key Are you sure will appear on the lower line of the display Press the 1 YES to initialize or 1 NO to cancel the initialize operation Completed will appear briefly when the init...

Страница 50: ...eas Procedure Make sure the internal memory protect function is turned OFF before using this function see MEMORY PROTECT above From the initial SU FACTORY V M dis play press 6 cursor key Are you sure...

Страница 51: ...UTILITY SETUP 46...

Страница 52: ...n whether the VOICE or MULTI play mode is selected when the RECALL function is called RECALL makes it possible to recover a voice or multi play setup that has been lost through failure to store the vo...

Страница 53: ......

Страница 54: ...the VOICE play mode while RECALL MULTI function is selected if called from the MULTI play mode Are you sure appears on the lower display line Press the 1 YES key to recall or 1 NO to cancel the recal...

Страница 55: ...UTILITY RECALL 50...

Страница 56: ...l of the SY35 s MIDI control functions MIDI ON OFF 53 BASIC RECEIVE CHANNEL 53 TRANSMIT CHANNEL 53 LOCAL CONTROL ON OFF 54 MIDI PROGRAM CHANGE 54 MIDI CONTROL CHANGE 54 AFTER TOUCH ON OFF 55 PITCH BEN...

Страница 57: ......

Страница 58: ...ine The 1 NO and 1 YES keys are used to select the desired MIDI channel or the omni mode Details When the SY35 is to receive data from an external MIDI device such as a sequencer make sure that the SY...

Страница 59: ...lay line The 1 NO and 1 YES keys are used to select the desired MIDI program change mode Details The off setting turns MIDI program change reception and transmission off so MIDI program change message...

Страница 60: ...touch will function normally but no MIDI after touch data will be transmitted or received Keyboard after touch generates a tremendous amount of MIDI data so you might want to turn after touch off when...

Страница 61: ...o the MIDI IN of the receiving SY35 via a MIDI cable the receiving unit will automatically receive and load the data as long as its internal memory protect function is turned off and EXCLUSIVE ON OFF...

Страница 62: ...APPENDIX 57 APPENDIX...

Страница 63: ...APPENDIX 58...

Страница 64: ...m the 70s 24 EP Malet Malet 001 E Piano 2 071 Vibes 2 2 Rev Hall MW Bright electric piano with mallet attack 25 KY Clav1 Clavi1 002 Clavi 083 HornBody 057 Bass 4 242 Wave24 2 Dly Rev2 MW A standard cl...

Страница 65: ...054 TumbStr 006 E Organ1 043 Clavi 2 Rev Hall MW Slapped bass thumps when played hard 54 BA Fingr Finger 030 E Bass 1 055 Bass 2 Rev Plate MW Fingered electric bass 55 BA Pick Pick 031 E Bass 2 056 B...

Страница 66: ...ar 3 Rev Hall MW Charango 78 PL Sitar Sitar 025 Sitar 053 Guitar 8 Rev Room Sitar 81 CH Pure Pure 067 NoisPad3 043 Choir 130 Decay 6 2 Rev Hall Choir with a clear high tone 82 CH Itopy Itopy 044 Itopi...

Страница 67: ...omping synth 25 SC Brash Brash 015 SynBrass 2 026 Brass 13 017 Brass 4 Rev Club Comping synth with brass attack 26 SC Water Water 056 Harmonic 090 Metal 6 Rev Hall Wet synth with water drops 27 SC San...

Страница 68: ...ounding synth strings 56 ST Soft Soft 038 Strings 2 091 Lead 1 2 Rev Hall Very basic synth strigns 57 ST Mild Mild 039 Vn Ens 2 067 Str 5 2 Rev Hall Mild synth strings 58 ST Lite Light 085 Str Body 15...

Страница 69: ...l vibraphone 82 PC Marim Marimba 047 Marimba 2 075 Marimba2 2 Rev Hall Marimba 83 PC M Box MusicBox 046 Vibes 088 Metal 4 Rev Room MW An old time music box 84 PC Timp Timpani 049 Timpani 184 Wave5 1 D...

Страница 70: ......

Страница 71: ...nts 11 12 13 14 15 16 17 18 21 22 23 24 25 26 27 28 SyncLead SuperSaw BellPad SunBeam WideDcy AnaPad1 AnaPad2 AnaPad3 FatBrass HyuhPad Reggae Mikado Prologue Epilogue SolidSet RytmSec Layer Layer Laye...

Страница 72: ...85 86 87 88 89 Tp Body Tb Body HornBody Fl Body Str Body AirBlown Reverse1 Reverse2 Reverse3 OSC 90 91 92 93 94 95 EP wv Organ wv M Tp wv Gtr wv Str wv 1 Str wv 2 Category No Name OSC 96 97 98 99 100...

Страница 73: ...3 Move 4 Move 5 Move 6 Move 7 Syn D 125 126 127 128 129 130 131 132 133 134 135 136 137 138 139 140 141 142 Decay 1 Decay 2 Decay 3 Decay 4 Decay 5 Decay 6 Decay 7 Decay 8 Decay 9 Decay 10 Decay 11 D...

Страница 74: ...ECTOR CONTROL PITCH BEND MODULATION Key Switches POWER VECTOR PLAY ON OFF LEVEL DETUNE CURSOR 4 and 6 MODE VOICE and MULTI 1 NO and 1 YES EDIT UTILITY COMPARE STORE INTERNAL CARD PRESET BANK 1 8 VOICE...

Страница 75: ......

Страница 76: ......

Страница 77: ......

Страница 78: ......

Страница 79: ......

Страница 80: ......

Страница 81: ......

Страница 82: ......

Страница 83: ......

Отзывы: