background image

E-

2

SETUP PROCEDURES

(You will need a screwdriver for the setup.)

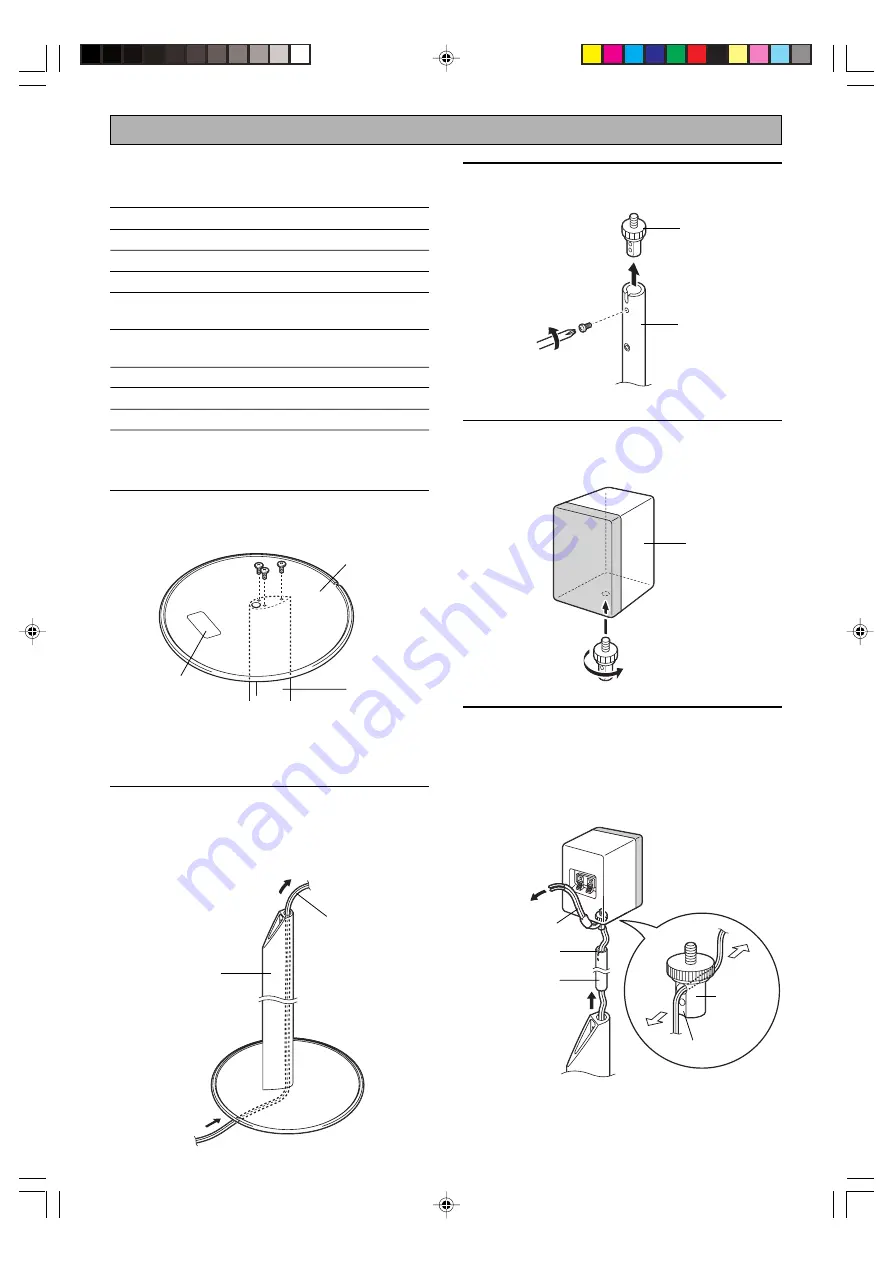
1

Attach the support to the base by fastening the
three + face screws from the holes on the bottom
of the base.

* Do not overtighten the + self-machine screws. Doing

so may damage the screws or assembly.

2

Pass the speaker cable through the support from
the bottom.
* A speaker cable more than 4 mm x 2 mm in diameter

cannot be used. If you use such a cable, connect it to
the speaker’s terminals without passing it through the
pole.

  NAME

QUANTITY


1

Pole

2


2

Support

2


3

Base

2


4

+ face screws

6

(Diam. x Length: 4 x 8 mm)


5

Hexagon socket set screws

5

(Diam. x Length: 4 x 6 mm)


6

Wrench (hexagonal)

1


7

Cable protection seal

2


8

Rubber cap

2

SETUP PROCEDURES

Before beginning the setup, check the parts list
and make sure all the parts are included.

3

Remove the speaker mounting bracket from the
pole by removing the screw using the screwdriver.

4

Attach the speaker mounting bracket to the
speaker by screwing it into the screw hole on the
bottom of the speaker.

5

Pass the speaker cable through the pole from the
end without the cut.
Then pass the cable through the hole on the
speaker mounting bracket from the side with the
groove as shown in the figure.

Base

Support

Speaker cable
(not included)

Speaker
(not included)

Support

Speaker
mounting
bracket

Pole

Speaker
mounting
bracket

Pole

Speaker cable

Cut

Groove

Name plate

Front

Back

SPS-80 ENG(02.6.17)b

02.6.19, 11:57 AM

2

Содержание SPS-80

Страница 1: ...kers included in the NS P220 speaker package NX S80S the front and rear speakers included in the AVX S80 sound system NX S60S the front and rear speakers included in the DVX S60 sound system NX S77E the rear speakers included in the AV S77 sound system NX VS10E the rear speakers included in the VS 10 sound system Use a speaker of 1 kg or less Use a speaker with a screw hole of 4 mm in diameter for...

Страница 2: ...Length 4 x 6 mm 6 Wrench hexagonal 1 7 Cable protection seal 2 8 Rubber cap 2 SETUP PROCEDURES Before beginning the setup check the parts list and make sure all the parts are included 3 Remove the speaker mounting bracket from the pole by removing the screw using the screwdriver 4 Attach the speaker mounting bracket to the speaker by screwing it into the screw hole on the bottom of the speaker 5 P...

Страница 3: ...ghten the bracket to the speaker by moving the wrench counterclockwise 9 Connect the speaker cable to the speaker s terminals correctly Refer to the instruction manual of the speakers for connecting the speaker cables 10 Align the speaker cable to the grooved part of the bottom of the base and fix the cable on the base by putting the protection seal on it The setup has completed In the same way se...

Страница 4: ...N BEI HAMBURG F R OF GERMANY YAMAHA ELECTRONIQUE FRANCE S A RUE AMBROISE CROIZAT BP70 CROISSY BEAUBOURG 77312 MARNE LA VALLEE CEDEX02 FRANCE YAMAHA ELECTRONICS UK LTD YAMAHA HOUSE 200 RICKMANSWORTH ROAD WATFORD HERTS WD1 7JS ENGLAND YAMAHA SCANDINAVIA A B J A WETTERGRENS GATA 1 BOX 30053 400 43 VASTRA FRÖLUNDA SWEDEN YAMAHA MUSIC AUSTRALIA PTY LTD 17 33 MARKET ST SOUTH MELBOURNE 3205 VIC AUSTRALIA...

Отзывы: