background image

Other Pattern Functions

2

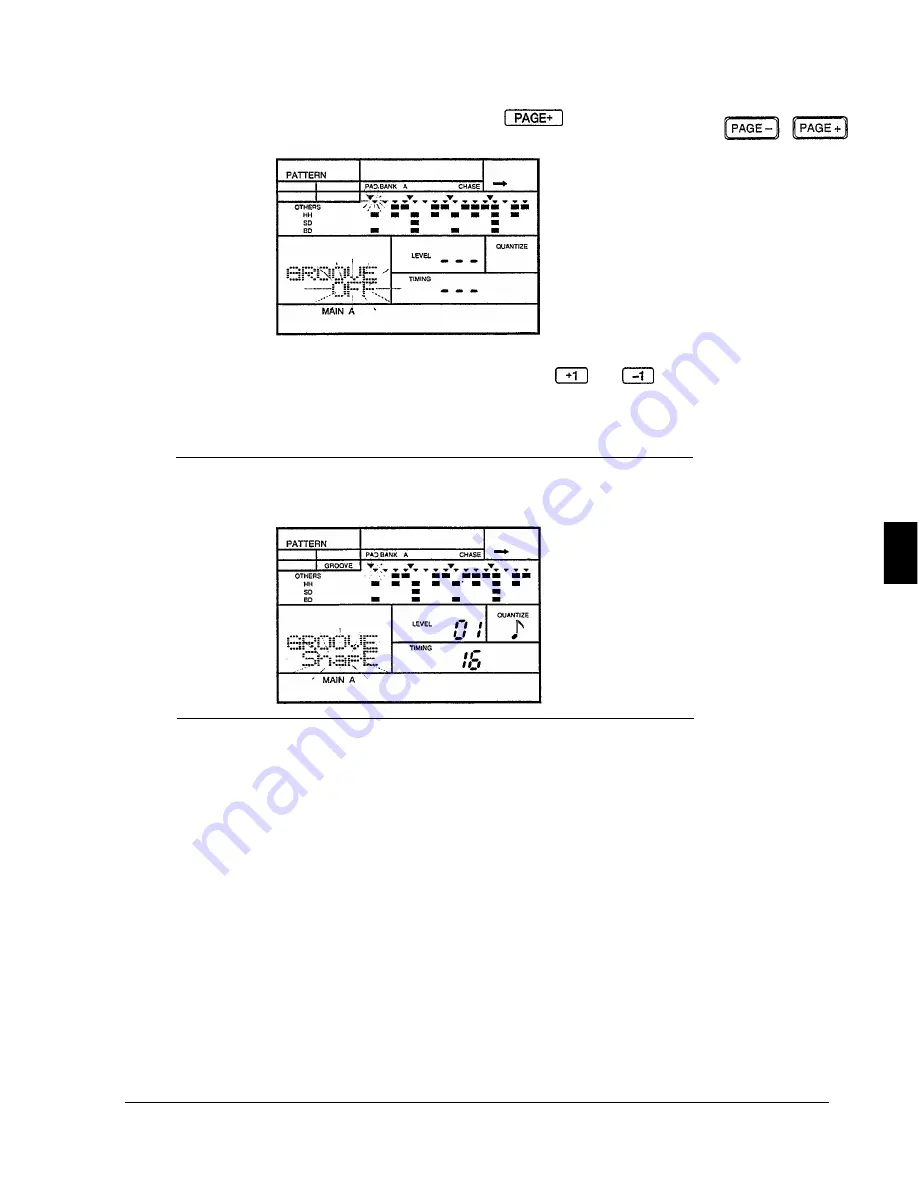
Select the Groove display page by pressing the 

 button until the

display indicates 

“GROOVE” 

and the current value 

(“OFF”) 

flashes.

3

Select the groove by rotating the Jog Dial or using the 

 and 

buttons.

NOTE

The 

“GROOVE” 

indicator will appear on the top of the LCD when any groove

parameter other than 

“OFF” 

is selected. It will remain lit for the current pattern as

long as a groove function is active.

The default is 

“OFF”. 

There are 14 groove types, each modifies your

pattern in different ways:

HevyE
Heavy Even

Increase the velocity of notes that fall on the beat and

decrease the velocity of all other notes. Delay the

even-numbered beats.

Hevy2
Heavy 2nd

Increase the velocity of notes that fall on the beat and

decrease the velocity of all other notes. Delay the

second beat of each measure.

Hevy4
Heavy 4th

Increase the velocity of notes that fall on the beat and

decrease the velocity of all other notes. Delay the

fourth beat of each measure.

SnapE

Snap Even

If there is a snare on the even-numbered beats, repeat

it after a delay of an eighth note, a dotted eighth note,

or a sixth note. Any note on an even-numbered beat is

shifted forward in time.

51

Содержание RY20

Страница 1: ...YAMAHA AUTHORIZED PRODUCT MANUAL RHYTHM PROGRAMMER ...

Страница 2: ...OWNER S MANUAL YAMAHA ...

Страница 3: ...ction or effect works when the unit is oper ating as designed are not covered by the manufacturer s war ranty and are therefore the owners responsibility Please study this manual carefully and consult your dealer before requesting service ENVIRONMENTAL ISSUES Yamaha strives to produce products that are both user safe and environmentally friendly We sincerely believe that our products and the produ...

Страница 4: ...interference will not occur in all installations If this product is found to be the source of interference which can be determined by turning the unit OFF and ON please try to eliminate the problem by using one of the following measures Relocate either this product or the device that is being affected by the interference Utilize power outlets that are on different branch circuit breaker of fuse ci...

Страница 5: ...tor when the instrument is not in use Unplug the AC adaptor during electrical storms Avoid plugging the AC adaptor used with the RY20 into the same AC mains outlet as appliances with high power consumption such as electric heaters or ovens Also avoid using multi plug adaptors since these can result in reduced sound quality and possibly damage Turn off the power before making or breaking connection...

Страница 6: ...ATT LOW will momentarily appear on the display when you turn the power ON When this happens have the back up battery replaced by qualified Yamaha service personnel WARNING DO NOT ATTEMPT TO REPLACE THE BACK UP BATTERY YOURSELF Transfer important data from your RY20 to a MIDI data recorder such as the Yamaha MDF2 MIDI Data Filer for safe long term storage Yamaha cannot be held responsible for data ...

Страница 7: ...dditional 50 combination patterns Each pattern has six sections INTRO MAIN A MAIN B FILL AB FILL BA and ENDING and each section has four tracks bass drum snare drum hi hat and other instruments Patterns can be combined to create complete songs The RY20 can store 50 songs in its user song memory It features easy to use controls with a large useful LCD display Change values quickly using the Shuttle...

Страница 8: ...iv ...

Страница 9: ...v ...

Страница 10: ...po 69 Deleting a Part 69 Inserting a Part 70 Adjusting the Click 72 Playing the Songs 73 Playing a Song 73 Chain and Repeat 75 Clearing a Song 77 Copying a Song 79 Name that Song 81 Modifying the Drum Kits 82 Assigning Voices to Each Pad 83 Volume Level 86 Stereo Pan 87 Pitch 88 Decay 89 Sensitivities 90 Voice Polyphony 95 Alternate Group 96 Note Trigger Driven 97 Pad Sensitivity 98 Chase 99 Copy ...

Страница 11: ... a display page The various display pages in each mode are accessed using the buttons described below and Within a display page there are various focus areas A focus area is a parameter you can adjust identified by a flashing prompt Use the cursor buttons to change the focus area and Volume Control The volume control adjusts the volume of sound output from the rear panel PHONES jack or the OUTPUT ...

Страница 12: ...s you even more rapid access to the current value The further you rotate the Shuttle Dial from its center detent the faster the parameter will scroll For fine single step adjustments you may want to use the buttons described below and Track Select Mute Buttons and These buttons allow you to mute tracks The buttons are When you press one of these buttons the corresponding mute indicator lights up n...

Страница 13: ...er drum kit or modify the parameters of the current drum kit Effect Button button switches the RY20 to Effect Mode In this mode you can change the current effect or modify the effect parameters The Page and Page Buttons and buttons select the display pages within the various modes Pad Bank Button The button is used to select DRUM or BASS mode In drum mode it is used to select one of the five banks...

Страница 14: ...le for editing NOTE The focus is always indicated by the flashing prompt or symbol Record Button and Record LED button switches the RY20 into Record Mode in either Pattern Mode or Song Mode The red Record LED lights up and the Rhythm Programmer is ready for you to begin creating The NOTE The default Record Mode for either a pattern or a song is Step Record Mode Press button for Real time Record Mo...

Страница 15: ...he button steps forwards through a song or pattern Clear Delete Button button is used to clear all the data in the selected pattern or song in Pattern or Song Mode In Record Mode it is used to delete individual parts such as an incorrect or unwanted note in a pattern or an unwanted part in a song The Copy Insert Button button is used to copy the current song or pattern to another location In Song ...

Страница 16: ...um Pads The RY20 has 12 velocity sensitive drum pads that you play to record pattern data NOTE through and also have a drum name printed The voices of the RY20 are fully programmable and can be assigned to any pad The drum pads are labeled on them The voice assigned to the pad may not correspond to the name printed on the pad See page 83 for further details The lower row Drum Pads are used to sele...

Страница 17: ... is inserted into the L MONO jack only the left and right channel signals are combined and delivered via this jack which can be used for connecting to a mono sound system The Volume control adjusts the level of the signal sent to these jacks PHONES Jack Accepts a pair of stereo headphones with a miniature stereo phone plug for headphone monitoring of the RY20 DC IN Jack The DC output cable from th...

Страница 18: ... AC mains outlet Audio Connections The simplest way to monitor your RY20 is through a set of stereo headphones miniature stereo phone plug type Connect them to the PHONES jack on the rear panel of the instrument CAUTION It is possible to produce sounds with the RY20 that are loud enough to cause hearing damage Set the volume control to MIN when connecting the RY20 to headphones for the first time ...

Страница 19: ... only the L MONO jack CAUTION Make sure that both the RY20 and your sound system are turned OFF when making connections Failure to do so may result in damage to the sound system MIDI Connections If you intend to use other MIDI instruments with your RY20 you must connect them properly The following diagram shows a simple connection For further details on MIDI and MIDI connections see page 110 10 ...

Страница 20: ...e irreparable damage to the RY20 and might pose a serious shock hazard Be sure to unplug the AC Adaptor from the AC mains outlet when the RY20 is not in use Once you have completed the connections turn the RY20 on by pressing in the Power switch The following display will momentarily appear The RY20 will then switch to Pattern Mode See page 14 for details of the RY20 patterns and instructions for ...

Страница 21: ...lashing above the current Song Number 2 Select the demonstration song by rotating the Jog Dial or by using the buttons and The demonstration song is number 50 DEMO HINT A quick way to select an item at either end of a range of settings is to use the Shuttle Dial For example to select the demonstration song rotate the Shuttle Dial clockwise The Shuttle Dial increases the song number much more rapid...

Страница 22: ...U meter Adjust the volume of the playback by rotating the VOLUME control NOTE You cannot adjust the tempo of the demonstration song You also cannot copy clear or edit the demonstration song Press the 4 button to stop the demonstration song The green Play LED stops flashing NOTE The demonstration song sets the Repeat function For further details see page 75 The demonstration song repeats until you ...

Страница 23: ...lashing beside the current Pattern Number Select a pattern by rotating the Jog Dial or by using the buttons The preset patterns are from number 000 to number 049 Refer to the list of preset patterns provided on page 121 NOTE The RY20 is shipped with no data recorded in patterns 050 to 149 button to start the pattern The green Play LED will flash in time with the current tempo setting and the patte...

Страница 24: ...oice sounds the Voice Level Indicator lights up depending on how loud the voice was recorded Press the 5 button to stop playing the pattern The green Play LED stops flashing Press the 6 button again to start the pattern from the point at which it was stopped NOTE button to If you want to play the pattern from the beginning again press the reset the position Then press the button to play the patter...

Страница 25: ...s Each section can be programmed for a specific purpose The preset patterns have all six sections programmed The sections are INTRO This section is used for the introduction to the pattern When it has finished playing the introduction the RY20 automatically switches to the MAIN A section MAIN A This is the default section It can be used for the basic verse and chorus structure of a pattern MAIN B ...

Страница 26: ...t other sections NOTE When you select a section other than the two transition sections the newly selected section will begin playing after the current section has finished playing Press and hold the 1 button then press the Drum Pad button for the section you want to play The appropriate Section indicator lights up for example the INTRO indicator There are labels below the lower row of drum pads in...

Страница 27: ...ern The button steps forwards through the measures of the pattern Each time you press the button the RY20 moves to the next measure button to start playback at the selected measure Press the The button steps backwards through the measures of the pattern Alternatively press the or buttons cursor button to change the focus to the MEASURE prompt The MEASURE prompt starts to flash Select another measu...

Страница 28: ... the current Tempo value The tempo can be adjusted either when the RY20 is stopped or while it is playing a pattern or a song NOTE You can also change the tempo while you are recording a pattern or a song and 2 Adjust the tempo by rotating the Jog Dial or by using the buttons The playback tempo can be set to any value from 40 to 250 beats per minute NOTE 3 button to return to Pattern Mode and Each...

Страница 29: ...e tracks are Bass Drum Snare Drum High Hat and Others 1 To mute a track press the appropriate Track Select Mute button For example to mute the percussion instruments or a bass part press the button The MUTE indicator lights up next to the word OTHERS 2 Press the key again to turn muting off 20 ...

Страница 30: ...s You can assign its voices to individual drum kits These kits can be selected and played using the 12 drum pads or you can use a MIDI instrument connected to the MIDI IN connector Internal Layout There are 20 preset drum kits and 20 user drum kits each containing five drum banks and a bass bank See page 24 for further details about the bass bank 21 ...

Страница 31: ...ther details The drum pads are velocity sensitive The harder you tap a pad the louder the voice will play Playing the Pads The drum pads are labeled through NOTE The velocity sensitivity level SENS LVL and the pad sensitivity PADSNS settings determine the way in which the velocity sensitive feature works See page 90 and page 98 for further details button The Selecting a Drum Kit 1 Place the unit i...

Страница 32: ...essing the button again will switch the RY20 back to the previously selected main mode such as Pattern or Song Play mode Selecting a Pad Bank 1 button NOTE Place the unit in Pad Bank Mode by pressing the Pressing the button again will switch the RY20 back to the previously selected main mode such as Pattern or Song Play mode 2 Select another pad bank by rotating the Jog Dial or by using the button...

Страница 33: ...the pad bank assignments for each voice in the preset drum kits NOTE Changing the voice assignment of the drum kits will affect the voices of each pattern This is because only the pad numbers are recorded in a pattern Playing the Bass Voices When the RY20 is in bass mode the drum pads function as a keyboard with each key playing the bass voice at a different pitch The following diagram shows how t...

Страница 34: ...Bass Voice Layout Each drum kit contains one bass bank The bass bank is subdivided into five octaves pad numbers 60 to 119 Playing the Pads 25 ...

Страница 35: ...voices and bass voices 2 Change the type from DRUM to BASS by rotating the Jog Dial or by using the and II buttons Notice the Pad Bank indicator is now set to BASS 3 To return to Pad Bank Mode press the PAGE button The display shows the current octave range When the RY20 is in bass mode the five pad banks become five octave ranges from OCT 2 to OCT 2 26 ...

Страница 36: ...the Bass pad bank See page 83 for more information 5 Place the unit in Drum Kit Mode by pressing the EkiKi F button The DRUM KIT indicator flashes beside the current kit number 6 Select a kit by rotating the Jog Dial or by using the m and m buttons To play a voice tap the appropriate drum pad Playing the Pads 27 ...

Страница 37: ...ecord Mode is best for capturing the feel of a rhythm because it allows you to actually play the pattern as you are creating it The method you choose depends partly on the type of rhythm you intend to create and partly on your own preference You can even switch between the two while editing to create a single rhythm pattern using both methods For example you could program the basic beats of a rhyt...

Страница 38: ... buttons You should select an empty pattern to record into Patterns 000 to 049 are preset patterns and cannot be modified Patterns 100 to 149 are combination patterns and are recorded in a different manner See page 38 for an explanation of how to record combination patterns WARNING Be careful not to overwrite a pattern accidentally The EMPTY indicator will light for patterns that contain no data I...

Страница 39: ...electing a Drum Kit Place the unit in Drum Kit Mode by pressing the DRUM button The DRUM KIT indicator flashes Select another drum kit by rotating the Jog Dial or by using the and 1 11 buttons If a suitable kit cannot be found you should create one with one of the user drum kits See page 83 for instructions Selecting a Pad Bank Place the unit in Pad Bank Mode by pressing the PAD button Select anot...

Страница 40: ... and which Pad Bank you have selected Each voice is associated with a track For example all the bass drum voices are associated with the BD track and the snare drum voices are all assigned to the SD track The tracks cannot be muted in Pattern Record Mode Each time you tap a pad the voice is recorded the note indicator also lights up for the appropriate track and the RY20 moves to the next beat The...

Страница 41: ...easures When you have completed the two measures the RY20 loops back to the beginning of the pattern This feature allows you to layer your pattern For example start by recording the bass drum part After you have recorded two measures of bass drum parts record the snare drum part If you missed a beat or accidently skipped a beat you can step back with the sACKMlARD button NOTE The behavior of the 1...

Страница 42: ... power off while Pattern Record Mode is active may cause irretrievable loss of ALL the user data Play the Pattern You can review your pattern at any time 1 Press the PlAv button to start the pattern The green Play LED will flash in time with the current tempo setting and the pattern will begin playback NOTE You can change the tempo as the pattern plays See page 19 for further details Also see page...

Страница 43: ...is recorded the clock is updated to 24 and the note indicator lights up Recording a User Pattern Skip the next three beats by pressing the Then tap the drum pad again to enter the second bass drum beat button three times Repeat for the remaining two bass drum beats of the measure 34 Complete the second measure by repeating the above procedure Once the RY20 has looped back to the beginning of the f...

Страница 44: ...Mode Real time recording allows you to record a pattern as you play the drum pads in real time You can switch to and from real time mode at anytime during the recording of your pattern 1 Select a pattern and start the recording by pressing the RECORD button 2 Press the PlAv button to start recording in real time The green Play LED will flash in time with the current tempo setting you will hear the...

Страница 45: ...me level and the quantization of the click sound Refer to page 47 3 Play the drum pads to record your pattern When you tap a pad the appropriate Voice Level indicator lights up on the LCD As on a VU meter more indicators light up the harder you tap the pad 36 ...

Страница 46: ...ng tapped As the RY20 loops through your pattern you will also hear the previously recorded instruments They will also cause the Voice Level indicators to light up 4 Press the STOP button to stop the real time record The green Play LED stops flashing However the RY20 is still in record mode allowing you to continue adding to your pattern 37 ...

Страница 47: ...RD button The initial track selected is the BD bass drum track Notice the track indicator is lit You can change tracks by pressing the appropriate Track Select Mute button NOTE Although you are using other patterns the combination pattern controls the time signature and the number of measures You can use patterns with different time signatures METER and or measure numbers A shorter pattern will be...

Страница 48: ...ss of the maximum polyphony The RY20 will record these notes without difficulty However on playback some of the notes will be truncated and will therefore not sound Some of the voices use more than one element Each element uses one note of the instrument s polyphony When notes with multiple elements are recorded in your pattern the maximum polyphony actually becomes less than 28 notes Please refer...

Страница 49: ...ght the measure beat and clock number of the pattern section These parameters show you which location you are currently at In real time record this is the only visual indication you have of the location of the current position The Level Prompt shows the recorded level of the pad at the current insert location If there is no event recorded at this location the display shows You can edit the level o...

Страница 50: ...7 Indicator shows the quarter note divisions of the measure and changes depending on the quantization The Position Indicator shows the possible note locations for the current quantization level The flashing position indicator shows the current point in the pattern The Note Indicator shows that an instrument has been recorded on one of the four tracks at this position Editing Buttons The 1 IBACKWAR...

Страница 51: ...ous note It functions in a similar fashion to the FORWARD button NOTE Instead of the I 1 or 1 buttons you can use the Jog Dial or the m and 11 buttons to easily change the current location Use the m or m cursor buttons to change the focus to the indicators Select another location within the pattern by rotating the Jog Dial or pressing the a and 11 buttons A single note can be deleted from your pat...

Страница 52: ...r Pad You can change the level or pad of an event Use the FoRWARD and BACKWARD buttons to locate the note event Press the a cursor button to change the focus to the LEVEL prompt Change the level by rotating the Jog Dial or by using the m and m buttons NOTE The level value changes in increments of 4 For example increasing the level 087 shown above by one step changes it to 091 Press the m cursor bu...

Страница 53: ...imultaneously resets the tempo of the user pattern to 120 beats per minute Pressing the TEMPO button again is another method of switching the RY20 back to Pattern Record Mode Quantization helps to produce a tight recording by automatically aligning notes to the nearest specified beat as you record You can change the quantization value at any time during the recording of a pattern NOTE n Quantizati...

Страница 54: ...h note 16th note triplet 32nd note 32nd note triplet 96th note OFF A recommended approach is to use eighth note or eighth note triplet quantization to record the basic portions of your pattern such as the bass drum As you add to your pattern you can use a finer quantization value to increase its complexity n Gate Time Gate time is used to adjust the duration of a note It is most effective when use...

Страница 55: ... NOTE Changing the Meter You can only change the gate value for a pattern position that has data in it If there is no data at a position in the pattern the gate value is Before you record data into a pattern you can adjust the time signature and the number of measures 1 Select the Meter display page by pressing the PAGE button The display indicates METER and the current time signature flashes 2 Se...

Страница 56: ...ese values the message NOT EMPTY will momentarily appear on the display Adjusting the Click The RY20 has a built in click sound which sounds on each beat of the measure to serve as a rhythmic guide when you record in Real time Mode You can change both the volume and the quantization of the click sound 1 Select the Click display page by pressing the PAGE button until the display indicates CLICK 2 S...

Страница 57: ... Change the value by rotating the Jog Dial or using the and 11 buttons The default quantization is quarter note The quantization values are quarter note eighth note eighth note triplet 16th note 16th note triplet NOTE Changing the click level or quantization in Pattern Record Mode also changes it in Song Record Mode 48 ...

Страница 58: ...n can be programmed with a different swing setting You can modify the swing at anytime while the RY20 is stopped or during playback 1 Press the iF button to put the RY20 into Pattern Mode Select a pattern by rotating the Jog Dial or using the m and 11 buttons 2 Select the Swing display page by pressing the PAGE J button The display indicates SWING and the current value OFF flashes 3 Set the swing ...

Страница 59: ...he value by rotating the Jog Dial or using the and m buttons The values are eighth notes or 16th notes NOTE Pressing the m and m buttons simultaneously resets both the Swing and Quantize values to their default n Groove Groove adds a human rhythm feel by changing the velocity timing or quantization values of a pattern Each pattern can be programmed with a different groove setting You can modify th...

Страница 60: ...our pattern in different ways HevyE Heavy Even Increase the velocity of notes that fall on the beat and decrease the velocity of all other notes Delay the even numbered beats Hevy2 Heavy 2nd Increase the velocity of notes that fall on the beat and decrease the velocity of all other notes Delay the second beat of each measure Hevy4 Heavy 4th Increase the velocity of notes that fall on the beat and ...

Страница 61: ...i hat ride cup and percussion beats Increase the velocity of the last note of the group Delay the even numbered beats Decrease the velocity of the first note of a group of eighth note eighth note triplet or 16th note hi hat ride cup and percussion beats Increase the velocity of the last note of the group Delay the second beat of each measure Decrease the velocity of the first note of a group of ei...

Страница 62: ...in to skip the inactive setting 6 Change the focus to the TIMING prompt using the a cursor button 7 Modify the value by rotating the Jog Dial or using the m and m buttons The range is from 01 slight delay to 16 extreme delay NOTE If the TIMING setting is inactive it is indicated with a value of on the display 8 Change the focus to the QUANTIZE prompt using the a cursor button 9 Modify the value by...

Страница 63: ...that one of the track b indicators is lit 3 Select the track you wish to modify with the Track Select Mute buttons When you press a button the track b indicator for the current track switches off as the indicator corresponding to the selected track lights up 4 Alter the velocity rate by rotating the Jog Dial or using the m and 11 buttons The default rate is 100 which is the normal setting The rang...

Страница 64: ...reased 7 Select the next track you wish to modify with the Track Select Mute buttons Repeat the above steps NOTE You can reset each parameter to its default setting by pressing the m and a buttons simultaneously 1 2 Clearing a Pattern Clearing data from a user combination pattern is a flexible operation You can clear individual tracks or an entire section Press the PATTERN button to put the RY20 i...

Страница 65: ...lect a track by accident just press the button again to switch it off IMPORTANT If you decide that you DO NOT want to clear the pattern you can cancel this operation by simply selecting another function There are several ways to do this Press the L 1 button to return to Pattern Mode Press the w or w buttons to select another display page 5 Clear the selected tracks in the current section by pressi...

Страница 66: ...eared Also note that the pad bank selection and the tempo swing groove and velocity settings of a user pattern cannot be cleared WARNING Turning the power off during the execution of the clear function may cause the irretrievable loss of ALL user data n Copying a Pattern You can copy the data of any pattern to a user pattern numbered 050 to 099 This allows you for example to copy a preset pattern ...

Страница 67: ...the section of the pattern you want to copy by pressing the appropriate Drum Pad button while holding the sECTloN button WARNING Be careful not to overwrite a pattern accidentally The EMPTY indicator will light for pattern sections that have no data If the destination pattern you have selected already contains data the copy function will overwrite that data on the selected tracks 5 Select the trac...

Страница 68: ... 1 button the copy operation will be performed It is not possible to recover data that you have lost by overwriting the pattern PLEASE BE CERTAIN THAT THIS IS WHAT YOU INTEND TO DO NOTE If you forget to select any tracks the RY20 will prompt you with the error message SELECT TRACK 7 Select another section to copy by pressing the appropriate Drum Pad button while holding the SECTION button The pad ...

Страница 69: ...ign a name of up to five characters to a user combination pattern 1 Press the 1 button to put the RY20 into Pattern Mode Select a pattern by rotating the Jog Dial or using the m and 11 buttons Select Name display page by pressing the IPAGE button until the display 2 indicates NAME and the name of the current pattern Notice that the first character is flashing 60 The default name for all user patte...

Страница 70: ...pper and lower case letters and symbols for your name 4 To move to the next character press the a button The second character will flash Change that character by rotating the Jog Dial or by using the Cm and 11 buttons 5 Repeat the previous step until you have finished creating the name for your pattern 61 ...

Страница 71: ...it in Song Mode Notice that the SONG indicator is flashing above the current Song Number 2 Select a song from 00 to 49 to record into by rotating the Jog Dial or by using the and 1 11 buttons Song 50 is the demonstration song and cannot be edited See page 12 for demonstration song playback WARNING Be careful not to overwrite a song accidentally If a song is empty the PATTERN number is marked indic...

Страница 72: ...ng Record Mode 4 Select your first pattern by rotating the dial Jog Dial or by using the m or 1 buttons You can select any pattern from 000 to 149 to record into your song 5 Select one of the six pattern sections The default section is the last one selected in Pattern Mode for example MAIN A Press and hold the SECTION button Then press the Drum Pad button for the section you want to record for exa...

Страница 73: ...ext part HINT Most songs consist of an intro a number of measures of verse and chorus optionally a bridge and an ending The patterns of the RY20 follow this design For example start your song off with an INTRO section Then select the MAIN A section and record four parts Record a single part of FILL AB and follow it with two parts of MAIN B a single part of FILL BA to make the transition back Recor...

Страница 74: ...ess the Drum Pad button for the transition section you want to play for example the button to select FILL AB The display changes as shown 3 While still holding the SECTION button rotate the Jog Dial or use the a and I 1 buttons to select the precise point at which you want the transition or fill to replace the currently selected main section The MEAS I BEAT I CLOCK indicators initially show the to...

Страница 75: ... 77 to clear unwanted song data The maximum memory capacity is approximately 4 000 parts You may also want to use a MIDI data storage device such as the Yamaha MDF2 MIDI Data Filer to save your important data to floppy disk WARNING Turning the power off while Song Record Mode is active may cause the irretrievable loss of ALL user data Playing the Song After you have recorded a song you may want to...

Страница 76: ...Drum Pad button for the section you want to record Then select the first pattern by rotating the Jog Dial or by using the m and m buttons 3 Press the PlAv button to start real time recording The green Play LED will flash in time with the current tempo setting you will hear the click sounds and the RY20 will count down two measures When the countdown has completed the RY20 will start playing the fi...

Страница 77: ...other section Press and hold the SECTION button Then press the drum pad button for the next section you want to record The NEXT indicator lights up until the current pattern or section has finished playing If the pattern or section you select is empty the EMPTY indicator will also light up NOTE If you selected the INTRO section it will be recorded and automatically followed by MAIN A If you select...

Страница 78: ...to Song Record Mode NOTE Pressing the TEMPO button again is another method of switching the RY20 back to Song Record Mode Deleting a Part 1 In Song Record Mode you can delete a part from the current song Select the Delete Part display page by pressing the DELETE Clear button The DEL indicator is lit and the prompt SURE is displayed NOTE You can also select this display page by pressing the I 1 but...

Страница 79: ... button to return to Song Record Mode Press the s or PAGE buttons to select another display page Cancel the recording by pressing the w button 4 Press the PAGE J button to return to Song Record Mode NOTE If the selected part has no data the message PART EMPTY will momentarily appear Inserting a Part 1 In Song Record Mode you can insert a part into the current song Select the Insert Part display pa...

Страница 80: ... for the section you want to record 4 Press the button to insert the part NOTE The new part is inserted BEFORE the current part IMPORTANT If you decide that you DO NOT want to insert a part into the song you can cancel this operation by simply selecting another function Press the button to return to Song Record Mode Press the or buttons to select another display page Cancel the recording by pressi...

Страница 81: ...Jog Dial or using the and buttons The default volume is 15 The range is from 00 to 15 NOTE Pressing the and buttons simultaneously resets the level to 00 Set the quantization by using the cursor button to change the focus to the QUANTIZE prompt Change the value by rotating the Jog Dial or using the and buttons The default quantization is quarter note The quantization values are quarter note eighth...

Страница 82: ...TE You can change the tempo as the song plays See page 19 for further details Also see page 69 for recording an initial tempo for your song The RY20 always remembers the last tempo you entered for a song 3 Press the button to stop playing the song The green Play LED stops flashing 4 Press the button again to start the song from the point at which it was stopped NOTE If you want to play the song fr...

Страница 83: ...t other focus areas in the Song Mode display page 1 Select the PART prompt This allows you to use the Jog Dial or the and buttons to change the part number Then press the button to start playback from the selected part NOTE This is an alternative method to using the and buttons as shown above 2 Select the MEASURE prompt This allows you to select a measure within a song by rotating the Jog Dial or ...

Страница 84: ...laying songs Chain and Repeat Repeat 1 2 3 4 Repeat causes the currently selected song to be played continuously Press the button to put the RY20 into Song Mode Select the song you want to play by rotating the Jog Dial or using the and buttons Select the Repeat display page by pressing the or buttons The display indicates REPEAT Change the value from OFF to ON by rotating the Jog Dial or using the...

Страница 85: ...the next song is empty song play stops 1 Press the button to put the RY20 into Song Mode 2 Select the song with which to start the chain playback by rotating the Jog Dial or using the and buttons 3 Select the Chain display page by pressing the or buttons The display indicates CHAIN 4 Change the value from OFF to ON by rotating the Jog Dial or using the and buttons Notice that the icon changes in t...

Страница 86: ...ne the Repeat and Chain functions This allows continuous playback of all the songs in order The icon in the top right corner of the LCD panel changes again This indicates that both the repeat and chain functions are selected and active n Clearing a Song This function is used to remove all the song data from a song 1 Press the button to put the RY20 into Song Mode 2 Select the Clear display page by...

Страница 87: ... Press the or buttons to select another display page NOTE If the selected song contains a lot of data you may see the prompt PLEASE WAIT as the RY20 clears the data WARNING When you press the button the clear operation will be performed It is not possible to recover data that you have lost by clearing or overwriting the song BE CERTAIN THAT THIS IS WHAT YOU INTEND TO DO NOTE Clearing a song DOES N...

Страница 88: ... also get to this display page by pressing the or buttons 3 Select the song to copy to by rotating the Jog Dial or using the and buttons The song you just selected is the Destination Song You must select a song from 00 to 49 as your destination song WARNING Be careful not to overwrite a song accidentally The EMPTY indicator will light for songs that contain no data If the destination pattern you h...

Страница 89: ...ta you may see the prompt PLEASE WAIT as the RY20 copies the data to the destination song NOTE The message MEMORY FULL may appear on the display See the important message on page 66 for further details WARNING When you press the button the copy operation will be performed It is not possible to recover data that you have lost by overwriting the song BE CERTAIN THAT THIS IS WHAT YOU INTEND TO DO WAR...

Страница 90: ...otice that the first character is flashing The default name for all songs is 3 Select the first character of the name by rotating the Jog Dial or by using the and buttons NOTE The RY20 contains the following character set allowing you to use numbers upper and lower case letters and symbols for your name 4 To move to the next character press the button The second character will flash Change that ch...

Страница 91: ...same data as the preset drum kits 00 to 20 respectively IMPORTANT When you attempt to change the voice assignment or any of the parameters of the preset drum kits numbered 00 to 19 the message PRESET will momentarily appear on the display You cannot modify any of the parameters or voice assignments for a preset drum kit However the Pad Sensitivity and Chase functions affect the entire system You c...

Страница 92: ...sing the button will switch the RY20 back to the previously selected main mode such as Pattern or Song Play Mode or one of the recording modes From the other display pages of Drum Kit Mode pressing the button will switch to the mode s initial display page 2 Select a user drum kit from 20 to 39 by rotating the Jog Dial or by using the and buttons NOTE Use one of the user locations from 20 to 39 to ...

Страница 93: ...be shown at the top of the display You can also select the Bass Pad Bank With the RY20 in Pad Bank Mode press the button to access the Type display page Change the type from DRUM to BASS by rotating the Jog Dial or by using the and buttons NOTE When you switch the RY20 to BASS the Pad Bank indicator also changes Press the button to select the octave The display shows the current octave range Selec...

Страница 94: ...ress the cursor button until the PAD indicator starts flashing select another pad with the Jog Dial or by using the and buttons then press the cursor button until the focus has returned to the voice assignment 5 Complete your drum kit by repeating the steps shown above with the other drum pads When you have finished assigning voices to the current Pad Bank of your Drum Kit select another Pad Bank ...

Страница 95: ...ss the pad you want to modify after selecting the Pad Bank 3 Adjust the level of the pad by rotating the Jog Dial or by using the and buttons The volume level setting ranges from 00 to 15 As you adjust the level tap the pad to listen to the level changes Pressing the and buttons simultaneously resets the level to 15 NOTE Each pad in your drum kit can be set with a different level setting unless yo...

Страница 96: ...oming from the right channel only while a setting of 7 pans fully left A setting of 0 is stereo centre NOTE Even though a voice is panned fully to one channel you may still hear that voice in the other channel due to the effects processing performed by the built in DSP All drum voices have a pre assigned pan Selecting OFF uses that value Pressing the and buttons simultaneously resets the pan to th...

Страница 97: ...e Jog Dial or by using the and buttons You can adjust the pitch from 2400 cents minus two octaves to 2400 cents plus two octaves in increments of 10 cents 100 cents 1 semitone NOTE Some of the voices may not produce an audible effect Pressing the and buttons simultaneously resets the pitch to 0000 NOTE If you have selected the Bass Pad Bank you assign the pitch change for the entire bank Each pad ...

Страница 98: ...you want to modify after selecting the Pad Bank 3 Adjust the decay of the pad by rotating the Jog Dial or by using the and buttons The range is from 7 to 7 NOTE Some of the voices may not produce an audible effect Pressing the and buttons simultaneously resets the decay to 0 NOTE If you have selected the Bass Pad Bank the decay setting applies to all the pads You can use the and cursor buttons to ...

Страница 99: ...pad the louder its voice will sound 1 Select the Level Sensitivity parameter by pressing the or button The display reads SENS and LVL The current level flashes 2 Press the pad you want to modify after selecting the Pad Bank 3 Adjust the level sensitivity of the drum pad by rotating the Jog Dial or by using the and buttons The range is from 0 to 3 Depending on the Pad Sensitivity setting see page 9...

Страница 100: ...e pads You can use the and cursor buttons to access the SENS LVL DRUM KIT and PAD settings Pitch Sensitivity This parameter controls how much the pitch of a voice will shift as the velocity with which you tap its drum pad increases 1 Select the Pitch Sensitivity parameter by pressing the or button The display reads SENS and PCH 2 Press the pad you want to modify after selecting the Pad Bank 3 Adju...

Страница 101: ...e selected the Bass Pad Bank the pitch sensitivity setting applies to all the pads You can use the and cursor buttons to access the SENS PCH DRUM KIT and PAD settings Decay Sensitivity The decay of a voice can also be modified by the velocity of the drum pad tap 1 Select the Decay Sensitivity parameter by pressing the or buttons The display reads SENS and DCY 2 Press the pad you want to modify aft...

Страница 102: ...ed the Bass Pad Bank the decay sensitivity setting applies to all the pads You can use the and cursor buttons to access the SENS DCY DRUM KIT and PAD settings Balance Sensitivity Some of the voices of the RY20 are two layered For example a snare drum will have both a center snare and a rim shot voice The balance sensitivity controls how much of the second sound is heard as the pad is tapped harder...

Страница 103: ...ped harder The following diagram illustrates the effects of the different settings on two element voices NOTE If the balance sensitivity setting is not applicable to the voice currently assigned to the pad the display shows to indicate that this parameter cannot be changed Pressing the and buttons simultaneously resets the balance sensitivity to 0 NOTE If you have selected the Bass Pad Bank the ba...

Страница 104: ...pad select the Polyphonic display page by pressing the or button The display reads POLY 2 Press the pad you want to modify after selecting the Pad Bank 3 The voice polyphony of the drum pad is either OFF or ON Set the value by rotating the Jog Dial or by using the and buttons NOTE This mode applies to the individual voices not the overall instrument The voice polyphony setting applies to all the p...

Страница 105: ...he and buttons You have seven groups to choose from The range is OFF or from 1 to 7 Pressing the and buttons simultaneously resets the setting to OFF NOTE In a real drum set you would never hear the sound of a closed hi hat at the same time as an open hi hat If you assign both of these instruments to one of the available alternate groups the closed and open hi hat sounds will not sound together ev...

Страница 106: ...ess the pad you want to modify after selecting the Pad Bank 3 The Note Driven value of a drum pad is either TRIG or NOTE Select a value by rotating the Jog Dial or by using the and buttons When the Note Off is received the sound is cut off immediately NOTE If the Driven setting is not applicable to the voice currently assigned to the pad the display shows to indicate that this parameter cannot be ...

Страница 107: ...rent curve flashes 2 Select the pad sensitivity by rotating the Jog Dial or by using the and buttons The RY20 has four pad sensitivity settings EASY LINER Linear HARD and CONST Constant EASY sets the drum pads to the most sensitive level You do not have to tap very hard to get a louder sound LINER is a linear setting HARD requires you to tap the drum pads firmly in order to get a louder sound CONS...

Страница 108: ... Pad Sensitivity the Chase function affects the entire system 1 Select the Chase display page by pressing the or button The display indicates CHASE The current mode flashes 2 The chase mode is either ON the default or OFF Change the mode by rotating the Jog Dial or by using the and buttons When you turn the chase mode off notice that the CHASE indicator on the PAD BANK row also switches off 99 ...

Страница 109: ...shing Select a drum kit from 20 to 39 to copy to by rotating the Jog Dial or by using the and buttons The kit you just selected is the Destination Kit NOTE You can only copy to the user drum kits 20 to 39 You CANNOT use the button in this case If you want to exit this operation without performing the copy press the button or select another display page with the or button To initiate the copy press...

Страница 110: ...s the name of the current drum kit Notice that the first character is flashing 3 Select the first character of the name by rotating the Jog Dial or by using the and buttons NOTE The RY20 contains the following character set allowing you to use numbers upper and lower case letters and symbols for your name 4 To move to the next character press the cursor button The second character will flash Chang...

Страница 111: ...ng the button Notice that the EFFECT indicator is switched on as is the EFFECT prompt and that the current setting is flashing NOTE From the initial display page of the Effect Mode pressing the button will switch the RY20 back to the previously selected main mode such as Pattern or Song Play Mode or one of the recording modes From the other display pages of the Effect Mode pressing the button will...

Страница 112: ...ed type by rotating the Jog Dial or by using the and buttons The effect types are HALL1 HALL2 ROOM1 Reverb ROOM2 PLAT1 PLAT2 DELY1 DELY2 Delay DELY3 DELY4 A midsize concert hall A large concert hall A large room A small room A rapidly attenuating plate reverb A rigid plate echo A stereo delay with the delay and reverb connected in parallel A stereo delay with the delay and reverb connected in seri...

Страница 113: ...o select another drum kit or pad by changing the focus area with the cursor button then selecting a drum kit or pad by rotating the Jog Dial or by using the and buttons 3 Set the send level by rotating the Jog Dial or by using the and buttons The range is from 0 to 7 A level of 7 is the maximum signal level and a level of 0 sends no signal to the DSP NOTE You can change the Send Level for the indi...

Страница 114: ... by rotating the Jog Dial or by using the and buttons The range is from 00 to 31 A level of 31 is the maximum signal level and a level of 00 turns off the parameter HINT Judicious use of the return level will give you a reasonably clean sound A high return level generates a lot of reflected sound NOTE You can change the Return Level for the preset drum kits Your altered setting will stay in effect...

Страница 115: ...ompt 2 Set the reverb time by rotating the Jog Dial or by using the and buttons The range is from 00 to 31 NOTE With a setting at or near 00 the reverberation ends quickly giving you an artificial metallic effect Using a higher setting for example at or near 3l causes the reverberation to go on for a long time You can change the Reverb Time for the preset drum kits Your altered setting will stay i...

Страница 116: ...pressing the or 1 button The current level flashes under the F GAIN prompt NOTE Feedback gain can only be applied to the delay effects When the reverberation effects are selected is displayed 2 Set the feedback gain by rotating the Jog Dial or by using the and buttons The range is from 00 to 31 NOTE You can change the Feedback Gain for the preset drum kits Your altered setting will stay in effect ...

Страница 117: ...annel delay time by rotating the Jog Dial or by using the and buttons For the delays DELY1 and DELY2 the range is 00 to 99 These settings change the length of the delay loop for each channel A low value sets a short loop while a high value sets a long loop The other two delays DELY3 and DELY4 use synchronized delays Sets a 32nd note triplet delay Sets a 32nd note delay Sets a 16th note triplet del...

Страница 118: ...nother drum kit IMPORTANT The delays DELY3 and DELY4 may not be synchronized with the tempo if you slow the tempo down too far This is because the RY20 can only work within a maximum delay time of approximately 380 milliseconds The synchronized delays may be incorrectly reproduced when they are controlled through an external MIDI device s clock Changing the tempo during playback while using the sy...

Страница 119: ...ing is synchronized by its own internal clock or by an external MIDI clock 1 Put the RY20 in MIDI Mode by pressing the button Notice that the MIDI indicator is switched on The current mode is flashing below the SYNC prompt NOTE From the initial display page in MIDI Mode pressing the button will switch the RY20 back to the previously selected play mode such as Pattern or Song Play Mode From the oth...

Страница 120: ...clock signal Note that the MIDI SYNC indicator is lit up IMPORTANT When there is no external MIDI device this function MUST be set to INT internal clock INT is the normal setting when the RY20 is being used by itself Drum Instruments MIDI Channel Set the transmission and reception channel for the drum instruments A separate channel is provided for the bass instrument 1 Select the Drum Instruments ...

Страница 121: ...tion channel for the bass instrument 1 Select the Bass Instrument display page by pressing the or button The current channel flashes beside the CH prompt 2 Select a channel by rotating the Jog Dial or by using the and buttons The channel choices are 01 to 16 and OFF The default channel is 01 Pressing the and buttons simultaneously resets the channel to 01 Select OFF if you do not want the bass ins...

Страница 122: ...tton The current channel flashes beside the CH prompt whenever one of its voice selectors is pressed 2 Select a receive channel by rotating the Jog Dial or by using the and buttons The channel choices are 01 to 16 and OFF The default channel is 10 Pressing the and buttons simultaneously resets the channel to 10 Select OFF if you do not want the RY20 to respond to program change messages Refer to t...

Страница 123: ...g Dial or by using the and buttons The RY20 has four note tables PREST USER1 USER2 and USER3 The default is PREST the preset table The preset table is set to GM General MIDI Level1 to enable communication with external GM devices 114 NOTE You must select one of the user tables USERl to USER3 in order to change the note assignments in the next display page Factory Set Values PREST GM General MIDI L...

Страница 124: ...ote number range depends on which pad you select NOTE You can use Pad Bunk Mode to select another group of drum pads See page 84 for instructions regarding Pad Bank Mode An alternative method is to press the cursor button to change the focus to the pad prompt the PAD indicator starts flashing Select a pad with the Jog Dial or by using the and buttons then press the cursor button to change the focu...

Страница 125: ... VOLUME prompt 2 Select the instrument DR drums or BS bass by rotating the Jog Dial or by using the and buttons 3 Change the focus area to the volume data by pressing the cursor button 4 Change the volume by rotating the Jog Dial or by using the and buttons The default is 127 The range is 000 to 127 NOTE The volume setting affects the sounds produced by tapping the drum pads or note events from th...

Страница 126: ... the previous display page it will already be changed on this page In the same way changing the instrument on this page changes it on the previous display page 3 Change the focus area to the expression data by pressing the cursor button 4 Change the expression by rotating the Jog Dial or by using the and buttons The default is 127 The range is 000 to 127 NOTE The expression setting affects the sou...

Страница 127: ... when the transmission has finished Receiving Bulk Data The RY20 can also read back data which you had previously saved to an external MIDI storage device Turn the RY20 on by pressing the Power switch ON Select Song Play Mode or Pattern Play Mode By default the RY20 powers up in Pattern Play Mode IMPORTANT Do NOT select one of the sub functions The RY20 cannot receive MIDI Bulk Data when it is set...

Страница 128: ...G When the RY20 receives bulk data it is stored in the same locations it was in when it was dumped to the external MIDI data storage device This means that any pattern or song data which you recorded after performing the bulk dump will be overwritten by the bulk receive BE SURE THIS IS WHAT YOU INTEND TO DO 119 ...

Страница 129: ...o save any data you want to keep on a MIDI data storage device such as the Yamaha MDF2 MIDI Data Filer before you carry out the total reset procedure 1 Turn the RY20 power OFF 2 Press and hold both the and buttons Turn the power back on FACTRY SET will momentarily appear on the display and the Record and Play LEDs will flash The YAMAHA RY20 prompt will appear then the instrument will default to Pa...

Страница 130: ...Pattern List 121 ...

Страница 131: ...Drum Kit List 122 ...

Страница 132: ...123 ...

Страница 133: ...Voice List 124 ...

Страница 134: ...Note Voices fixed to Note Driven cannot be changed to Trigger Driven They always receive Note Off 125 ...

Страница 135: ...ake sure the cable plugs are clean and that all cable connections are secure If your RY20 is connected to an external sound system check that the RY20 VOLUME control is not turned up too high thereby overloading the input to your sound system and causing distortion The pads produce sound but the This problem is most likely caused by an improper MIDI Sync songs or patterns will not play setting see...

Страница 136: ... RY20 to an LOW authorized Yamaha Service Center to have the battery replaced DO NOT ATTEMPT TO REPLACE THE BACK UP BATTERY YOURSELF DATA Unrecognizable MIDI data was received by the RY20 Make sure that all bulk data sent ERROR to the RY20 conforms with the RY20 MIDI specifications TIME If a MIDI bulk data transfer fails to complete within a certain period of time this error OVER message will appe...

Страница 137: ...ature Measure Click Delete Record Data Level Pad Gate Time Songs Song Play Song Record 50 Demo Initial Tempo Repeat Chain Clear Copy Name Part Part Delete Part Insert Click Record Data Pattern Section Fill In Start Position 20 Presets 20 Users Assign Level Pan Pitch Decay Sensitivities Level Pitch Decay Balance Voice Polyphony Alternate Group Trigger Note Driven Pad Sensitivity Chase Copy Name 5 D...

Страница 138: ...System Common Messages Song Position Pointer Only received in Song Play Mode Song Select Only received in Song Play Mode Note 4 System Exclusive Messages Bulk Dump The RY20 can only receive bulk data while it is in Pattern or Song Select Mode A block consists of the Byte Count the data bytes and the Checksum A number of blocks are repeatedly transferred The number of blocks transmitted or received...

Страница 139: ...Ch s x x Pitch Bender x x 7 x o volume 11 x o expression Control Change Prog x o 0 127 drum kit select Change True x System Exclusive o o song data etc Song Pos o o common Song Sel o 0 49 o 0 49 Tune x x System Clock o o Real Time Commands o o Aux Local ON OFF x x A11 Notes OFF x x Mes Active Sense o o sages Reset x x Note 1 Drum voice a different voice sounds by each note Bass voice single voice ...

Страница 140: ... NAME 60 81 101 NEXT 16 NOTE Note driven 97 Note indicator 41 Note number 115 NT TBL Note table 114 O OCT Octave Output jacks 26 84 8 10 P PAD 43 Pad Bank button 4 23 84 Pad Bank mode 23 84 PADBNK Pad Bank 23 84 PADSNS Pad sensitivity 98 Page and Page buttons 4 PAN 87 PART Pattern button 64 69 70 Pattern mode 3 14 29 14 Pattern real time record mode 35 Pattern step record mode 29 Phones jack 8 9 P...

Страница 141: ...e authorized distributor listed below HEAD OFFICE Yamaha Corporation Electronic Musical Instrument Division Nakazawa cho 10 1 Hamamatsu Japan 430 Tel 053 460 2445 YAMAHA YAMAHA CORPORATION M D G EMI Division Yamaha Corporation 1994 Printed in Japan 405CRIT15 2 01A0 ...

Страница 142: ...YAMAHA Yamaha Corporation of America 6600 Orangethorpe Avenue P O Box 6600 Buena Park CA 90622 6600 11 17 98 98109 Recycled ...

Отзывы:

Похожие инструкции для RY20