background image

En

3

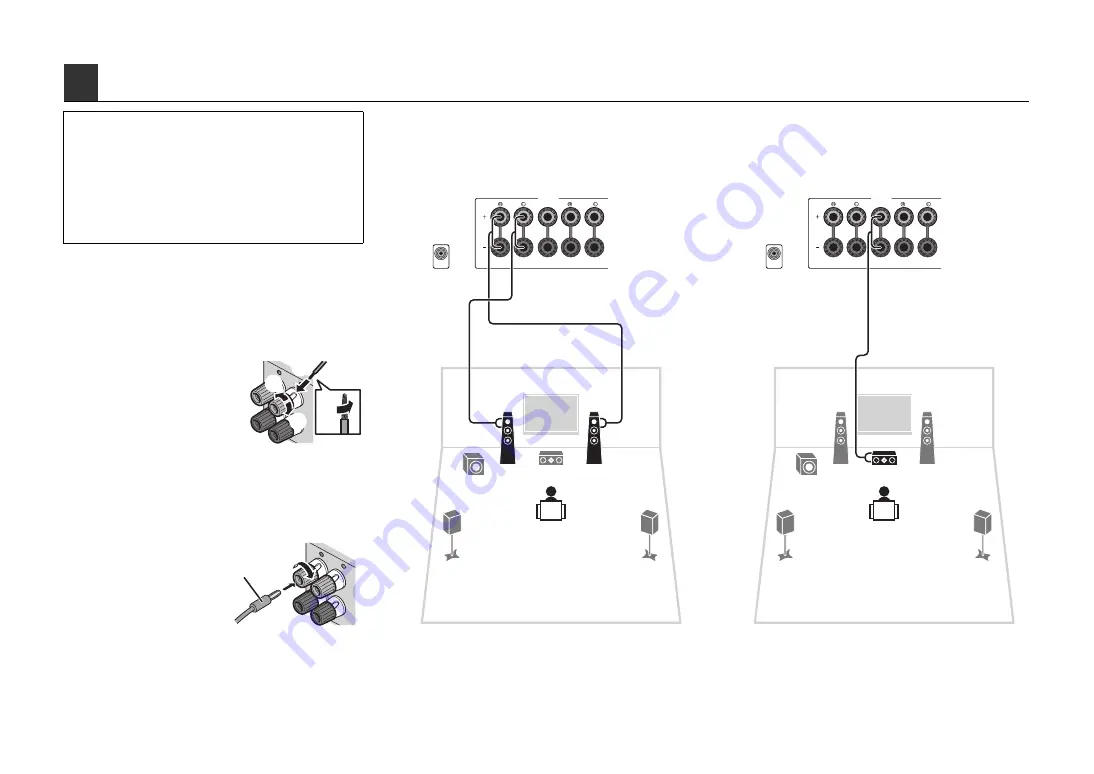
Connecting speaker cables

Speaker cables have two wires. One is for connecting the 
negative (–) terminals of the unit and the speaker, and the 
other is for the positive (+) terminals. If the wires are 
colored to prevent confusion, connect the black wire to 
the negative and the other wire to the positive terminals.

a

Remove approximately 10 
mm (3/8”) of insulation 
from the ends of the 
speaker cable and twist 
the bare wires of the cable 
firmly together.

b

Loosen the speaker terminal.

c

Insert the bare wires of the cable into the gap on the side 
(upper right or bottom left) of the terminal.

d

Tighten the terminal.

Using a banana plug

(Australia model only)

a

Tighten the speaker 
terminal.

b

Insert a banana plug into 
the end of the terminal.

1

Connect the front speakers (

1

/

2

to the FRONT (

/

/

\

) terminals.

2

Connect the center speaker (

3

) to the 

CENTER terminal.

3

Connecting speakers/subwoofer

• Use speakers with an impedance of at least 6 

Ω

.

• Use a subwoofer equipped with built-in amplifier.

• Before connecting the speakers, remove the unit’s power cable 

from the AC wall outlet and turn off the subwoofer.

• Ensure that the core wires of the speaker cable do not touch 

each other or come into contact with the unit’s metal areas. This 
may damage the unit or the speakers. If the speaker cables 
short circuit, “Check SP Wires” will appear on the front display 
when the unit is turned on.

FR

ONT

a

a

b

d

c

– (black)

+ (red)

FRO

NT

a

b

Banana plug

FRONT

CENTER

SURROUND

OR OUT

P

B

Y

SPEAKERS

SUBWOOFER

PRE OUT

1

2

3

4

5

9

The unit (rear)

FRONT

CENTER

SURROUND

OR OUT

P

B

Y

SPEAKERS

SUBWOOFER

PRE OUT

1

2

3

4

5

9

The unit (rear)

Содержание RX-V500D

Страница 1: ...ht way round DAB FM antenna YPAO microphone CD ROM Owner s Manual Safety Brochure Easy Setup Guide Cables required for connections Easy Setup Guide English AV Receiver This document explains how to se...

Страница 2: ...wing diagram as a reference For information on other speaker systems refer to Owner s Manual 2 Placing speakers 1 2 3 9 4 5 1 Front speaker L 2 Front speaker R 3 Center speaker 4 Surround speaker L 5...

Страница 3: ...banana plug into the end of the terminal 1 Connect the front speakers 1 2 to the FRONT terminals 2 Connect the center speaker 3 to the CENTER terminal 3 Connecting speakers subwoofer Use speakers wit...

Страница 4: ...subwoofer 9 to the SUBWOOFER PRE OUT jack Use a subwoofer equipped with built in amplifier FRONT CENTER SURROUND OR OUT PB Y SPEAKERS SUBWOOFER PRE OUT 1 2 3 4 5 9 The unit rear FRONT CENTER SURROUND...

Страница 5: ...ntly connected to the TV directly with an HDMI cable disconnect the cable from the TV and connect it to this unit b Connect a TV to the unit with the other HDMI cable c Connect a TV to the unit with a...

Страница 6: ...surement will start in 10 seconds The following screen appears on the TV when the measurement finishes A u t o S e t u p S t a r t E x i t P r e s s S E T U P k e y t o S t a r t VOL SW L SL C SR R SE...

Страница 7: ...speaker is connected correctly Depending on the type of speakers or room environment this message may appear even if the speakers are connected correctly In this case you can ignore the message Proce...

Страница 8: ...5 1 2 3 4 SLEEP 6 SCENE RETURN ENHANCER DIRECT HDMI MHL AV TUNER FM INFO MEMORY DAB PRESET MOVIE MUSIC BD DVD MUTE ENTER TV TVVOL TV CH TOP MENU POP UP MENU DISPLAY SOURCE RECEIVER CODE SET OPTION SE...

Отзывы: