background image

CONTENTS

FUNCTION MAP

Monitor 

 MONITOR

141

RIVAGE PM10 Operation Manual

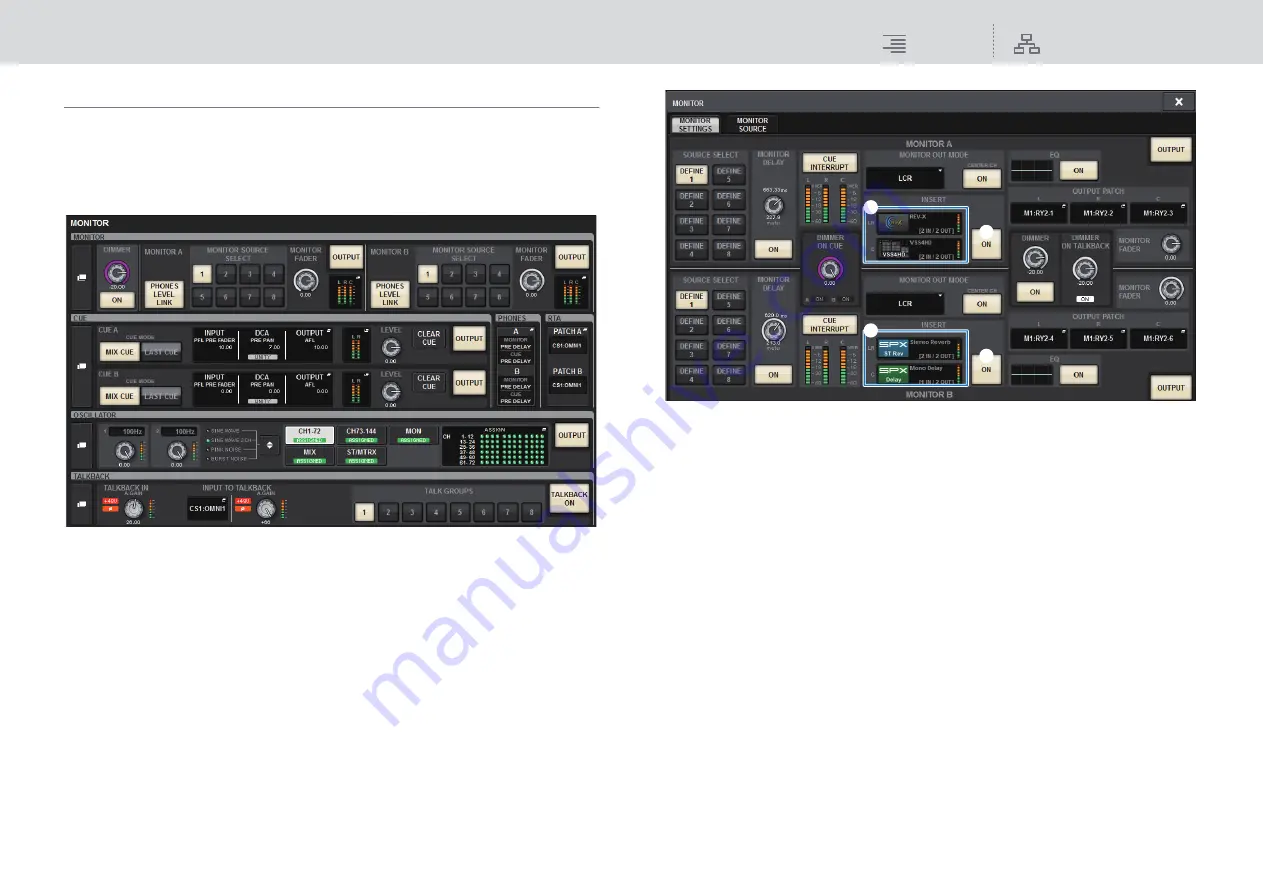
Inserting a plug-in into monitor signals

You can insert a plug-in into the monitor signals (L, R and C) of MONITOR A and MONITOR B 
individually.
You can insert plug-ins and GEQ/PEQ.

1.

Press the MONITOR button on the menu bar to access the MONITOR screen.

2.

Press the MONITOR popup button or the meter field to open the MONITOR 
SETTINGS popup window.

1

INSERT button

Press this button to display the window, in which you can insert plug-ins into the monitor 
signal.

2

INSERT ON button

Switches the plug-in insert on or off. The currently-specified plug-ins are displayed to the left 
of the INSERT ON button.

3.

Press the INSERT button to access the MONITOR INSERT popup window.

If effects have already been inserted, the EDIT window for the plug-ins will appear.

1

2

1

2

Содержание RIVAGE PM10

Страница 1: ...EN Operation Manual Part 1 Overview Part 2 Operations ...

Страница 2: ...ch is always posted on the Yamaha website http download yamaha com How to use this operation manual Since the RIVAGE PM10 Operation Manual this document is an electronic file PDF file it provides links that you can click to view an item of interest and allows you to search for terms Using the icon buttons Icon buttons are located in the upper right of the operation manual CONTENTS Press this butto...

Страница 3: ...Function List 19 Input Channels 20 I O unit section 20 Mixing Engine section 21 Output Channels 24 Mixing Engine section 24 MIX bus 24 MATRIX bus 26 STEREO bus 27 I O unit section 29 Delay Compensation 30 Monitor 31 Cue 32 Oscillator 33 Talkback 34 DCA Mute Groups 35 GEQ PEQ Automixer 35 Plug ins 36 Plug in type list 36 RTA Realtime Analyzer 38 Recording 40 2 track USB recorder 40 Multitrack recor...

Страница 4: ...transfer analog and digital audio signals to and from the DSP engine For details refer to pages 9 and 10 RY16 ML SILK This is a 16 channel mic line input card It features SILK digital processing technology that has been co developed by Rupert Neve Designs and Yamaha RY16 DA This card features 16 channel analog outputs RY16 AE This card features 16 channel digital I Os that support the AES EBU form...

Страница 5: ...rs local I O and control input output connectors MIDI GPI Two track USB recorder function allows live recording or playback of background music or sound effects without requiring additional equipment Two internal power supply units provide redundant power CS R10 Top panel Front panel Rear panel Jack list Jack Connector Number of jacks OMNI IN ANALOG XLR 3 31 Type 8 OMNI OUT ANALOG XLR 3 32 Type 8 ...

Страница 6: ...Type 8 AES EBU IN XLR 3 31 Type 4 AES EBU OUT XLR 3 32 Type 4 TO ENGINE Console Network etherCON CAT5e 2 WORD CLOCK OUT BNC 1 MIDI IN DIN 5P 1 MIDI OUT DIN 5P 1 PHONES TRS 1 4 6 35 mm 2 front TALKBACK XLR 3 31 Type 1 USB TYPE A USB 1 top 3 rear RECORDING TYPE A USB 1 GPI D Sub 25P Female 1 VIDEO OUT DVI D 1 NETWORK PC etherCON CAT5 1 LAMP XLR 4 31 Type 3 AC INLET V Lock Type 2 Slot list Slot Numbe...

Страница 7: ... adjust those settings on line monitoring operation You can connect a computer with RIVAGE PM10 Editor installed called PM10 Editor elsewhere in this book to a DSP engine or a control surface If you connect it to a DSP engine you can control the entire system without a control surface Therefore in the event that the control surface encounters a problem you can still use your computer as a backup D...

Страница 8: ...be supported in a future update About the HY card slots HY card slot 1 of the DSP engine is only for a TWINLANe network card HY card slot 4 is used for multi track recording exclusively HY card slot 3 can be used as general purpose I O HY card slot 2 will be supported in the future Each HY card slot 1 4 is 256 in out 5U size Jack list Jack Connector Number of jacks TO CONSOLE Console Network ether...

Страница 9: ...figured flexibly Two power supply units are built in providing redundant power Front panel About the HY card slots HY card slot 1 of the I O rack is only for a TWINLANe network card HY card slot 2 can be used as general purpose I O HY card slot 1 is 256 in out and HY card slot 2 is 128 in out Rear panel Support is planned in a future update 10U size Jack list Jack Connector Number of jacks WORD CL...

Страница 10: ...ibility in installation Two power supply units are built in providing redundant power Front panel About the HY card slots HY card slot 1 on the I O rack is for only a TWINLANe network card HY card slot 2 can be used as a general purpose I O HY card slot 1 features 256 in outs and HY card slot 2 features 128 in outs Rear panel Support is planned in a future update 5U size Jack list Jack Connector N...

Страница 11: ...ital audio signals and control signals to be transferred TWINLANe interface card This is a 256 in 256 out interface card that supports Yamaha s proprietary TWINLANe audio transfer network protocol HY256 TL It uses multi mode optical fiber cables such as Neutrik s opticalCON DUO to allow transmission between devices up to 300 meters apart HY256 TL SMF It uses single mode optical fiber cables such a...

Страница 12: ...he RIVAGE PM10 system To connect devices first install a TWINLANe network card in an HY card slot of each device then use fiber optic cables to connect the TWINLANe network cards in a ring network topology NOTE Do not install both an HY256 TL SMF and HY256 TL cards on a TWINLANe network If you use an HY256 TL SMF card make sure that the total length of all cables is 6km or less TWINLANe Network Tr...

Страница 13: ... in the network malfunctions other working devices will be able to continue communicating Normal situation When a cable is broken Even if a cable is severed at one point the signal will be re routed automatically and communication will continue without interruption Device Device Device Device TWINLANe network card TWINLANe network card TWINLANe network card TWINLANe network card OUT IN OUT IN OUT ...

Страница 14: ...TOR OUTS CH REC OUT MIX OUT STEREO OUT MATRIX OUT MONITOR A B INSERT 1 INSERT 2 INSERT 1 INSERT 2 INSERT 1 INSERT 2 INSERT 1 INSERT 2 for Inserts for Inserts Send Return OSCILLATOR RTA TALKBACK 8x OMNI IN 4x AES EBU TALKBACK 2trk USB PLAYBACK 2trk USB RECORDER MY1 MY2 I O Rack RPio622 Inputs HY1 HY256 TL HY2 HY144 D RY1 RY2 MY1 MY2 RY3 RY4 RY5 RY6 I O Rack RPio622 Outputs Control Surface CS R10 8x...

Страница 15: ...e output to the TWINLANe network turn on off in 16 channel units for each slot HY SLOT 1 OUT 256 ch max RY SLOT 1 OUT RY SLOT 2 OUT RY SLOT 3 OUT RY SLOT 4 OUT RY SLOT 5 OUT RY SLOT 6 OUT MY SLOT 1 OUT MY SLOT 2 OUT HY SLOT 2 OUT HY SLOT 1 IN 256 ch max RY SLOT 1 IN RY SLOT 2 IN RY SLOT 3 IN RY SLOT 4 IN RY SLOT 5 IN RY SLOT 6 IN MY SLOT 1 IN MY SLOT 2 IN HY SLOT 2 IN TWINLANe Network 400 ch Split...

Страница 16: ...can be used as general purpose I O HY card slot 2 will be supported in the future Each HY card slot 1 4 is 256 in out 2 HY card slot 1 of the I O rack is only for a TWINLANe network card HY card slot 2 can be used as general purpose I O HY card slot 1 is 256 in out and HY card slot 2 is 128 in out About Connections I O Rack RPio622 RY card MY card DSP Engine DSP R10 Control Surface CS R10 MY card ...

Страница 17: ... the NETWORK connector located above the HY card slots Alternatively you can use the NETWORK connector on the control surface However in this case please note that the computer will be unable to communicate with the DSP engine if the power to the control surface is turned off NOTE You can use only one instance of PM10 Editor per system Do not connect two or more computers to the system Connecting ...

Страница 18: ...acks on the rear panel of the control surface and of the RY16 AE This allows digital signals that are not synchronized to the RIVAGE PM10 system to be input and output SRC block diagram The input SRC converts the signal to the system clock of the RIVAGE PM10 system The output SRC converts the signal to the specified internal clock source or to the same clock as the input of the same channel Only t...

Страница 19: ...Inserts Send Return 4x AES EBU TALKBACK 2trk USB Rec MY1 MY2 HY1 HY256 TL RY1 RY2 MY1 MY2 RY3 RY4 RY5 RY6 Control Surface CS R10 4x AES EBU 4x PHONES MY1 MY2 DSP Engine DSP R10 I O Network I O Network Console Network Console Network 16 16 16 16 16 16 256 256 16 16 128 8 8 16 16 1 256 256 256 256 16 16 256 16 16 16 16 16 16 16 16 16 16 128 8 8 16 16 8 HY2 HY144 D TWINLANe Network 400 ch INPUT PATCH...

Страница 20: ...irtual Sound Check 1 2 3 4 4 5 4 5 The graceful and solid tone characteristic of an analog console can be obtained Breathing and subtle pianissimos can be expressed in a lifelike way Channel EQ and reverb become more effective If this is used only on a small number of important channels those parts will stand out from the mix If this is used on all channels the mix will be given depth and three di...

Страница 21: ...nclude DSP Engine A B input A B VSC 256 TWINLANe Network 400 Ch HY slot1 INPUT PATCH INPUT CHANNEL Virtual Sound Check 1 2 Only STEREO CH HPF LPF 4 BAND PEQ DYNAMICS 1 DYNAMICS 2 ON LCR PAN BAL INPUT PATCH TO ST L R PATH R R DELAY A B VSC INSERT 1 INSERT 2 DIRECT OUT LEVEL DCA1 24 INSERT 1 PLUG IN 1 PLUG IN 2 PLUG IN 3 PLUG IN 4 INSERT 2 PLUG IN 1 PLUG IN 2 PLUG IN 3 PLUG IN 4 DELAY 1000ms DIGITAL...

Страница 22: ...ilt using Yamaha s proprietary VCM Virtual Circuitry Modeling technology It emulates the characteristics of compressors and limiters of the mid 1970s which are now a standard for live sound reinforcement This compressor has faithfully modeled the VCA Voltage Controlled Amplifier circuit and the RMS Root Mean Square detection circuit Compression curve Knee can be set to Hard Medium or Soft Although...

Страница 23: ...sent from an input channel to the MIX MATRIX bus can be made to follow the channel FADER ON DCA settings regardless of the send point For example you can select whether or not a PRE FADER monitoring signal will follow the ON OFF setting for the STEREO bus send Pair setting Adjacent channels can be paired and used as a stereo module Either odd numbered even numbered channels or even numbered odd nu...

Страница 24: ...ts of dynamics parameter settings A and B can be saved for convenient comparison The selectable dynamics types are the same as for input channels page 22 KEY IN SOURCE Selects the source of the key in signal In addition to SELF the key in signal can also be selected directly from another channel or input patch You can use an HPF BPF or LPF as a KEY IN FILTER 4 INSERT Two inserts are provided Inser...

Страница 25: ...o channels are paired all of their parameters except for delay are linked BUS TYPE MIX buses can be either the FIXED type whose send level is fixed or the VARI type whose send level is variable you can switch each odd even numbered pair to either type Library The OUTPUT CHANNEL LIBRARY lets you store and recall various output channel parameters PRE POST PRE FILTER POST FADER PRE EQ POST ON PRE DYN...

Страница 26: ...the source of the key in signal In addition to SELF the key in signal can also be selected directly from another channel or input patch You can use an HPF BPF or LPF as a KEY IN FILTER 4 INSERT Two inserts are provided Insert 1 and Insert 2 In each insert you can insert up to four plug ins GEQ PEQ external devices via the I O jacks Each insert point can be freely specified independently 5 DELAY Up...

Страница 27: ...ameter settings A and B can be saved for convenient comparison The selectable dynamics types are the same as for input channels page 22 KEY IN SOURCE Selects the source of the key in signal In addition to SELF the key in signal can also be selected directly from another channel or input patch You can use an HPF BPF or LPF as a KEY IN FILTER 4 INSERT Two inserts are provided Insert 1 and Insert 2 I...

Страница 28: ...and R of STEREO B This is also used as the CENTER channel of LCR If it is set to MONO the same signal is sent to L and R of STEREO B LCR By using STEREO A as L R and STEREO B set to MONO as CENTER the two stereo buses can be used as an LCR bus PRE POST PRE FILTER POST FADER PRE EQ POST ON PRE DYN PRE DELAY PRE FADER ON BALANCE STEREO A B L R LEVEL DCA1 24 To OUTPUT PATCH To OUTPUT PATCH DIMMER TAL...

Страница 29: ...el I O Rack RY Card Slot DSP Engine MY XXX HY XXX MY Card Slot HY Card Slot RY16 DA RY16 AE 1 2 3 256 256 SRC I O Network HY1 HY256 TL HY1 HY256 TL OUTPUT PATCH CH 1 144 MIX 1 72 ST A B MATRIX 1 36 CUE MONITOR DIRECT OUT MIX OUT ST OUT MATRIX OUT CUE OUT MONITOR OUT 1 2 3 DA DELAY MAX1000ms GAIN TRIM DELAY MAX1000ms GAIN TRIM DELAY MAX1000ms GAIN TRIM METER METER METER METER ...

Страница 30: ...that automatically matches the timing of these delays The maximum delay is estimated and the appropriate amount of delay is added to each channel as compensation Delay caused by inserts in input channels example Delay Compensation 10 102 56 56 0 102 0 Before compensation After compensation Delay Compensation samples samples 10 samples 112 samples 112 samples 112 samples 10 samples Insert1 Insert1 ...

Страница 31: ...evel can also be assigned to a fader 8 Output structure L channel R channel and CENTER channel of MONITOR A L channel R channel and CENTER channel of MONITOR B 9 CUE SOLO LOGIC Causes the CUE signal to interrupt the monitor output when CUE is active The CENTER channel can be turned on off independently DIMMER ON TALKBACK Attenuates the monitor signal by a fixed amount PHONES LEVEL LINK The level o...

Страница 32: ...d and auditioned LAST CUE Only most recently selected channel will be auditioned CUE stack Cue signals are divided into four groups INPUT CUE group DCA CUE group OUTPUT CUE group and other CUE group The illustration on the right shows the priority of the CUE keys After you have switched groups from lower to upper levels if you then defeat cue for the upper group the previous CUE key status of the ...

Страница 33: ...he PREFERENCES page Channel Mode This mode assumes that one operator is using two cue buses separately Each channel s cue audio destination Cue A B A B can specified individually Bay Mode This mode assumes two operators will operate the system You can specify the cue destination CUE A and B for each Bay The RIVAGE PM10 features two oscillators that output individual sine waves with different frequ...

Страница 34: ...for monitor out Temporarily attenuates the monitor out volume so that the sound from the monitor speakers will not interfere with the input of the talkback mic Talkback dimmer for MIX MATRIX and STEREO Temporarily attenuates the volume of each MIX MATRIX and STEREO bus output signal so that excessive output from these buses will not make the talkback inaudible Talkback TALKBACK Terminal 48V ON 48V...

Страница 35: ...ings can be saved and recalled using the dedicated library The library contains channel information for the channels that belong to the mute group and the name of the mute group The RIVAGE PM10 system provides 31 band GEQ Flex15 GEQ 8 band PEQ and Automixer Each type can be used by inserting it in an insert point GEQ GEQ TYPE You can use two types of GEQ 31 band GEQ which enables you to freely adj...

Страница 36: ...TRIX 1 36 PLUG IN INPUT PATCH CH 1 MIX 1 CH 2 INPUT PATCH OUTPUT PATCH Plug in type Explanation Amount of DSP resources Tap tempo function REV X A 2 in 2 out reverb algorithm that provides a high density richly reverberant sound quality smooth decay and spaciousness and depth that enhance the original sound You can choose one of three programs to suit the acoustic environment and your purpose REV ...

Страница 37: ...810 Dual Stereo Models a console EQ module that Rupert Neve designed in the 1980s 3 Plug in type Explanation Amount of DSP resources Tap tempo function Portico5033 Dual Stereo Models an analog 5 band EQ made by the Rupert Neve Designs 2 EQ 1A Dual Stereo Models a classic vacuum tube passive type vintage EQ 3 Equalizer601 Equalizer that emulates the characteristics of an analog equalizer used in th...

Страница 38: ...ealtime analyzer also known as a spectrum analyzer The RTA can be displayed in a dedicated RTA screen or displayed in the GEQ PEQ settings screen or EQ settings screen Dedicated RTA screen RTA display screen in GEQ PEQ settings OpenDeck This mastering plug in emulates the tape compression created by two open reel tape recorders a recording deck and a reproduction deck 4 Plug in type Explanation Am...

Страница 39: ...CONTENTS RTA Realtime Analyzer Plug in type list 39 RIVAGE PM10 Operation Manual RTA display screen in EQ settings ...

Страница 40: ...irst you must install an HY144 D card in HY card slot 4 on the DSP engine max 144 in 144 out then record using the DAW software on your computer in a Dante network If your computer already has a Dante Accelerator AIC128 D installed you can perform up to 128 in 128 out Fs 96 kHz high resolution recording If you use Dante Virtual Soundcard DVS you can perform up to 64 in 64 out FS 48 kHz recording M...

Страница 41: ... Playback Computer with AIC128 D card installed DAW software such as Nuendo Live During playback TWINLANe Network 400 ch TWINLANe Network 400 ch STAGE INPUT PLAYBACK INPUT CH STAGE INPUT PLAYBACK INPUT CH HY144 D HY144 D Slot 4 Slot 4 I O rack I O rack DSP engine DSP engine Dante network Computer with AIC128 D card installed DAW software such as Nuendo Live FoH Monitor STAGE INPUT PLAYBACK INPUT C...

Страница 42: ...hannel can individually be set to ON OFF when switching to virtual sound check This allows a virtual sound check that mixes playback from the recorder with actual stage inputs A B HPF A B HPF HY SLOT 4 HY SLOT 4 HY SLOT 4 DAW VSC ON VSC VSC VSC Input Patch Recording Patch Input Ch 1 Input Ch 2 Ch 1 Ch 2 Rec Playback Virtual Sound Check DSP engine ...

Страница 43: ...nversely the corresponding fader knob or key operation can be executed when Control Change messages are received from an external device This capability can be used to record fader and key operations on a MIDI sequencer or other external device and play back the data later Receiving MMC MMC MIDI Machine Control can be received on the system This can be used to control the 2 track USB recorder on a...

Страница 44: ...rip encoder on the fader strip of each channel and use them to control the function For example if DIGITAL GAIN is assigned to the channel strip encoder you can use the Selected Channel section to adjust the analog gain while using the fader strip to directly access the digital gain as well For details on the assignable functions and their parameters refer to Part 2 PREFERENCES You can enable or d...

Страница 45: ... CONTRAST Settings such as display brightness and contrast PATCH INPUT Input port patching settings OUTPUT Output port patching settings INSERT Insert patching settings DIRECT OUT Patching settings for output ports that perform direct output RECORDING Patching settings for recording MIXING DATA HA Head amp settings INPUT CH Input channel mixing data MIX MIX channel mixing data STEREO STEREO channe...

Страница 46: ... settings EQ EQ library settings DYNAMICS Dynamics library settings GEQ GEQ library settings PLUG IN Plug in library settings NAME Name library settings DCA NAME ASSIGN DCA Assign library settings MUTE NAME ASSIGN Mute Group Assign library settings USER SETUP User Setup library settings OVERLAY Overlay library settings ...

Страница 47: ...ptual Diagram of Memory MIX Data SCENE MEMORY Current Data CUSTOM FADER SETTING FADE TIME SETTING EQ DYNAMICS LIBRARY DCA ASSIGN MUTE ASSIGN LIBRARY CHANNEL ISOLATE Current MIX Data Actual Value DSP UI INPUT MIX ST MATRIX NAME LIBRARY CH LIBRARY Overwrite UPDATE Create New STORE OVERLAY LIBRARY OVERLAY FILTER Always associated FOCUS FILTER RECALL SAFE FILTER STORE OFFSET VALUES STORE UPDATE STORE ...

Страница 48: ...this mic unused would be recalled each time a scene was recalled In this case that mic channel alone can be given the Recall Safe setting ALL so that it will be excluded from scene recall that channel alone can be operated manually regardless of recalls In the same way if a rehearsal mic channel is to be turned off during the actual performance that channel can be set to Recall Safe In addition to...

Страница 49: ...he desired operation will not be obtained unless you manually change the Recall Safe filter settings However by using the Isolate function you can instantly disconnect that channel regardless of Recall Safe The Isolate on off parameter is provided on each of the channels Input Ch 1 144 Mix 1 72 Matrix 1 36 and Stereo A B Overlay and storing a scene Overlay is a function that enables you to specify...

Страница 50: ... to recall only the input channel settings of a certain scene FADE TIME You can make the faders of specified channels DCAs change smoothly to their new values over a specified duration when you recall a scene The settings of the Fade function can be made independently for each scene Control via GPI MIDI You can use the GPI connector or MIDI connectors to execute scene recall from an external devic...

Страница 51: ...cene This is where the Overlay function becomes very handy Set an offset value of 6dB for the channel in question In this way 6dB will be temporarily added to the existing current mix and applied to the DSP process This Overlay filter a set of offset values is inserted between the current mix and the DSP process Therefore as long as Overlay is enabled a relative value of 6dB in this example will a...

Страница 52: ... a password when locking the console Initialization You can return the entire system to its factory set state or initialize just a portion of the mixing data System log You can store the history of errors and alerts that occurred on the devices as a log file The log can be export to an external storage device Calibration FADER CALIBRATION Depending on the environment in which you use the system di...

Страница 53: ...area 81 Main area 81 Menu bar 82 Channel name area 83 Entering names 84 Using tool buttons 85 About the tool buttons 85 Copying and pasting parameters 85 Resetting parameters to default 86 Comparing two settings 86 Using libraries 87 Preset limits in the libraries 87 Recalling a preset from a library 88 Storing setting data in a library 89 Deleting setting data from a library 89 Pairing 90 Setting...

Страница 54: ...S FROM 191 Using SENDS TO 191 Using SENDS FROM 193 Using the Selected Channel section to make send settings 194 Using the faders to adjust the sends SENDS ON FADER mode 195 Using the Quick data copy function 196 TO STEREO 199 Controlling via the TO STEREO section 199 Sending a signal to a STEREO bus 199 SIGNAL FLOW 201 Viewing the signal flow 201 Channel Job 203 About DCAs 203 Assigning channels t...

Страница 55: ...ene Direct Recall function 286 Editing scene memories 288 Sorting scene memories 288 About editing scene memories 290 Deleting a scene DELETE 290 Duplicating a scene DUPLICATE 291 Modifying the scene number and title RENAME 291 Using the Focus function 292 Using the Fade function 294 Outputting a control signal to an external device in tandem with scene recall GPI OUT 295 Playing back an audio fil...

Страница 56: ...tem dump 356 Console Status 357 Setting the date and time of the internal clock 357 Panel Settings 359 Specifying the brightness of the touch screens LEDs channel name displays and lamps 359 Console Lock 360 Locking the console 360 Unlocking the console 361 Specifying the CONSOLE LOCK screen image 361 Setup Procedure and Basic Operation of the RIVAGE PM10 Editor 362 About the RIVAGE PM10 Editor 36...

Страница 57: ... 292 FADE TIME 294 GPI 295 PLAYBACK LINK 296 RECALL SAFE 301 EVENT LIST 302 OVERLAY OVERLAY 305 MONITOR MONITOR 135 MONITOR 136 CUE 145 PHONES 159 RTA 160 OSCILLATOR 151 TALKBACK 155 METER INPUT METER 163 OUTPUT METER 163 IN OUT METER 163 FULL SCREEN 164 SETUP SYSTEM CONFIG 104 DEVICE SYNC 104 WORD CLOCK 122 DELAY COMPENSATION 121 BUS SETUP 125 MIDI GPI 335 PREFERENCES 318 SEL LINK 319 BAY LINK 75...

Страница 58: ...graphs regarding operation Please refer to the appropriate section for more information Top panel of the control surface The top panel of the control surface is divided into the following sections A Touch Screen section page 64 B Channel Strip section page 65 C Selected Channel section page 59 D UTILITY section page 62 E SCENE MEMORY section page 63 F USER DEFINED KEYS KNOBS section page 63 Part N...

Страница 59: ...nel parameter Channel name display Indicates the channel number and name and the fader level Channel color indicator Indicates the channel color INC DEC keys Switch channels to edit parameters 1 4 5 6 2 3 7 8 9 1 ISOLATE key Switches Isolate on or off The Isolate function enables you to protect the entire selected channel strip with just one key press from any recall operations for scenes or libra...

Страница 60: ...C indicator Lights up when GC GAIN COMPENSATION is enabled 9 Phase key Reverses the phase of the input signal DELAY ON key Switches Delay on or off DELAY display Indicates the delay value DELAY knob Sets the delay value 1 2 4 7 3 5 6 8 9 1 EQUALIZER 1 4 5 8 keys Switch the EQ bands for which you want to make settings Pressing both 1 4 and 5 8 keys simultaneously will set the gain for all bands to ...

Страница 61: ...ters that are indicated on the DYNAMICS display 4 DYNAMICS 1 2 setting knobs Set parameters that are indicated on the DYNAMICS display 5 DYNAMICS 1 2 display Indicates the Dynamics parameters 6 DYNAMICS 1 2 ON key Switches Dynamics on or off 1 2 3 4 1 2 4 5 6 3 5 6 4 1 2 3 1 MIX MATRIX knobs Adjust the send levels for the corresponding buses 2 MIX MATRIX SENDS PRE keys Toggle the send point betwee...

Страница 62: ...tor Lights when AC power to the unit is ON If both power switches A and B are turned on this indicator will light green If either power switch A or B is turned on it will light red If the RIVAGE PM 10 system is not started it will light orange 2 USB port Enables you to connect a USB device such as a mouse keyboard or USB flash drive Use a USB flash drive to store the system s internal data and to ...

Страница 63: ...ey Stores the current mix data to the selected scene memory 7 INC DEC keys Enable you to select the scene number of a scene that you want to store or recall 8 RECALL key Enables you to recall a stored scene from scene memory 1 3 6 4 2 5 8 7 1 OVERLAY key Press this button to display the OVERLAY SETTING screen While pressing and holding down the SHIFT key press the OVERLAY key to switch Overlay on ...

Страница 64: ...ng transport NOTICE Never use a sharp or pointed object such as your fingernail to operate the touch screens Doing so may scratch the screens and render the touch screens inoperable 2 VIEW key Recalls and toggles between the OVERVIEW and SELECTED CHANNEL VIEW screens 3 MIX MATRIX keys Specify the type of the send destination buses displayed on the OVERVIEW screen 4 1 12 13 24 25 36 37 48 49 60 61 ...

Страница 65: ...ON FADER mode this fader adjusts the send level of the signal sent from each channel to the currently selected MIX MATRIX bus SAFE R indicator Lights if the channel is set to Recall Safe SAFE M indicator Lights if the channel is set to Mute Safe ISOLATE indicator Lights if the channel is Isolated CUE key Selects the channel for cue 1 Screen encoder bay L and C only Controls the knob currently sele...

Страница 66: ... ON This feature will be supported by a future update 2 TOUCH AND TURN knob Controls the parameter of the knob you are touching on the touch screen 3 Channel strip encoder display Indicates the function that has been assigned to the channel strip encoder 4 UP U DOWN D keys Enable you to select the function that you want to control using the channel strip encoder 5 SHIFT key Combine with another ke...

Страница 67: ...nger turn the knob clockwise to unlock it and then push it in 3 PHONES A B LEVEL knobs Adjust the level of the signal output from the PHONES OUT jacks respectively 4 PHONES A B output jacks These are headphone jacks for monitoring the MONITOR or CUE signal Rear panel of the control surface 1 LAMP jacks These four 4 pin female XLR output connectors are used to supply power to Yamaha LA1L gooseneck ...

Страница 68: ...r 6 RESET switch Resets the control surface Only the controls screens indicators and control keys and knobs on the control surface will restart without interrupting audio Use this switch in case the control surface becomes non responsive to your operations 7 OMNI IN jacks These are balanced XLR 3 31 female input jacks for inputting analog audio signals from line level devices or microphones They f...

Страница 69: ...mparable means The use of Ethernet cables with Neutrik etherCON CAT5 compatible RJ 45 plugs is recommended Standard RJ45 plugs can also be used Cable length can span up to 100 meters between devices Maximum practical distance may vary depending on the cable used LINK ACT indicator This indicator flashes or lights up green depending on the connection status Vent The control surface is equipped with...

Страница 70: ... connectors are usually connected to each other via the system network Therefore connecting them to the network switch will generate a loop that could prevent normal system communications CS R10 RPio622 RPio222 DSP R10 RPio622 RPio222 DSP R10 CS R10 NETWORK connector on each component Do NOT connect multiple components to the network switch Exclusively used for firmware update Exclusively used for...

Страница 71: ...below You can use the Layer Select keys to the right of the faders to recall the channels to edit There are two layer types base layer and custom layer Base layer A base layer features mixer channels lined up in the fixed order of channels Input 1 12 13 24 133 144 total 12 layers Mix 1 12 13 24 61 72 total 6 layers Matrix 1 12 13 24 35 36 total 3 layers Stereo A B total one layer CUE A B MONITOR A...

Страница 72: ...a single control surface Selecting a channel by using hardware You can select a specific channel for the Selected Channel section hardware You can also use SEL keys on each bay Selecting channels on screen up to three individual channels On the CS R10 you can select one specific channel each on bay L bay C and or bay R on the external monitor On the CS R10 S you can select one specific channel eac...

Страница 73: ...select the next channel 2 Press the channel name area located at the bottom of the screen Press the channel name repeatedly to switch the selected channel on screen If you switch fader layers in the meter area the channel name area will change the indication accordingly In this way you can access any channel on screen NOTE If you use the FADER BANK SEL LINK function specified in the PREFERENCES wi...

Страница 74: ...he link between the selected channels parameters on screen and the SEL keys hardware and to set up the link between SEL keys and the bays You can also specify whether the hardware SEL key selection will be linked with cue operations page 318 On screen selected channel L On screen selected channel C Selected channel via hardware On screen selected channel R ...

Страница 75: ...SETUP button on the menu bar to access the SETUP screen 2 Press the PREFERENCES button to access the PREFERENCES popup window This window includes several pages which you can switch between using the tabs located at the top of the window 3 Press the SURFACE SETTINGS1 tab to access the SURFACE SETTINGS1 page SURFACE SETTINGS1 1 BAY LINK Specifies whether the layers selected from multiple bays will ...

Страница 76: ...yer switching will move to the left most channel in the fader bank Please note that this applies only when FADER BANK SEL LINK is turned on If Bay Link mode is changed while DCA channels are being rolled out the DCA roll out operation will be canceled If the Bay Link setting is changed for a bay on which the SET BY SEL button is turned on SET BY SEL will be turned off About switching layers using ...

Страница 77: ... knobs a second time while a thick frame is displayed around them will open a window in which you can make additional detailed settings Basic operations on the top panel Screen encoder operations Screen encoders 1 12 are used to operate the knobs selected for operation in the touch screens When you press to select a knob that can be controlled by the screen encoders a thick frame appears around it...

Страница 78: ...creens go dark and the POWER indicator lights orange 4 Turn off both power switches A and B on the rear panel Caution If you plan to turn on the power to the control surface again wait at least five seconds before switching the power on Otherwise the unit may malfunction Even when the power switches are turned off a small amount of current still flows through the unit If you plan not to use the un...

Страница 79: ... corresponding parameter If you press a knob once in the window a thick frame appears around the knob This frame indicates that the knob is selected for operations that can be controlled by the TOUCH AND TURN knob or screen encoders List windows Windows similar to the following enable you to select items from a list such as the USER DEFINED knob setting window The highlighted item in the middle of...

Страница 80: ...s or a list for that parameter will appear These windows are called popup windows You can switch between popup windows using tabs as needed Some popup windows show several buttons called tool buttons at the top of the window You can use these tool buttons to recall libraries or to perform copy and paste operations Press the x symbol located in the upper right corner to close the popup window and r...

Страница 81: ...ents of the main area will vary depending on the currently selected function Mixing operations will involve mainly the following two types of screens To access these screens press the VIEW key SELECTED CHANNEL VIEW screen This screen shows all mix parameters of the currently selected channel For details about this screen see page 93 OVERVIEW screen This screen shows the main parameters of 12 chann...

Страница 82: ...aders of the top panel to adjust the MIX MATRIX send level page 195 During this time the main area will switch to a screen that enables you to select the send destination MIX MATRIX bus 6 MONITOR When you press this button the MONITOR screen will appear in the main area enabling you to edit the monitor or oscillator settings 7 RACK REC Recorder When you press this button the RACK REC screen will a...

Страница 83: ...s 1 36 STEREO A B channels CUE A B channels DCA IN OUT Input Output channels Input channels 1 144 MIX channels 1 72 MATRIX channels 1 36 STEREO A B channels CUE A B channels DCA FULL SCREEN Full screen display The METER screen is displayed full screen in the main area Channel name area Press the channel name area to switch the selected channel parameter on the screen If you switch fader layers the...

Страница 84: ...selected range of characters CLEAR button Erases all characters that have been input in the text input box DEL button Deletes the character to the right of the cursor or the string of characters selected in the text box BS button Deletes the character to the left of the cursor or the string of characters selected in the text box TAB button Enables you to access the next selectable item For example...

Страница 85: ...e them to corresponding parameters for other channels or a similar type of GEQ PEQ or Plug in NOTE The EQ and Dynamics parameter settings will be copied and pasted per bank A B You can copy and paste the parameters between Bank A and B of the same channel For example you can copy the parameter settings for Dynamics 1 on CH1 in Bank A to Dynamics 2 on CH144 in Bank B If 15 bands or less are used fo...

Страница 86: ...ing the COMPARE button enables you to switch between and compare the settings stored in buffer memory with the EQ or Dynamics settings of the currently selected channel or GEQ PEQ or Plug in This function is useful if you want to compare and listen to the edited data using the settings temporarily stored during the editing process 1 Open a popup window that features tool buttons 2 Select a channel...

Страница 87: ...gs Libraries are categorized as follows INPUT CH library OUTPUT CH library INPUT EQ library OUTPUT EQ library DYNAMICS library GEQ library PLUG IN library NAME library DCA NAME ASSIGN library MUTE NAME ASSIGN library USER SETUP library OVERLAY LIBRARY Basic operation is nearly identical for all of these libraries NOTE PLUG IN library is sub categorized into libraries based on type NAME library is ...

Страница 88: ...he following restrictions apply for each library Channel libraries In the OUTPUT CH library if the type of channel selected in the list does not match the type of channel selected as the recall destination the CONFLICT indicator will appear on the right side of the TYPE column You can still recall the preset while the CONFLICT indicator appears However please note that parameters that are not incl...

Страница 89: ...The setting data will be stored to the preset number you selected in step 2 If you decide to cancel the store operation press the CANCEL button instead of the OK button NOTE You can change the title of the setting data after storing it by pressing on the setting data title in the list to open the TITLE EDIT popup window Deleting setting data from a library 1 Press the LIBRARY tool button in the ta...

Страница 90: ...st 2 To defeat pairing press and hold down the SEL keys of one of the paired channels and then press the SEL key of the other When MIX buses are paired the signal flow will change as described below CH to MIX FIX CH to MIX VARI MIX1 72 MATRIX1 36 72 71 2 1 to MIX1 ON to MIX2 72 same as above POST ON to MIX FIX MONO to MONO to MIX1 to MIX2 ON to MIX3 72 same as above POST PAN L to MIX FIX MONO to S...

Страница 91: ...ONO ON to MATRIX 1 to MATRIX 2 36 same as above LEVEL PRE FADER PRE FILTER PRE EQ PRE DYN POST FADER POST ON PRE DELAY PRE FADER PRE FILTER PRE EQ PRE DYN POST FADER POST ON PRE DELAY MATRIX 36 35 2 1 to MATRIX 3 36 same as above to MATRIX 1 to MATRIX 2 L CH ON R CH BALANCE L CH R CH to MATRIX VARI STEREO to STEREO LEVEL to MATRIX 2 36 same as above to MATRIX 1 to MATRIX 1 L CH ON R CH L CH R CH t...

Страница 92: ... FUNCTION MAP Basic Operations Pairing 92 RIVAGE PM10 Operation Manual A window will be displayed asking you to confirm that you want to defeat pairing 5 Press the OK button The pairing setting will be defeated ...

Страница 93: ...the Mute Safe function on and off TO STEREO field You can control the stereo balance of the signals sent from the selected channel to the STEREO bus or the signals output from the MIX MATRIX STEREO buses The indication varies depending on the selected channel as follows If the selected channel is an input channel or MIX channel Use the PAN knob on the right 1 to adjust the panning of the signal Us...

Страница 94: ...etting PATCH field 1 INPUT A B switch buttons Switch between INPUT A and INPUT B 2 PATCH popup button Press this button to access the patching popup window The button will indicate the patch setting ANALOG GAIN field 1 ANALOG GAIN knob Sets the analog gain of the head amp If the Gain Compensation function is turned on a blue indicator appears showing the analog gain position at the time the functi...

Страница 95: ...f these values to display the DELAY TIME popup window in which you can set the delay time 3 GANG button Appears if channels are paired If this button is on then differences in delay time will be maintained DIRECT OUT field input channels only This field enables you to turn Direct Out on off for the selected input channel 1 ON button Turns the Direct Out on or off 2 Direct Out patch popup button Pr...

Страница 96: ...nables you to set the LPF 1 LPF knob Specifies the cutoff frequency of the low pass filter 2 ON button Switches the LPF on or off 3 LPF type select button Enables you to set the LPF attenuation per octave to 6 dB oct or 12 dB oct HPF field This field enables you to set the HPF 1 HPF knob Specifies the cutoff frequency of the high pass filter 2 ON button Switches the HPF on or off 3 HPF type select...

Страница 97: ...pen the DYNAMICS 1 2 popup window in which you can make detailed parameter settings page 176 1 DYNAMICS 1 graph Indicates the abbreviated name of the dynamics processor type and the threshold value that are selected for Dynamics 1 You can view an input and output level indicator on the right and a real time GR Gain Reduction meter 2 on the left 3 DYNAMICS 2 graph input channels only Indicates the ...

Страница 98: ...o the MIX bus If an input channel is selected press the relevant button to open the SENDS FROM popup window If a MATRIX channel is selected press the button to open the SENDS FROM popup window On with PRE On with POST Off with PRE Off with POST 2 MATRIX popup buttons input MIX STEREO channels only Each button indicates the level of the send signal sent from the selected channel to the MATRIX bus P...

Страница 99: ...Compensation function is turned on this indicator will appear showing the fixed gain value of the signal output to the TWINLANe network 2 PRE GC OVER indicator Lights to indicate that a signal is clipping before gain compensation 3 POST GC OVER indicator Lights to indicate that a signal is clipping after gain compensation 4 ANALOG GAIN knob Indicates the analog gain value of the head amp Use the s...

Страница 100: ...bles you to make insert and Direct Out settings Press this field to open the INSERT D OUT 1CH popup window 1 DIRECT OUT ON OFF indicator input channels only Indicates the Direct Out on off status 2 INSERT ON OFF indicator Indicates the Insert on off status The following indicators indicate the status of the corresponding insert point EQ field This field indicates the approximate response of the EQ...

Страница 101: ...ng of the signal sent to the STEREO bus Press this knob and you will be able to use the screen encoder and the TOUCH AND TURN knob to adjust the value If you press the knob once again the TO STEREO popup window page 200 will appear This field varies depending on the type of the selected channel When an input channel or MIX channel is selected 1 TO STEREO PAN knob Sets the pan balance of a signal r...

Страница 102: ...ich you can switch bus operations mono stereo operations or the send points page 125 6 48V MASTER button Switches the console s master 48V master phantom power on or off If this button is off phantom power will not be supplied even if the 48V button of an OMNI jack input channel or TALKBACK IN is on 7 MIDI GPI popup button Press this button to access the MIDI GPI popup window in which you can make...

Страница 103: ... NOT CONNECTED will appear here DATE TIME popup button Press this button to access the DATE TIME popup window in which you can set the date and time page 357 PANEL SETTINGS field This field enables you to set the LED brightness and contrast page 359 BANK A D buttons Select the bank to which you want to save the brightness and contrast settings You can save four different settings in banks A D and ...

Страница 104: ...ine each maintain mixing data and synchronize this data via the network This means that when connecting a network it is necessary to specify whether synchronization is performed on the basis of the control surface s data or the DSP engine s data I O racks maintain parameters such as HA gain and gain compensation and you must likewise specify the unit associated with the data used as the basis of s...

Страница 105: ...d in advance in this way you can manage the bandwidth so as not to exceed the maximum number of channels 400 NOTE Since a TWINLANe network cannot convey data in excess of 400 channels you must keep the total number of channels to 400 channels or less 1 Press the SETUP button on the menu bar to access the SETUP screen 2 Press the SYSTEM CONFIG button to access the SYSTEM CONFIG popup window 1 OTHER...

Страница 106: ...nchronized Yellow The TWINLANe network is not in a ring connected state a cable is disconnected somewhere in the ring connection When there is a device on the TWINLANe network whose input output level is diminished Red When a misconnection of a TWINLANe cable is detected If connected IN IN If connected OUT OUT If the DSP engine s own IN OUT are connected directly 3 CS popup button Press this butto...

Страница 107: ...cable if an MY card that does not support high sampling is specified 7 Parameter settings popup buttons Press a button to open a popup window in which you can set the parameters of each card 8 WITH RECALL buttons If a button is on scene data is applied to the HA device when scene recall occurs Turn this off if you do not want HA gain settings to be recalled for example if all HA settings are contr...

Страница 108: ...button For an HY slot a window in which you can make settings in 16 channel units will appear If you press a TWINLANe assignment button that is already assigned an x mark appears indicating that the assignment is canceled If you press a TWINLANe assignment button that is not assigned a checkmark appears indicating the assignment 5 Press the APPLY button to apply the channel settings to the TWINLAN...

Страница 109: ...Channel assign popup buttons DIRECT OUT 1 72 6 Channel assign popup buttons DIRECT OUT 73 144 When you press a button an TWINLANe CONFIGURATION popup window appears in which you can assign the direct out to the TWINLANe network 7 Channel insert assignment buttons These buttons are used to assign channels to the TWINLANe network so that the external hardware can be inserted to those channels via th...

Страница 110: ...t assigned to TWINLANe are selected for assignment in a single operation 5 REVERT button If you press this button all selections for cancellation or for assignment will revert to their original state 5 Select the channels that you want to use on the TWINLANe network When you finish making selections press the CLOSE button to close the window 6 Press the APPLY button to apply the channel settings t...

Страница 111: ... channels to the TWINLANe network 4 Set the operating mode for the Mini YGDAI card s high sampling setting if necessary 5 When you finish making settings press the x button to close the SYSTEM CONFIG CS popup window Editing the internal parameters of each component 1 Press a parameter settings popup button to access the parameter settings popup window of each component 2 Edit the parameters as nee...

Страница 112: ...he M S decoder on or off for each pair of channels S GAIN knob Adjusts the side gain of M S Tabs Switch the display in units of eight channels RY16 DA OMNI OUT of the control surface 1 Patch indication Indicates the channel that is patched 2 DELAY button Switches the output delay on or off 3 Delay time knob Sets the delay time of the output port If you press this knob when it is selected the DELAY...

Страница 113: ...ter Shows the input level 3 SRC button Switches the sampling rate converter on off for each pair of channels 4 Clock status indicator Indicates the status of the input signal 5 PHASE button Switches the phase of the input signal NOTE This is a parameter within the I O rack It is different than the Ф parameter within the channel module of the control surface 6 M S button Switches the M S decoder on...

Страница 114: ... above the knob is not shown 4 PHASE button Switches the phase of the output signal 5 SRC button Switches the sampling rate converter on off for each pair of channels 6 Sampling rate select menu Selects the output sampling rate when an SRC is turned on Choose from SAME AS INPUT same as the word clock that is input 44 1 kHz 48 kHz 88 2 kHz or 96 kHz 7 GAIN knob Adjusts the output gain of the output...

Страница 115: ...channels MY CARD OUTPUT 1 Patch indication Indicates the channel that is patched 2 DELAY button Switches the output delay on or off 3 Delay time knob Sets the delay time of the output port If you press this knob when it is selected the DELAY TIME popup window will appear The delay time value is shown above the knob in millisecond units and below the knob in the units that are selected in the DELAY...

Страница 116: ... channel that is patched 2 48V button Switches phantom power 48V on or off 3 A GAIN knob Indicates the HA analog gain setting You can use the screen encoders to make adjustments 4 Meter This meter indicates the level of signals after passing through analog gain 5 SILK ON button Switches SILK on or off 6 RED BLUE selection button Switches the character of Silk processing between the powerful BLUE a...

Страница 117: ...ace by itself without connecting a DSP engine or I O rack The procedure for offline settings is described below 1 Mounting the I O rack 2 Specifying the type and number of cards page 119 3 Assigning channels to the TWINLANe network page 106 4 Editing the internal parameters of each component page 111 NOTE If the settings made while offline differ from the settings of the actual device when the act...

Страница 118: ... use If you press this button when an I O rack is already mounted the I O rack settings window will appear page 119 Devices being edited offline are indicated as VIRTUAL in yellow 3 Press the I O rack select popup button to access the I O SELECT popup window I O SELECT popup window 4 Select the I O rack RPio622 or RPio222 that you want to use and press the OK button You will return to the SYSTEM C...

Страница 119: ...dow 3 Press the mounted I O rack select popup button to access the I O rack settings popup window I O rack settings popup window 1 RY SLOT 1 6 popup buttons When you press a button the RY CARD SELECT popup window appears in which you can select an RY card 2 MY SLOT 1 2 popup buttons When you press a button the MY CARD SELECT popup window appears in which you can select a Mini YGDAI card page 120 3...

Страница 120: ...nd press the OK button You will return to the I O rack settings popup window To cancel press the CANCEL button If you want to add another RY card repeat steps 4 5 6 When you finish adding cards press the button to close the I O rack settings window MY CARD SELECT popup window 1 Mini YGDAI card select buttons Select the Mini YGDAI card that you want to use 2 BLANK button Use this if you do not want...

Страница 121: ...hannel signal may be delayed by a different amount of time due to digital signal processing through plug ins GEQ inserts or certain routings The Delay Compensation function automatically fixes this delayed timing The maximum delay is estimated and the appropriate amount of delay is added to each channel as compensation 1 Press the SETUP button on the menu bar to access the SETUP screen 2 Press the...

Страница 122: ...and delay time WORD CLOCK A TWINLANe network that features the RIVAGE PM10 system transfers not only audio and control signals but also word clock On a TWINLANe network only one DSP engine can become the clock master If two DSP engines are on the same network one becomes the master and the other becomes a slave For the master clock on a TWINLANe network you can select either the DSP engine s inter...

Страница 123: ... device and the RIVAGE PM10 system UNKNOWN black This indicates that the clock status cannot be detected because no external device is connected or because there is no valid clock input You will be able to select this connector slot but successful synchronization cannot occur until a valid connection is established NOTE If the indicator for the port selected as the clock source has turned light bl...

Страница 124: ...WORD CLOCK IN connector At this time the slave DSP engine will become the master and use the frequency of the word clock being supplied via the rear panel WORD CLOCK IN connector This frequency is the same as that of WORD CLOCK IN specified for the original master DSP engine At first you must input the same clock to the DSP1 master and the DSP2 slave devices 3 In the MASTER CLOCK SELECT field sele...

Страница 125: ...switch between using the tabs located at the top of the window 3 Press the BUS SETUP tab The screen contains the following items 1 SIGNAL TYPE switch buttons Enable you to select how signals are processed for every adjacent pair of buses You can select either STEREO stereo signal or MONOx2 monaural signal x 2 2 BUS TYPE select buttons Enable you to select the bus type for every adjacent pair of bu...

Страница 126: ...PE select buttons to select the bus type SEND POINT INPUT Specifying the send point for each input channel You can select the send destination points for each channel The send point can be specified for both when the send source channel is set to PRE and set to POST individually 1 Press the SETUP button to access the SETUP screen 2 Press the BUS SETUP button to open the BUS SETUP popup window This...

Страница 127: ...ou to select for each channel whether the signal sent to the MIX MATRIX bus will follow the ON FADER DCA settings regardless of the send point These buttons correspond to the following parameters 6 SEND TO buttons Enable you to select the MIX MATRIX bus channel as the signal destination for a single channel at a time 7 SEND TO buttons Enable you to select the MIX MATRIX bus channel as the signal d...

Страница 128: ...ng the tabs located at the top of the window 3 Press the SEND POINT OUTPUT tab The screen contains the following items 1 Category select list Enables you to select the bus category 2 ALL button Press this button to apply the selected send point to all MIX STEREO buses simultaneously If the send point is not selected for some channels in the column will appear 3 PRE send point select buttons You ca...

Страница 129: ... parameters 5 SEND TO buttons Enable you to select the MATRIX bus channel as the signal destination for a single channel at a time 6 SEND TO buttons Enable you to select the MATRIX bus channel as the signal destination for 12 channels at a time 4 Use the send point select buttons to specify the send point Button Send Point POST FADER Immediately after the fader POST ON Immediately after the ON key...

Страница 130: ... The abbreviations displayed in this section have the following meaning M1 M8 I O rack 1 8 CONSOLE Control surface DSP DSP engine 5 SHOW PORT button Enables you to select the ports that are displayed in the grid from A B and A B 6 Continuous patch button Press the continuous patch button and then rotate the select knob to in the upper right to patch the intersecting channels continuously If you pr...

Страница 131: ...eviations displayed in this section have the following meaning M1 M8 I O rack 1 8 CONSOLE Control surface DSP DSP engine 5 Continuous patch button Press the continuous patch button and then rotate the select knob to in the upper right to patch the intersecting channels continuously If you press the continuous patch button the button and the button will appear Press the button again to confirm the ...

Страница 132: ... Press this button to open the NAME library window 4 Channel group select tab Use the corresponding screen encoder or the TOUCH AND TURN knob 3 Access the NAME ICON EDIT popup window by pressing the NAME EDIT popup button of channel for which you want to edit the channel name icon or channel color NAME ICON EDIT popup window The window contains the following items 1 Channel name edit box Indicates...

Страница 133: ...plate select buttons to select a template The selected template will be entered in the channel name field in the upper part of the window To enter the channel name directly proceed to step 6 NOTE You can also add or edit characters in the channel name field after you have entered the name from the template If you want to quickly assign channel names that consist of a common name plus a consecutive...

Страница 134: ... again to confirm the selected continuous patches Press the button to revert the continuous patches to the previous state 3 Output components slots channels This section indicates the type of the output component slot number and channel number for the output port 4 Grid This grid lets you patch output jacks horizontal lines to input jacks vertical columns Currently patched cells in the grid are in...

Страница 135: ...ternal monitor speakers 1 Connect your monitor system to the OMNI OUT jacks or AES EBU jack on the rear panel Monitor signals can be sent to any desired output jack or output channel If you are monitoring through headphones make sure that your headphones are connected to the front panel PHONES A B output jacks 2 Press the MONITOR button on the menu bar to access the MONITOR screen The MONITOR fiel...

Страница 136: ...indow In the MONITOR SETTINGS popup window you can make detailed monitoring settings MONITOR SETTINGS popup window 1 SOURCE SELECT DEFINE buttons Enable you to select one of the DEFINE 1 8 sources that will be output to the MONITOR bus 2 MONITOR DELAY knob Indicates the currently specified delay time The millisecond value is indicated above the knob and the delay time value in currently selected u...

Страница 137: ...ss this field to open the window in which you can set the EQ parameters EQ ON button Switches the EQ on off OUTPUT PATCH popup buttons Indicate the monitor output destination slot or port for the L C and R channels respectively Press these buttons to access the OUTPUT PATCH popup window MONITOR OUTPUT button Switches Monitor Out on or off MONITOR FADER LEVEL knobs Adjusts the monitor fader level D...

Страница 138: ...monitor sources that will be assigned to the DEFINE buttons The selected monitor sources will be highlighted Press the same button again to cancel the selection NOTE You can select up to eight monitor sources If you select eight monitor sources no further selections will be possible First turn off the buttons for unneeded sources 2 Display switching tabs Use these tabs to select the type of channe...

Страница 139: ... SEL key 4 CLEAR ALL button Press this button to clear all selections 5 CLOSE button Press this button to close the popup window and return to the previous screen MONITOR SOURCE SELECT popup window DIRECT INPUT In this window you can assign the slots or ports to up to 16 channel direct inputs as the possible direct monitor sources You can select up to eight direct monitor sources 1 Monitor source ...

Страница 140: ...cify the output ports for MONITOR OUT L R and C NOTE If desired you can specify output ports only for MONITOR OUT L and R to monitor through two speakers 8 To enable monitoring press the MONITOR OUTPUT button to turn it on The monitor source you selected in step 5 will be sent to the output destination you specified in step 7 NOTE The PHONES A B output jacks will always output the monitor signal r...

Страница 141: ... screen 2 Press the MONITOR popup button or the meter field to open the MONITOR SETTINGS popup window 1 INSERT button Press this button to display the window in which you can insert plug ins into the monitor signal 2 INSERT ON button Switches the plug in insert on or off The currently specified plug ins are displayed to the left of the INSERT ON button 3 Press the INSERT button to access the MONIT...

Страница 142: ... to the monitor signal 4 Press the MOUNT popup button to access the INSERT MOUNT window 1 Tabs Enable you to select REVERB dElAY MOD EQ DYNAMICS or GEQ PEQ 5 Press the desired insert plug in button 6 Press the OK button 7 Edit the effect parameters as desired For details on editing the effect parameters refer to Controlling the parameters of a plug in page 234 1 1 ...

Страница 143: ...n the Channel Strip section press the OUTPUT MIX MATRIX key and then press the desired CUE key 2 DCA CUE group The cue solo signals of DCAs make up this group To enable Cue Solo for this group in the Channel Strip section press the DCA key and then press the desired CUE key 3 INPUT CUE group The cue solo signals of input channels make up this group To enable Cue Solo for this group in the Channel ...

Страница 144: ...to CUE B and bay C to CUE A NOTE You can also set the mode in the OPERATION MODE field in the PREFERENCES popup window page 318 Using the Cue function This section explains how to use the CUE key of a desired channel or DCA to monitor the Cue signal NOTE Be aware that if you turn CUE INTERRUPTION off in the MONITOR SETTINGS popup window the cue signal will not be sent to the connected monitor spea...

Страница 145: ...ied for each bay Therefore this setting will be invalid page 318 2 CUE MODE buttons Select one of the following two cue modes MIX CUE All selected channels will be mixed and auditioned LAST CUE Only most recently selected channel will be auditioned 3 SOLO ON button Switches the Solo function on or off 4 SOLO SAFE popup button Press this button to access the SOLO SAFE popup window in which you can ...

Страница 146: ...adjust the value 8 Meters This field indicates the output level of the cue L R channels 9 CUE OUT MODE select button You can output the cue signal in stereo or monaural INSERT button Press this button to display the window to insert plug ins to the cue signal INSERT ON button Switches the plug in insert on or off The currently specified plug in is displayed to the left of the INSERT ON button EQ f...

Страница 147: ...to which the last cued signal belongs will be turned on allowing only the signals of that Cue group to be monitored However if CUE OPERATION MODE is set to BAY and if LAST CUE is selected the cue setting in each bay will be active individually 3 Use the buttons and knobs of the INPUT CUE field DCA CUE field and OUTPUT CUE field to specify the output position and output level for each Cue group Ref...

Страница 148: ...nction with this If PHONES LEVEL LINK is ON you can use the MONITOR A B knob the monitor fader and the PHONES A B LEVEL knob to adjust the cue signal level while monitoring through headphones NOTE To adjust the level of the signal sent to the Cue Out port which you specified in step 4 use OUTPUT PORT GAIN for the patch destination 8 To defeat cue press the currently on CUE key once again You can p...

Страница 149: ...o mode The Solo Safe function is useful if you do not want to accidentally mute certain channels during Solo operations such as the main Stereo channels or Mix channels that send out mix signals to an external recorder 7 Press the CUE key of a desired channel or DCA to turn it on Only the corresponding channel or DCA will be output to the buses and output jacks other channels and DCAs will be mute...

Страница 150: ...tailed oscillator settings 2 OSCILLATOR LEVEL field Adjusts the level of the oscillator A meter beside the LEVEL knob indicates the output level of the oscillator If OSCILLATOR MODE is set to SINE WAVE the frequency of the oscillator is shown Press the LEVEL knob to adjust the oscillator level using the corresponding screen encoder The range is 96 00 dB to 0 00 dB 3 OSCILLATOR MODE field Indicates...

Страница 151: ...equency from 100 Hz 1 kHz and 10 kHz SINE WAVE 2CH LEVEL knob ODD Indicates the output level of the odd channel sine wave Use the screen encoder to adjust the value FREQ knob ODD Indicates the frequency of the odd channel sine wave Use the screen encoder to adjust the value LEVEL knob EVEN Indicates the output level of the even channel sine wave Use the screen encoder to adjust the value FREQ knob...

Страница 152: ...ut signals will vary depending on whether the selected channel number is odd or even For example the odd channel signal will be routed to MIX1 and the even channel signal will be routed to MIX2 You can press the CLEAR ALL button to defeat all selections 4 Channel display select buttons Select the type of channels that you want to view on the screen Available options are CH1 72 CH73 144 MIX and ST ...

Страница 153: ...ck input you can select any input port from input patches as well as the TALKBACK jack on the top panel of the Control Surface Using talkback Controlling the Monitor function via the UTILITY section CH1 72 button Input channels 1 72 CH73 144 button Input channels 73 144 MIX button MIX buses 1 72 ST MTRX button STEREO A bus L STEREO A bus R STEREO B bus L STEREO B bus R MATRIX buses 1 36 MONITOR bu...

Страница 154: ...e value TALKBACK IN level meter Indicates the level of signals after the input gain at the TALKBACK jack 3 INPUT TO TALKBACK field INPUT TO TALKBACK patch button Press the button to open the INPUT PORT SELECT popup window in which you can patch a desired input port slot to talkback The selected port slot name will appear on the button If no patch is assigned button will indicate INPUT TO TALKBACK ...

Страница 155: ...power 48V supplied to an input port INPUT TO TALKBACK Ø button Sets the phase for the corresponding jack to normal or reverse when you use an input port as a talkback input INPUT TO TALKBACK gain knob Sets the input gain of the corresponding HA when you use any input port as a talkback input INPUT TO TALKBACK SILK Adjusts the corresponding SILK setting when you use any input port as a talkback inp...

Страница 156: ...e input level of the mic connected to the TALKBACK jack Turn phantom power on or off and set the phase to normal or reverse as required by the connected mic 4 If you want to use an input jack other than the TALKBACK jack as supplementary input for talkback follow the steps below 4 1 Press the INPUT TO TALKBACK patch button to open the INPUT PATCH popup window 4 2 Press the button for the input tha...

Страница 157: ...SE button to close the popup window 9 Repeat steps 6 8 to assign the buses to other DEFINE buttons as needed 10 Select a DEFINE that you want to use for talkback using DEFINE buttons in the TALK GROUPS field on the MONITOR screen or in the TALK GROUPS field in the TALKBACK SETTINGS popup window 11 To enable talkback press the TALKBACK ON button to turn it on The TALKBACK ON button will alternately...

Страница 158: ...t jack PHONES LEVEL LINK Headphone Level Link function You can adjust the level of the signal sent to the PHONE output jack using the MONITOR LEVEL knob Using PHONES 1 Press the MONITOR button on the menu bar to access the MONITOR screen 1 PHONES popup display buttons Indicate the PHONES POINT assigned to PHONES A and PHONES B respectively Press these buttons to access the PHONES popup window in w...

Страница 159: ...l not be monitored 4 INSERT button Indicates the mount status of the currently selected rack If nothing is selected the button will indicate BLANK Press this button to display the window in which you can set the insert for the PHONES signal 5 INSERT ON button Switches the insert on or off 6 PHONES LEVEL LINK button If this is on the MONITOR FADER LEVEL knob will adjust the level of signals sent to...

Страница 160: ...igned to RTA A and RTA B If CUE OVERRIDE is on these buttons will indicate the name of cues set by CUE OVERRIDE Press these buttons to access the RTA popup window in which you can make detailed RTA settings 2 Press the RTA popup button to access the RTA popup window RTA popup window 1 Frequency response graph The frequency response graph indicates the result of frequency analysis by 1 12 octave ba...

Страница 161: ...ndow in which you clicked the EQ graph will display the response graph HPF EQ popup window 1ch GEQ popup window PEQ popup window Using the HPF EQ popup window for the channel parameters 1 Press the EQ graph field on the SELECTED CHANNEL VIEW screen or press the EQ field on the OVERVIEW screen to open the HPF EQ popup window HPF EQ popup window 1ch 1 RTA button If this button is on a semi opaque fr...

Страница 162: ...add rate of decay to the analyzed frequency response graph FAST SLOW switch button Switches the decay rate of graph rendering FAST SLOW Using the PEQ popup window for the inserted PEQ 1 Press the rack container of the rack which contains an inserted PEQ to open the PEQ popup window PEQ popup window 1 RTA button If this button is on a semi opaque frequency analysis graph of the input signal immedia...

Страница 163: ...ing point of the channel NOTE To switch the metering point use the METERING POINT field page 165 To display the meter area press the meter icon button located on the right end of the menu bar to open the meter menu in which you can select INPUT meter OUTPUT meter or IN OUT meter Input meter This screen shows the meters for all input channels Stereo A B and Cue A B simultaneously Output meter This ...

Страница 164: ...route at which the level is detected INPUT OUTPUT DCA tabs Use these tabs to select the INPUT METER screen OUTPUT METER screen or the DCA METER screen FULL SCREEN METER INPUT screen This screen shows the meters and faders for all input channels FULL SCREEN METER OUTPUT screen This screen shows the meters for all output channels Stereo A B CUE A B and MONITOR A B simultaneously FULL SCREEN METER DC...

Страница 165: ...ponding fader will be grayed out 8 ISOLATE indicator Indicates the Isolate mode status with a red frame NOTE Press any part of the meter area to recall the corresponding fader layer to the panel METERING POINT field You can select one of the following options as the metering point at which the level will be detected The metering point for the level meter can be specified independently for input ch...

Страница 166: ...N knob Sets the analog gain for the head amp 2 48V key Switches phantom power 48V on or off 3 SILK TEXTURE knob Adjusts the intensity of SILK processing 4 SILK ON key Switches SILK on or off SILK processing can be applied only to specific channels to bring the corresponding parts to life within the mix or to all channels to add depth and perspective to the mix overall 5 SILK BLUE RED key Toggles b...

Страница 167: ...mpensation is on an indicator shows the analog gain position at the time that gain compensation was turned on 5 HA meter Displays the level PRE GC of the HA input signal 6 SILK ON button Switches Silk on or off 7 BLUE RED switch button Toggles between BLUE and RED BLUE for solidity and power and RED for sparkling energy 8 SILK TEXTURE knob Adjusts the TEXTURE parameter of Silk 9 GC GAIN COMPENSATI...

Страница 168: ...ol surface HA settings can also be made in the SYSTEM CONFIG parameter settings screen page 111 5 Edit the SILK settings as needed NOTE SILK settings can also be made in the SYSTEM CONFIG parameter settings screen page 111 6 Perform the same operations for other input channels as desired If you are viewing the GAIN SILK popup window you can also use the SEL keys to switch the channel for editing 7...

Страница 169: ...analog gain while gain compensation is still on gain compensation operates to boost the signal on the TWINLANe network by the same amount so the signal will still be distorted EQ The RIVAGE PM10 features a full parametric channel EQ 4 band for input and 8 band for output It includes the following features EQ can be used on all input channels and all output channels High low pass filters are indepe...

Страница 170: ...or each band in the Selected Channel section to set the Q center frequency and gain for each band NOTE Pressing the Q knob and the FREQUENCY knob simultaneously enables you to bypass the corresponding band 4 If you want to restore the EQ of the currently operated channel to a flat state simultaneously press the 1 4 and 5 8 keys in the Selected Channel section When you press these two keys simultan...

Страница 171: ...les you to edit all EQ parameters of the currently selected channel This is convenient if you want to make detailed EQ settings for a specific channel 1 HPF ON OFF button Switches the HPF on or off 2 HPF FREQUENCY knob Indicates the cutoff frequency of the HPF Use the screen encoder to adjust the value 3 HPF type select button Enables you to set the HPF attenuation per octave to 6 dB oct 12 dB oct...

Страница 172: ...annel these meters indicate the level of both the L and R channels LOW SHELVING ON OFF button Turn on this button to switch the LOW band to a shelving type filter HIGH SHELVING ON OFF button Turn on this button to switch the HIGH band to a shelving type filter A BYPASS button Temporarily bypasses the EQ B EQ parameter setting knobs Indicate the Q FREQUENCY and GAIN parameters for the LOW LOW MID H...

Страница 173: ... to select the channel that you want to operate The current channel icon channel number channel name and color appear on the button 2 EQ graph This field graphically indicates the approximate EQ filter response 3 Tabs Use these tabs to select a channel that you want to view on the screen Controlling the EQ via the SELECTED CHANNEL VIEW screen 1 Press the VIEW key to access the SELECTED CHANNEL VIE...

Страница 174: ...ory VCM Virtual Circuitry Modeling technology It emulates the characteristics of compressors and limiters of the mid 1970s which are now a standard for live sound reinforcement This compressor has faithfully modeled the VCA Voltage Controlled Amplifier circuit and the RMS Root Mean Square detection circuit Compression curve Knee can be set to Hard Medium or Soft Attack time and release time are va...

Страница 175: ...ction produced by the dynamics processor 3 Dynamics processor type Indicates the abbreviated name of the currently selected dynamics processor type 4 Threshold The horizontal line indicates the currently specified threshold value and its approximate position in the GR meter 2 Select the channel that you want to edit 3 Press the DYNAMICS 1 2 field to access the DYNAMICS 1 2 popup window In the DYNA...

Страница 176: ...P260 GATE DE ESSER EXPANDER DUCKING 8 A B switch buttons Enable you to switch between A and B as the storing destination for the dynamics parameters 9 Dynamics graph Displays the input output response of the dynamics processors DYNAMICS ON OFF button Switches the dynamics processor on or off Dynamics IN OUT level meters GR meter These meters indicate the peak level of the signals before and after ...

Страница 177: ...y depending on the currently selected dynamics processor type LEGACY COMP COMP206 or EXPANDER GATE or DUCKING DE ESSER DYNAMICS 1 2 popup window CH 1 72 CH 73 144 MIX MTRX ST This window enables you to make settings of the global dynamics parameters for the corresponding channel 1 Channel select buttons Enable you to select the channel that you want to operate The current channel icon number thres...

Страница 178: ...he dynamics processor via the SELECTED CHANNEL VIEW screen 1 Press the VIEW key to access the SELECTED CHANNEL VIEW screen 2 Select the channel that you want to operate 3 Press the DYNAMICS field to access the DYNAMICS 1 2 popup window page 176 4 Use the corresponding screen encoder or the TOUCH AND TURN knob to adjust the EQ parameters Gate status indicator Red Yellow Green Dark On Off status On ...

Страница 179: ...ed Channel section Controlling via the OVERVIEW screen Controlling via the SELECTED CHANNEL VIEW screen Controlling via the Selected Channel section 1 Select the channel that you want to operate 2 Press the INSERT PLUG INS key to access the INSERT screen 1 INSERT 1 2 switch button Switches between INSERT1 and INSERT2 2 INSERT block A D buttons Indicate four plug ins that have been assigned to INSE...

Страница 180: ...s a popup window in which you can select an output port The currently selected port is indicated on the button To insert an external device to a channel via the RPio you must assign the channel to the TWINLANe network 3 INSERT IN patch select popup button Press this button to access a popup window in which you can select an input port The currently selected port is indicated on the button 4 Level ...

Страница 181: ...indow 10 Specify the input port that you want to use as the insert in 11 If necessary make insert settings for other channels in the same way Controlling via the OVERVIEW screen 1 Press the VIEW key to access the OVERVIEW screen 2 Press the INSERT DIRECT OUT field for the channel into which you want to insert The INSERT D OUT popup window appears There are two types of INSERT D OUT popup window 1C...

Страница 182: ...N1 PRE DYN2 PRE FADER POST ON Output Channels PRE FILTER PRE EQ PRE DYNA PRE DELAY PRE FADER POST ON 3 INSERT block A D buttons These buttons represent four plug ins that have been assigned to INSERT1 and INSERT2 respectively Press this button to display the edit screen for the assigned plug in 3 Press the INSERT block button to which you want to assign the external device The MOUNT screen appears...

Страница 183: ...xternal device compressor EQ etc into a channel via on the RPio Only the INSERT 1C for channels 1 36 supports this function 1 Assign the channels that will be used by the DSP engines to the TWINLANe network page 109 2 Specify the input output ports that you want to use as the insert out for INSERT 1C of channels 1 36 TWINLANe Console Network Stage area FOH area ...

Страница 184: ...Each screen contains the following items INSERT D OUT popup window 1CH 1 DIRECT OUT point Enables you to select the signal extraction point as PRE FILTER PRE EQ PRE DYN1 PRE DYN2 PRE FADER POST FADER or POST ON 2 DIRECT OUT LEVEL knob Indicates the output level of the Direct Out You can press this knob and then use the screen encoder or the TOUCH AND TURN knob to adjust the level 3 DIRECT OUT PATC...

Страница 185: ...m input channels to the direct out so that the parameters will follow the FADER ON DCA settings 5 DIRECT OUT LEVEL knob Indicates the output level of the Direct Out You can press this knob and then use the screen encoder or the TOUCH AND TURN knob to adjust the level 2 Press the DIRECT OUT PATCH popup button to access the DIRECT OUT PATCH popup window 3 In the DIRECT OUT PATCH popup window select ...

Страница 186: ...mponent slot number and channel number for the output port The abbreviations displayed in the output component column have the following meaning Mx I O rack x is the UNIT ID number CONSOLE Control surface DSP DSP engine 7 DIRECT OUT ASSIGN assign Indicates the number of channels assigned to each port 8 Grid This grid enables you to patch input channels vertical columns to output ports horizontal l...

Страница 187: ...Using delay There are three ways to set the delay Controlling the delay via the Selected Channel section Controlling the delay via the OVERVIEW screen Controlling the delay via the SELECTED CHANNEL VIEW screen Controlling the delay via the Selected Channel section 1 Use a SEL key to select the channel you want to control 2 Turn on the DELAY ON key in the Selected Channel section 3 Use the DELAY kn...

Страница 188: ...window DELAY popup window 12ch 1 DELAY SCALE popup button Press this button to access the DELAY SCALE popup window page 190 in which you can select the unit for the delay time 2 Channel select buttons Each button will light to indicate that the corresponding channel is selected Press the button to select the channel 3 DELAY ON buttons Switch delay on or off 4 Delay insert point select buttons Enab...

Страница 189: ...MTRX ST This window displays the corresponding input channels or output channels simultaneously It is useful when you want to quickly check the delay setting for multiple channels 1 Channel select buttons Enable you to select the channel that you want to operate The current channel icon number and color appear on the button 2 DELAY ON indicator Indicates the on off status of the delay 3 DELAY TIME...

Страница 190: ...he RIVAGE PM10 system operates the number of samples will change accordingly 4 msec milliseconds The delay time is shown in units of milliseconds 5 FRAME The delay time is shown in units of frames Use the six buttons located below the FRAME button to select the number of frames per second 6 CLOSE button Closes the DELAY SCALE popup window DELAY TIME popup window Using the ENTER NEXT button enables...

Страница 191: ...refer to page 136 SENDS TO SENDS FROM Using SENDS TO By using SENDS TO you can specify the sends to a specific MIX or MATRIX bus for 12 channels at a time 1 Press the VIEW key to access the OVERVIEW screen 2 Use the MIX MATRIX SENDS MIX MATRIX keys to switch the type of send destination bus 3 Use the MIX MATRIX SENDS 1 12 13 24 25 36 37 48 49 60 61 72 keys to select a bank of send destination buse...

Страница 192: ... Switches the send point to PRE or POST for each send source channel If a button is lit the send point is set to PRE 6 SEND ON button Switches send on off for each send source channel 7 FOLLOW setting buttons Enable you to set parameters for signals routed from input channels to the MIX MATRIX bus so that the parameters will follow the FADER ON DCA settings 8 SEND PAN BALANCE knob Adjusts the pan ...

Страница 193: ...acent channels You can use the buttons to switch in steps of 12 channels This indication is linked with the on screen selected channel 2 Bus indication Shows the send destination bus Use the MIX MATRIX keys to switch the send destination selection You can also switch this by holding down the SHIFT key and pressing the meter area display section 3 PRE button Selects either PRE or POST as the send p...

Страница 194: ...d point of the signal that is sent to the MIX or MATRIX bus NOTE You can flexibly select the send point for each channel page 126 The PRE button is not shown for a FIXED type MIX bus Using the Selected Channel section to make send settings You can use the knobs of the Selected Channel section to adjust the send levels MIX MATRIX SEND section 1 MIX MATRIX knobs Adjust the send levels for the corres...

Страница 195: ...nal that is being sent to a specific MIX MATRIX bus recall the corresponding MIX MATRIX channel and press the corresponding CUE key 6 Use the top panel SEL keys to switch channels and adjust the send levels to all MIX MATRIX buses in the same way Using the faders to adjust the sends SENDS ON FADER mode You can use the top panel faders to adjust the signals that are sent from a specific channel to ...

Страница 196: ...eturns to its previous state and the RIVAGE PM10 system exits SENDS ON FADER mode and returns to normal mode NOTE If you press the button in the upper right of the screen SENDS ON FADER mode will be maintained when you close the screen To exit SENDS ON FADER mode perform step 7 Using the Quick data copy function This function enables you to copy desired channel parameters to multiple channels It i...

Страница 197: ...e copy destination 4 REVERT button Revert the copy destination settings to status obtained when the PARAMETER COPY popup window was displayed 5 EXECUTE button Copies the selected parameter and closes the window 6 CANCEL button Aborts the copy operation and closes the window 2 Select the copy destination and then press the EXECUTE button The parameter is copied to the selected channel number To abo...

Страница 198: ... number as the copy destination 3 SELECT ALL button Selects all channels as the copy destination 4 REVERT button Cancels the SELECT ALL button setting 5 EXECUTE button Copies the selected parameter and closes the window 6 CANCEL button Aborts the copy operation and closes the window 2 Select the copy destination and then press the EXECUTE button The parameter is copied to the selected channel numb...

Страница 199: ... STEREO A L R and STEREO B C simultaneously The signals sent to the STEREO A bus and STEREO B bus can be switched on off together The level difference between the signals sent from the input channel or MIX channel to the STEREO A L R bus and to the STEREO B C bus is controlled by the CSR center side ratio knob The level of the signal sent from the input channel or MIX channel to the STEREO A L R b...

Страница 200: ... that adjusts the volume balance of the left right signals sent to the STEREO bus To edit a value press a knob to select it and then use the corresponding screen encoder 6 clipping indicator This indicator lights to indicate that a signal is clipping at some point in the channel NOTE This is also shown for MATRIX channels that do not have a stereo send If the ST LCR mode select button is set to LC...

Страница 201: ...ate and then raise the fader to an appropriate position 5 Press the top panel TO ST A B key to turn it on 6 In the channel strip section of the top panel verify that the ON key is turned on for the STEREO channel that you want to operate and then raise the fader to an appropriate position SIGNAL FLOW A signal flow window enables you to view the entire signal flow of a single channel You can also s...

Страница 202: ...fter the EQ DYN OUT immediately after the dynamics DELAY OUT immediately after the delay FADER OUT immediately after the fader ON OUT immediately after the channel ON NOTE If PEAK HOLD is on the flow indication will stay red if clipping occurs even once making it easier for you to recognize that clipping has occurred 3 DELAY POINT select buttons input channels only Enable you to select the delay i...

Страница 203: ...e DCA fader is set to 0 dB All channels assigned to a DCA can be temporarily recalled rolled out on the panel and controlled individually DCA ROLL OUT Assigning channels to a DCA There are two ways to assign a channel to a DCA You can select a specific DCA first and then specify the channels to be assigned to the group or You can select specific channel and then specify a DCA to which it should be...

Страница 204: ...n channels 3 Press the DCA assign popup field to open the DCA ASSIGN popup window DCA ASSIGN popup window 1 Switching tabs Enable you to switch between the input channel page and output channel page 2 Channel select buttons Enable you to select the channels that will be assigned to a DCA 3 SET BY SEL button If this button is on you will be able to select a channel by using the corresponding SEL ke...

Страница 205: ... to select the 1CH ALL DCA or ALL MUTE window 2 Channel select buttons Indicates the currently selected channel Press the button to select the next channel Press the button to select the previous channel 3 DCA ASSIGN buttons Press a button to assign the selected channel to the corresponding DCA 2 Use the channel select buttons to select the channel that is assigned to a DCA 3 Press a DCA ASSIGN bu...

Страница 206: ...A When you press the CUE key to make the key indicator light the CUE keys for the channels assigned to that DCA will blink and cue monitoring will be enabled For more information about cue refer to Using the Cue function page 144 NOTE You can also press the DCA DCA 1 8 or DCA 9 16 key in the Channel Strip section to select the DCA that you want to control Viewing the list of DCA status on the OVER...

Страница 207: ...ROLL OUT setting in PREFERENCES 3 To exit from ROLL OUT mode select a different bank press the HOME key or press the SEL key again for the same DCA NOTE You cannot turn Roll out mode on while operating a DCA for example while assigning channels or editing the group name If the number of channels assigned to a DCA exceeds the number of faders in the block that is a roll out target you will be unabl...

Страница 208: ...Selecting the channels that will belong to a specific mute group 1 Press the CH JOB button on the menu bar and then select MUTE ASSIGN The DCA MUTE ASSIGN window ALL MUTE tab opens DCA MUTE ASSIGN window ALL MUTE 1 MUTE group and MUTE SAFE buttons Enable you to select a mute group or Mute Safe to which you want to assign channels 2 NAME EDIT button Press this button to access a keyboard window in ...

Страница 209: ...EL keys of the assigned channels will light and the corresponding channels will be highlighted in red in the mute group assign indication field To cancel an assignment press a lit SEL key once again to make it go dark 4 Assign channels to other mute groups in the same way NOTE You may assign a single channel to more than one mute group 5 When you finish assigning the channels press the CLOSE butto...

Страница 210: ... select the previous channel 3 MUTE ASSIGN buttons Press a button to assign the selected channel to the corresponding mute group 2 Use the channel select buttons to select the channel you want to assign to the group 3 Press a DCA ASSIGN button s to select the mute group s to which the currently selected channel will be assigned multiple selections are allowed 4 Select the mute group s for other ch...

Страница 211: ... PRE POST and FOLLOW settings for signals sent to MIX buses On off level PRE POST and FOLLOW settings for signals sent to MATRIX buses TO STEREO settings DCA MUTE ASSIGN settings Fader operations ON key operations Output channels Insert on off and insert point settings Direct out on off level point and FOLLOW settings HPF settings LPF settings PEQ settings Dynamics settings Delay settings On off l...

Страница 212: ...ed 1 Press the CH JOB button on the menu bar and then select CH COPY The CH COPY popup window will appear CH COPY popup window 1 FROM button This button is highlighted when the CH COPY popup window opens Press this button if you want to select a different copy source channel 2 TO button Enables you to select the copy destination 3 PASTE button After specifying the copy source and destination chann...

Страница 213: ...s for the copy destination channel s will be highlighted in pink 4 To execute the copy operation press the PASTE button The copy operation will be executed and the parameter settings will overwrite those of the copy destination s 5 To close the CH COPY popup window press the CLOSE button Initializing channel parameters You can restore the parameters of a channel to an initialized state This operat...

Страница 214: ...you want to restore parameters to their initial values 4 SET BY SEL button If this button is on you will be able to select a channel by using the corresponding SEL key 5 CLOSE button Press this button to close the popup window and return to the previous screen 2 Select the channel s that you want to initialize multiple selections are allowed The corresponding channel will be highlighted 3 To execu...

Страница 215: ...re valid in both the boost and cut directions or 24 dB valid only in the cut direction If you are using a stereo source you can link the two GEQ units About using a parametric EQ PEQ 8BandPEQ This is a monaural 8 band PEQ It also features four notch filters The PEQ features a 1 12 oct 121 band Real Time Analyzer also called spectrum analyzer NOTE Notch filters 1 4 are independent of the PEQ and th...

Страница 216: ...UCH AND TURN knob to select a page to view Inserting a GEQ PEQ into a channel This section explains how to insert a GEQ PEQ into the selected channel for use There are three ways to control the GEQ PEQ Controlling a GEQ PEQ via the Selected Channel section Controlling a GEQ PEQ via the OVERVIEW screen Controlling a GEQ PEQ via the SELECTED CHANNEL VIEW screen Controlling a GEQ PEQ via the Selected...

Страница 217: ...to INSERT1 and INSERT2 respectively Press this button to display the edit screen for the assigned plug in 3 MOUNT popup button Press this button to display the Mount popup window 3 Use the INSERT 1 2 switch buttons and INSERT A D buttons to select an insert channel and block for which you want to assign the GEQ PEQ 4 Press the MOUNT popup button to access the MOUNT popup window 5 Press the GEQ PEQ...

Страница 218: ...ndow and closes the window 6 Use the MODULE SELECT buttons to select the item you want to insert and then press the OK button The GEQ_ASSIGNMENT popup window will appear This screen contains the following items 1 GEQ PEQ allocation field Indicates the GEQ PEQ allocation status You can view 48 available DSP resources at a glance A location to which you can allocate GEQ PEQ is indicated in a pink fr...

Страница 219: ...e channel into which you want to insert the GEQ PEQ The INSERT D OUT popup window 1CH will appear 1 INSERT block A D buttons Indicate four plug ins that have been assigned to INSERT1 and INSERT2 respectively Press this button to display the edit screen for the assigned plug in 3 Press the INSERT block button to which you want to assign the GEQ PEQ to access the INSERT screen 4 Follow steps 4 8 on ...

Страница 220: ...ing a GEQ PEQ into a channel page 216 insert the 31BandGEQ into a channel The system displays the EDIT screen for the GEQ PEQ that you inserted 1 MOUNT GEQ PEQ popup button Press this button to access the MOUNT GEQ PEQ popup window 2 EQ graph Indicates the approximate current response of the 31BandGEQ 3 GEQ LINK button Press this button to access the GEQ LINK window in which you can link the GEQ o...

Страница 221: ...LIMIT select buttons Enable you to select the range of gain adjustment from the following options 15 dB 12 dB 6 dB these are valid in both the boost and cut directions or 24 dB valid only in the cut direction LIBRARY button Press this button to open the GEQ library window DEFAULT button Press this button to restore the default parameter setting COPY button Copies the selected GEQ settings to buffe...

Страница 222: ...nds you had previously been controlling will automatically be assigned to the faders 7 When you finish making settings turn off the buttons in the FADER ASSIGN field The faders and ON keys in the Channel Strip section will return to their previous function NOTE When you close the GEQ popup window the buttons in the FADER ASSIGN field automatically turn off Using the Flex15GEQ You can use faders 1 ...

Страница 223: ...s NOTE If you switch the touch screen display to a different screen or to the GEQ window the fader assignments in the Channel Strip section will forcibly be defeated However if you once again display the same GEQ the group of bands you had previously been controlling will automatically be assigned to the faders 6 When you finish making settings turn off the buttons in the FADER ASSIGN field The fa...

Страница 224: ...e peak level of signals before and after the EQ For a stereo channel these meters indicate the level of both the L and R channels LOW SHELVING ON OFF button Turn on this button to switch the LOW band to a shelving type filter HIGH SHELVING ON OFF button Turn on this button to switch the HIGH band to a shelving type filter BYPASS button Enables you to bypass bands independently EQ parameter setting...

Страница 225: ...gineer can maintain consistent system gain throughout multiple microphones without having to focus on the operation of multiple faders Theory of Automixer operation Automixer employs the Dugan Speech System which automatically adjusts the automix gain of up to 64 live speech microphones The behavior of the Dugan Speech System is different than that of a limiter or auto level controller function Th...

Страница 226: ... each microphone and inputs even signal levels resulting in more accurate automix gain distribution It achieves preferential distribution of automix gain for the speaker you want to emphasize by raising the fader for that speaker or lowering others Inserting Automixer into a channel 1 Press the RACK REC button on the menu bar to access the RACK REC screen This window includes several pages which y...

Страница 227: ...e the GEQ PEQ Automixer select buttons to select the item you want to mount and then press the OK button The GEQ RACK screen will appear 1 INPUT popup buttons Press these buttons to access the INPUT PATCH popup window in which you can select a signal to patch to the channel 2 OUTPUT popup buttons Press these buttons to access the OUTPUT PATCH popup window in which you can select a signal to patch ...

Страница 228: ...st useful choice during normal operation 5 reset button Initializes the Automixer settings Channel control field Each channel is always in man auto or mute mode The indicators for the engaged channel mode will light up To select a mode press the corresponding mode button or the PRESET button in the master field 3 weight The weight controls balance relative sensitivity of the input channels Balance...

Страница 229: ...ride button status While the channels override buttons are on turning on the OVERRIDE button in the master field will place the corresponding channels into man ual mode While the channels override buttons are off turning on the OVERRIDE button in the master field will place the corresponding channels into mute mode Turn off the Master OVERRIDE button to restore the previous channel mode The Overri...

Страница 230: ... of slots currently in use 2 Max mountable size XX The maximum number of slots in which plug ins can be mounted NOTE Depending on the mounted state the Max mountable size XX may be less than the remaining number of slots The number of slots used by plug ins is shown on the plug in select button DSP resource management for plug ins Plug ins and GEQ PEQ each feature their dedicated DSP resources DSP...

Страница 231: ...on to display the RACK MOUNT popup window in which you can select a plug in to mount 5 OUTPUT popup buttons L R Press these buttons to access the OUTPUT PATCH popup window in which you can select a signal to patch to the L R channel 6 COPY button Use this button to copy the currently selected plug in when you want to mount a single plug in in multiple locations 7 PASTE button Use this button to pa...

Страница 232: ...ress the MOUNT popup button The RACK MOUNT popup window appears NOTE The RACK MOUNT popup window is displayed on only one of the bays This screen contains the following items 1 Category select tabs Enable you to select the category of plug in that will be mounted in the rack 2 BLANK button Unmounts the plug in from the rack NOTE If you open this window by pressing the MOUNT button on the PLUG IN R...

Страница 233: ...tton to allocate the plug in If you decide to cancel the operation press the CANCEL button instead of the OK button The mounted plug in is displayed This screen contains the following items 1 Plug in allocation number Indicates the locations of plug ins expressed by the row name a x and the column number 2 SAFE button L R Switches Recall Safe on off for the rack 3 INPUT popup buttons L R Press the...

Страница 234: ...er memory you will be unable to paste it 9 COMPARE button Press this button to switch between the current plug in settings and data in buffer memory If valid data has not been copied into buffer memory you will be unable to compare the data Parameter field Shows the parameters of the currently selected plug in Screen encoder access field Shows the name and value of the parameters that are assigned...

Страница 235: ...s to suit the acoustic sound field and your intentions REV X Hall REV X Room and REV X Plate 1 EFFECT TYPE Enables you to select an effect type 2 Reverb Time Duration of time until the reverberation attenuates and stops Higher values extend the reverberation 3 Initial Delay Duration of time between sound input and the start of reverberation Higher values delay the start of reverberation KEY IN but...

Страница 236: ...Low Freq Frequency value that serves as the basis for the Lo Ratio value The frequency band below this value is affected by the Lo Ratio parameter setting Filter frequency response curve The curve changes depending on the HPF and LPF values Reverberation images These images represent the high range 10kHz mid range 1kHz and low range 100Hz reverberation These images change shape depending on the pa...

Страница 237: ...dth of the reverb tail 7 Decrease button Adjusts the number of reflections for the early reflections 8 Lo Color button Adjusts the low frequency range of the early reflections 9 Early Start button Adjusts the first early reflections to eliminate them Hi Color button Adjusts the high frequency range of the early reflections Early Stop button Adjusts the end of the early reflections to reduce them L...

Страница 238: ...cut frequency 2 Lo Damp button Adjusts the low cut amount in dB units 3 Hi Soften button Adjusts the high frequency range of the reverb tail 4 Lo Decay button Adjusts the multiple of decay for the frequency range below Lo Xover 5 Lo Mid Decay button Adjusts the multiple of decay for the low mid frequency range 6 Hi Mid Decay button Adjusts the multiple of decay for the middle frequency range 7 Hi ...

Страница 239: ...e button Selects the type of modulation Modulation Rate button Selects the rate of modulation Modulation Depth button Selects the depth of modulation Dry Level button Adjusts the level of the dry signal at the output stage NonLin2 NonLin2 is a processor that emulates an effect reverb made by TC Electronic that enables the user to adjust an envelope It provides vocal ambience drum sound reverse rev...

Страница 240: ...plications It delivers the same deep organic echo sound that was a characteristic of the BBD analog delay devices used in the original E1010 Modulation can be added for a thick chorus sound And taking versatility to the next level it is possible to select BBD sounds that were not available in the original E1010 so you have characters ranging from clear and precise to warm 1 Drive meter Indicates a...

Страница 241: ...ELAY knob Adjusts the delay time 9 FEEDBACK knob Adjusts the feedback amount of the delay signal FREQUENCY knob Adjusts the frequency of modulation DEPTH knob Adjusts the depth of modulation MIX knob Adjusts the mix balance between dry and delay sounds Max100 Max100 reproduces a classic phaser that appeared in the second half of the 1970s and continues to be popular today With just four modes and ...

Страница 242: ...b Adjusts the feedback amount of Phaser B SWEEP LFO1 LFO2 switch Selects the Phaser B LFO SWEEP NORM REV switch Selects the LFO phase of Phaser B NORM is normal phase and REV is reverse phase PHASER B ON OFF switch Switches Phaser B on off MODE knob Rearranges the two phasers I After mixing the stereo input the sound processed by Phaser A is output from the L channel and the sound processed by Pha...

Страница 243: ...or settings for detailed control of the sound 1 SPEED knob Adjusts the modulation speed 2 MANUAL knob Adjusts the center frequency of modulation 3 DEPTH knob Adjusts the depth of modulation 4 FEEDBACK knob Adjusts the feedback amount 5 COLOR knob Makes fine adjustments to the tone 6MODE and 7STAGE are valid only in the following combinations 6 MODE switch Switches the type of circuit structure tha...

Страница 244: ...d algorithm 2 PROGRAM SELECT list button Switches the preset If you switch the preset the internal algorithm and parameters will change accordingly 3 Level meters Indicate the input and output levels The OVER indicator will light up if the output level exceeds 0 dB 4 Value enter buttons Use this numeric pad to enter a value for the parameter selected by the PARAMETERS buttons Press the numeric and...

Страница 245: ...hen the HPF is turned on the sound becomes solid yet without impairing the presence of that region allowing you to control the tone while preserving the musical balance Also the EQ precisely emulates the input and output circuits that make lavish use of audio transformers and discrete class A amps which are the signature of Rupert Neve Simply passing the signal through these circuits enhances the ...

Страница 246: ...justs the gain of the LF band low shelving 4 LMF IN button Switches the LMF band peaking on off 5 LMF x3 button Triples the center frequency value of the LMF band peaking 6 LMF FREQ knob Adjusts the center frequency of the LMF band peaking 7 LMF GAIN knob Adjusts the gain of the LMF band peaking 8 LMF Q knob Adjusts the Q steepness of the LMF band peaking 9 HF IN button Switches the HF band high s...

Страница 247: ...acteristics The input output transformers designed by Rupert Neve himself are also modeled using VCM technology giving this model a highly musical sound even when in the bypassed state The unique properties of this EQ are such that reducing the low frequency region tightens it and boosting the high frequency region will raise the desired frequency band without fatiguing the ear 1 ALL BYPASS button...

Страница 248: ...is model its unique character The input output circuit and vacuum tubes also give the sound an extremely musical character producing a well balanced sound 1 IN switch Switches the processor on off If this is off the filter section is bypassed but the signal passes through the input output transformer and amp circuit 2 LOW FREQUENCY knob Adjusts the frequency of the low range filter 3 LOW BOOST kno...

Страница 249: ...alog circuit 1 Frequency response curve graph Shows the frequency response curve of all bands combined and the frequency response curve of each band You can change the filter frequency or gain by dragging the line in the graph using the mouse 2 buttons Zoom in or out the vertical axis of the graph display 3 TYPE switch Selects one of two equalizer types with different effects DRIVE emulates the ch...

Страница 250: ...g the EQ gain to be varied dynamically when a specific band of the input signal becomes louder or softer so that EQ is applied just as you might apply a compressor or expander to a specific frequency band For example by using this on a vocal as a de esser you can apply EQ to only that specific band when sibilants and high frequency scratchy sounds reach an obtrusive level obtaining a natural sound...

Страница 251: ... Enable you to select one of three settings for the attack time and release time at which compression or boost is applied FAST produces a fast attack and fast release SLOW produces a fast attack and slow release and AUTO automatically adjusts the attack and release according to the frequency region MODE buttons Specify whether processing operates when the sidechain signal exceeds the threshold val...

Страница 252: ...vel 7 KEY IN source buttons Select main INT or external EXT as the source for the KEY IN signal used for the corresponding band 8 KEY IN CUE button If this button is on the sidechain signal is sent to the CUE bus for monitoring In this case the graph shows the response of the sidechain filter 9 RATIO knob Specifies the ratio of boost cut for the input signal Turning this toward the right applies b...

Страница 253: ...l of this knob so that the volume remains the same as the pass through volume the volume when COMP IN and LIMIT IN are off For example if INPUT ADJUST is 5 dB the input gain is 5 dB and the output gain is 5 dB INPUT ADJUST can be used in the following ways If the input signal level to the effect is too low to reach the threshold you can raise the input gain You can change the input level to the in...

Страница 254: ...remely broad range of tone shaping possibilities and letting you create nearly any sound The compression is transparent and smooth sounding and can be used on any source in any situation By using VCM technology this compressor models a circuit with a further evolved audio transformer by Rupert Neve A shiny colorful and well defined sound can be obtained simply by routing the signal through this pr...

Страница 255: ...ween the FF Feed Forward circuit gain reduction that is currently mainstream and the FB Feed Back circuit used on vintage compressors letting you create differing characters of sound as needed 1 IN button Switches compressor bypass on off When bypassed the button is unlit However even in the bypassed state the signal passes through the input output transformer and amp circuit 2 INPUT meter Shows t...

Страница 256: ...ssor that has been used in recording studios and broadcasting stations since the 1980s It produces smooth natural compression that does not interfere with source signal nuances in contrast with the aggressive compression of the U76 Buss Comp 369 includes a compressor and a limiter that you can use individually or in combination The rich overtones generated by the audio input and output transformer...

Страница 257: ...ecifies the compressor ratio 8 METER SELECT switch for Stereo mount Selects the signal source of the meter You can select from IN input level GR gain reduction OUT output level If you change this selection the meter design also changes to VU GR or VU respectively 9 VU SELECT switch for Dual mount Selects the signal source for the VU meter You can select either the input level or output level LIMIT...

Страница 258: ... the knob all the way to the right produces the fastest attack time 3 RELEASE knob Adjusts the release time of the compressor Turning the knob all the way to the right produces the fastest release time 4 RATIO switching buttons Use these five buttons to set the compression ratio Buttons with higher numbers produce a higher compression ratio Pressing the ALL button selects All mode which not only r...

Страница 259: ...ttings the output signal level reference is considered as 18 dB and a value of 10 dB or 4 dB relative to that reference is shown as 0 VU Comp276 Comp276 emulates the characteristics of a sought after analog compressor commonly used in recording studios It produces a thick and solid sound that is suitable for drums or bass 1 INPUT knob Adjusts the input level 2 RATIO knob Adjusts the ratio of the c...

Страница 260: ...ve been built into the gain reduction circuitry of the MBC4 allowing smooth control of dynamics while retaining the overall image of the original sound The sound image can also be visually manipulated via a graphical display 1 GAIN LINE This red horizontal line indicates the GAIN parameter values for the corresponding band 2 MAXIMUM GR GUIDELINE This orange horizontal line indicates a guideline fo...

Страница 261: ... the level of the input signal One meter is shown in the case of DUAL and two meters in the case of STEREO 9 OUTPUT meter Shows the level of the output signal One meter is shown in the case of DUAL and two meters in the case of STEREO 1 GAIN Adjusts the output gain for the corresponding band 2 THRESHOLD Adjusts the level at which the compressor begins to apply for the corresponding band The value ...

Страница 262: ...ing band Even if this button is off you will be able to adjust the corresponding band parameters FLAVOUR button Switches the type of the compressor between VCA accurate effects and OPTO natural effects HARMONICS button Switches on off musical harmonics that emulate analog circuitry OpenDeck OpenDeck emulates the tape compression created by two open reel tape recorders a recording deck and a reprod...

Страница 263: ...RECORD REPRO switch Enables you to select RECORD input to the recording deck or REPRO output from the reproduction deck as the signals to be monitored via the level and VU meters Level meter Shows the effect level of the monitoring signals selected via the RECORD REPRO switch VU meters The VU meters of the deck selected via the RECORD REPRO switch are displayed here The number of VU meters varies ...

Страница 264: ...effects the delay time will change according to the tempo For modulation type effects the frequency of the modulation signal will change according to the tempo Parameters related to tempo synchronization The following five parameters are related to tempo synchronization 1 SYNC 2 NOTE 3 TEMPO 4 DELAY 5 FREQ SYNC This is the on off switch for tempo synchronization NOTE and TEMPO These are the basic ...

Страница 265: ... TEMPO parameter can be shared by multiple effects You cannot store it to or recall it from the Plug in Library You can store it to and recall it from a scene This means that the TEMPO value may not necessarily be the same when an effect is recalled as when that effect was stored Here is an example Store the effect TEMPO 120 Change TEMPO to 60 TEMPO 60 Recall the effect TEMPO 60 Normally when you ...

Страница 266: ...n sampling rates between the system and the recording playback files If the system s sampling rate is the same as that of the recording playback files the SRC will automatically be bypassed The RIVAGE PM10 system supports WAV uncompressed PCM and MP3 MPEG 1 Audio Layer 3 file formats for recording and playback Supported recording format WAV files Bit depth 16 bit 24 bit Sampling rate 44 1 kHz 48 k...

Страница 267: ...n which you can select signals that will be patched to the recorder s L R input channels 2 RECORDER INPUT GAIN knob Sets the level of the signal input to the recorder 3 RECORDER INPUT CUE buttons If CUE A or CUE B is on you will be able to audition the signal input to the recorder NOTE You cannot turn on any of these buttons and the PLAYBACK OUT CUE button simultaneously 4 RECORDER INPUT meter Ind...

Страница 268: ...USB memory recorder always records and plays back in stereo If you want to record in monaural with the same signal for left and right you must assign both of the recorder inputs to the same channel 7 To assign channels to the recorder s playback output press the PLAYBACK OUT popup button L or R to open the OUTPUT PATCH popup window 1 Category list Enables you to select the channel category 2 Chann...

Страница 269: ...layback 4 Current song format Indicates the file format and bit rate of the current song the file being played back 5 REC FORMAT RATE popup button Enables you to select the recording file format and recording rate 6 REW button Moves the playback point to the beginning of the current song If the playback point is already at the beginning the point will move to the beginning of the preceding song th...

Страница 270: ...he order of the list and then playback will stop 3 Connect a USB flash drive with sufficient free capacity to the RECORDING connector The FREE SIZE field indicates the amount of free capacity When you connect a USB flash drive to the RECORDING connector a YPE folder and a SONGS folder within that YPE folder will be created automatically in the root directory of the USB flash drive The files create...

Страница 271: ...t a recorded audio file and then press the PLAY PAUSE button The recorded content will be played back via the input channel you specified in step 4 You can also turn on the CUE button in the PLAYBACK OUT field to audition it 10 2 To stop playback press the STOP button Playing back audio files from a USB flash drive You can play back audio files that have been saved on a USB flash drive In addition...

Страница 272: ...isplay switch buttons Toggles between the SONG TITLE display and the FILE NAME display in the list SAVE LIST button Saves the order of the current title list and PLAY check symbol settings as a playlist RELOAD button Loads the playlist that was saved most recently Use this button to revert the current playlist you are editing back to the previous state 4 You can use the change directory button on ...

Страница 273: ...you can change the order of the audio files shown in the title list and edit the titles or artist names 1 Connect a USB flash drive containing audio files to the RECORDING connector 2 Press the RACK REC button on the menu bar to access the RACK REC USB RECORDER tab screen 1 SONG TITLE FILE NAME EDIT button Enables you to edit the title or file name of the song selected in the list 2 ARTIST EDIT bu...

Страница 274: ...zontally 6 Press the OK button to close the popup window 7 If necessary use the SONG TITLE FILE NAME SORT button ARTIST SORT button and MOVE UP MOVE DOWN buttons on screen to change the order of the title list Use the following buttons to change the order of the title list SONG TITLE FILE NAME SORT button Press this button to sort the title list in numerical alphabetical order by title file name P...

Страница 275: ...n recorded using the DAW software on your computer Virtual sound check Materials that were recorded by multitrack recording can be used for virtual sound check For example you can record a rehearsal session the day before the concert and use that recording for sound check on the day of the concert This virtual sound check will reduce the burden on both musicians and sound engineers and will help t...

Страница 276: ...ECORDING slot 3 Grid This grid lets you patch output jacks horizontal lines to channels vertical columns Currently patched grids are indicated by white squares Press or click a desired grid to set or disable the patch 4 ALL button All channels will be subject to or excluded from the virtual sound check simultaneously If any one channel is turned off this button will indicate 5 Check buttons Enable...

Страница 277: ...t HY slot 4 on the DSP R10 If the RPio622 or RPio222 signal is split out you do not need to configure the patches The signals will be output to the Dante network directly from the HY144 D card inserted in HY slot 2 of the RPio622 Configuring Dante Accelerator or Dante Virtual Soundcard Configure the Dante network and the computer Setting up Dante patches Use Dante Controller to configure Dante pat...

Страница 278: ...rmation on ASIO settings Windows Configuring Dante Controller Connect the network port of the computer to a GbE compatible network switch Configure the computer to obtain an IP address automatically this is the default setting You must make the following settings for Dante Controller For multitrack recording Patch audio signals from the I O rack to the DVS or Dante Accelerator card for multitrack ...

Страница 279: ...record and play back audio For multitrack recording set the input ports for tracks in DAW software to the ports that receive audio signals from the I O rack For a virtual sound check you must route recorded audio signals to the input channels on the RIVAGE PM10 system To do so use Dante Controller to patch the signals so that the signals will be output from the DAW software to the RIVAGE PM10 syst...

Страница 280: ...ain scene You can also create sub scenes without the main scene For example you can create sub scene 1 01 without main scene 1 00 Up to 1 000 scenes combining main and sub scenes can be stored in one project For information on the parameters that are included in one scene refer to Part 1 of the RIVAGE PM10 Operation Manual Storing updating and recalling scenes To store the current mix data as a sc...

Страница 281: ...his field to select it and enter a comment for the scene You can use this as a memorandum for each scene maximum 128 characters 4 STORE WITH OVERLAY APPLIED button If you press this button while Overlay is enabled a dialog box will appear enabling you to store scene data including all currently applied Overlay offset values Caution While Overlay is enabled if you recall a scene that was previously...

Страница 282: ... current scene number and the already existing number will be suggested Examples of automatically suggested scene numbers The same name as the current scene will be suggested Updating a scene You can update scene data by overwriting the last recalled scene with the current mix data 1 Press the SCENE MEMORY UPDATE key A dialog box will ask you to confirm the update operation 2 To execute the update...

Страница 283: ...ect symbol 5 E symbol EDIT symbol This symbol will appear when you edit the mix parameters for the currently loaded scene This symbol indicates that you must execute the store operation if you want to keep the changes you made NOTE If you press and hold down either of the SCENE MEMORY INC DEC keys the scene number will count up or down continuously If you press and hold down either of the SCENE ME...

Страница 284: ...e direction ascending or descending order in which the list is sorted 3 Scene number Indicates the current scene number The scene number in a larger font indicates the current scene 4 Scene title popup button Indicates the title assigned to the scene Press this button to access the SCENE STORE popup window in which you can edit the title 5 Protect lock symbol Indicates the write protect on off sta...

Страница 285: ... and use the SCENE MEMORY INC DEC keys A yellow scene number indicates that the scene number has already been used A red scene number indicates that the scene number has already been used and protected 5 Assign a title or comment to the scene as desired 6 Press the OK button located at the bottom of the SCENE STORE window A dialog box will ask you to confirm the store operation 7 To execute the st...

Страница 286: ...press the RECALL UNDO button A dialog box will ask you to confirm the undo operation Press the OK button if you want to execute the operation After undoing the recall you can press the RECALL UNDO button once again to Redo re execute NOTE You can also use MIDI messages Program Changes to recall scenes page 337 Using USER DEFINED keys to recall a scene Direct Recall function You can use the USER DE...

Страница 287: ...ual 2 Press the USER DEFINED KEYS button to access the USER DEFINED KEYS popup window The USER DEFINED KEYS page enables you to assign functions to USER DEFINED keys 1 12 3 Press the popup button for the USER DEFINED key to which you want to assign a function to open the popup window ...

Страница 288: ...ally pasted with added offset values both the current offset values and the original offset values will be applied to the scene thus doubling the offset value In this case extremely high volume sound may be output Confirm the status of a scene to recall and the on off status of Overlay before recalling the scene Editing scene memories This section explains how to sort the scenes stored in scene me...

Страница 289: ...content that will be saved by the next scene store operation You can edit the comment data for the current scene memory 3 To select a scene number rotate the CH1 screen encoder or the TOUCH AND TURN knob on the top panel The highlighted line in the scene list indicates that the corresponding scene is currently selected for operations 4 To sort the list press one of the column headers No TITLE COMM...

Страница 290: ...rations 2 Perform the desired editing operation For more information about these operations refer to the explanations below Deleting a scene DELETE This section explains how to delete a scene 1 Press the SCENE field on the menu bar The SCENE LIST screen will appear 2 Rotate the CH1 screen encoder to select the scene you want to delete and then press the DELETE button A dialog box will ask you to c...

Страница 291: ...e duplicate operation press the OK button The source scene will be duplicated and saved to the scene numbers specified in step 3 If you decide to cancel the duplicate operation press the CANCEL button instead of the OK button Modifying the scene number and title RENAME This section explains how to modify the scene number and title 1 Press the SCENE field on the menu bar The SCENE LIST screen will ...

Страница 292: ...function for each scene 2 SET popup button Press this button to access the SCENE SETUP FOCUS popup window which enables you to select the parameters that you want to recall 3 Focus parameter display section These indicators show the Focus settings that are specified for each scene green all parameters blue selected parameters 4 CURRENT SETTING field Enables you to specify the content that will be ...

Страница 293: ...el display and then scroll through the category select list channel 1 5 If you want to apply the Focus function only to specific parameters use the parameter buttons 9 to select those parameters multiple selections are allowed If you want to apply the Focus function to all parameters turn on the ALL ON button 6 6 Turn on the channel Focus ON button 5 for the channels to which you want to apply the...

Страница 294: ...reach its new value 3 FADE TIME display This area indicates the fade time specified for each scene 4 CURRENT SETTING field Here you can specify the content that will be saved by the next scene store operation When you recall a scene the Fade settings of that scene will overwrite those of the current scene 3 Press the SET popup button to access the SCENE SETUP FADE TIME popup window In this popup w...

Страница 295: ...for which the Fade function is turned on The faders will begin to move immediately after Recall occurs and will reach the values of the recalled scene over the course of the specified fade time NOTE By touching a moving fader you can stop the fade operation of the fader at that point If you recall the same scene while faders are moving the faders of all channels and DCAs will move immediately to t...

Страница 296: ...ant to output GPI OUT signals When you recall the scene the control signals will be output to an external device connected to the GPI OUT connector Playing back an audio file in tandem with scene recall PLAYBACK LINK You can specify an audio file that will be played back from a USB flash drive when a specific scene is recalled This can be convenient if you want a sound effect or background music t...

Страница 297: ...e current scene 4 Press the song select popup button for a scene to which you want to link the audio file The PLAYBACK LINK popup window will appear In this popup window you can select an audio file that you want to link with the scene and set the offset time 1 PATH indicator This area indicates the current directory path 2 SONG TITLE FILE NAME switch buttons Switch between the song title list and...

Страница 298: ...er the offset time duration has elapsed the specified audio file will play once NOTE If another song is playing during a scene recall the song playback will stop when the scene is recalled regardless of the offset time setting Using the Global Paste function Global Paste is a function that enables you to copy and paste the settings of a desired channel or parameter from the current mix data to sce...

Страница 299: ... this button to access the popup window in which you can set up global paste for each plug in or GEQ NOTE If Global Paste is set to on the parameters of the RACK with different GEQs PEQs or effects plug ins are not pasted when the PLUG IN GEQ ALLOCATION is not selected for Global Paste To paste with the mount status turn on Global Paste for the PLUG IN GEQ ALLOCATION 3 To select a target channel p...

Страница 300: ... high volume sound may be output as a result 10 Press the PASTE button The selected item s in the current scene will be pasted to the specified scene s in memory A progress bar will appear during the paste operation Also during the paste operation a STOP button will appear which you can press to cancel the paste operation In this case data will be pasted up until you press the STOP button The oper...

Страница 301: ...rresponding channels 8 ALL channel ON buttons Turn Recall Safe on or off for all channels related to the selected parameter 9 Parameter ON buttons Turn Recall Safe on or off for parameters on each channel FADER BANK SELECT buttons Specify for each bay individually whether the Recall Safe function is applied to the fader layer position RECALL SAFE PLUG IN GEQ popup button Press this button to acces...

Страница 302: ...lumn displays a description of an event to be executed You can use the SHOW COMMENTS button to specify whether you want to show comments for a scene 3 INSERT MANUAL button Adds a new event to the event list 4 MOVE button UP button Moves the currently selected event up step by step in the event list DOWN button Moves the currently selected event down step by step in the event list 5 DELETE button D...

Страница 303: ...to select a scene by entering the scene number directly into the field 3 PARAMETER2 field You do not need to select this field 5 Select SCENE in the TYPE field and then use the LIST DIRECT field to select a desired scene number for recall operations To select an item use the TOUCH AND TURN knob Press the OK button to confirm the change and close the EVENT LIST EDIT popup window NOTE Alternatively ...

Страница 304: ...nob to select an event 5 EVENT RECALL buttons DIRECT button Immediately recalls the currently selected event PREV button Directly recalls the event that immediately precedes the most recently recalled event NEXT button Directly recalls the event that immediately follows the most recently recalled event NOTE You can assign the function of the PREV or NEXT button to a USER DEFINED key 6 MOVE button ...

Страница 305: ...ling the function using the keys and knobs on the top panel OVERLAY 1 OVERLAY key Press this button to display the OVERLAY SETTING screen While pressing and holding down the SHIFT key press the OVERLAY key to switch Overlay on or off While Overlay is turned on press and hold down the OVERLAY key to enter Overlay edit mode 2 SHIFT key Combine with another key to perform certain functions 1 2 3 ON k...

Страница 306: ...OTE You can change the levels within the range from 20dB to 10dB using the faders or knobs You cannot change the value if the fader level is set to The setting value will appear in the channel name display or MIX MATRIX SENDS display The channel or bus ON keys will light up on the channels or buses for which the offset values are programmed If you turn these ON keys off the values will be reset to...

Страница 307: ...B L ST B R DCA GROUPS DCA1 24 You can press the or button located to the right to expand or collapse the channel parameter indication for each category 5 Channel display Indicates the channel name 6 EXCLUDE button If the EXCLUDE button is turned on the corresponding channel will be excluded from the Overlay target 7 Category select list parameter Enables you to select the parameter category The ca...

Страница 308: ...offset value is 10dB when Overlay is turned on the limiter will kick in and the resultant fader level will change to 128dB When Overlay is turned off this value will not change 5 Turn the EXCLUDE buttons on as needed NOTE The Overlay setting will be invalid if the EXCLUDE button has been pressed if Isolate mode is enabled or if the bus type of the send destination is set to FIXED only for the send...

Страница 309: ...t necessarily guarantee the operation of all USB flash drives The FAT16 and FAT32 formats are supported NOTICE ACCESS will appear on the status indicator while data is being accessed i e saved loaded or deleted During this time do not remove the USB flash drive or power off the control surface Doing so may damage the data on the storage media Saving the RIVAGE PM10 system s settings on a USB flash...

Страница 310: ...e targeted Type SCENE INPUT OUTPUT tab The following table lists the items you can select PLUG IN GEQ tab The following table lists the items you can select 1 2 3 Button Data Type INPUT CH LIB Input channel libraries IN CH OUTPUT CH LIB Output channel libraries OUT CH INPUT EQ LIB Input EQ libraries IN EQ OUTPUT EQ LIB Output EQ libraries OUT EQ DYN LIB Dynamics libraries DYNA Button Data Type PLU...

Страница 311: ...otary library P ROTR Ring Mod library P RMOD Mod Filter library P MFIL Dyna Filter library P DFIL Distortion library P DIST Amp Simulate library P ASIM Comp276 library P 276 Equalizer601 library P 601 OpenDeck library P OPDK Button Data Type PLUG IN NonLin2 library P NL2 VSS4HD library P VSS4 Max100 library P M100 Dual Phaser library P DUPH Vintage Phaser library P VPHS RupertEQ773 library P Q773 ...

Страница 312: ...the file name and try saving the file again Loading a file from a USB flash drive Follow the steps below to load the RIVAGE PM10 system setting file extension PM10ALL or PM10PART from the USB flash drive into the console You can use the same procedure to load the following files other than the setting file 1 For more information about the type and file details refer to the TYPE field page 310 in t...

Страница 313: ... you to select a type of data to load The displayed items on this screen vary depending on the selected tab page 310 2 Data field Indicates data of the selected type 3 Data select knob Use the corresponding screen encoder or the TOUCH AND TURN knob to select data 4 SOURCE field This area lists data that are saved on the USB flash drive 5 DESTINATION field This area lists the destination to which t...

Страница 314: ... 5 Maximum number of data items Indicates the maximum number of selected scenes and libraries 4 In the LOAD SELECT screen select a type of data data to load and load destination NOTE If the SOURCE field and DESTINATION field are displayed selecting data to load and the data destination in these fields will enable the LOAD button 5 Press the LOAD button A confirmation dialog box will appear 6 Press...

Страница 315: ...utton is dimmed 7 File List This area lists files that are saved on the USB flash drive FILE NAME Indicates the file name extension and icon If you press the file name the TITLE EDIT popup window will appear enabling you to edit the file name COMMENT Indicates comments added to the RIVAGE PM10 system file NOTE If the file extension is PM10ALL or PM10PART press the comment A popup window will appea...

Страница 316: ...d press the RENAME button or SET button 3 To turn the protect setting on or off press the READ ONLY field for the file A protect symbol is displayed for write protected files These files cannot be overwritten NOTE You cannot edit the file name or comment field of a write protected file Copying and pasting a file Follow the steps below to copy a file into buffer memory and then paste it with a diff...

Страница 317: ...ry icon and change the directory To move to the next higher level press the arrow button in the PATH field 2 Press the MAKE DIR button A keyboard window will appear allowing you to enter a directory name 3 Enter the name of the directory you want to create then press the MAKE button NOTE You cannot create a directory using a directory name that already exists ...

Страница 318: ...he CLOSE button SURFACE SETTINGS1 1 SEL LINK This section enables you to set up the link between the selected channel parameter on the screen and the SEL keys and the link between bays and the SEL keys Linked elements will be indicated in the same color Any unlinked elements will be indicated in gray 2 CUE SEL LINK Specifies whether channel selection will be linked with cue operations If this butt...

Страница 319: ...ion You can set this parameter separately for INPUT input channels OUTPUT output channels and CUSTOM Custom fader bank If this ON button is lit and you select the corresponding fader bank the channel in that bank that was selected most recently will be selected and its SEL key will light NOTE Changing the Bay Link setting will clear the position of the selected channel stored in each layer 5 DCA R...

Страница 320: ...utput of the control surface or digital input output of the RY slot or MY slot 4 MIDI I O If this ON button is lit an error message will appear when a MIDI transmission reception error occurs CONFIRMATION MESSAGES field 5 SCENE MEMORY Enables you to turn on or off options related to scene store update recall operations If these ON buttons are lit a confirmation message will appear when you perform...

Страница 321: ...rs A set of channels assigned to the top panel faders is called a fader bank There are input and output channel banks as well as custom fader banks Custom fader banks enable you to select various combinations of channels regardless of channel types You can also change the setting of the channels that will be controlled by the two master faders 1 Press the SETUP button on the menu bar to access the...

Страница 322: ...ors Indicate the channels assigned to the corresponding blocks 5 Fader select button Enables you to elect the target fader Press this button to select it then press SEL keys on the top panel to add the corresponding channels to the selected fader bank 6 Channel select popup button Press this button to access the channel select popup window in which you can select channels on the touch screen 7 CLE...

Страница 323: ... the channel select popup buttons CH SELECT popup window 8 From the list select desired channels 9 When you finish selecting the channels press the CLOSE button USER DEFINED KNOBS This section explains how to assign the desired functions to the USER DEFINED knobs in the USER DEFINED KNOBS section on the top panel and press these knobs to execute the defined function Using the USER DEFINED KNOBS se...

Страница 324: ...e bank A B C or D for the USER DEFINED knobs 2 USER DEFINED KNOBS 1 4 Link to USER DEFINED knobs 1 4 on the panel Press one of these buttons to access the USER DEFINED KNOBS SETUP popup window in which you can assign a function to the selected button If nothing is assigned to the button an indication of NO ASSIGN is shown 3 Press the button corresponding to the USER DEFINED knob to which you want ...

Страница 325: ...EREO PAN BAL CH 1 144 PAN BAL MIX 1 72 CSR CH 1 144 CSR MIX 1 72 TO MIX LEVEL MIX 1 72 CH 1 144 TO MATRIX LEVEL MATRIX 1 36 CH 1 144 MIX 1 72 TO MIX PAN BAL MIX 1 72 CH 1 144 TO MATRIX PAN BAL MATRIX 1 36 CH 1 144 MIX 1 72 DYNAMICS 1 THRESHOLD CH1 144 MIX 1 72 MATRIX 1 36 STEREO AL STEREO AR STEREO BL STEREO BR RANGE CH1 144 MIX 1 72 MATRIX 1 36 STEREO AL STEREO AR STEREO BL STEREO BR RATIO CH1 14...

Страница 326: ...REO BR BAND1 4 FREQUENCY CH1 144 MIX 1 72 MATRIX 1 36 STEREO AL STEREO AR STEREO BL STEREO BR BAND5 8 FREQUENCY MIX 1 72 MATRIX 1 36 STEREO AL STEREO AR STEREO BL STEREO BR BAND1 4 GAIN CH1 144 MIX 1 72 MATRIX 1 36 STEREO AL STEREO AR STEREO BL STEREO BR BAND5 8 GAIN MIX 1 72 MATRIX 1 36 STEREO AL STEREO AR STEREO BL STEREO BR FILTER HPF FREQ CH1 144 MIX 1 72 MATRIX 1 36 STEREO AL STEREO AR STEREO...

Страница 327: ...Assigning a function to a channel strip encoder 1 Press the SETUP button on the menu bar to access the SETUP screen 2 Press the USER DEFINED KNOBS button to open the USER DEFINED KNOBS popup window 1 Channel strip encoder 2 Channel strip encoder display Indicates the function that has been assigned to the channel strip encoder 3 UP DOWN keys Enable you to select the function that you want to contr...

Страница 328: ...n encoder to select the function that you want to assign You can assign the following functions PAN BALANCE ANALOG GAIN DIGITAL GAIN SELECTED SEND MIX 1 72 SEND MATRIX 1 36 SEND HPF FREQUENCY LPF FREQUENCY DYNAMICS1 THRESHOLD DYNAMICS2 THRESHOLD DELAY SILK TEXTURE 5 Press the OK button to close the CH STRIP ENCODERS popup window 6 Use the UP DOWN keys on the top panel to select the function ...

Страница 329: ...eys to execute the defined function Using the USER DEFINED KEYS section Assigning a function to a USER DEFINED key 1 Press the SETUP button on the menu bar to access the SETUP screen 1 USER DEFINED A B C D BANK keys Select the bank A B C or D for the USER DEFINED knobs or USER DEFINED keys 2 USER DEFINED KEYS displays Indicate the functions assigned to the USER DEFINED keys 3 USER DEFINED KEYS 1 1...

Страница 330: ...sponding to the USER DEFINED key to which you want to assign a function The system displays a popup window in which you can assign a function to the USER DEFINED key 4 Make sure that the FUNCTION field is enclosed by a frame and then use the screen encoder on the panel to select the function you want to assign For details on the assignable functions and their parameters refer to the data list 5 If...

Страница 331: ...on has been assigned CUE OUTPUT A Switches CUE A on off B Switches CUE B on off CLEAR CUE CUE A Clears CUE A CUE B Clears CUE B CUE A B Clears CUE A B SPECIFIC CH CH 1 144 Switches Cue Out on off MIX 1 72 MATRIX 1 36 STEREO A B DCA 1 24 CUE MODE A B Switches Cue mode CUE INTERRUPTION A B Switches Cue Interruption function on off INPUT CUE POINT A B Switches the input channel s cue point DCA CUE PO...

Страница 332: ...TE GROUP MASTER on off ALL MUTE ON Switches all MUTE GROUP MASTER settings on off at once Function PARAMETER 1 PARAMETER 2 PARAMETER 3 Description OSCILLATOR ON Switches the oscillator on off SEL CH ASSIGN While holding down this key press a SEL key to switch the assignment on off During this time the SEL LED will be lit if the assignment is ON or dark if OFF While this key is held down the assign...

Страница 333: ...the next scene number DEC RECALL Recalls the scene associated with the previous scene number DIRECT RECALL SCENE Hold down this key and press the SEL key to switch it on off Function PARAMETER 1 PARAMETER 2 PARAMETER 3 Description SENDS ON FADER MIX 1 72 NORMAL BAY L BAY R BAY C Switches between the normal function on off NORMAL and between the function with cue on off WITH CUE With WITH CUE cue w...

Страница 334: ... USER DEFINED key to use the function SET BY SEL SET 48V Hold down this key and press the SEL key to switch it on off During this time the SEL LED will be lit if on or dark if off SET PHASE SET INSERT1 ON SET INSERT2 ON SET DIRECT OUT ON SET PRE SEND SET TO STEREO A SET TO STEREO B SET TO LCR SET GAIN COMPENSATION ON SET DEFAULT VALUE While holding down this key press a knob of the Selected Channe...

Страница 335: ...age can be transmitted to an external device Conversely the corresponding fader knob or key operation can be executed when Control Change messages are received from an external device This allows you to record fader and key operations on a MIDI sequencer or other external device and play them back later Receiving MMC An MMC MIDI Machine Control can be received on the system This can be used to con...

Страница 336: ...ple MIDI channels Multi mode OMNI If this button is on Program Changes on all MIDI channels will be received in Single mode Multi mode transmission reception and Single mode transmission are disabled BANK If this button is on Bank Select messages can be transmitted and received in Single mode Bank Select messages switch the group of Program Change messages to be used 4 CONTROL CHANGE field Enables...

Страница 337: ...trol Changes refer to Using Control Changes to control parameters page 340 Using Program Changes to recall scenes The RIVAGE PM10 system enables you assign a specific scene to be recalled to each Program Change number so that when a scene is recalled on the RIVAGE PM10 system a Program Change message of the corresponding number will be transmitted to an external device Conversely the corresponding...

Страница 338: ... the MIDI PROGRAM CHANGE popup window in which you can select the content that you want to assign 4 Scroll knob Press this knob to scroll the list upward or downward using the screen encoder 5 CLEAR ALL button Press this button to clear all scene recall assignments in the list 4 Use the buttons in the PROGRAM CHANGE MODE field to select the Program Change transmission reception mode You can select...

Страница 339: ...ings of the OMNI and BANK buttons are ignored in Multi mode If the BANK button is on and only a Program Change on an applicable MIDI channel is received the last selected bank number will be used If the BANK button is on the OMNI button can also be turned on at the same time In this case Bank Select and Program Change messages of all MIDI channels will be received 5 Use the buttons in the PROGRAM ...

Страница 340: ...gram numbers Assignments to program numbers are maintained as settings for the entire system rather than for individual scenes In Single mode if the same scene is assigned to more than one program number on a Tx channel only the lowest program number will be transmitted If the BANK button is on only the program number of the lowest bank number will be transmitted In Multi mode if the same scene is...

Страница 341: ... button Press this button to clear all parameter assignments on the list 4 Use the buttons in the CONTROL CHANGE field to turn transmission and reception on or off and make settings for echo output Each button has the following function Tx button Switches Control Change transmission on or off Rx button Switches Control Change reception on or off ECHO button Selects whether incoming Control Changes...

Страница 342: ...ut GPI The GPI connector located on the rear panel of the control surface CS R10 CS R10 S can be used as a GPI General Purpose Interface input output connector This connector provides eight GPI IN ports and eight GPI OUT ports For example you can use an external switch to control internal parameters of the RIVAGE PM10 system or to switch scenes Conversely operations or scene changes performed on t...

Страница 343: ... the GPI connector to control the parameters of the RIVAGE PM10 system from an external device For example you could use an external switch to turn the RIVAGE PM10 system s Talkback on off operate the Tap Tempo function or switch scenes 1 Connect an external device to the GPI connector on the control surface 2 Press the SETUP button on the menu bar to access the SETUP screen 3 Press the MIDI GPI b...

Страница 344: ...e when the input signal is low level High active Active when the input signal is high level 4 GPI SETUP popup button Press this button to access the GPI SETUP popup window The button shows the name of the currently selected function or parameter 5 Specify the input type and POLARITY MODE based on the specifications of the external device you are using 6 To assign the function or parameter that you...

Страница 345: ...PI page 1 GPI OUT status indicator Indicates the status of the voltage that is being output from each GPI OUT port 2 POLARITY MODE select button Enables you to select the polarity of the GPI OUT port Low active Grounded when the GPI OUT port is active High active Open when the GPI OUT port is active 3 GPI OUT SETUP popup button Press this button to access the GPI OUT SETUP popup window The button ...

Страница 346: ...open the MIDI GPI popup window This window includes several pages which you can switch between using the tabs located at the top of the window 4 Press the FADER START tab to access the FADER START page Function PARAMETER 1 PARAMETER 2 Description NO ASSIGN No assignment CUE ACTIVE CUE ON A Turns on the CUE key of the selected channel for CUE A CUE B B DCA ONLY A Turns on the CUE key of the DCA for...

Страница 347: ...is raised from below the specified UPSTROKE level between 138 0 dB and 10 0 dB to beyond that level 6 FADER STOP A trigger signal of 250 msec duration will be output when the fader of the selected channel reaches the specified DOWNSTROKE level between dB and 9 95 dB 7 FADER TALLY A trigger signal will be output if the fader of the selected channel is raised from below the specified UPSTROKE level ...

Страница 348: ...ble on the website Adjusting the faders Depending on the environment in which you use the system discrepancies may occur in the motion of the motorized faders You can use the Calibration function to correct these discrepancies The RIVAGE PM10 system features two types of fader calibration NOTE An alarm message will appear if a problem is detected in the fader settings while the RIVAGE PM10 system ...

Страница 349: ...ion the motorized fader movement will be automatically calibrated 5 Press the SEL key for each fader that you want to calibrate Faders for which a problem was detected in the fader settings at start up will already be selected 6 Press the START button The system starts optimizing the movement of the motorized faders The corresponding SEL keys will flash during calibration To cancel in the middle o...

Страница 350: ...ton 7 Each of the specified faders will move to the target positions in the following sequence Manually move the faders to the correct positions 1 dB all the way down 2 20 dB 3 0 dB 4 10 dB all the way up 8 After you adjust the fader position press the NEXT button The process will proceed to the next fader position 9 Repeat steps 7 and 8 to adjust the faders for positions 1 through 4 10 When calib...

Страница 351: ...p of the window 3 Press the TOUCH CALIB tab The TOUCH SCREEN CALIBRATION screen will appear enabling you to calibrate the touch screen panels 4 Press the LEFT PANEL button to calibrate the left touch screen panel Press the RIGHT PANEL button to calibrate the right touch screen panel You can also select and calibrate both left and right panels simultaneously 5 Press the START button A cross shaped ...

Страница 352: ...indow This window includes several pages which you can switch between using the tabs located at the top of the window 3 Press the INITIALIZATION tab The INITIALIZATION page appears enabling you to initialize the internal memory 1 SYSTEM LOG button Press this button to initialize the system log 2 LIBRARY button Press this button to initialize the libraries 3 SCENE button Press this button to initia...

Страница 353: ... surface will restart at the time of initialization Adjusting the input output gain If necessary you can make fine adjustments to the input and output gain 1 Press the SETUP button on the menu bar to access the SETUP screen 2 Press the MAINTENANCE button to access the MAINTENANCE popup window This window includes several pages which you can switch between using the tabs located at the top of the w...

Страница 354: ... corresponding screen encoder to adjust the value 6 Press the CLOSE button System log The system log enables you to identify and read about problems that occurred during operation of the RIVAGE PM10 system and related information You can also store system log data to a USB flash drive as text data System log data is useful for analysis and troubleshooting of problems and malfunctions NOTE You can ...

Страница 355: ...GS TO USB button The following files will be stored in the root directory of the USB flash drive NOTE If you want to store the files using RIVAGE PM10 Editor they will be stored in the storage location specified on the SAVE LOAD screen If the specified storage location is not valid the EXPORT LOGS TO STORAGE button will be disabled If you do not have an Administrator account for a computer running...

Страница 356: ...ps below 1 Press the SETUP button on the menu bar to access the SETUP screen 2 Press the MAINTENANCE button to access the MAINTENANCE popup window 3 Press the SYSTEM LOG tab to access the SYSTEM LOG page 1 Data select buttons Select data to store ERROR LOGS Current system log file SYSTEM DUMP System dump file and screen shot and project file created at the time of the problem 2 EXPORT button Press...

Страница 357: ...IME button to access the DATE TIME popup window This popup window includes the following items 1 DATE Specifies the date of the internal clock 2 TIME Specifies the time of the internal clock 3 FORMAT field display format This field specifies the format in which the date and time of the internal clock are displayed 3 In the FORMAT field press the MODE buttons several times to select the desired for...

Страница 358: ...rs on the top panel to specify the current date and time 5 When you finish making settings press the OK button The date time and display format you specified will be finalized and the popup window will close If you press the CANCEL button or the x symbol instead of the OK button your changes will be discarded and the popup window will close ...

Страница 359: ...splay on the top panel BRIGHTNESS field NAME Adjusts the brightness of the channel name displays on the top panel This will also change the CH COLOR brightness If you want to adjust the CH COLOR brightness after setting the name display brightness use the CH COLOR knob CH COLOR Adjusts the brightness of the channel colors on the top panel This lets you apply a relative adjustment to only the chann...

Страница 360: ...IDI will still operate as usual Locking the console 1 Press the SETUP button on the menu bar to access the SETUP screen 2 Press the CONSOLE LOCK button to access the PASSWORD popup window 1 PASSWORD field 2 RE ENTER PASSWORD field Enter the password once again 3 REMEMBER THIS PASSWORD button If this button is on you will need to use the same password next time 3 If you do not set the password pres...

Страница 361: ... press the OK button The console will be unlocked the system will display the SETUP screen and the controllers will be operable once again Specifying the CONSOLE LOCK screen image You can display an image file on the CONSOLE LOCK screen In the SAVE LOAD popup window specify the image file that you want to display and then load it from the USB flash drive For a procedure on loading a file from a US...

Страница 362: ...ICENSE screen On line monitoring operation 1 Connect a computer that has PM10 Editor installed to the DSP engine using an Ethernet cable For more information on configuring the network please refer to the RIVAGE PM10 Editor Installation Guide NOTE You can use only one instance of PM10 Editor per system Do not connect two or more computers to the system 2 Start PM10 Editor The following screen appe...

Страница 363: ...OR DSP 5 Press the SYNC button Parameter settings on the RIVAGE PM10 system will be copied to PM10 Editor Once data synchronization is completed the line indicating synchronization is displayed in green 6 Edit the mixing data Off line editing synchronization You can edit mixing data off line Off line editing 1 Start PM10 Editor The following screen appears at start up 2 Press the Use Offline butto...

Страница 364: ...PM10 system Once data synchronization is completed the line indicating synchronization will be displayed in green NOTE If the DSP engine is connected on line with the control surface the EDITOR DSP synchronization is disabled Edited mixing data can be saved to a USB flash drive and loaded directly to the control surface On screen operation Using the mouse wheel You can use the mouse wheel as if yo...

Страница 365: ...he manual library About RIVAGE PM10 Editor Opens the About RIVAGE PM10 Editor screen which displays the version number of PM10 Editor NOTE You must connect to the Internet to view the manual library About the screens The screens of PM10 Editor are identical to those on the control surface However parts that you cannot control in PM10 Editor are hidden as shown below Press the ESC key repeatedly to...

Страница 366: ...r left corner to select the desired CONTROLS screen MUTE MASTER screen You can switch MUTE MASTER on or off USER DEFINED KEYS screen You can switch the functions assigned in the USER DEFINED KEYS screen on or off Buttons for the functions that you cannot control in PM10 Editor will be grayed out USER DEFINED KNOBS screen You can switch the function assigned in the USER DEFINED KNOBS screen on or o...

Страница 367: ... load a file The file format that PM10 Editor supports is expressed with the extension PM10ALL or PM10PART Internal setting files of the RIVAGE PM10 system will be saved NOTE You can save PM10ALL files created in PM10 Editor in a USB storage device connected to the computer and then load the files directly to the control surface via the USB port Similarly if you save PM10ALL files from the control...

Страница 368: ...tion Exit Ctrl Q Alt F4 Copying text inside an edit box Ctrl C Pasting text into an edit box Ctrl V Cutting text inside an edit box Ctrl X Parameter value increment Page Up normal operation Right arrow fine adjustment Upward arrow fine adjustment Wheel up Parameter value decrement Page Down normal operation Left arrow fine adjustment Down arrow fine adjustment Wheel down Minimizing the parameter v...

Страница 369: ...ta in the DSP CS sync direction Alternatively access the SAVE LOAD screen and load the control surface setting file Otherwise initialize the control surface Cannot Select for GLOBAL PASTE too many scenes max 100 You cannot select more than 100 scenes for the Global Paste operation Cannot store too many scenes max 1000 The scene cannot be stored because the maximum number 1 000 of scenes that can b...

Страница 370: ...ER_FULL An internal error occurred on the console If this error persists please contact your Yamaha dealer Internal error PANELxx_COMMUNICATION_ERR An internal error occurred in the console Communications inside the operation panel may be faulty Please contact your Yamaha dealer Internal error PANELxx_DISCONNECTED An internal error occurred in the console Connections inside the operating panel may...

Страница 371: ...ception detected Restart this console as soon as possible An abnormality occurred in software Restart this control surface immediately Software exception detected Restart this editor as soon as possible An abnormality occurred in software Restart Editor immediately Song file not found The song file to play cannot be found Sync error XX The digital input signal at the XX connector is not syncing wi...

Страница 372: ...access Playback was interrupted due to insufficient access speed to the USB storage device USB recorder Recording stopped due to slow memory access Recording was interrupted due to insufficient access speed to the USB storage device USB recorder Recording stopped due to wrong word clock Recording on the USB recorder was stopped due to an inappropriate system word clock USB recorder Storage full Th...

Страница 373: ...4 99 167 Digital gain 100 167 Gain reduction 97 175 176 GANG 94 95 GEQ 215 GPI 342 TALLY 296 TRIGGER 296 Graphic EQ 215 H Head amp 60 99 166 HPF 96 HPF indicator 94 I Icon 132 INITIALIZATION 352 Initializing 352 Initializing channels 212 Input patching 130 INSERT 97 INSERT ON OFF indicator 100 Insert point Signal source point 182 Status 202 Internal clock 357 ISOLATE 93 K KEY IN 176 L LED ASSISTAN...

Страница 374: ... Index 374 RIVAGE PM10 Operation Manual U USB flash drive 309 USB flash drive format 62 USB keyboard 321 USB mouse 321 USER DEFINED KEYS 329 USER DEFINED KNOBS 323 V VARI 125 Virtual sound check 275 W WAV 266 Word clock 122 ...

Страница 375: ...Published 06 2017 IP D0 2015 Yamaha Corporation Manual Development Group Yamaha Downloads http download yamaha com Yamaha Pro Audio global website http www yamahaproaudio com ...

Отзывы: