Yamaha RAPTOR YFM80WP Скачать руководство пользователя страница 22

–18–

1

b

a

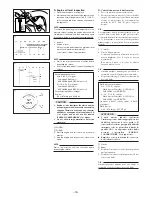
D. Engine oil level inspection

1. Place the machine on a level place.

2. Start the engine, warm it up until the engine oil has

reached a normal temperature of 60 °C (140 °F),

let it continue to idle for ten seconds, and then turn

the engine off.

NOTE:

To achieve the proper engine oil temperature for an

accurate oil level reading, the engine must have first

completely cooled down, and then warmed up again

for several minutes to normal operating temperature.

3. Inspect:

Engine oil level

Oil level should be between the minimum level

mark 

a

 and maximum level mark 

b

.

Low oil level 

 Add oil to proper level.
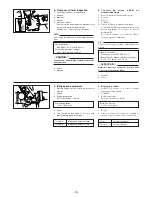
NOTE:

Wait a few minutes until the oil settles before

inspecting the oil level.

Do not screw the dipstick 

1

 in when inspecting the

oil level.

Recommended engine oil:

At 0 °C (32 °F) or higher:

Yamalube 4 (20W40) or

SAE20W40 type SE/SF/SG motor oil

At –10 °C (14 °F) or higher:

Yamalube 4 (10W30) or

SAE10W30 type SE/SF/SG motor oil

Oil quantity (periodic oil change):

Engine:

0.8 L (0.70 Imp qt, 0.85 US qt)

CAUTION:

Engine oil also lubricates the clutch and the

wrong oil types or additives could cause clutch

slippage. Therefore, do not add any chemical

additives or use engine oils with a grade of CD

c

 or higher and do not use oils labeled

“ENERGY CONSERVING 

@

@

@

@

@

” 

d

 or higher.

Do not allow foreign material to enter the

crankcase.

Å

 For CDN

ı

 For EUR

4. Start the engine and let it warm up for several

minutes.

5. Stop the engine and inspect the oil level once

again.

NOTE:

Wait a few minutes until the oil settles before

inspecting the oil level.

D. Contrôle du niveau d’huile moteur

1. Placer la machine sur une surface plane.
2. Mettre le moteur en marche, le laisser chauffer

jusqu’à 10 secondes après que l’huile moteur ait
atteint sa température de fonctionnement
normale de 60 °C (140 °F), puis couper le
moteur.

N.B.:

La température d’huile moteur optimale pour un
contrôle du niveau d’huile le plus précis possible
s’obtient en laissant d’abord refroidir le moteur, puis
en le réchauffant  à nouveau pendant plusieurs
minutes jusqu’à sa température de fonctionnement
normale.

3. Contrôler:

Niveau d’huile moteur
Le niveau d’huile doit se situer entre le repère de
niveau minimum 

a

 et le repère de niveau

maximum 

b

.

Bas niveau d’huile 

 Ajouter de l’huile

jusqu’au niveau correct.

N.B.:

Attendre quelques minutes pour que l’huile se
rassemble avant de vérifier le niveau d’huile.

Ne pas visser la jauge 

1

 lors de la vérification du

niveau d’huile.

Huile moteur recommandée:

A 0 °C (32 °F) ou plus:

Huile moteur Yamalube 4 (20W40) ou
SAE20W40, type SE/SF/SG

A –10 °C (14 °F) ou plus:

Huile moteur Yamalube 4 (10W30) ou
SAE10W30, type SE/SF/SG

Quantité  d’huile (changement d’huile
périodique):
Huile moteur:

0,8 L (0,70 Imp qt, 0,85 US qt)

ATTENTION:

•••••

L’huile moteur lubrifie également
l’embrayage et une huile inappropriée ou des
additifs pourraient le faire patiner. Il
convient dès lors de ne pas ajouter d’additifs
chimiques et de ne pas utiliser d’huiles de
qualités CD 

c


ou supérieure ni des huiles

portant l’inscription 

“ENERGY

CONSERVING 

@

@

@

@

@

” 

d


ou supérieure.

•••••

Empêcher toute pénétration de crasse ou
d’objet dans le carter.

Å

 Canada

ı

 Europe

4. Démarrer le moteur et le faire chauffer pendant

quelques minutes.

5. Démarrer le moteur et vérifier une nouvelle fois

le niveau d’huile.

N.B.:

Attendre quelques minutes pour que l’huile se
rassemble avant de vérifier le niveau d’huile.

Å

ı

ı

Содержание RAPTOR YFM80WP

Страница 1: ...YFM80WP ASSEMBLY MANUAL MANUEL D ASSEMBLAGE 5TH 28107 70...

Страница 2: ...death to the machine operator a bystander or a person inspecting or repairing the machine CAUTION A CAUTION indicates special precautions that must be taken to avoid damage to the machine NOTE A NOTE...

Страница 3: ...carton and the machine for damage scratches and other defects PR PARATION Certaines fournitures et conditions sont indispensables pour monter correctement le v hicule Fournitures Huiles graisses essuy...

Страница 4: ...rt ex 5 0 2 5 mm 0 2 in SYMBOLES EMPLOY S DANS LES NOTICES D ASSEMBLAGE Afin de simplifier les descriptions donn es dans les notices d assemblage les symboles suivants sont employ s Couvriravecunel g...

Страница 5: ...s a 5 6 1 2 4 6 5 3 PARTS LOCATION 1 Carton box 2 Vinyl pack 3 Vinyl pack 4 Carton box 5 Rear wheel 6 Front wheel EMPLACEMENT DES PI CES 1 Bo te en carton 2 Emballage en plastique 3 Emballage en plast...

Страница 6: ...erette et boulon et rondelle plate pare chocs avant Flange bolt Rear protector Boulon collerette protection arri re Hexagon bolt and spring nut front panel Boulon hexagonal et crou ressort capot avant...

Страница 7: ...r reflector 60 mm plain washer and spring washer Catadioptre arri re 60 mm rondelle plate et rondelle ressort et crou 2Vinylpack Emballageenplastique Handlebar cover Cache de guidon 4 Carton box Bo te...

Страница 8: ...tires 5 Remove the bolt 9 swingarm 6 Remove the main body from to the lower frame D BALLAGE 1 Retirer l emballage du cadre 1 2 Retirer les boulons 2 les boulons de demi palier de guidon 3 et les ronde...

Страница 9: ...5 B 0 A 7 Remove the bolts 0 and bracket A 8 Remove the tube B 7 Retirer les boulons 0 et le support A 8 Retirer le tube B...

Страница 10: ...7 0 m kg 51 ft lb Front bumper and front fender 7Nm 0 7 m kg 5 1 ft lb Front bumper and frame 23Nm 2 3 m kg 17 ft lb Front panel and front fender 3Nm 0 3 m kg 2 2 ft lb C Routing of wire cables etc F...

Страница 11: ...lb Pare chocs avant et garde boue avant 7Nm 0 7 m kg 5 1 ft lb Pare chocs avant et cadre 23Nm 2 3 m kg 17 ft lb Capot avant et garde boue avant 3Nm 0 3 m kg 2 2 ft lb C CHEMINEMENT DES C BLES FILS ET...

Страница 12: ...del is equipped with low pressure tires Refer to ADJUSTMENTS AND PREDELIVERY SERVICE MONTAGE N B Apr s avoir ouvert le conteneur placer le VTT sur un support ad quat et suivre les op rations de montag...

Страница 13: ...ES ET FILS A Connect the neutral indicator light connectors NOTE Refer to CABLE ROUTING B Pass the breather hose through the hole on the handlebar cover NOTE Refer to CABLE ROUTING 1 1 1 1 2 2 1 2 3 4...

Страница 14: ...1 C 1 C d 8 0 31 R 14 0 55 A Tighten the bolts to the specified torque Tightening torque 23 Nm 2 3 m kg 17 ft lb A Serrer les boulons au couple sp cifi Couple de serrage 23 Nm 2 3 m kg 17 ft lb B 23...

Страница 15: ...eur noire la borne A NOTE Before installing the battery refer to ADJUSTMENTS AND PREDELIVERY SERVICE Before connecting the battery leads remove the key from the main switch B First connect the lead re...

Страница 16: ...d 5 0 20 60 mm 10 Seat Selle 1 Seat 1 A Insert the lobes on the seat front into the receptacles on the frame then push down the seat at the end A Ins rer les lobes de l avant de la selle dans les pat...

Страница 17: ...tank into the hole in the handlebar cover CHEMINEMENT DES C BLES ET FILS ATTENTION Un cheminement correct des c bles et fils est essentiel pour assurer la s curit de la machine 1 Contacteur de feu sto...

Страница 18: ...14 I GH D B I A E B CF ADJUSTMENTS AND PREDELIVERY SERVICE R GLAGES ET ENTRETIEN AVANT LIVRAISON...

Страница 19: ...OUT OF REACH OF CHILDREN A Contr le de la batterie 1 Charge La batterie doit tre charg e correctement avant la premi re utilisation Cette charge initiale augmentera sa long vit ATTENTION Nejamaisessay...

Страница 20: ...CAUTION Make sure that the battery leads are connected properly Reversing leads can seriously damage the electrical system d Connecter la batterie un chargeur de batterie e R gler le d bit du chargeu...

Страница 21: ...p rapide peut entra ner un clatement 2 Une pression de gonflage trop faible avant 17 kPa 0 17 kgf cm2 2 5 psi arri re 17 kPa 0 17kgf cm2 2 5psi entra neraled jantage du pneu 3 Les deux pneus arri re d...

Страница 22: ...uile moteur 1 Placer la machine sur une surface plane 2 Mettre le moteur en marche le laisser chauffer jusqu 10 secondes apr s que l huile moteur ait atteint sa temp rature de fonctionnement normale d...

Страница 23: ...huile jusqu au niveau recommand N B Ne pas visser la jauge 1 lors du contr le du niveau d huile Huile recommand e Huile hypo de SAE 80 API GL 4 Quantit d huile changementd huilep riodique 0 12 L 0 11...

Страница 24: ...Adjust Throttle lever free play 3 5 mm 0 12 0 20 in 2 Adjust Pull up the adjuster cover 1 Loosen the locknut 2 Turn the adjuster 3 clockwise or counter clock wise until specified free play attained Cl...

Страница 25: ...arri re 1 Contr ler Garde de la p dale de frein arri re a Garde du levier de frein arri re b Hors sp cifications R gler Garde de la p dale de frein arri re 20 30 mm 0 8 1 2 in Garde du levier de frein...

Страница 26: ...SOLINE 6 8 L 1 50 Imp gal 1 80 US gal 0 05 0 10 mm 0 0020 0 0039 in 0 075 0 125 mm 0 0030 0 0050 in Parts name Owner s manual Owner s tool kit Low pressure air gauge Q ty 1 1 1 QUIPEMENT STANDARD No 1...

Страница 27: ...d frame Front shock absorber and lower arm Steering knuckle and lower arm Steering knuckle and ball joint Steering shaft and ball joint Tie rod and locknut Steering shaft and frame Steering shaft and...

Страница 28: ...isseur avant et cadre Amortisseur avant et bras inf rieur Fus e de direction et bras inf rieur Fus e de direction et joint rotule Arbre de direction et joint rotule Barre d accouplement et contre crou...

Страница 29: ......

Страница 30: ...PRINTED ON RECYCLED PAPER PRINTED IN JAPAN 2001 9 2 2 1 CR E F YAMAHA MOTOR CO LTD 2500 SHINGAI IWATA SHIZUOKA JAPAN...

Отзывы: