background image

PSR-S975/S775 Owner’s Manual

63

Son

g

s – Pl

a

y

in

g

P

rac

ti

ci

ng and

 R

eco

rd

in

g Son

g

s –

3

4

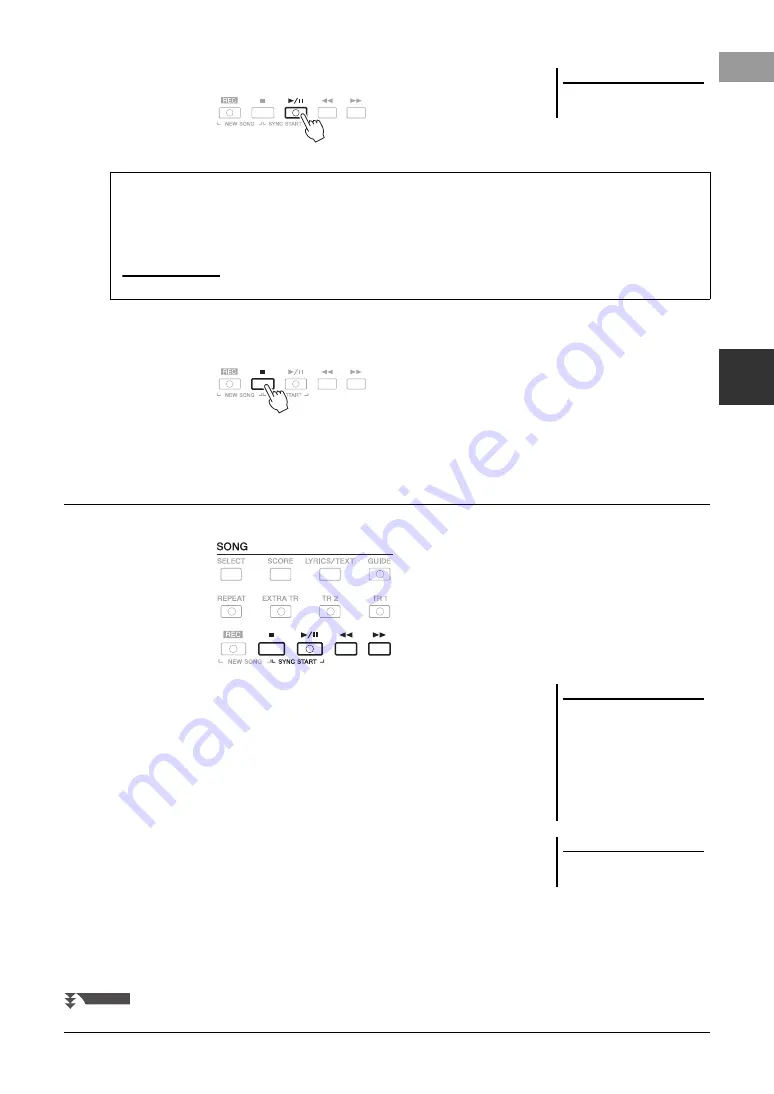
Press the SONG [

F

/

K

] (PLAY/PAUSE) button to start playback.

5

Press the SONG [

J

] (STOP) button to stop playback.

•  Synchro Start

  .........While playback is stopped, hold down the SONG [

J

(STOP) button and press the [

F

/

K

] (PLAY/PAUSE) button. 

The [

F

/

K

] (PLAY/PAUSE) button flashes, indicating the 

standby status. You can start playback as soon as you play the 
keyboard.
To cancel the Synchro Start function, press the SONG [

J

(STOP) button.

•   Pause

........................Press the [

F

/

K

] (PLAY/PAUSE) button during playback. 

Pressing it again resumes Song playback from the current 
position.

•  Rewind/Fast Forward

...............................Press the [

G

] (REW) or [

H

] (FF) during playback or 

while the Song is stopped. Pressing either of them once 
moves back/forward one measure. Holding either of them 
scrolls backward/forward continuously.

NOTE

You can transpose the Song playback 
(page 38).

Queuing the next Song for playback

While a Song is playing back, you can queue up the next Song for playback. This is convenient for chaining it to 
the next Song smoothly during live performance. Select the Song you want to play next in the Song Selection 
display, while a Song is playing back. The “NEXT” indication appears at the upper right of the corresponding 
Song name. To cancel this setting, press the [7 

] (NEXT CANCEL) button.

NOTE

Make sure that MENU 1 is shown at the bottom right corner of the display (page 26).

Playback-related Operations

NOTE

• You can adjust the volume balance 

between the Song and keyboard 
(page 57). On the VOL/VOICE page 
of the Mixing Console display 
(page 95), you can adjust the vol-
ume for each Song channel.

• You can also adjust the volume bal-

ance between the Song and Audio 
(page 74).

NOTE

You can also turn specific part(s) on or 
off (page 65).

NEXT PAGE

Содержание PSR-S775

Страница 1: ...ECAUTIONS on pages 5 6 Merci d avoir choisi ce Clavier Arrangeur Professionnel Yamaha Ce clavier lectrique destin aux professionnels dispose d une large s lection de sonorit s et de fonctions polyvale...

Страница 2: ...on or effect works when the unit is operating as designed are not covered by the manufacturer s warranty and are therefore the owners responsibility Please study this manual carefully and consult your...

Страница 3: ...g measures Relocate either this product or the device that is being affected by the interference Utilize power outlets that are on different branch circuit breaker or fuse circuits or install AC line...

Страница 4: ...plugs convenience receptacles and the point where they exit from the apparatus 11 Only use attachments accessories specified by the manufacturer 12 Use only with the cart stand tri pod bracket or tabl...

Страница 5: ...e of the instrument Use the specified adaptor page 111 only Using the wrong adaptor can result in damage to the instrument or overheating Check the electric plug periodically and remove any dirt or du...

Страница 6: ...or uncomfortable volume level since this can cause permanent hearing loss If you experience any hearing loss or ringing in the ears consult a physician Always turn the power off when the instrument i...

Страница 7: ...tting receiving MIDI data iPhone iPad Connection Manual only in English French German and Spanish Explains how to connect the instrument to smart devices such as an iPhone iPad etc To obtain these mat...

Страница 8: ...nse to use others copyrights Due to copyright laws and other relevant laws you are NOT allowed to distribute media in which these contents are saved or recorded and remain virtually the same or very s...

Страница 9: ...with the Guide Function 66 Repeat Playback 67 Recording Your Performance 68 4 USB Audio Player Recorder Playing Back and Recording Audio Files 71 Playing Back Audio Files 71 Recording Your Performanc...

Страница 10: ...n your instrument The PSR S975 S775 has new and high quality effect types including Real Distortion and Real Reverb On the PSR S975 these also include VCM effects that use the same technology as the p...

Страница 11: ...s cutoff frequency of the sound being played or to control the volume balance between the parts such as Voice and Style Thus you can easily add variations to the sound without interrupting your perfor...

Страница 12: ...O buttons Page 51 Controls the tempo for Style Song and Metronome playback 8 TRANSPOSE buttons Page 38 Transposes the entire pitch of the instrument in semitone steps 9 METRONOME button Page 37 Turns...

Страница 13: ...E EFFECT buttons Page 42 Applies various effects to the keyboard performance G MUSIC FINDER button Page 80 Calls up ideal panel setups for your performance H PART SELECT buttons Page 36 Selects a keyb...

Страница 14: ...onnecting a microphone or guitar 6 GAIN knob Page 88 For adjusting the input level of the MIC GUITAR INPUT jack 7 MIC GUITAR switch Page 88 For switching between MIC and GUITAR for proper use of the M...

Страница 15: ...computer USB TO DEVICE terminal Page 100 For connecting a USB device such as a USB flash drive RGB OUT terminal PSR S975 Page 99 For connecting to an external monitor 8 9 Using the Headphones Connect...

Страница 16: ...e instrument or overheating CAUTION When setting up the product make sure that the AC outlet you are using is easily accessible If some trouble or malfunction occurs immedi ately turn the power off an...

Страница 17: ...roduct at the minimum level When you are not using the prod uct for a long time make sure to unplug the power cord from the wall AC outlet NOTICE While recording or editing or while a message is displ...

Страница 18: ...an are available used in the display for messages 1 Call up the operation display FUNCTION TAB F MENU 2 G SYSTEM TAB E OWNER 2 Use the 4 5 buttons to select the desired language Press the EXIT button...

Страница 19: ...o display 2 Press one of the A E buttons to show a specific Demo Pressing one of the F J buttons plays back the overview Demo continuously calling up the various displays in sequence Sub menus may be...

Страница 20: ...onding menu items shown next to them Example 1 Example 2 Display based Controls 1 A J buttons 1 A J buttons 2 TAB E F buttons DIRECT ACCESS button page 23 4 Data dial and ENTER button 3 1 8 buttons 5...

Страница 21: ...ve them 2 TAB E F buttons 3 1 8 buttons For menus that appear in this section of the display use the 1 8 buttons For menus that appear in this section of the display use the 1 8 buttons For list menus...

Страница 22: ...play This convenient technique also works well with pop up parameters such as Tempo and Transpose Simply press the appropriate button ex TEMPO then rotate the Data dial to set the value 4 Data dial an...

Страница 23: ...appears in the display prompting you to press the appropriate button 2 Press the button or move the knob wheel or connected pedal corresponding to the desired setting display to instantly call up that...

Страница 24: ...e Split Point positions page 58 5 MIC Guitar input level indicator PSR S975 When a microphone guitar is connected this indicates the input level Adjust the level with the GAIN knob on the rear panel s...

Страница 25: ...IVE CONTROL knob assignments page 40 Vocal Harmony type PSR S975 Displays the currently selected Vocal Harmony type page 91 USB Audio Player Recorder information Displays information for the selected...

Страница 26: ...n 10 files exist the page numbers P1 P2 are shown below the files Pressing the corresponding button changes the display page When other pages follow the Next button appears and for the previous page t...

Страница 27: ...and most commercially available songs are copy protected to prevent illegal copying or accidental erasure They are marked by the indications at the upper left side of the file names The indications a...

Страница 28: ...o call up MENU 2 3 Press the 6 SAVE button The Character Entry window is called up 4 Enter the file name page 32 Even if you skip this step you can rename the file at any time after saving it page 30...

Страница 29: ...new folder page 32 The created folder will be automatically located at the appropriate position among the folders in alphabetical order Creating a New Folder NOTE A new folder cannot be made in the PR...

Страница 30: ...nd paste them to another location folder You can also copy folders but not move them by using the same procedure 1 In the File Selection display select the appropriate tab PRESET USER or USB which con...

Страница 31: ...If necessary select the destination folder by using the A J buttons 7 Press the 4 PASTE button to paste the file folder selected in step 4 The pasted file folder appears on the display at the appropri...

Страница 32: ...numbers marks 2 Use the Data dial to move the cursor to the desired position 3 Press the 2 6 and 7 buttons corresponding to the character you wish to enter Several different characters are assigned to...

Страница 33: ...ages 3 Press the 8 OK button to apply the selected icon While holding the right most key C6 on the keyboard turn the power on This resets the settings of the entire instrument referred to as the Syste...

Страница 34: ...ed the instrument will be restarted automatically Data Backup NOTE Before using a USB flash drive be sure to read Connecting USB Devices on page 100 NOTE You can also back up files in the USER drive s...

Страница 35: ...nd lower keys are used for the LEFT part while the upper keys excluding F 2 are used for the RIGHT 1 and 2 parts The key which divides the keyboard into the left hand and right hand sections is referr...

Страница 36: ...oice Selection display you can call up the Voice categories folders including GM XG and GM2 which do not have any VOICE category selection buttons NOTE If you pressed the ORGAN FLUTES button in step 3...

Страница 37: ...old By turning on the PART ON OFF LEFT HOLD button when the LEFT part is ON the LEFT part Voice is held even when the keys are released Non decaying Voices such as strings are held continuously while...

Страница 38: ...emperament This basic tuning can be changed in the display called up via FUNCTION TAB E MENU 1 E MASTER TUNE SCALE TUNE The pitch can be shifted up or down between 414 8Hz and 466 8Hz in approximately...

Страница 39: ...ard you decreases it You can set whether the effects caused by the MODULATION wheel will be applied or not to each keyboard part independently FUNCTION TAB E MENU 1 D CONTROLLER TAB F KEYBOARD PANEL A...

Страница 40: ...the right increases the RIGHT 2 volume Voice Effect Cho R1 R2 Adjusts the Chorus depth for the RIGHT 1 and 2 parts Rotating the knob to the right makes it deeper 3 Voice Attack R1 R2 Adjusts the leng...

Страница 41: ...requency of the filter and the resonance for all keyboard parts and the Style to change the timbre or tone of the sound Reverb Voice Style Adjusts the Reverb depth for all keyboard parts and the Style...

Страница 42: ...he DSP Digital Signal Processor effect on or off for the currently selected keyboard part The DSP VARI button is used to change between variations of the DSP effect For example this could be used to c...

Страница 43: ...MP button and the LEFT part are on Multi Assign The Multi Assign effect automatically assigns notes played simultaneously on the right hand section of the keyboard to separate parts Voices Both of the...

Страница 44: ...e 4 6 buttons to select the desired type You can set the Arpeggio volume and select the part for playing the Arpeggio in the display called up via the 7 DETAIL buttons For details refer to the Referen...

Страница 45: ...hange other settings such as Rotary Speaker and Vibrato Creating Your Original Organ Flutes Voices NOTE The term footage is a reference to the sound generation of traditional pipe organs in which the...

Страница 46: ...s You can get high quality Expansion Pack data created by Yamaha or create your own original Expansion Pack data by using the Yamaha Expansion Manager software on your computer For instructions on how...

Страница 47: ...tch of the entire instrument FUNCTION TAB E MENU 1 E MASTER TUNE SCALE TUNE TAB E MASTER TUNE Scale Tuning FUNCTION TAB E MENU 1 E MASTER TUNE SCALE TUNE TAB F SCALE TUNE Changing the part assignment...

Страница 48: ...Accompaniment The specific left hand section of the keyboard page 58 becomes the chord section and chords played in this section are automatically detected and used as a basis for fully automatic acco...

Страница 49: ...ter expressive potential Specifically it retains the subtle nuances and grooves that are difficult to reproduce using the preset drum percussion kit Yamaha Time Stretch Technology allows the audio to...

Страница 50: ...before starting Style playback After pressing one of the INTRO I III buttons start playback of the Style When the Intro finishes playing Style playback automatically shifts to the Main section ENDING...

Страница 51: ...nute Holding down either button can change the value continuously Pressing both TEMPO and buttons simultaneously lets you call up the default tempo of the last selected Style or Song TAP TEMPO button...

Страница 52: ...es making up a chord in the left hand section of the keyboard when ACMP is turned on or the LEFT part is turned on For information on which notes to press for each chord use the Chord Tutor function p...

Страница 53: ...ects etc that match the current Style it also automatically turns on ACMP and SYNC START so that you can immediately start playing the Style 3 As soon as you play a chord in the chord section the sele...

Страница 54: ...ted Style starts Automatically changing One Touch Settings with the Main sections OTS Link The convenient OTS One Touch Setting Link function lets you automatically have One Touch Settings change when...

Страница 55: ...on the Piano section ideally by using both hands or play the rhythm on the Drum section for one or two measures along with the metronome The performance is analyzed over several seconds then playback...

Страница 56: ...2 Chord 1 2 These are rhythmic chord backing parts commonly used with piano or guitar Voices PAD This part is used for sustained instruments such as strings organ choir etc PHR1 2 Phrase 1 2 These pa...

Страница 57: ...on to close the BALANCE display To change the Voice for each channel Press one of the 1 8 buttons corresponding to the desired channel to call up the Voice Selection display page 36 then select the de...

Страница 58: ...ight hand UPPER section Split Point LEFT RIGHT 1 2 Voices section NOTE You can also specify each Split Point by note name using the 3 6 buttons F STYLE LEFT Sets Split Point STYLE and Split Point LEFT...

Страница 59: ...hand UPPER section you can specify the chord type as you play the melody When the Manual Bass function is turned on via the E button the Voice for the Bass part of the current Style is muted and assig...

Страница 60: ...sting Styles The Rhythm parts of a preset Style consist of a preset Drum Kit and each drum sound is assigned to a separate note You may want to change the sound and the note assignments or make more d...

Страница 61: ...l One Touch Settings MEMORY ONE TOUCH SETTING 1 4 Creating editing Styles Style Creator FUNCTION TAB F MENU 2 A STYLE CREATOR Realtime Recording TAB E BASIC Step Recording TAB F EDIT G STEP REC Style...

Страница 62: ...n recorded Songs page 68 Commercially available Song data SMF Standard MIDI File If you want to play back a Song in USB flash drive connect the USB flash drive containing Song data to the USB TO DEVIC...

Страница 63: ...r of them scrolls backward forward continuously NOTE You can transpose the Song playback page 38 Queuing the next Song for playback While a Song is playing back you can queue up the next Song for play...

Страница 64: ...icating the current position You can change the displayed notation style by using the 1 8 buttons For details refer to the Reference Manual on the website NOTE Phrase Mark is a pre programmed marker i...

Страница 65: ...lor of the lyrics changes indicating the current position To view the text file on the TEXT display press one of the 5 6 TEXT FILES buttons to call up the File Selection display and select the desired...

Страница 66: ...ou can now play that part by yourself 4 Press the SONG F K PLAY PAUSE button to start playback Practice the muted part while viewing the SCORE display The playback of the left and extra parts will wai...

Страница 67: ...4 To stop playback press the SONG J STOP button The Song position returns to Point A and pressing the SONG F K PLAY PAUSE button lets you start from that point again After you ve finished practicing...

Страница 68: ...y A blank Song for recording is automatically set and the Song name on the Main display page 24 is set to NewSong 2 Press the SONG REC button The REC and F K PLAY PAUSE buttons flashes indicating the...

Страница 69: ...recording make the necessary settings such as Voice Style selection 1 Press the SONG REC button and the J STOP button simultaneously A blank Song for recording is automatically set and the Song name...

Страница 70: ...another Song or you turn the power off without carrying out the Save operation Advanced Features Refer to the Reference Manual on the website Chapter 3 Editing Music Notation settings SCORE 1 8 button...

Страница 71: ...formats WAV 44 1 kHz sample rate 16 bit resolution stereo MP3 MPEG 1 Audio Layer 3 44 1 48 0 kHz sample rate 64 320 kbps with variable bit rate mono stereo 1 Connect the USB flash drive containing th...

Страница 72: ...Information window which you can view the file name path sample rate etc of the selected red framed file NOTE Make sure that MENU 1 is shown at the bottom right corner of the display page 26 To close...

Страница 73: ...his selects the previous file holding it moves continuously back through the cur rent file in seconds 5 NEXT Pressing this selects the next file holding it moves continuously forward through the cur r...

Страница 74: ...of the USB flash drive 1 Connect the USB flash drive to the USB TO DEVICE terminal 2 Make the necessary settings such as Voice Style selection and the microphone connection if you want to record your...

Страница 75: ...ction display press the H FILES button NOTE The USB flash drive of USB1 is selected as the recording destination when multiple USB flash drives are connected NOTE You can use the metronome page 37 whi...

Страница 76: ...button to call up the Multi Pad Bank Selection display 2 Press one of the A J buttons to select the desired bank You can call up the other pages by pressing the buttons that correspond to the page nu...

Страница 77: ...playing back pressing the Multi Pad button starts playback at the top of the next measure When the Style or Song is stopped pressing the Multi Pad button starts playback immediately While the Style o...

Страница 78: ...Press the EXIT button to return to the AUDIO LINK MULTI PAD display Creating a Multi Pad with Audio files Audio Link Multi Pad NOTE Audio Link Multi Pads can neither be created nor played back during...

Страница 79: ...setting Select the desired Audio Link Multi Pad then carry out the same operations as in steps 3 to 10 You can play the Multi Pad to which the audio file is assigned by selecting them in the USER or...

Страница 80: ...EARCH 1 2 Search result page 81 2 Use the 2 3 buttons to select the desired Record You can also use the Data dial and the ENTER button The panel settings in the Record are called up When the Record in...

Страница 81: ...e suitable for performing a song in 2 4 and 6 8 beat can be searched but the actual Style is created by using a 4 4 beat NOTE To cancel searching press the 8 CANCEL button A MUSIC Calls up the Charact...

Страница 82: ...d to a computer http download yamaha com 2 Connect the USB flash drive which contains the Music Finder file mfd to the USB TO DEVICE terminal of the instrument 3 Press the MUSIC FINDER button to call...

Страница 83: ...heck that the registered Record is shown in the MUSIC FINDER display In the STYLE column of the Record the Song is registered as SONG the audio file as AUDIO and the Style is registered according to i...

Страница 84: ...ight hand To stop playback press the STYLE CONTROL START STOP button Calling up the Song Audio or Style registered to Music Finder NOTE If you want to play back a Song audio or Style file in the USB f...

Страница 85: ...nel settings such as those for Voices Styles and Effects For information on the panel settings that can be registered with the Registration Memory function refer to the Registration section of the Par...

Страница 86: ...the 6 SAVE button to save the Bank file For instructions on saving refer to page 28 NOTICE If you select the button whose lamp is lit in red or green here the panel setup previously mem orized to the...

Страница 87: ...sure to read Connecting USB Devices on page 100 NOTE Turning the FREEZE button on lets you disable recall of specific item s as desired For instructions refer to the Reference Manual on the website Co...

Страница 88: ...775 1 Before connecting a microphone or guitar set the GAIN knob to the minimum position 2 Set the MIC GUITAR switch When connecting a microphone set it to MIC When connecting a guitar set it to GUITA...

Страница 89: ...he instrument when you talk sing into the microphone or play the guitar 4 If necessary press the C EFFECT TYPE button to call up the EFFECT page of the MIXING CONSOLE display and select the effect typ...

Страница 90: ...6 Sing into the microphone or play the guitar 7 Adjust the volume balance between the microphone guitar sound and the instrument sound on the BALANCE display page 57 Turning the Talk function on by p...

Страница 91: ...which can be selected automatically by selecting a Vocal Harmony type Using Vocal Harmony PSR S975 4 7 Icon Mode Descriptions Microphone and man woman Chordal The harmony notes are determined by the c...

Страница 92: ...d played part LOWER to have it applied by your left hand played part or OFF in order to not to have any Vocoder effect applied by your keyboard playing For more information on the keyboard setting for...

Страница 93: ...elect the desired Synth Vocoder type 4 Make sure that the 4 HARMONY buttons in the MIC GUITAR SETTING display is set to ON If necessary use the 5 VOCAL EFFECT buttons to turn on the Vocal Harmony effe...

Страница 94: ...ocal Harmony Con trol parameters MIC SETTING VOCAL HARMONY E TYPE 8 SET UP PSR S975 Editing the Vocal Harmony Types MIC SETTING VOCAL HARMONY E TYPE TAB VOCAL HARMONY select a Vocal Harmony type 8 EDI...

Страница 95: ...applied 1 Press the MIXER EQ button to call up the MIXING CONSOLE display 2 Press the MIXER EQ button repeatedly to call up the MIXING CONSOLE display for the relevant parts The part category Panel St...

Страница 96: ...ound NOTE You can instantly set the same value for the parameter to all of the parts if you simultaneously hold down one of the A J buttons and use the 1 8 buttons or the Data dial To save the PANEL d...

Страница 97: ...ple Controlling Song Start Stop by footswitch Connect a footswitch FC4A or FC5 to one of the FOOT PEDAL jacks To assign the function to the connected pedal select SONG PLAY PAUSE in the operation disp...

Страница 98: ...ernal device then to the instrument Since this instru ment s power may automatically be turned off due to the Auto Power Off function page 17 turn off the power to the external device or disable Auto...

Страница 99: ...wn on the instrument s LCD When you select LCD the monitor shows the same contents as shown on the instrument s LCD You can connect a microphone or guitar to the MIC GUITAR INPUT jack standard 1 4 pho...

Страница 100: ...ch as Save Copy Delete and Format or when accessing the USB device Failure to observe this may result in freezing of the operation of the instrument or corruption of the USB device and the data When c...

Страница 101: ...tton to actually carry out the Format operation By pressing the USB button you can access the files which are saved in the USB flash drive Select the desired category by using the A C and F H buttons...

Страница 102: ...n transfer data between the instrument and the computer via MIDI For details on using a computer with this instrument refer to the Computer related Operations on the website Connecting to an iPhone iP...

Страница 103: ...device For detailed information about MIDI settings such as transmit receive channels on the instrument refer to the Reference Manual on the website Connecting External MIDI Devices MIDI IN OUT termin...

Страница 104: ...ns Also included are advanced Creator features such as for Styles Songs and Multi Pads 1 Call up the operation display FUNCTION TAB E F MENU 1 MENU 2 2 Press one of the A J buttons to call up the desi...

Страница 105: ...ng Song playback related settings such as Guide Function Channel settings Repeat settings etc Chapter 3 I MIDI For making MIDI related settings Chapter 11 J UTILITY CONFIG 1 For making general setting...

Страница 106: ...CTION MIDI MIXER EQ MIXING CONSOLE VOL VOICE BAL CHANNEL ON OFF USB FUNCTION UTILITY USB USB AUDIO PLAYER AUDIO File Selection display called up only when a USB flash drive is connected TAB E F ENTER...

Страница 107: ...are set to off Use the PART ON OFF RIGHT 1 RIGHT 2 LEFT button to turn it on The volume of the individual parts may be set too low Raise the volume in the BALANCE display page 57 Make sure the desire...

Страница 108: ...board pages 58 59 The Track Mute function may have been assigned to the LIVE CONTROL knob s Check the knob settings and reset the value page 40 Styles in a USB flash drive cannot be selected If the si...

Страница 109: ...f the Style and Song from the VOICE parameter the detailed settings related to the drum voice are reset and in some cases you may be unable to restore the original sound In the case of Song playback y...

Страница 110: ...5 Preset 2 User 5 Preset 2 User Part EQ 27 Parts 27 Parts Mic Guitar Effects Noise Gate Compressor 3Band EQ Noise Gate Compressor 3Band EQ Vocal Harmony Number of Presets Vocal Harmony 44 Synth Vocod...

Страница 111: ...3 MB max External Drives USB flash drive USB flash drive Connectivity DC IN 16 V 16 V Headphones Standard stereo phone jack Standard stereo phone jack Microphone Guitar Yes Yes MIDI IN OUT IN OUT AUX...

Страница 112: ...96 Expansion Pack 46 47 F Factory Reset 33 Fade In Out 52 Fast Forward 63 73 File 26 27 File Selection display 26 Fill in 51 Filter 96 Fingering type 52 Folder 29 Foot controller 97 Footage 45 Footswi...

Страница 113: ...ve 28 Scale Tune 38 Score 64 Section 51 SFF Style File Format 8 49 SFX Kit 37 SMF Standard MIDI File 62 Song 62 Song Creator 70 Speaker 98 105 Specifications 110 Split 35 Split Point 58 Standard MIDI...

Страница 114: ...items please contact your local authorities or dealer and ask for the correct method of disposal weee_eu_en_02 Informations concernant la collecte et le traitement des d chets d quipements lectriques...

Страница 115: ......

Страница 116: ...ments will cause this warranty to be void This warranty covers only the Original Owner and is not transferable In Order to Obtain Warranty Service Warranty service will only be provided for defective...

Страница 117: ...DENMARK Yamaha Music Denmark Fillial of Yamaha Music Europe GmbH Tyskland Generatorvej 8C ST TH 2860 S borg Denmark Tel 45 44 92 49 00 FINLAND F Musiikki Oy Antaksentie 4 FI 01510 Vantaa Finland Tel 3...

Страница 118: ...Yamaha Global Site https www yamaha com Yamaha Downloads http download yamaha com ZY93900 Manual Development Group 2018 Yamaha Corporation Published 01 2018 POMA B0...

Отзывы: