background image

126

 PSR-A3000 Owner’s Manual

6

Repeat steps 3–5 as desired. 

7

Press the [I] or [J] (SAVE) button on any of the pages to save the created Style.

For instructions, refer to page 28.

NOTICE

The created Style will be lost if you change to another Style or turn off the power to the instrument without carrying out the Save operation.

Realtime Recording

In the BASIC page, you can record your original rhythm pattern from the keyboard. 

Recording Rhythm Channels 1–2

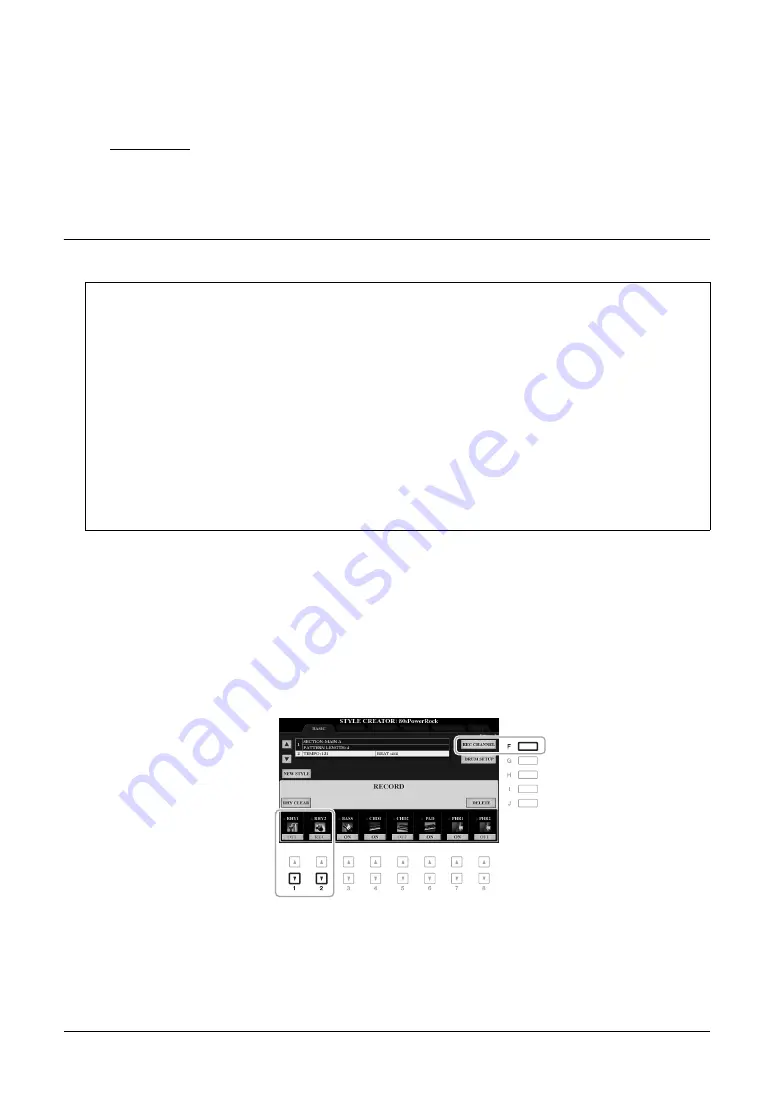
The procedure below applies to step 4 in the Basic Procedure on page 125. 

1

From the BASIC page, while holding down the [F] (REC CHANNEL) button, press the 
[1

] or [2

] button to select the desired channel as the recording target. 

A Rhythm channel can be selected as the recording target no matter whether already recorded data is included 
or not. If already recorded data is included in the selected channel, you can record notes additionally to the 
existing data. 

Realtime Recording Characteristics in the Style Creator

• Loop Recording

Style playback repeats the rhythm patterns of several measures in a “loop,” and Style recording is also done using 
loops. For example, if you start recording with a two-measure MAIN section, the two measures are repeatedly 
recorded. Notes that you record will play back from the next repetition (loop), letting you record while hearing 
previously recorded material.

• Overdub Recording

This method records new material to a channel already containing recorded data, without deleting the original data. 
In Style recording, the recorded data is not deleted, except when using functions such as Rhythm Clear (page 127) 
and Delete (pages 127,
 129). For example, if you start recording with a two-measure MAIN section, the two 
measures are repeated many times. Notes that you record will play back from the next repetition, letting you 
overdub new material to the loop while hearing previously recorded material. When creating a Style based on an 
existing internal Style, overdub recording is applied only to the rhythm channels. For all other channels (except 
rhythm), you need to delete the original data before recording.

Содержание PSR-A3000

Страница 1: ...efully so that you can fully take advantage of the advanced and convenient functions of the instrument We also recommend that you keep this manual in a safe and handy place for future reference Before using the instrument be sure to read PRECAUTIONS on pages 5 6 Digital Workstation Owner s Manual EN ...

Страница 2: ...ction or effect works when the unit is operating as designed are not covered by the manufacturer s warranty and are therefore the owners responsibility Please study this manual carefully and consult your dealer before requesting service ENVIRONMENTAL ISSUES Yamaha strives to produce products that are both user safe and environmentally friendly We sincerely believe that our products and the product...

Страница 3: ... following measures Relocate either this product or the device that is being affected by the interference Utilize power outlets that are on different branch circuit breaker or fuse circuits or install AC line filter s In the case of radio or TV interference relocate reorient the antenna If the antenna lead in is 300 ohm ribbon lead change the lead in to co axial type cable If these corrective meas...

Страница 4: ...lugs convenience receptacles and the point where they exit from the apparatus 11 Only use attachments accessories specified by the manufacturer 12 Use only with the cart stand tri pod bracket or table specified by the manufacturer or sold with the apparatus When a cart is used use caution when moving the cart apparatus combination to avoid injury from tip over 13 Unplug this apparatus during light...

Страница 5: ...the instrument Use the specified adaptor page 215 only Using the wrong adaptor can result in damage to the instrument or overheating Check the electric plug periodically and remove any dirt or dust which may have accumulated on it This instrument contains no user serviceable parts Do not open the instrument or attempt to disassemble or modify the internal components in any way If it should appear ...

Страница 6: ...or uncomfortable volume level since this can cause permanent hearing loss If you experience any hearing loss or ringing in the ears consult a physician Always turn the power off when the instrument is not in use Even when the Standby On switch is in standby status display is off electricity is still flowing to the instrument at the minimum level When you are not using the instrument for a long tim...

Страница 7: ...Effects as well as MIDI related information Computer related Operations Includes instructions on connecting this instrument to a computer and operations related to transmitting receiving MIDI data iPhone iPad Connection Manual only in English French German and Spanish Explains how to connect the instrument to smart devices such as an iPhone iPad etc To obtain these materials access the Yamaha Down...

Страница 8: ...ue to copyright laws and other relevant laws you are NOT allowed to distribute media in which these contents are saved or recorded and remain virtually the same or very similar to those in the product The contents described above include a computer program Accompaniment Style data MIDI data WAVE data voice recording data a score score data etc You are allowed to distribute medium in which your per...

Страница 9: ...ed and share them over the Internet or burn your own original CDs The instrument also provides a variety of advanced convenient audio playback and processing functions including Time Stretch which lets you slow down or speed up an audio file without changing the pitch and Pitch Shift which allows you to change the pitch without affecting the time Moreover a Vocal Cancel function effectively attenu...

Страница 10: ... Notation Score 64 Displaying Lyrics Text 65 Turning Each Channel of the Song On Off 65 One handed Practice with the Guide Function 66 Repeat Playback 67 Recording Your Performance 68 4 USB Audio Player Recorder Playing Back and Recording Audio Files 71 Playing Back Audio Files 71 Recording Your Performance as Audio 74 5 Multi Pads Adding Musical Phrases to Your Performance 76 Playing the Multi Pa...

Страница 11: ...ing Songs Song Creator 151 4 USB Audio Player Recorder 168 5 Multi Pads 168 Creating Multi Pads Multi Pad Creator 168 Editing Multi Pads 170 6 Music Finder 172 Creating a Set of Favorite Records 172 Editing Records 173 Saving the Records as a Single File 174 7 Registration Memory 176 Editing the Registration Memory 176 Disabling Recall of Specific Items Freeze 177 Calling Up Registration Memory Nu...

Страница 12: ... the entire pitch of the instrument in semitone steps 9 METRONOME button Page 38 Turns the metronome on or off FADE IN OUT button Page 53 Controls fade in out of Style Song playback OTS LINK button Page 55 Turns on off the OTS Link function STYLE CONTROL buttons Page 51 Controls Style playback SCALE SETTING buttons page 88 Lowers the pitches of specific notes by 50 cents SCALE MEMORY MEMORY 1 5 RE...

Страница 13: ...EFFECT buttons Page 42 Applies various effects to the keyboard performance G MUSIC FINDER button Page 80 Calls up ideal panel setups for your performance H PART SELECT buttons Page 37 Selects a keyboard part I PART ON OFF buttons Page 36 Turns the keyboard part on or off J REGISTRATION MEMORY buttons Page 85 Registers and recalls panel setups K MULTI PAD CONTROL buttons Page 76 Selects and plays a...

Страница 14: ...rminals Page 98 For connecting external MIDI devices 6 USB TO HOST terminal Page 97 For connecting to a computer 7 USB TO DEVICE terminal Page 95 For connecting a USB device such as a USB flash drive 1 2 3 4 Air Vents NOTICE This instrument has special air vents in the top panel and rear panel Do not place objects where they might block the air vent since this may prevent adequate ventilation of t...

Страница 15: ...ontrols and Terminals 5 6 7 Using the Headphones Connect a pair of headphones to the PHONES jack CAUTION Do not listen with the headphones at high volume for long periods of time Doing so may cause hearing loss Standard stereo phone plug ...

Страница 16: ...age to the instrument or overheating CAUTION When setting up the product make sure that the AC outlet you are using is easily accessible If some trouble or malfunction occurs immedi ately turn the power off and disconnect the plug from the outlet NOTE Follow the order shown above in reverse when disconnecting the AC adaptor 3 1 2 AC adaptor DC IN jack page 14 AC Outlet The shape of the plug and ou...

Страница 17: ...at the minimum level When you are not using the prod uct for a long time make sure to unplug the power cord from the wall AC outlet NOTICE While recording or editing or while a message is displayed the power cannot be turned off even if you press the Standby On switch If you want to turn off the power press the Standby On switch after recording editing or after the message has disap peared If you ...

Страница 18: ...n are available used in the display for messages 1 Call up the operation display FUNCTION TAB F MENU 2 G SYSTEM TAB E OWNER 2 Use the 4 5 buttons to select the desired language Press the EXIT button several times to exit from the display Adjusting the Master Volume CAUTION Do not use the instrument at high volume for long periods of time Doing so may cause hearing loss Changing the Display Languag...

Страница 19: ...ay 2 Press one of the A H buttons to show a specific Demo Pressing one of the I J buttons plays back the overview Demo continuously calling up the various displays in sequence Sub menus may be shown on the display Press one of the A J buttons corresponding to the desired sub menu 3 Press the EXIT button several times to exit from the Demo display Playing the Demos NOTE To return to the higher leve...

Страница 20: ...s shown next to them Example 1 Example 2 Display based Controls 1 A J buttons 1 A J buttons 2 TAB E F buttons DIRECT ACCESS button page 23 4 Data dial and ENTER button 3 1 8 buttons 5 EXIT button 1 A J buttons In the File Selection display page 26 the A J buttons can be used to select the corresponding files The A and B buttons are used to move the cursor up or down The F and H buttons are used to...

Страница 21: ...hem 2 TAB E F buttons 3 1 8 buttons For menus that appear in this section of the display use the 1 8 buttons For menus that appear in this section of the display use the 1 8 buttons For list menus that appear use the 1 8 buttons to select the desired item For parameters that appear in slider or knob form use the 1 8 buttons to adjust the value To reset the desired parameter value to its default si...

Страница 22: ...lay This convenient technique also works well with pop up parameters such as Tempo and Transpose Simply press the appropriate button ex TEMPO then rotate the Data dial to set the value 4 Data dial and ENTER button Rotate the Data dial to move the cursor Press the ENTER button to actu ally select the file The selected file is highlighted Rotate the Data dial to adjust the selected parameter Select ...

Страница 23: ...pears in the display prompting you to press the appropriate button 2 Press the button or move the joystick or connected pedal corresponding to the desired setting display to instantly call up that display For example pressing the GUIDE button calls up the display in which the Guide mode can be set A message information or confirmation dialog sometimes appears on the screen to facilitate operation ...

Страница 24: ...ified in the chord section of the keyboard will be displayed When the Song containing the chord data is played the current chord name will be displayed 5 Scale Tune setting button Pressing the B C buttons calls up the SCALE TUNE display page 108 for making scale settings 6 Scale Tune Bank name Displays the currently selected Scale Tune Bank Pressing the D button calls up the Scale Tune Bank Select...

Страница 25: ...56 65 among the parts Use the 1 8 buttons to change the settings Joystick information Indicates the currently selected number of the eight available Joystick function assignments page 40 USB Audio Player Recorder information Displays information for the selected audio file in the connected USB flash drive page 71 including the elapsed playback time file name and Repeat mode icon When the audio rec...

Страница 26: ...n 10 files exist the page numbers P1 P2 are shown below the files Pressing the corresponding button changes the display page When other pages follow the Next button appears and for the previous page the Prev button appears 3 MENU 1 MENU 2 At the bottom of the File Selection display you can toggle the indication between MENU 1 and MENU 2 by pressing the 8 button Selecting MENU 1 shows the function ...

Страница 27: ...s and most commercially available songs are copy protected to prevent illegal copying or accidental erasure They are marked by the indications at the upper left side of the file names The indications and relevant restrictions are detailed below Prot 1 Indicates Preset Songs copied to the USER drive These only can be copied moved deleted in the USER drive Prot 2 Orig Indicates Yamaha protection for...

Страница 28: ... call up MENU 2 3 Press the 6 SAVE button The Character Entry window is called up 4 Enter the file name page 32 Even if you skip this step you can rename the file at any time after saving it page 30 5 Press the 8 OK button to actually save the file The saved file will be automatically located at the appropriate position among the files in alphabetical order Saving a File NOTE Files cannot be saved...

Страница 29: ...folder page 32 The created folder will be automatically located at the appropriate position among the folders in alphabetical order Creating a New Folder NOTE A new folder cannot be made in the PRESET tab or the Expansion folder page 46 in the USER tab NOTE The maximum number of files folders which can be saved in a folder is 500 NOTE In the USER tab no more than three folder levels can be created...

Страница 30: ...es and paste them to another location folder You can also copy folders but not move them by using the same procedure 1 In the File Selection display select the appropriate tab PRESET USER or USB which contains the file folder you want to copy by using the TAB E F buttons 2 Make sure that MENU 2 is shown at the bottom right corner of the display If necessary press the 8 button to call up MENU 2 Ren...

Страница 31: ...s If necessary select the destination folder by using the A J buttons 7 Press the 4 PASTE button to paste the file folder selected in step 4 The pasted file folder appears on the display at the appropriate position among the files in alphabetical order You can delete individual or multiple files folders 1 In the File Selection display select the appropriate tab USER or USB which contains the file ...

Страница 32: ...Lowercase letters numbers marks 2 Use the Data dial to move the cursor to the desired position 3 Press the 2 6 and 7 buttons corresponding to the character you wish to enter Several different characters are assigned to each button and the characters change each time you press the button To actually enter the selected character move the cursor or press another character input button Alternately you...

Страница 33: ...3 Press the 8 OK button to apply the selected icon While holding the right most key C6 on the keyboard turn the power on This resets the settings of the entire instrument referred to as the System Setup parameters to their factory default settings Refer to the Parameter Chart in the Data List on the website for details about which parameters belong to System Setup You can also reset specified sett...

Страница 34: ...eration is completed the instrument will be restarted automatically Data Backup NOTE Before using a USB flash drive be sure to read Connecting USB Devices on page 95 NOTE You can also back up files in the USER drive such as Voice Song Style Multi Pad and Registration Memory by copying them individually to a USB flash drive as desired For instructions refer to page 30 NOTE You can also back up Syst...

Страница 35: ...0 Owner s Manual 35 Basic Operations Registration Memory Oriental Scales Mixing Console Connections Other Functions Styles Voices Songs USB Audio Player Recorder Multi Pads Music Finder 1 2 3 4 5 6 7 8 9 10 11 ...

Страница 36: ...on the LEFT and RIGHT 1 and or 2 parts The F 2 and lower keys are used for the LEFT part while the upper keys excluding F 2 are used for the RIGHT 1 and 2 parts The key which divides the keyboard into the left hand and right hand sections is referred to as the Split Point 1 Turn on the PART ON OFF button corresponding to the part you want to use The corresponding PART SELECT button is automaticall...

Страница 37: ...he other part 6 Play the keyboard NOTE By pressing the 8 UP button in the Voice Selection display you can call up the Voice categories folders including GM XG and GM2 which do not have any VOICE category selection buttons NOTE If you pressed the ORGAN FLUTES button in step 3 press the I PRE SETS button before proceeding to step 4 Expansion Voices Voices additionally installed page 46 User Voices V...

Страница 38: ...on the PART ON OFF LEFT HOLD button when the LEFT part is ON the LEFT part Voice is held even when the keys are released Non decaying Voices such as strings are held continuously while decay type Voices such as piano decay more slowly as if the sustain pedal has been pressed This function is convenient when used along with Style playback since the sound of the chord matching Style playback is main...

Страница 39: ...g to equal temperament This basic tuning can be changed in the display called up via FUNCTION TAB E MENU 1 E MASTER TUNE SCALE TUNE The pitch can be shifted up or down between 414 8Hz and 466 8Hz in approximately 0 2 Hz increments For details refer to the Advanced Features section page 108 Changing the Pitch of the Keyboard Adjusting the Pitch in Semitones Transpose NOTE The Transpose functions do...

Страница 40: ...to the right or down by moving the joystick to the left while playing the keyboard This is applied to all keyboard parts RIGHT 1 2 and LEFT The maximum pitch bend range can be changed on the TUNE page of the Mixing Console display page 183 Y Modulation Applies modulation effects which are set on the CONTROLLER page of the VOICE SET display page 115 to notes played on the keyboard By default this i...

Страница 41: ...k to control the sound while playing the keyboard or playing back the Style etc NOTE Pressing the F RESET button resets the selected function s parameter value to the default while pressing the G ALL RESET button resets all parame ter values of the assignable functions X X Y Y ...

Страница 42: ...a concert hall The DSP button is used to turn the DSP Digital Signal Processor effect on or off for the currently selected keyboard part The DSP VARI button is used to change between variations of the DSP effect For example this could be used to change the rotating speed slow fast of the rotary speaker effect while you play Performance effects such as harmony duet trio etc echo tremolo and trill c...

Страница 43: ...he ACMP button and the LEFT part are on Multi Assign The Multi Assign effect automatically assigns notes played simultaneously on the right hand section of the keyboard to separate parts Voices Both of the keyboard parts RIGHT 1 and RIGHT 2 should be turned on when using the Multi Assign effect The RIGHT 1 and RIGHT 2 Voices are alternately assigned to the notes in the order you play 2 2 2 3 NOTE ...

Страница 44: ...cho 2 3 Use the 4 6 buttons to select the desired type You can set the Arpeggio volume and select the part for playing the Arpeggio in the display called up via the 7 DETAIL buttons For details refer to the Advanced Features section page 106 3 Play a note or notes to trigger the Arpeggio The arpeggiated phrase differs depending on the notes played To turn off the effect turn the HARMONY ARPEGGIO b...

Страница 45: ...etween these two footages If you want you can select the Organ type and change other settings such as Rotary Speaker and Vibrato Creating Your Original Organ Flutes Voices NOTE The term footage is a reference to the sound generation of traditional pipe organs in which the sound is pro duced by pipes of different lengths in feet NOTE Pressing the D button while holding down one of the 1 buttons can...

Страница 46: ...pi to be installed to the instrument is referred to as Pack Installation file Only one Pack Installation file can be installed to the instrument If you want to install multiple Expansion Packs bundle the packs together on your computer by using the Yamaha Expansion Manager software For information on how to use the software refer to the accompanying manual 1 Connect the USB flash drive in which th...

Страница 47: ...tory in the USB flash drive The saved file is named PSR A3000_InstrumentInfo n27 Song Style or Registration Memory containing Expansion Voices or Styles Song Style or Registration Memory containing any Expansion Voices or Styles will not sound properly or cannot be called up if the Expansion Pack data does not exist in the instrument We recommend that you write down the name of the Expansion Pack ...

Страница 48: ... related settings Fine tuning the pitch of the entire instrument FUNCTION TAB E MENU 1 E MASTER TUNE SCALE TUNE TAB E MASTER TUNE Scale Tuning FUNCTION TAB E MENU 1 E MASTER TUNE SCALE TUNE TAB F SCALE TUNE Changing the part assignment of the TRANS POSE buttons FUNCTION TAB E MENU 1 D CONTROLLER TAB F KEYBOARD PANEL B 4 TRANSPOSE ASSIGN Editing parameters assigned to the joystick ASSIGN I ASSIGN E...

Страница 49: ...pond to the page numbers P1 P2 or by pressing the same STYLE category selection button several times 3 Press the ACMP button to turn on the Auto Accompaniment The specific left hand section of the keyboard page 58 becomes the chord section and chords played in this section are automatically detected and used as a basis for fully automatic accompaniment with the selected Style Playing a Style with ...

Страница 50: ...iate or even harmonically correct for all songs and for all chord playing In some cases for example playing a simple major triad for a country song may result in a jazzy seventh chord or playing an on bass chord may result in inappropriate or unexpected accompaniment DJ These Styles can be selected from the category called up via the DANCE button These contain their own special chord progressions ...

Страница 51: ...add an introduction before starting Style playback After pressing one of the INTRO I III buttons start playback of the Style When the Intro finishes playing Style playback automatically shifts to the Main section ENDING rit I III buttons The instrument features three different Ending sections to add an ending before stopping Style playback When you press one of the ENDING rit I III buttons while S...

Страница 52: ...imultaneously lets you call up the default tempo of the last selected Style or Song TAP TEMPO button During playback of a Style or Song you can change the tempo by tapping the TAP TEMPO button twice at the desired tempo When Style and Song are stopped tapping the TAP TEMPO button four times for a 4 4 time signature starts Style playback at the tempo you tapped Changing Pattern Variation Sections D...

Страница 53: ...fy the chord by pressing the notes making up a chord in the left hand section of the keyboard when ACMP is turned on or the LEFT part is turned on For information on which notes to press for each chord use the Chord Tutor function page 54 or refer to page 121 AI FULL KEYBOARD This lets you play just about anything anywhere on the keyboard using both hands like conventional playing of a piano and s...

Страница 54: ...that match the current Style it also automatically turns on ACMP and SYNC START so that you can immediately start playing the Style 3 As soon as you play a chord in the chord section the selected Style starts Each Style has four One Touch Setting setups Press other ONE TOUCH SETTING 1 4 buttons to try out other setups Using the Chord Tutor Function NOTE Depending on the chord some notes may be omi...

Страница 55: ...gs for playing the music piece are called up 4 As soon as you play a chord in the chord section the selected Style starts Automatically changing One Touch Settings with the Main sections OTS Link The convenient OTS One Touch Setting Link function lets you automatically have One Touch Settings change when you select a different Main section A D The Main sections A B C and D correspond to One Touch ...

Страница 56: ...OFF button repeatedly if necessary to call up the CHANNEL ON OFF STYLE display which contains the desired channel 2 Use the 1 8 buttons to turn the channels on or off To listen to only one channel by itself hold down the appropriate button for the channel to set the channel to SOLO To cancel SOLO simply press the appropriate channel button again 3 Press the EXIT button to close the CHANNEL ON OFF ...

Страница 57: ...board parts LEFT RIGHT1 and 2 In the BALANCE 2 2 page you can adjust the volume balance between the Song MIDI Audio page 71 sound input from the AUX IN jack and all keyboard parts KBD For information on the 2 3 buttons refer to page 74 3 Press the EXIT button to close the BALANCE display Adjusting the Volume Balance Between the Parts 2 NOTE On the VOL VOICE page of the MIX ING CONSOLE display page...

Страница 58: ...ght hand UPPER section Split Point LEFT RIGHT 1 2 Voices section NOTE You can also specify each Split Point by note name using the 3 6 buttons F STYLE LEFT Sets Split Point STYLE and Split Point LEFT to the same note Press the F button and rotate the Data dial You can also specify the Split Point directly from the keyboard by pressing the desired key on the keyboard while holding the F button G ST...

Страница 59: ...and UPPER section you can specify the chord type as you play the melody When the Manual Bass function is turned on via the E button the Voice for the Bass part of the current Style is muted and assigned to the left hand LOWER section The Chord Fingering setting page 53 will be set to a specific type FIN GERED automatically in which case you should press three or more notes simultaneously to specif...

Страница 60: ...or each channel or by importing pattern data from other existing Styles The Rhythm parts of a preset Style consist of a preset Drum Kit and each drum sound is assigned to a separate note You may want to change the sound and the note assignments or make more detailed settings such as volume balance effect etc By using the Drum Setup function of the Style Creator you can edit the Rhythm part of a St...

Страница 61: ...al One Touch Settings MEMORY ONE TOUCH SETTING 1 4 Creating editing Styles Style Creator FUNCTION TAB F MENU 2 A STYLE CREATOR Realtime Recording TAB E BASIC Step Recording TAB F EDIT G STEP REC Style Assembly TAB E F ASSEMBLY Editing the rhythmic feel TAB E F GROOVE Editing data for each channel TAB E F CHANNEL Making Style File Format settings TAB E F PARAMETER Editing the rhythm part of a Style...

Страница 62: ...own recorded Songs page 68 Commercially available Song data SMF Standard MIDI File If you want to play back a Song in USB flash drive connect the USB flash drive containing Song data to the USB TO DEVICE terminal beforehand 1 Press the SONG SELECT button to call up the Song Selection display 2 Use the TAB E F buttons to select the location of the desired Song 3 Select the desired Song by using the...

Страница 63: ...ither of them scrolls backward forward continuously NOTE You can transpose the Song playback page 39 Queuing the next Song for playback While a Song is playing back you can queue up the next Song for playback This is convenient for chaining it to the next Song smoothly during live performance Select the Song you want to play next in the Song Selection display while a Song is playing back The NEXT ...

Страница 64: ...ating the current position You can change the displayed notation style by using the 1 8 buttons For details refer to the Advanced Features section page 143 NOTE Phrase Mark is a pre programmed marker in certain Song data which indicates a specific location in the Song For Songs containing Phrase Marks You can change the unit for rewinding fast forwarding by pressing the D BAR or the E PHRASE MARK ...

Страница 65: ...opped As Song playback starts the color of the lyrics changes indicating the current position To view the text file on the TEXT display press one of the 5 6 TEXT FILES buttons to call up the File Selection display and select the desired file created on your computer For more information about the LYRICS TEXT display refer to the Advanced Features section page 145 A Song consists of 16 separate cha...

Страница 66: ...can now play that part by yourself 4 Press the SONG F K PLAY PAUSE button to start playback Practice the muted part while viewing the SCORE display The playback of the left and extra parts will wait for you to play the notes correctly After your practice turn the GUIDE button off NOTE Usually each part is recorded to the following channels Channels 1 3 keyboard parts RIGHT 1 LEFT RIGHT 2 Channels ...

Страница 67: ...4 To stop playback press the SONG J STOP button The Song position returns to Point A and pressing the SONG F K PLAY PAUSE button lets you start from that point again After you ve finished practicing press the REPEAT button to turn off Repeat playback Repeat Playback NOTE You can play multiple Songs repeatedly FUNCTION TAB E MENU 1 H SONG SETTING TAB F OTH ERS G REPEAT MODE Specifying a Range of Me...

Страница 68: ... simultaneously A blank Song for recording is automatically set and the Song name on the Main display page 24 is set to NewSong 2 Press the SONG REC button The REC and F K PLAY PAUSE buttons flashes indicating the standby status 3 Start recording You can start recording by playing the keyboard starting a Style playing a Multi Pad or pressing the SONG F K PLAY PAUSE button 4 After you finish your p...

Страница 69: ...fore recording make the necessary settings such as Voice Style selection 1 Press the SONG REC button and the J STOP button simultaneously A blank Song for recording is automatically set and the Song name on the Main display page 24 is set to NewSong 2 While holding down the SONG REC button press the appropriate 1 8 buttons to set the desired channels to REC To cancel the REC status of the channel ...

Страница 70: ...er Song or you turn the power off without carrying out the Save operation Advanced Features Refer to the Advanced Features section in this manual Chapter 3 Editing Music Notation settings SCORE 1 8 buttons Editing Lyrics Text display settings LYRICS TEXT 1 8 buttons Using the Auto Accompaniment features with Song Playback SONG J F K ACMP STYLE CONTROL SYNC START STYLE CONTROL START STOP Song Playb...

Страница 71: ...owing formats WAV 44 1 kHz sample rate 16 bit resolution stereo MP3 MPEG 1 Audio Layer 3 44 1 48 0 kHz sample rate 64 320 kbps with variable bit rate mono stereo 1 Connect the USB flash drive containing the audio files to the USB TO DEVICE terminal 2 Press the USB AUDIO PLAYER button to call up the USB AUDIO PLAYER display 3 Press the H FILES button to call up the Audio File Selection display NOTE...

Страница 72: ...ing Audio file information Pressing the 6 INFO button calls up the Information window which you can view the file name path sample rate etc of the selected red framed file NOTE Make sure that MENU 1 is shown at the bottom right corner of the display page 26 To close the window press the F OK button NOTE Make sure that MENU 1 is shown at the bottom right corner of the display page 26 NOTICE Do not ...

Страница 73: ...ng this selects the previous file holding it moves continuously back through the cur rent file in seconds 5 NEXT Pressing this selects the next file holding it moves continuously forward through the cur rent file in seconds 6 AUDIO VOLUME Adjusts the volume of the current audio file NOTE The volume balance between the Song playback and audio file playback can be adjusted via the BAL button For ins...

Страница 74: ...ary settings such as Voice Style selection 3 Press the USB AUDIO PLAYER button to call up the USB AUDIO PLAYER display Adjusting the Volume Balance Between Song and Audio Playback Pressing the BAL button once or twice calls up the BALANCE 2 2 display In this display you can adjust the volume balance between the Song MIDI and Audio by using the 2 3 buttons When this is set to CENTER the levels of t...

Страница 75: ...ance in the File Selection display press the H FILES button NOTE You can use the metronome page 38 while recording however the metro nome sound will not be recorded Recordable time NOTICE Do not attempt to disconnect the USB flash drive or turn the power off during recording Doing so may corrupt the USB flash drive data or the recording data 5 6 Elapsed recording time NOTE The recording operation ...

Страница 76: ...LECT button to call up the Multi Pad Bank Selection display 2 Press one of the A J buttons to select the desired bank You can call up the other pages by pressing the buttons that correspond to the page numbers P1 P2 or pressing the MULTI PAD CONTROL SELECT button repeatedly Press the 8 UP button to call up the next higher level folder to which the Multi Pads are categorized 3 Press any of the MULT...

Страница 77: ...playing back pressing the Multi Pad button starts playback at the top of the next measure When the Style or Song is stopped pressing the Multi Pad button starts playback immediately While the Style or Song is playing back pressing the STYLE CONTROL START STOP or SONG J STOP button also stops playback of the Multi Pad s While both the Style and Song is playing back pressing the SONG J STOP button s...

Страница 78: ...uttons 6 Press the EXIT button to return to the AUDIO LINK MULTI PAD display Creating a Multi Pad with Audio files Audio Link Multi Pad NOTE Audio Link Multi Pads can neither be created nor played back during play back recording standby or recording of audio files NOTE Before using a USB flash drive be sure to read Connecting USB Devices on page 95 NOTE Make sure that MENU 1 is shown at the bottom...

Страница 79: ...ng Select the desired Audio Link Multi Pad then carry out the same operations as in steps 3 to 10 You can play the Multi Pad to which the audio file is assigned by selecting them in the USER or USB tab of the Multi Pad Bank Selection display Although you can play them via the same operations in page 76 note the following limitations Make sure to connect the USB flash drive including the correspond...

Страница 80: ...Search result page 81 2 Use the 2 3 buttons to select the desired Record You can also use the Data dial and the ENTER button The panel settings in the Record are called up When the Record including the Style name is selected the ACMP and SYNC START buttons are turned on and the corresponding Style is called up This lets you start Style playback immediately Selecting the Desired Record Panel Settin...

Страница 81: ...Style suitable for performing a song in 2 4 and 6 8 beat can be searched but the actual Style is created by using a 4 4 beat NOTE To cancel searching press the 8 CANCEL button A MUSIC Calls up the Character Entry window page 32 to enter the song title To clear the entered title press the corresponding F CLEAR button B KEYWORD Calls up the Character Entry window page 32 to enter the keyword To clea...

Страница 82: ...nected to a computer http download yamaha com 2 Connect the USB flash drive which contains the Music Finder file mfd to the USB TO DEVICE terminal of the instrument 3 Press the MUSIC FINDER button to call up the MUSIC FINDER display 4 Use the 7 FILES buttons to call up the File Selection display 5 Select the Music Finder file in the USB flash drive by pressing the A J buttons to call up a message ...

Страница 83: ...gister the file 4 Check that the registered Record is shown in the MUSIC FINDER display In the STYLE column of the Record the Song is registered as SONG the audio file as AUDIO and the Style is registered according to its Style name NOTE Even after appending or replacing the Music Finder Records you can reset them to their original factory settings by selecting the MusicFinderPreset file in PRESET...

Страница 84: ...hand To stop playback press the STYLE CONTROL START STOP button Calling up the Song Audio or Style registered to Music Finder NOTE If you want to play back a Song audio or Style file in the USB flash drive that has been registered as a Record make sure to connect the same USB flash drive to the USB TO DEVICE termi nal NOTE When searching for Songs or audio files page 81 it is necessary to set the ...

Страница 85: ...d panel settings such as those for Voices Styles and Effects For information on the panel settings that can be registered with the Registration Memory function refer to the Registration section of the Parameter Chart in the Data List on the website 2 Press the MEMORY button in the REGISTRATION MEMORY section The display for selecting the groups to be registered appears 3 Determine the groups you w...

Страница 86: ...the 6 SAVE button to save the Bank file For instructions on saving refer to page 28 NOTICE If you select the button whose lamp is lit in red or green here the panel setup previously mem orized to the button will be erased and replaced by the new settings About the lamp status Red Data registered and currently selected Green Data registered but not currently selected Off No data registered NOTE The...

Страница 87: ...drive be sure to read Connecting USB Devices on page 95 NOTE Turning the FREEZE button on lets you disable recall of specific item s as desired For instructions refer to page 177 Confirming the Registration Memory Information In the REGISTRATION BANK Selection display press the 6 INFO button to call up the Information window showing which Voices and Style are memorized to the 1 8 buttons of a Regi...

Страница 88: ...lay can be called up via FUNCTION TAB E MENU 1 E MASTER TUNE SCALE TUNE TAB F SCALE TUNE For details refer to the Advanced Features section page 108 The settings you make using the SCALE SETTING buttons or in the SCALE TUNE display can be memorized to the SCALE MEMORY buttons for instant recall 1 Set up the scale settings as desired using the SCALE SETTING buttons or the parameters in the SCALE TU...

Страница 89: ... can be saved as a single Scale Tune Bank file 1 Press the DIRECT ACCESS button followed by the EXIT button to call up the Main display About the lamp status of the 1 5 buttons On Data registered and currently selected Off No data registered or not currently selected NOTE The RESET button lights up when all notes are of normal pitch NOTICE The scale settings memorized to the numbered button will b...

Страница 90: ...D button to call up the Scale Tune Bank Selection display 3 Press one of the A J buttons to select a Bank 4 Press one of the SCALE MEMORY 1 5 buttons to select a specific memory location 3 The SCALE TUNE EDIT display appears SCALE TUNE EDIT display The contents of the current Scale Tune Bank are listed in the SCALE TUNE EDIT display The names of the Scale Settings memorized to the SCALE MEMORY 1 5...

Страница 91: ... stereo image and lets you set how the effects are applied 1 Press the MIXER EQ button to call up the MIXING CONSOLE display 2 Press the MIXER EQ button repeatedly to call up the MIXING CONSOLE display for the relevant parts The part category Panel Style Song is indicated at the top of the display Basic Procedure 3 NOTE You can switch between the pages of SONG by pressing the A PART but ton Entire...

Страница 92: ... NOTE You can instantly set the same value for the parameter to all of the parts if you simultaneously hold down one of the A J buttons and use the 1 8 buttons or the Data dial To save the PANEL display settings Register them to Registration Memory page 85 To save the STYLE display settings Save them as Style data If you want to recall the settings for future use select the Style file saved here 1...

Страница 93: ...red Example Controlling Song Start Stop by footswitch Connect a footswitch FC4 FC4A or FC5 to one of the FOOT PEDAL jacks To assign the function to the connected pedal select SONG PLAY PAUSE in the operation display FUNCTION TAB E MENU 1 D CONTROLLER TAB E FOOT PEDAL CAUTION Before connecting the instrument to other electronic components turn off the power of all the components Also before turning...

Страница 94: ...ernal device When turning off the power first turn off the power to the external device then to the instrument Since this instru ment s power may automatically be turned off due to the Auto Power Off function page 17 turn off the power to the external device or disable Auto Power Off when you do not intend to operate the instrument NOTICE Do not route the output from the OUTPUT jacks to the AUX IN...

Страница 95: ...le management operations such as Save Copy Delete and Format or when accessing the USB device Failure to observe this may result in freezing of the operation of the instrument or corruption of the USB device and the data When connecting then disconnecting the USB device and vice versa make sure to wait a few seconds between the two opera tions NOTE If you intend to connect two devices at the same ...

Страница 96: ...e Format operation By pressing the USB button you can access the files which are saved in the USB flash drive Select the desired category by using the A C and F H buttons then select files by pressing one of the A J buttons Formatting a USB Flash Drive NOTICE The format operation deletes any previously existing data Make sure that the USB flash drive you are formatting does not contain important d...

Страница 97: ...pps By connecting a computer to the USB TO HOST terminal you can transfer data between the instrument and the computer via MIDI For details on using a computer with this instrument refer to the Computer related Operations on the website Connecting to an iPhone iPad USB TO DEVICE USB TO HOST and MIDI terminals NOTICE Do not place your iPhone iPad in an unstable position Doing so may cause the devic...

Страница 98: ...t MIDI settings such as transmit receive channels on the instrument refer to the Advanced Features section page 194 Connecting External MIDI Devices MIDI IN OUT terminals MIDI IN MIDI OUT MIDI transmit MIDI receive playback MIDI IN MIDI OUT MIDI device NOTE For a general overview of MIDI and how you can effectively use it refer to MIDI Basics which is downloadable from the website Advanced Feature...

Страница 99: ...iled settings for specific functions Also included are advanced Creator features such as for Styles Songs and Multi Pads 1 Call up the operation display FUNCTION TAB E F MENU 1 MENU 2 2 Press one of the A J buttons to call up the desired function page For information on what you can do on each page refer to the Function List on page 209 3 Use the TAB E F buttons to call up desired page 4 Change th...

Страница 100: ...100 PSR A3000 Owner s Manual Memo ...

Страница 101: ... Owner s Manual 101 Advanced Features Registration Memory Oriental Scales Mixing Console Connections Other Functions Styles Voices Songs USB Audio Player Recorder Multi Pads Music Finder 1 2 3 4 5 6 7 8 9 10 11 ...

Страница 102: ... in stereo to produce a truly authentic rich sound full of atmosphere and ambience Cool These Voices use sophisticated programming to capture the dynamic textures and subtle nuances of electric instruments Sweet These acoustic instrument sounds also benefit from Yamaha s sophisticated technology and feature a finely detailed and natural sound Drums Various drum and percussion sounds are assigned t...

Страница 103: ...easure of your playing strength has a completely different sound For example a guitar MegaVoice includes the sounds of various performance techniques In conventional instruments different Voices having those sounds would be called up via MIDI and played in combination to achieve the desired effect However now with MegaVoices a convincing guitar part can be played with just a single Voice using spe...

Страница 104: ...other than the ORGAN FLUTES and EXPANSION USER buttons to call up the Voice Selection display 3 Press the 8 UP button to call up the Voice categories 4 Press the 2 P2 button to display page 2 5 Press the desired A J button to call up the Voice Selection display of GM XG Voices GM2 Voices etc NOTE You can find the Legacy folder in this display This folder contains previous Yamaha keyboards Voices s...

Страница 105: ...e A button to select 1 TOUCH RESPONSE 3 Use the 1 2 and 4 7 buttons to set the Touch Response Touch Response and Effect Related Settings 1 2 TOUCH Determines the Touch Response type HARD 2 Requires strong playing to produce high volume Best for players with a heavy touch HARD 1 Requires moderately strong playing for higher volume MEDIUM Standard Touch Response SOFT 1 Produces high volume with mode...

Страница 106: ...ETAIL buttons to call up the detailed setting window 4 Use the 3 8 buttons to make various Harmony Arpeggio settings When any one of the Arpeggio types is selected only the parameters indicated by in the list below can be set 3 VOLUME Determines the volume level of the Harmony Arpeggio notes generated by the Harmony Arpeggio function NOTE When you are using certain Voices such as Organ Voices in w...

Страница 107: ...TE When the Harmony category is selected the keyboard part which is set to MONO and LEGATO is selected page 114 for the Voice is regarded as off For example when RIGHT 1 is set to LEGATO MONO and RIGHT 2 is set to POLY and both parts are turned on turning the HARMONY ARPEGGIO button on applies the Harmony effect only to the RIGHT 2 part 6 SPEED This parameter is only available when the Echo catego...

Страница 108: ... tuning in music today BAYAT RAST Use these tunings when playing Arabic music PURE MAJOR PURE MINOR These tunings preserve the pure mathematical intervals of each scale especially for triad chords root third fifth You can hear this best in actual vocal harmo nies such as choirs and a cappella singing PYTHAGOREAN This scale was devised by the famous Greek philosopher and is created from a series of...

Страница 109: ...he base note is changed the pitch of the keyboard is transposed yet maintains the original pitch rela tionship between the notes 3 4 TUNE Select the desired note to be tuned by using the 3 buttons and tune it in cents by using the 4 buttons NOTE In musical terms a cent is 1 100th of a semitone 100 cents equal one semitone NOTE The note can also be selected by pressing one of the SCALE SETTING butt...

Страница 110: ...ons are always assigned to number 1 and other functions cannot be assigned 3 Press the I ASSIGN button to call up the PARAMETER ASSIGN window 4 Use the 2 4 buttons for horizontal X directions and the 5 7 buttons for vertical Y directions to select the functions to be assigned For information on available functions see pages 111 112 5 Press the EXIT button to close the PARAMETER ASSIGN window 6 If ...

Страница 111: ...filter and the resonance for the RIGHT 1 and or 2 parts to change the timbre or tone of the sound Voice Filter R1 Voice Filter R2 Voice Attack R1 R2 Adjusts the length of time attack time until the RIGHT 1 and or 2 parts reach their maximum level after the key is played Moving the joystick in the direc tion increases it Voice Attack R1 Voice Attack R2 Voice Release R1 R2 Adjusts the length of time...

Страница 112: ... channels in the order of Rhythm 1 2 Phrase 1 2 Bass Pad Chord 2 and only the Chord 1 is kept turned on at the end Moving the joystick in the direction turns off the channels in the order of Phrase1 2 Pad Chord 1 2 Bass Rhythm1 and only the Rhythm 2 is kept turned on at the end Returning the joystick to the center position turns all channels on Filter Voice Style Adjusts the cutoff frequency and t...

Страница 113: ... MENU 1 to call up the VOICE SET display 3 Use the TAB E F buttons to call up the relevant setting page For information on the available parameters in each page see the Editable Parameters in the VOICE SET Displays on page 114 4 As necessary use the A B buttons to select the item parameter to be edited and edit the Voice by using the 1 8 buttons By pressing the D COMPARE button you can compare the...

Страница 114: ...ing sounds such as a guitar when they are played with legato with the edited Voice set to MONO above When NORMAL is selected the next note sounds after the previous note is stopped When LEGATO is selected the sound of the previously played note is maintained and only the pitch changes to that of the next note NOTE This parameter is unavailable for Super Articulation Voices Organ Flute Voices and D...

Страница 115: ...termines the degree to which the joystick modulates the Filter Cutoff Frequency For details about the filter see below 3 AMPLITUDE Determines the degree to which the joystick modulates the amplitude vol ume 5 PMOD Determines the degree to which the joystick modulates the pitch or the vibrato effect 6 FMOD Determines the degree to which the joystick modulates the Filter modula tion or the wah effec...

Страница 116: ...kly the sound decays to silence after the key is released The lower the value the quicker the decay 6 DEPTH Determines the intensity of the Vibrato effect Higher settings result in a more pronounced Vibrato 7 SPEED Determines the speed of the Vibrato effect 8 DELAY Determines the amount of time that elapses between the playing of a key and the start of the Vibrato effect Higher settings increase t...

Страница 117: ... you can also disable this feature by the operation in the relevant display as explained below For example if you want to change the Voice yet keep the same effect set the EFFECT parameter to OFF in the display explained below 1 Call up the operation display FUNCTION TAB E MENU 1 F VOICE SET FILTER 2 Use the A B buttons to select a keyboard part 1 2 CATEGORY Selects the DSP effect category and typ...

Страница 118: ...e VOICE SET display 3 Use the TAB E F buttons to call up the relevant setting page FOOTAGE VOLUME ATTACK or EFFECT EQ For information on the available parameters in each page see pages 45 and 119 4 Edit the Organ Flutes Voice 5 Press the I PRESET button to call up the Organ Flutes Voice Selection display 6 Save your edited Voice For instructions on the Save operation refer to page 28 NOTICE The se...

Страница 119: ...controlled by the Vibrato On Off F G buttons and Vibrato Depth H button 4 MODE The MODE control selects between two modes FIRST and EACH In the FIRST mode attack percussive sound is applied only to the first notes played and held simultaneously while the first notes are held any subse quently played notes have no attack applied In the EACH mode attack is applied equally to all notes 5 7 4 2 2 3 2 ...

Страница 120: ...owest note played in the Chord section of the keyboard is used as the bass note allowing you to play on bass chords In the Fingered type the root of the chord is always used as the bass note FULL KEYBOARD Detects chords in the entire key range Chords are detected in a way similar to Fingered even if you split the notes between your left and right hands for example playing a bass note with your lef...

Страница 121: ...5 b7 Cm7 Minor seventh flatted fifth m7b5 1 b3 b5 b7 Cm7 b5 Minor add ninth m 9 1 2 b3 5 Cm add9 Minor seventh ninth m7 9 1 2 b3 5 b7 Cm7 9 Minor seventh eleventh m7 11 1 2 b3 4 5 b7 Cm7 11 Minor major seventh flatted fifth mM7b5 1 b3 b5 7 CmM7 b5 Minor major seventh mM7 1 b3 5 7 CmM7 Minor major seventh ninth mM7 9 1 2 b3 5 7 CmM7 9 Diminished dim 1 b3 b5 Cdim Diminished seventh dim7 1 b3 b5 6 Cd...

Страница 122: ...tion will not sound STYLE The chord played in the chord section will sound via the Voices for the Pad channel and the Bass channel of the selected Style FIXED The chord played in the chord section will sound via the specified Voice regardless of the selected Style NOTE When the selected Style contains MegaVoices unexpected sounds may result when this is set to STYLE NOTE When you record a Song the...

Страница 123: ...different Style is selected When any of the MAIN A D sections is not included in the Style data the nearest section is automatically selected For example when MAIN D is not contained in the selected Style MAIN C will be called up 7 TEMPO This determines whether the tempo setting of the Style changes or not when you change Styles LOCK The previous tempo setting is always maintained HOLD During Styl...

Страница 124: ...ction 4 Press one of the ONE TOUCH SETTING 1 4 buttons to which you wish to memorize your panel settings A message appears If you are sure you want to memorize the current settings to the selected button press the F YES button If you want to change the settings press the G NO button then repeat steps 2 4 as necessary NOTE For ONE TOUCH SETTING buttons to which your original panel settings have not...

Страница 125: ... enter the specified length For the entire current Style use the A B buttons to select 2 TEMPO BEAT then set the Tempo via the 3 4 buttons and the Time Signature via the 5 6 buttons NOTE Even when you are editing an existing Style changing the Time Signature BEAT clears the data from all sections and you will need to create the Style from scratch 4 Create the Source Pattern for each channel Realti...

Страница 126: ...stics in the Style Creator Loop Recording Style playback repeats the rhythm patterns of several measures in a loop and Style recording is also done using loops For example if you start recording with a two measure MAIN section the two measures are repeatedly recorded Notes that you record will play back from the next repetition loop letting you record while hearing previously recorded material Ove...

Страница 127: ...essary you can delete channel data While holding down the J DELETE button press one of the 1 8 desired channel buttons 4 As soon as loop playback returns to the first beat in the first measure start playing the rhythm pattern to be recorded If the rhythm is difficult to play in real time break it up into individual parts and play each separately as the playback loops as shown in the example below ...

Страница 128: ...se in CM7 for playing appropriate notes while chords change during performance Rules when recording a Main or Fill With the default initial settings the Source Root Chord page 136 is set to CM7 This means that you should record a Source Pattern using a CM7 scale which will change according to the chords you specify during normal performance Record a bass line phrase or chord backing which you want...

Страница 129: ... returns to the first beat in the first measure start playing the bass line chord backing or phrase to be recorded 5 Press the START STOP button to stop playback If you want to add more notes press the START STOP button again to continue recording To hear the playback sound of the already recorded channels with another Source Root Chord 1 Use the TAB E F buttons to call up the PARAMETER page 2 Pre...

Страница 130: ...e changed Unlike in Song Creator a Recording channel can be set on the BASIC page It cannot be set on the EDIT page Unlike in Song Creator Chord and Lyrics data cannot be entered This is because such data is not necessary for Style playback For instructions on Step Recording refer to pages 152 155 For information on the EDIT page called as Event List display in Song Creator refer to page 165 Style...

Страница 131: ...ONTROL START STOP button to play back the Style 4 As desired repeat step 3 for another channel NOTICE The created Style will be lost if you change to another Style or turn off the power to the instrument without carrying out the Save operation step 7 on page 126 Playing the Style During Style Assembly You can play back the Style while you are assembling a Style and the playback method can be selec...

Страница 132: ...when ORIGI NAL BEAT is set to 8 BEAT and BEAT CONVERTER is set to 12 all 8th notes in the section are shifted to 8th note triplet timing The 16A and 16B Beat Converter which appear when ORIGINAL BEAT is set to 12 BEAT are variations on a basic 16th note setting 5 6 SWING Produces a swing feel by shifting the timing of the back beats depending on the ORIGINAL BEAT parameter above For example if the...

Страница 133: ...e NOTICE The edited Style will be lost if you change to another Style or turn off the power to the instrument without carrying out the Save operation step 7 on page 126 1 2 CHANNEL Selects the desired channel part to which Dynamics is to be applied The selected channel is shown at the upper left of the display 3 4 ACCENT TYPE Determines the type of accent applied in other words which notes in the ...

Страница 134: ...the selected channel 5 REMOVE EVENT This function lets you remove specific events from the selected channel 2 Use the 1 2 CHANNEL buttons to select the channel to be edited The selected channel is shown at the upper left of the display 3 Use the 4 8 buttons to edit the data 4 Press the D EXECUTE button to actually enter the edits for each display After the operation is completed this button change...

Страница 135: ...on this instrument can be played back only on instruments which are compatible with SFF GE 1 In the PARAMETER page use the A B buttons to select the edit menu For details of the edit menu see pages 136 139 Set these parameters before recording Set these parameters after recording Source Pattern settings Source Root Source Chord Determines what key and what chord type are used for playing Note Conv...

Страница 136: ...d set these parameters which determine what key is used for playing when you record the Source Pattern to the Bass Chord Pad or Phrase channel If you set this to Fm7 your recorded original phrase Source Pattern will be triggered by specifying Fm7 during normal performance CM7 Source Chord Root C and Source Chord Type M7 is set by default Depending on the settings here the playable notes chord note...

Страница 137: ...hat contain melody lines ROOT FIXED The note is kept as close as possible to the previ ous note range For example the notes C3 E3 and G3 in the key of C become C3 F3 and A3 when they are transposed to F Use this setting for channels that contain chord parts GUITAR This is exclusively for transposing guitar accompaniment Notes are trans posed to approximate the chords played with natural guitar fin...

Страница 138: ...Use this for chord channels of Sections which respond only to major minor chords such as in Intros and Endings NATURAL MINOR 5th In addition to the Natural Minor transposition above augmented and dimin ished chords affect the 5th note of the Source pattern DORIAN When the played chord changes from a major to a minor chord this table low ers the third and seventh intervals in the scale by a semiton...

Страница 139: ...s setting of this range you can ensure that the Voices sound as realistic as possible in other words that no notes out side the natural range are sounded e g high bass sounds or low piccolo sounds 7 NOTE LIMIT HIGH STOP The notes stop sounding PITCH SHIFT The pitch of the note will bend without a new attack to match the type of the new chord PITCH SHIFT TO ROOT The pitch of the note will bend with...

Страница 140: ...are set to that of the current section in order to use the Drum Setup function 2 Press the G DRUM SETUP button to call up the DRUM SETUP window 3 If necessary press the STYLE CONTROL START STOP button to start playback of the rhythm part The sounds played back are indicated on the display keyboard letting you to check the note to edit 4 Use the 1 2 NOTE buttons to select the note to edit NOTE You ...

Страница 141: ...he reverb depth Chorus Send For adjusting the chorus depth Variation Send For adjusting the variation effect DSP1 depth When the Connection parameter is set to Insertion on the Mixing Console display and this rhythm channel is selected as the assign part this parameter affects as below When Variation Send is set to 0 No effects are applied to the instrument Insertion Off When Variation Send is set...

Страница 142: ...ing out the Save operation step 7 on page 126 EG Attack Determines how quickly the sound reaches its maximum level after the key is played The higher the value the quicker the attack EG Decay 1 Determines how quickly the sound reaches its sustain level a slightly lower level than maximum The higher the value the quicker the decay EG Decay 2 Determines how quickly the sound decays to silence after ...

Страница 143: ...U 1 H SONG SETTING TAB E GUIDE CHANNEL and set the TRACK 2 parameter to any channel except OFF page 147 RIGHT next parameter and LEFT cannot be turned off at the same time 2 RIGHT ON OFF Enables disables display of the right hand notation RIGHT and LEFT above cannot be turned off at the same time 3 CHORD ON OFF Enables disables display of the chords If the selected Song does not contain chord data...

Страница 144: ...ion This menu is useful when the selected Song contains no key signature settings for displaying notation 5 QUANTIZE This gives you control over the note resolution in the notation letting you shift or correct the timing of all displayed notes so that they line up to a par ticular note value Make sure to select the smallest note value used in the Song 6 NOTE NAME Selects the type of the note name ...

Страница 145: ...sults in no text file being selected If you want to restore the text indication select the text file again via the 5 6 buttons 3 4 FIXED 16 28 PROPORTIONAL 16 28 only when a text file is selected Determines the text type fixed or proportional and font size Fixed is suit able for displaying lyrics with chord names since the positions of chord names are fixed to the corresponding lyrics Proportional...

Страница 146: ...o turn on the auto accompaniment function then press the SYNC START button to enable synchronized start of the accompaniment 5 Press the STYLE CONTROL START STOP button or play chords in the chord section The Song and Style starts playing When you play chords pressing the SCORE button and turning CHORD on page 143 allows you to see the chord information NOTE When playing back a Song and a Style at...

Страница 147: ...eral measures each in the Song When this is set to ON the section corresponding to the Phrase Mark specified via the SONG G REW and H FF buttons is played back repeatedly Note that this parameter can be set only when the Song playback is stopped 2 3 TRACK 2 These parameters determine which MIDI channel in the Song data is assigned to the left or right hand part of the Guide function and the Song S...

Страница 148: ...MP Pressing H button once instantly sets the playback position to the next measure without sounding Holding H button scrolls for ward continuously SCRUB Pressing and holding H plays and sounds the Song at high speed 2 3 LYRICS LANGUAGE Determines the language displayed in the Lyrics display AUTO When the language is specified in the Song data the lyrics are dis played accordingly When the language...

Страница 149: ...ay a key on the keyboard in time with the music and Song playback continues Your Tempo The same as Follow Lights except that Song playback matches the speed at which you play Guide mode for singing Karao Key This function lets you control the Song playback timing with just one finger while you sing along This is useful for singing to your own performance Song playback pauses waiting for you to sin...

Страница 150: ...playback go to the next step 2 Call up the operation display FUNCTION TAB E MENU 1 H SONG SETTING TAB F OTHERS 3 Use the 6 7 buttons to turn P A T performance assistant technology on 4 Press the SONG F K PLAY PAUSE button to start playback 5 Play the keyboard Along with Song playback try playing the bass line with the left hand area while playing various phrases or chords with the right hand area ...

Страница 151: ...UP For selecting the panel setups to be recorded to the top position of the Song See page 158 CHANNEL For editing Channel events See page 162 CHORD For recording chords and Sections with precise timing page 155 or editing them page 165 Creating Editing Songs Song Creator Channel 1 Song Channel 2 Channel 3 Channel 4 Channel 5 Channel 6 Channel 7 Channel 8 Channel 9 Channel 10 Channel 11 Channel 12 ...

Страница 152: ... J STOP buttons simultaneously A blank Song New Song is called up for recording 2 Call up the operation display FUNCTION TAB F MENU 2 B SONG CREATOR TAB E F 1 16 3 Press the F button to select the channel for recording 4 Press the G STEP REC button to call up the STEP RECORD display 5 Start Step Recording by using the A J buttons and 1 8 buttons as well as the keyboard Refer to the example on page...

Страница 153: ...he note to be entered The velocity value can be specified within a range from 1 to 127 The higher the velocity value the louder the actual sound KBD VEL Actual resulting velocity fff 127 ff 111 f 95 mf 79 mp 63 p 47 pp 31 ppp 15 H Determines the gate time actual length of the note to be entered Normal 80 Tenuto 99 Staccato 40 Staccatissimo 20 Manual The gate time can be set to any desired percenta...

Страница 154: ...ect Tenuto 1 3 Press the I button to select the dotted note type 1 4 Select the dotted quarter note length by using the 6 buttons 1 5 Play the C3 key This enters the first note 1 6 Press the I button to select the normal note type 1 7 Press the 7 button to select the eight note length 1 8 Play the D3 key This enters the second note 2 Enter the next notes and apply staccato 2 1 Press the H button t...

Страница 155: ...he button release the keys This enters the notes G3 and C4 notes have been entered as shown in the notation on the previous page Recording Chords Step Recording In Step Recording you can record the precise change timing of chords and Sections such as Intro Main and Ending of the current Style on the single display After the operations are finished the recorded information or events will be convert...

Страница 156: ... data 9 Press the I SAVE button to carry out the Save operation For details refer to page 28 NOTICE The recorded Song data will be lost if you select another Song or turn off the power to the instrument without carrying out the Save operation Example of Step Recording Chord detailed instructions of step 5 above NOTE This example uses a Style in 4 4 time Before executing the instructions below make...

Страница 157: ...L BREAK button 2 2 Press the 6 button to select the quarter note length 2 3 Play the chords F and G7 in the chord section of the keyboard NOTE If you want to record the Fill In Section turn on the AUTO FILL IN button then press one of the MAIN VARIATION A D buttons 3 Enter the chords for the Main B section 3 1 Press the STYLE CONTROL MAIN VARIATION B button 3 2 Press the 4 button to select the who...

Страница 158: ... automatically called up along with the selected Song The items selected here can be recorded only to the top position of the Song except for the KEYBOARD VOICE VOICE VOLUME PAN FILTER EFFECT TEMPO EQ Records the tempo setting and all settings made from the Mixing Console KEYBOARD VOICE Records the panel settings including the Voice selection of the keyboard parts RIGHT 1 2 and LEFT and their on o...

Страница 159: ...rding 1 3 REC START Punch In Determines the Punch In timing NORMAL Overwrite recording starts when the Song playback is started via the SONG F K PLAY PAUSE button or when you play the key board in the Synchro Standby mode FIRST KEY ON The Song plays back normally then starts overwrite recording as soon as you play the keyboard PUNCH IN AT The Song plays back normally up to the beginning of the ind...

Страница 160: ...carrying out the Save operation 7 8 PEDAL PUNCH IN OUT When this is set to ON you can use Foot Pedal 2 to control the Punch In and Punch Out points While a Song is playing back pressing and holding Foot Pedal 2 instantly enables Punch In recording while releasing the pedal stops recording Punch Out You can press and release Foot Pedal 2 as often as you want during playback to punch in out of overw...

Страница 161: ... overwrite recording 1 Start overwrite recording 1 Play back original data Play back original data Play back original data Play back original data Play back original data Play back original data Play the keyboard to start overwrite recording Play the keyboard to start overwrite recording Play the keyboard to start overwrite recording Start overwrite recording Start overwrite recording Start overwr...

Страница 162: ... the edit menu and available settings see pages 163 164 4 Press the D EXECUTE button to carry out the operation for the current display After the operation is completed this button changes to UNDO letting you restore the original data if you are not satisfied with the operation results The Undo function only has one level only the previous operation can be undone 5 Press the I SAVE button to carry...

Страница 163: ... time For example when the straight eighth notes and eighth note triplets are contained in the same channel if you quantize by the straight eighth notes all notes in the channel are quantized to straight eighth notes completely eliminating any triplet feel However if you use the eighth note eighth note triplet setting both the straight and triplet notes will be quantized correctly 7 8 STRENGTH Det...

Страница 164: ...channels If you transpose the channels of Drum Kits the instru ments assigned to each key will be changed 2 3 SOURCE 1 Determines the MIDI channel 1 16 to be mixed All MIDI events of the channel specified here are copied to the destination channel 4 5 SOURCE 2 Determines the MIDI channel 1 16 to be mixed Only note events of the channel specified here are copied to the destination channel Besides t...

Страница 165: ...eft right and selects the desired parameter of the high lighted event H FILTER Calls up the Filter display page 167 letting you select only the events you wish to be shown in the event list I SAVE Press to save the edited Song J MULTI SELECT Holding this button while using the A B buttons lets you select multiple events 1 BAR Determines the position bar beat clock of the data One clock is equal to...

Страница 166: ...on is assigned page 40 A T Aftertouch This event is generated when pressure is applied to a key after the note is played Note that the keyboard of this instrument does not feature Aftertouch ScBar Score Start Bar Determines the top measure of a Song Tempo Determines the tempo value Time Time signature Determines the time signature Key Key signature Determines the key signature as well as the major...

Страница 167: ...wn C MAIN Displays all main types of events D CC Displays all specific Control Change message events E STYLE Displays all types of Style playback related events H ALL ON Checkmarks all event types I NOTE ALL OFF CHORD NOTE shown when C MAIN is on selects only the NOTE data CHORD shown when E STYLE is on selects only the CHORD data ALL OFF shown when D CC is on removes all checkmarks J INVERT Rever...

Страница 168: ...Since only the RIGHT 1 part performance will be recorded as Multi Pad phrases you should select the desired Voice for the RIGHT 1 part beforehand The Super Articulation Voices and the Organ Flutes Voices cannot be used for Multi Pad Recording If one of these Voices is set for RIGHT 1 part it will be replaced with the Grand Piano Voice when recording Since recording can be done along with and synch...

Страница 169: ...gh it is not recorded Recommended notes for the Chord Match phrase If you intend to create a Chord Match phrase use the notes of C D E G A and B or in other words play the phrase in the key of C major This ensures that the phrase will stay harmonically constant and match whichever chord you play in the left hand section of the keyboard 8 Stop recording Press the H STOP button or the panel MULTI PA...

Страница 170: ...procedure is essentially the same as that for Song Recording pages 152 155 with the exception of the points listed below There is no LCD button for selecting channels since Multi Pads contain data for only a single channel In the Multi Pad Creator only channel events and System Exclusive messages can be entered Chord and Lyrics events are not available You can switch between the two types of Event...

Страница 171: ...i Pad s copied by the 3 button 5 DELETE Deletes the selected Multi Pads Copying the Multi Pad 1 Press the 3 COPY button in step 4 above 2 Select the Multi Pads to be copied by using the A B F and G buttons then press the 7 OK but ton The selected Multi Pad s is copied to the clipboard 3 Select the destination location by using the A B F and G buttons If you want to copy the selected Pad s to anoth...

Страница 172: ...ss the H ADD TO FAVORITE button then press the G YES button to add the selected Record to the FAVORITE page 3 Select the FAVORITE page by using the TAB E F buttons and check to see if the Record has been added As with the ALL page you can select the Record in the FAVORITE page then start your performance Creating a Set of Favorite Records Deleting Records from the FAVORITE Page 1 Select the Record...

Страница 173: ... play After selecting the desired Style press the EXIT button to return back to the EDIT display For SONG or AUDIO Records this field cannot be edited D BEAT Changes the beat time signature of the Record for search purposes For SONG or AUDIO Records this field cannot be edited NOTE Keep in mind that the Beat setting made here is only for the Music Finder search function this does not affect the ac...

Страница 174: ...O to return to the EDIT display in step 2 press I CANCEL 4 Press the G YES button to delete the current Record The Music Finder feature handles all the Records including the presets and additionally created Records as a single file Keep in mind that individual Records panel settings Song audio and Style files cannot be handled as separate files 1 Press the 7 FILES button in the MUSIC FINDER displa...

Страница 175: ...Press the A J buttons to select the desired Music Finder file A message appears prompting you to select one of the following options G REPLACE All Music Finder Records currently in the instrument are deleted and replaced with the Records of the selected file NOTICE Selecting REPLACE automatically deletes all your original Records from internal memory Make sure that all important data has been arch...

Страница 176: ...7 EDIT button of MENU 1 to call up the REGISTRATION EDIT display 3 Select a particular Registration Memory to be edited by pressing any of the A D and F I buttons 4 Press the 1 button to rename or the 5 button to delete the selected Registration Memory For details on the Rename and Delete operations refer to pages 30 31 5 Save the current Bank containing the edited Registration Memories Press the ...

Страница 177: ...E TAB F FREEZE 2 Use the 1 3 buttons to select the desired item then use the 4 5 buttons to enter or remove the checkmark Items having checkmarks will be frozen when the FREEZE button on the panel is turned on 3 Press the EXIT button to exit from the operation display NOTICE Settings in the FREEZE display are automatically saved to the instrument when you exit from this display However if you turn...

Страница 178: ...se a pedal specify here how the pedal will be used to advance or to reverse through the sequence Use the B or C button to select the pedal for advancing or reversing through the Registration Sequence For example if two pedals are connected Pedal 1 is used for advancing while Pedal 2 is used for reversing Note that the pedal settings here other than OFF will take priority over the settings in the F...

Страница 179: ...ation Memory Banks unless you ve saved it with the Regis tration Memory Bank file For instructions on saving see the section below Saving the Registration Sequence Settings The settings for the Sequence order and how Registration Sequence behaves when reaching the end of the sequence SEQUENCE END are included as part of the Registration Memory Bank file To store your newly programmed Registration ...

Страница 180: ...mber The box appears around the left most number indicating that this Registration Memory number is currently selected 4 Use the TAB buttons or Foot Pedal during your keyboard performance To return to the status in which no Registration Memory number is selected press the TAB E and F buttons simultaneously while the Main display is called up NOTE The pedal can be used for Registration Sequence no ...

Страница 181: ...s you to re select the Voices for each part NOTE Note the following operation limitations For each Style channel you can select the Voices for recording on pages 127 and 128 For each Style or Song channel you cannot select Voices in the USER drive For each Multi Pad you cannot change the Voice When a GM Song is selected only a Drum Kit Voice can be selected for channel 10 in the SONG CH9 16 page N...

Страница 182: ... Manual Editing FILTER Parameters D I HARMONIC CONTENT Allows you to adjust the Resonance page 115 for each part E J BRIGHTNESS Determines the brightness of the sound for each part by adjusting the Cutoff Frequency page 115 ...

Страница 183: ...en the Pitch Bend function is assigned page 40 The range is from 0 to 12 with each step corresponding to one semitone D I OCTAVE Determines the range of the pitch change in octaves over two octaves up or down for each keyboard part The value set here is added to the setting made via the UPPER OCTAVE buttons E J TUNING Determines the pitch of each keyboard part in cents NOTE In musical terms a cent...

Страница 184: ...adjust the Send Level Depth for each Part as well as Return Level for all Parts When the Connection parameter is set to Insertion the Effect of this Block is applied to a specific channel of the Style and Song DSP2 4 The Effects of these Blocks are applied to a specific Part or Channel with the exception of the Multi Pads Different Effect Types can be selected for each of the available Parts or Ch...

Страница 185: ...g or Style For instructions refer to page 92 Effect Block Effect applica ble parts Effect characteristics REVERB All parts Recreates the warm ambience of playing in a concert hall or jazz club CHORUS All parts Produces a richly textured sound as if several parts are being played simul taneously In addition other type effects such as reverb delay etc can also be selected in this effect block DSP1 S...

Страница 186: ...splay for editing the effect parameters 2 Use the 3 5 buttons to select a parameter then use the 6 7 buttons to edit the value When Reverb Chorus or DSP1 is selected as the Effect Block you can adjust the Return Level via the 8 RETURN LEVEL button If you want to change the Effect Type use the 1 2 buttons 3 If DSP2 3 or 4 is selected as the Effect Block edit the Variation parameter if desired Press...

Страница 187: ... return to the previous display The saved User Effect can be selected from the User category of the corresponding Effect Block page 185 Equalizer also called EQ is a sound processor that divides the frequency spectrum into multiple bands that can be boosted or cut as required to tailor the overall frequency response The EQ page lets you adjust the EQ for each corresponding part while the MEQ page ...

Страница 188: ...ed to boost the music for parties etc Flat Flat EQ settings The gain of each frequency is set to 0dB User1 2 Your own custom EQ settings stored in step 4 2 Use the E J buttons to move the cursor to the GAIN row then adjust the GAIN level to boost or cut each of the eight bands Use the 1 8 buttons to adjust the level Changing the value while the E or J button is held lets you boost or cut all the e...

Страница 189: ...NOTE Master Compressor cannot be applied to audio playback or the metronome sound Editing Master Compressor CMP Parameters G ON OFF Turns the Master Compressor effect on or off 2 3 TYPE Selects a Master Compressor type Standard Standard Compressor settings Lite Light Compressor settings in which the effect is slight Moderate Moderate Compressor settings in which the effect is moderately pronounced...

Страница 190: ...er Compressor is to be saved by using the 3 5 buttons If necessary change the User Master Compressor name Press the 6 RENAME button to call up the Character Entry window enter the name then press the 8 OK button 3 Press the 8 OK button to carry out the Save operation 4 Press the EXIT button to return to the previous display The saved Master Compressor type is shown in the TYPE selection list Block...

Страница 191: ...ct the function to be assigned to the pedal specified in step 2 For information on available functions see pages 192 193 NOTE You can also assign other functions to the pedal Punch in out of Song page 159 and Registration Sequence page 178 If you assign multiple functions to the pedal the priority is Punch in out of Song Registration Sequence Functions assigned here 4 Use the 2 8 buttons to set th...

Страница 192: ...on this display GLIDE When the pedal is pressed the pitch changes and then returns to normal pitch when the pedal is released You can turn this pedal function on or off for each keyboard part on this display UP DOWN Determines whether the pitch change goes up is raised or down is lowered RANGE Determines the range of the pitch change in semitones ON SPEED Determines the speed of the pitch change w...

Страница 193: ...hich is automatically followed by the previous Main section that of the button on the immediate left FILL SELF Plays a fill in FILL BREAK Plays a break FILL UP Plays a fill in followed by the next Main section that of the button on the immediate right ENDING1 3 Same as the ENDING rit I III buttons HALF BAR FILL While the pedal is pressed the Half bar fill in function is turned on and chang ing sec...

Страница 194: ...ogrammed template from the PRESET page page 195 If you have already created your original template and saved it to the USER page you can also select that template from the USER page 3 To edit the template press the 8 EDIT button to call up the MIDI display 4 Use the TAB E F buttons to call up the relevant page then set various parameters to edit the current MIDI template SYSTEM MIDI System Setting...

Страница 195: ...ith an exter nal MIDI clock instead of the instrument s internal clock This template should be used when you wish to set the tempo on the MIDI device connected to the instrument MIDI Accord 1 MIDI accordions allow you to transmit MIDI data and play connected tone gen erators from the keyboard and bass chord buttons of the accordion This tem plate lets you play melodies from the keyboard and contro...

Страница 196: ...te setting MIDI USB 1 or USB 2 In this case make sure that the external device is connected properly e g to the instrument s MIDI IN terminal and that it is properly transmitting a MIDI clock signal NOTE When CLOCK is set to a value other than INTERNAL the tempo is indicated as Ext on the Main display This means that playback of this instrument is con trolled only from an external MIDI device or c...

Страница 197: ...the ACMP button 2 Use the 3 buttons to select a channel via which the selected part will be transmitted NOTE If the same transmit channel is assigned to several different parts the transmitted MIDI messages are merged to a single channel resulting in unexpected sounds and possible glitches in the connected MIDI device NOTE Protected Songs cannot be transmitted even if the proper Song channels 1 16...

Страница 198: ...n be used as a 32 channel multi timbral tone generator by using these five parts in addition to the parts 3 Use the 4 8 button to determine the types of data to be received For information on the MIDI messages which can be set here see Note Events on page 166 MIDI transmission reception via the USB terminals and MIDI terminals The relationship between the MIDI terminals and the USB terminals which...

Страница 199: ...ions here apply to the CHORD DETECT page in step 4 on page 194 This page lets you select the MIDI channels over which the MIDI data from the external device will be used to detect the Chord Type for Style playback The note on off messages received at the channel s set to ON are recognized as the notes for detecting chords in Style playback The chords to be detected depend on the fingering type The...

Страница 200: ...splay I DETAIL For setting the detailed parameters on the pages below After making these settings press one of the 7 8 SAVE button to actually save them IP ADDRESS Sets the IP address and other related parameters OTHERS When the instrument is connected to the network with the Infra structure Mode the current time is shown on the Main display You can set the Time Zone via the B button and Daylight ...

Страница 201: ... of the 7 8 SAVE button to actually save them WIRELESS NETWORK For setting the SSID security password and channel IP ADDRESS For setting the IP address and other related parameters OTHERS For entering the Host name or showing MAC address etc 3 4 MODE Switches to the Infrastructure Mode 5 6 INITIALIZE Initializes the connection setup to the default factory status ...

Страница 202: ...time it takes for the volume to fade in or go from minimum to maximum range of 0 20 0 seconds 4 FADE OUT TIME Determines the time it takes for the volume to fade out or go from maxi mum to minimum range of 0 20 0 seconds 5 FADE OUT HOLD TIME Determines the time the volume is held at 0 following the fade out range of 0 5 0 seconds 2 VOLUME Determines the volume of the metronome sound 3 5 SOUND Dete...

Страница 203: ...nd 5 6 VELOCITY Sets the velocity 4 5 SPEAKER Determines whether or not the sound is output from the speaker of this instrument HEADPHONE SW Speaker sounds normally but is cut off when head phones are connected to the PHONES jack ON Speaker sound is always on even if headphones are connected OFF Speaker sound is off You can only hear the instrument sound via the headphones or an external device co...

Страница 204: ...formation and the current timestamp date and time is recorded to the files you save to the instrument Once you turn the power off the clock is set to the factory default and will not be updated unless the instrument is connected to the network 5 6 VOICE CATEGORY BUTTON OPTIONS Determines how the Voice Selection display is opened when one of the VOICE buttons is pressed OPEN SELECT Opens the Voice ...

Страница 205: ...ations for the instrument Before using a USB flash drive be sure to read Connecting USB Devices on page 95 A B DRIVE LIST Selects the desired drive to be formatted or to be checked for remaining memory F PROPERTY Opens the Property display of the device selected above by the A B but tons You can check the amount of remaining memory on the device NOTE The displayed remaining memory value is an appr...

Страница 206: ...s pictures provided on the PRESET page After selecting press the EXIT button to close the Selection display If you want to use an original picture prepare the desired file a bitmap BMP file no greater than 800 x 480 pixels in the USB flash drive copy it from the USB flash drive to the USER page then select it from the USER page Due to access speed limitations it is not recommended to select the de...

Страница 207: ...ry default files select the file in the PRESET tab When the file is selected a message is displayed according to the content of the file Press the desired button F SYSTEM SETUP FILES Parameters set on the various displays such as the FUNCTION TAB E MENU 1 J UTILITY are handled as a single System Setup file Refer to the Parameter Chart in the Data List on the website for details on which parameters...

Страница 208: ... the MIDI Setups on the USER tab display to the original factory status USER EFFECT Resets the current Effect settings and the following data User Effect types page 186 User Master EQ types page 188 User Master Compressor types page 189 MUSIC FINDER Resets the Music Finder data all Records to the original factory settings FILES FOLDERS Deletes all files and folders including the Expansion folder s...

Страница 209: ...such as Guide Function Channel settings Repeat settings etc page 147 I MIDI For making MIDI related settings page 194 J UTILITY CONFIG 1 For making general settings such as Fade in out time metronome sound Tap Tempo sound Auto Power Off pages 17 202 CONFIG 2 For making general settings such as speaker display etc page 203 PARAMETER LOCK Determines the parameters effect Split Point etc that are to ...

Страница 210: ...NER FUNCTION FUNCTION MIDI MIXER EQ MIXING CONSOLE VOL VOICE BAL CHANNEL ON OFF USB FUNCTION UTILITY USB USB AUDIO PLAYER AUDIO File Selection display called up only when a USB flash drive is connected TAB E F ENTER EXIT MAIN Data dial VOICE PART SELECT LEFT FUNCTION VOICE SET FILTER LEFT PART SELECT RIGHT1 RIGHT1 PART SELECT RIGHT2 RIGHT2 PART ON OFF LEFT LEFT PART ON OFF RIGHT1 RIGHT1 PART ON OF...

Страница 211: ...ay be set too low Set it to an appropriate level with the MASTER VOLUME dial All keyboard parts are set to off Use the PART ON OFF RIGHT 1 RIGHT 2 LEFT button to turn it on The volume of the individual parts may be set too low Raise the volume in the BALANCE display page 56 Make sure the desired channel is set to ON pages 57 65 Headphones are connected disabling the speaker output Unplug the headp...

Страница 212: ... button Make sure to play keys in the chord section of the keyboard pages 57 58 Styles in a USB flash drive cannot be selected If the size of the Style data is large about 120 KB or greater the Style cannot be selected because the data is too large to be han dled by the instrument Song Songs cannot be selected This may be because the language settings have been changed Set the appropriate language...

Страница 213: ...n it was recorded The audio playback volume has been changed Setting the volume value to 100 plays back the file at the same volume as when it was recorded page 73 Mixing Console The sound seems strange or different than expected when changing a rhythm Voice Drum Kit etc of the Style or Song from the Mixer When changing the rhythm percussion Voices Drum Kits etc of the Style and Song from the VOIC...

Страница 214: ...r EQ 5 Preset 2 User Part EQ 27 Parts Styles Preset Number of Styles 400 Featured Styles 380 Pro 10 Session 10 DJ Fingering Single Finger Fingered Fingered On Bass Multi Finger AI Fingered Full Keyboard AI Full Keyboard Style Control INTRO x 3 MAIN VARIATION x 4 FILL x 4 BREAK ENDING x 3 Other Features Music Finder Max 1 200 One Touch Setting OTS 4 for each Style Compatibility Style File Format SF...

Страница 215: ...Storage and Connectivity Storage Internal Memory Yes approx 13 MB max External Drives USB flash drive Connectivity DC IN 16 V Headphones Standard stereo phone jack MIDI IN OUT AUX IN Stereo mini jack OUTPUT L L R R FOOT PEDAL 1 SUSTAIN 2 ARTICULATION 1 Function assignable USB TO DEVICE Yes USB TO HOST Yes Amplifiers Speakers Amplifiers 15 W x 2 Speakers 13 cm x 2 5 cm x 2 Power Supply Power Supply...

Страница 216: ... 51 EQ Equalizer 116 117 187 Expansion Pack 46 F Factory Reset 33 208 Fade In Out 53 202 Fast Forward 63 73 File 26 27 File Selection display 26 Fill in 52 Filter 115 182 Fingering type 53 120 Folder 29 Follow Lights 149 Food pedal 191 Foot controller 93 191 Footswitch 93 191 Format Compatibility 8 Format USB flash drive 96 205 Freeze 177 Function List 209 G GM 8 104 GS 8 Guide 66 148 H Harmony 42...

Страница 217: ...3 Section 52 Setup data Song 158 Setup file 207 SFF Style File Format 8 50 135 SFX Kit 38 SMF Standard MIDI File 62 Song 62 Song Creator 151 Song setting 147 Source Chord 136 Source Root 136 Speaker 203 Specifications 214 Split 36 Split Point 58 Standard MIDI File SMF 62 Step Recording Multi Pad 170 Step Recording Song 152 155 Step Recording Style 130 Stop Accompaniment 122 Style 49 Style Assembly...

Страница 218: ...Memo ...

Страница 219: ...n about collection and recycling of old products please contact your local municipality your waste disposal service or the point of sale where you purchased the items For business users in the European Union If you wish to discard electrical and electronic equipment please contact your dealer or supplier for further information Information on Disposal in other Countries outside the European Union ...

Страница 220: ......

Страница 221: ...uments will cause this warranty to be void This warranty covers only the Original Owner and is not transferable In Order to Obtain Warranty Service Warranty service will only be provided for defective products within the Warranted Area Contact your local authorized Yamaha dealer who will advise you of the procedures to be followed If this is not successful contact Yamaha at the address telephone n...

Страница 222: ... 91 639 88 88 GREECE Philippos Nakas S A The Music House 19th klm Leof Lavriou 190 02 Peania Attiki Greece Tel 30 210 6686260 SWEDEN Yamaha Music Europe GmbH Germany filial Scandinavia JA Wettergrensgata 1 421 30 Västra Frölunda Sweden Tel 46 31 89 34 00 DENMARK Yamaha Music Denmark Fillial of Yamaha Music Europe GmbH Tyskland Generatorvej 8C ST TH 2860 Søborg Denmark Tel 45 44 92 49 00 FINLAND F ...

Страница 223: ......

Страница 224: ...Yamaha Global Site http www yamaha com Yamaha Downloads http download yamaha com ZQ09830 Manual Development Department 2015 Yamaha Corporation Published 07 2015 POZC 01A0 Printed in Indonesia ...

Отзывы: