background image


135


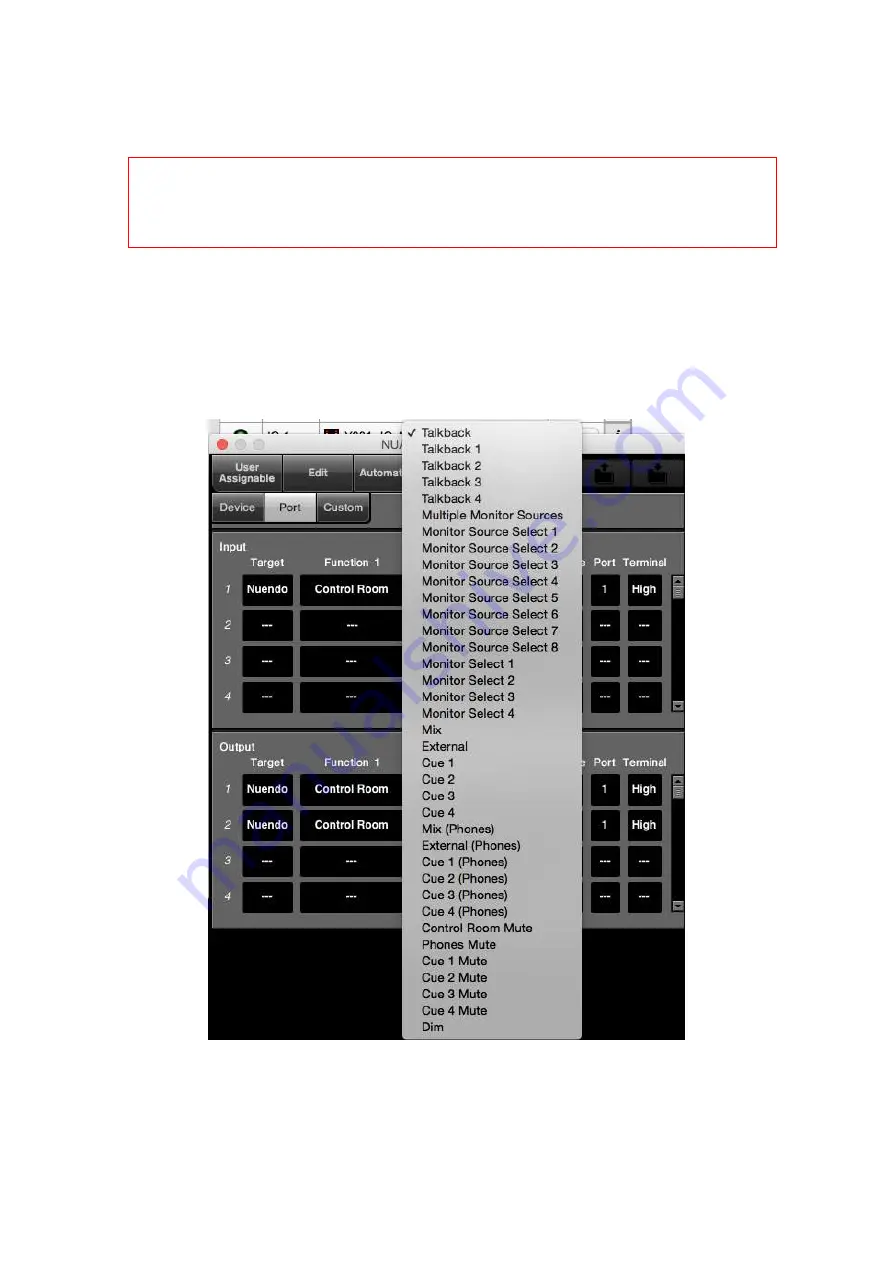
Below is an example in which you press Talkback button on Nuage Master and see if eBOX receives 

GPI signal from the Master. In the Output area, select “Nuendo” as target, “Control Room” as 

Function 1, “Talkback” as Function2, 1 and 2 as Device respectively, 1 as Port, and “High” as 

Terminal. 


Nuage MASTER Setup – GPIO - Port


TIPS


Like R series, eBOX is not displayed on Nuage Workgroup Manager even when connected and 

recognized, which is no problem. 

Содержание NUAGE

Страница 1: ...Nuage Setup Guide Version 1 8 ...

Страница 2: ...hernet connections 37 4 3 KVM switch connections 41 4 4 Audio connections 44 4 5 AD8HR Connections 50 4 6 Video related equipment connections and other connections 53 4 7 Wordclock Connections 55 5 Installing software and drivers 57 5 1 Installing the eLicenser Control Center 57 5 2 Installing NUENDO 59 5 3 Installing Tools for Nuage 62 5 4 Installing Dante Controller 67 5 5 Installing QuickTime 7...

Страница 3: ... 6 13 Connecting R Series units 122 6 14 Connecting RMio64 D 129 6 15 Connecting GPIO units 131 6 16 Connecting and setting up Pro Tools system 136 6 17 Setting up and configuring Dolby Atmos environment using VST MultiPanner 148 History March 2013 v1 0 released August 2013 v1 1 released June 2014 v1 5 released June 2016 v1 7 released September 2016 v1 8 released All Yamaha products described in t...

Страница 4: ...ing each piece of primary equipment connecting them via the various cables needed installing software and drivers and all the aspects of setup that need to be handled before the system can be used 2 Used Equipment List The main devices used in this guide are as follows 1 Nuage Master Unit 2 Nuage Fader Unit 2 units 3 Nuage I O 3 units 8A D8 8AD8 4 Nuage Workspace Unit 2 units large small 5 Dante A...

Страница 5: ...mate sizes for the controllers 58 1cm 22 9 93 5cm 36 8 116 2cm 45 7 174 3cm 68 7 35 4cm 13 9 232 4cm 91 6 290 5cm 114 5 58 1cm 22 9 58 1cm 22 9 58 1cm 22 9 22 7cm 9 0 72 0cm 28 3 We recommend a couple of Nuage console desks shown below for installing your Nuage controllers 1 Argosy Mirage for Nuage http www argosyconsole com html_internal argosy_studiofurniture_yamahaNuage_mirage32ls html ...

Страница 6: ...tion Supply Custom Console for Nuage http www custom consoles com recording studio furniture php Once you have finished getting the console desk set up fix each unit in place with joining brackets To attach a joining bracket first line up the units and remove the two neighboring screws on their undersides ...

Страница 7: ...7 Remove the screws Next attach the joining bracket using the screws you just removed Place the Jointing bracket screwed into place ...

Страница 8: ...led in two locations Caution When multiple Fader units with Master unit are in use always make sure to use the jointing brackets Caution Do not transport multiple units that are held together with joining brackets This is dangerous and likely to result in drops or damage ...

Страница 9: ...9 The positions for each rubber foot are as follows Nuage Fader rear Nuage Fader front Nuage Fader side ...

Страница 10: ...10 Nuage Master rear Nuage Master front Nuage Master side Nuage Workspace Small rear ...

Страница 11: ...0 x 1200 resolution and in plane switching IPS technology Why use an IPS monitor Although there are large LCD monitors available at low prices these typically use a kind of display technology called Twisted Nematic or TN which has a narrow viewing angle 130 140 when viewed from outside their viewing angle the colors and brightness tend to change considerably making it difficult to read them accura...

Страница 12: ...ttp www8 hp com us en products monitors product detail html oid 7483063 tab features 2 Dell U2413 http www dell com ed business p dell u2413 pd Mounting the video monitor There are two approaches to mounting video monitors for Nuage 1 Use the included monitor stand 2 Use a monitor arm ...

Страница 13: ... suitable height and angle using the included stand as shown above we recommend using that if not we recommend using a monitor arm that supports a single monitor and positioning it near the centerline of the clamp to the extent this is possible We recommend that the video monitor be angled at 70 in line with the rear surface of the controller When using HP Monitor ZR2440w it is recommended to use ...

Страница 14: ... ProductsDetails tabid 65 PRDID 351 language en US Default aspx Ergotron LX Dual Side by Side Arm http www ergotron com ProductsDetails tabid 65 PRDID 354 language en US Default aspx Humanscale M8 http www humanscale com products product_detail cfm group m8 ...

Страница 15: ...e of the LCD panel to sit just above the upper edge of the controller Note that if the video monitor s height creates acoustic problems you can position the lower part of the LCD panel to hid it behind the rear of the controller Adjustments to the display will be explained later ...

Страница 16: ...ler one of these buttons may get pushed accidentally Be careful to position the monitor so that this does not happen Note the buttons along the lower front TIPS In order to avoid unexpected power discontinuity press and hold the power button for ten seconds when the monitor display is on to turn it into Power Button Lockout mode And in order to turn the mode off press and hold the power button for...

Страница 17: ... on Nuage I O 3 4 Installing the computer and peripheral hardware Powerful computers generate a lot of fan noise which can affect your work in a control room or studio where being quiet is required Therefore we recommend locating computers in the machine rooms or other isolated spaces to the extent that is possible If setting up in an isolated spot is a problem we recommend setting it up in a dist...

Страница 18: ...keyboard tray 2 On a Nuage Workspace large Accommodates a keyboard measuring up to 460 138 38 mm 1 The Nuage Fader Workspace large keyboard tray Tray in open position TIPS To fit the keyboard into the Nuage Fader or Workspace Large the recommend size of the keyboard up to 460 138 38 mm 18 11 5 43 1 49 inch Please make sure your keyboard fits into the space in advance ...

Страница 19: ... with keyboard in place 2 The Nuage Workspace large If the keyboard is not stored in a tray but you want to keep it readily accessible place it on the Workspace large The keyboard s cable can be passed through a hole in the Workspace cover to run underneath ...

Страница 20: ...sing your mouse directly on the cover With trackball in use With mouse in use 3 5 Installing the network switch We recommend installing the network switch in a machine room that is not prone to electromagnetic interference Switching hub switch Ensure that your network switch fulfills the following requirements for use with Nuage 1 Gigabit switch 1 000 Mbps 2 Managed switch 3 No EEE function or off...

Страница 21: ...iversal power supply 3 Easy monitoring from computer 4 VLAN Link Aggregation IGMP Snooping Multicast Filtering 5 Has more ports than you will need We recommend the following switch based on the above criteria Yamaha SWP1 Series The Cisco SG300 Series Yamaha SWP1 16MMF Cisco SG300 10 QoS Settings To give clock signals and audio signals priority on a Dante network set up QoS as follows ...

Страница 22: ... Medium Audio PTP EF 0x2E 46 101110 Low reserved CS1 0x08 8 001000 None Other traffic BestEffort 0x00 0 000000 You can set up a Cisco switching hub as shown below using a web browser For more details on settings refer to the switch s user manual IGMP Snoopingsettings Turn on if using multicasting ...

Страница 23: ...lowing types of cables for use with Nuage Cat 7 to connect the Dante Accelerator card and the network switch Cat 6 or Cat 5e for all other connections we recommend the use of shielded cable Also note that although Ethernet cables have a theoretical maximum length of 100 m 328 feet transmissions are not necessarily reliable at that distance Check the value guaranteed by your cable manufacturer Make...

Страница 24: ...so each computer will need a separate graphics card for each monitor TIPS If there is only one set of keyboard and mouse or trackball to be used the second KVM switcher and on can be replaced with less expensive video switchers details will follow KVM switchers should be installed in the machine room when not necessary In that case please use cable extenders such as USB extenders for keyboard and ...

Страница 25: ...der About the MAIN DISP button on the Nuage Fader The Nuage Fader has a MAIN DISP button this is used to temporarily show the main screen Project window being displayed on the Nuage Master monitor on the Fader monitor as well ...

Страница 26: ...ontrolled with that mouse and keyboard is the one that is currently selected and displayed on the KVM switch to which the mouse and keyboard are connected TIPS Although each computer can only output one main screen it is necessary to use the MAIN DISP to choose which main screen to be displayed Therefore refer to the following figure and use the video splitter and assign the main screen to the KMV...

Страница 27: ...27 Workgroup Manager Setup FADER1 3 Workgroup Manager Setup MASTER Recommended KVM switch We recommend the following KVM switches and video switchers Gefen 8x1DVIKVMDL SL Gefen 4x1DVIKVMDL ...

Страница 28: ... following are the main types of video related equipment for use with Nuage TIPS When KVM switchers and splitters are being used it might be the case that the screen resolution is lowered depending on what type of display cable is used If that is the case make sure to use a dual link DVI display cable for each DVI connection and see if the problem is fixed ...

Страница 29: ...D video devices generates and distributes word clock at up to 192 kHz and synchronizes and controls external devices using 9 pin or MMC MIDI machine control or time codes Why do you need a SyncStation If you use a synchronizer from another company eg the Rosendahl NanoSync and not the SyncStation you will need to use the MIDI interface because these generally use MTC MIDI Time Code for syncing wit...

Страница 30: ...ting Installing the SyncStation The SyncStation is a fanless machine so it can be installed and used in the editing room settings can be set remotely using NUENDO Because it connects to the computer via a USB cable it can be placed anywhere the cable can reach In case if the SyncStation is going to be installed in a machine room look into using a USB extender The SyncStation uses an external AC ad...

Страница 31: ...l 3 7 c SMPTE timecode generator Video equipment runs on timecodes synchronization signals that include time information and a device that generates SMPTE timecodes such as LTC and VITC and sends video equipment sync signals is a timecode generator The SyncStation has XLR jacks for timecode I O and timecodes are calculated based on the NUENDO s position and sent to video equipment Also video equip...

Страница 32: ...iting and copying the audio to NUENDO Track lay down The finished audio from the editing process is then used to overwrite the master Track lay back While that is the conventional tape based process now that nonlinear editing systems are common and with SSD based cameras such as those from Blackmagic Design there are a number of solutions that create a seamless process from shooting to video editi...

Страница 33: ... output jacks and can take input from external devices to operate NUENDO or can operate external devices based on NUENDO operations The GPIO pin assignments and functions are as follows GPI IN Function Active Low GPI OUT Function Active Low 3 Stop Momentary 17 SyncStation Lock 4 Play Momentary 18 Record Off Momentary 5 Record Off Momentary 19 Record On Momentary 6 Record On Momentary 20 Record Con...

Страница 34: ...ces 3 8 Installing powered speakers Nuage systems allow for a variety of speaker configurations needed for monitoring environments what follows is a walk through of setting up 5 1 channel speakers for a typical surround sound environment What is 5 1 channel surround This is the most common surround sound format used both by movie theaters and DVDs It is used in multiple encoding formats including ...

Страница 35: ...ronment the speakers need to be located at appropriate distances angles and heights and you should lay in a sufficient supply of speaker cable to do that Recommended speakers are the Yamaha MSP Studio series shown below from the left are the SW10 subwoofer MSP7 Studio and MSP5 Studio and HS series shown below from the left are the HS5 HS7 HS8 and HS8S subwoofer L R C Ls Rs LFE ...

Страница 36: ...If you have a reverb with a remote control you can install the box in your machine room and the controller in the control room if you have a compressor that cannot be run by remote control you can install that so that it can be manipulated directly Miscellaneous The Nuage Master does have a built in headphone amp Headphones are essential when a headphone is needed for monitoring or when monitoring...

Страница 37: ... have enough power outlets and that the circuit they are on can supply enough power Do not use low price mass market outlet strips always use power conditioners or power distributors with noise filtering that are intended specifically for use in audio applications 4 2 Ethernet connections Apart from the connection between the Dante Accelerator and network switch use Cat 5e or Cat 6 cable for all E...

Страница 38: ...ect the Nuage Fader Nuage Master to the switch Connection between switch and controller Next connect the Nuage I O to the network switch When redundant mode is chosen Connection between switch and I O Redundant Mode ...

Страница 39: ...39 If the NIO units are connected in the Daisy chain mode Connection between switch and I O Daisy chain Mode Next connect the computers to the network switch Connection between switch and computers ...

Страница 40: ...twork switch using Cat 7 cable Connection between switch and Dante Accelerator TIPS HP Z840 has two LAN ports and it is always recommended to use the port labeled AMT and disable the AMT function Regarding AMT it will be explained in another chapter ...

Страница 41: ...he Ethernet cable connections are now complete 4 3 KVM switch connections To control KVM switches from the Nuage Fader Nuage Master you will need one 9 pin RS 232 C cable for each controller RS 232 C cable ...

Страница 42: ...ctions between KVM switches and computer monitors Next connect RS 232 C cables to the RS 232 C jacks on the Nuage Fader Nuage Master rear panels and to the RS 232 C jacks on the back of the KVM switches Nuage Fader Rear Connection between KVM switch and computers ...

Страница 43: ...e keyboard and mouse to the USB OUT jacks on a KVM switch Connection between KVM switch and keyboard mouse Next connect the computers USB jacks to the KVM switch s USB IN jack Connection between KVM switch and computers ...

Страница 44: ...nd mouse but they should be connected to the one serving the main display as a rule the one positioned at the Nuage Master Ensure that there are USB connections between that switch and the computers In this type of arrangement you only need to use a KVM switch for that station you can use less expensive video switches for the other two stations We currently do not recommend the use of matrix KVM s...

Страница 45: ...ke connections needed for talkback mic Make all connections to input devices This guide presupposes an I O channel setup using the Nio500 A16 16 analog channels and the Nio500 D16 16 digital channels Input channel setup example Output channel setup example ...

Страница 46: ...ices several for mics musical instruments etc Audio output devices several for speakers etc Headphone monitoring 2 Talkback mic 1 25 pin D sub cable for AES EBU digital connection XLR cable Use a female 25 pin D sub cable for Nuage I O input D sub25pin cable female ...

Страница 47: ...n using the AD8HR for the mic preamp connect to the Nuage I O s digital input with a 25 pin D sub cable Connection between Nuage I O and MLA8 Ensure that you have the appropriate number length and type of cables and then connect the output devices to the Nuage I O s analog output ...

Страница 48: ...connect to the PHONES jacks on the lower front of the Nuage Master There are two jacks one quarter inch and one 3 5 mm to accommodate headphones and in ear earphones both output L R sound in stereo being connected to TO HOST Note that headphone volume can be controlled by the headphone amp s LEVEL knob as a rule you should set volume to an appropriate level beforehand as part of control room adjus...

Страница 49: ...er s rear panel connect that to any input on the Nuage I O Nuage I O Rear Nuage Master Rear Nuage Talkback Mic Talkback mic connections Connect other line level input devices such as a DVD player to the Nuage I O s inputs Nuage I O Rear Video Deck Outboard gear CD Player TalkbackOut DVD Player Connection between Nuage I O and other audio input devices ...

Страница 50: ...te 4 5 AD8HR Connections In this setup guide we will introduce how to connect two AD8HR units 1 2 to Nio500 D16 and remotely control them from Nuendo Connect HA Remote Connectors AH8HR Rear Panel First connect the Remote connector on the AD8HR 1 and the serial connector on the computer Please make sure the switch next to the connector is set to PC ...

Страница 51: ...able TIPS Among our recommended computers for Nuage hp s Z840 has a serial connector while Z440 Z240 and Apple s Mac Pro don t If you need to use this feature with those computers use a USB serial adapter cable or a PCIe card ...

Страница 52: ...tor of second unit Make sure the switches on the second unit and on are all set to RS422 Then connect each AES EBU output connector on AD8HR to the AES EBU input on Nuage I O Finally connect the wordclock distributed from the clock master to each AD8HR unit and also Nuage I O unit ...

Страница 53: ...ides video syncing video sync signal to each video device and to the SyncStation Use a 75 Ω BNC cable BNC Cable House sync connected to SyncStation Connect your video devices to the sync signal similarly The SyncStation can generate and distribute a word clock to use as a master but if you have a separate master word clock connect that to the SyncStation ...

Страница 54: ... Expanded System Link is SyncStation s proprietary protocol expanding on Steinberg s VST System Link After connecting a computer running NUENDO with a SyncStation over USB the Nuage I O and SyncStation are connected and Expanded System Link lets you exchange sample level position information between audio audio system and video synchronizer Expanded system link requires one digital signal channel ...

Страница 55: ...nte Controller s Clock on for only one of the Nuage I O units and turn them off for the other units TIPS When using multiple Nuage I Os simply connecting the Extended System Link output from one of them to the AES2 input on the SyncStation will provide sample syncing on all the Nuage I Os You can select a channel for the Expanded System Link on the NUENDO s VST Connections as discussed later on bu...

Страница 56: ...56 Nuage Workgroup Manager NIO Properties Dante Controller Clock Status window ...

Страница 57: ...e from Steinberg for managing licenses and enforcing copy protection using either the USB eLicenser included in the NUENDO Cubase package or the soft eLicenser Steinberg USB eLicenser Begin by downloading eLCC from Steinberg s website and installing it http www elicenser net en latest_downloads html Once installation is complete launch eLCC Click the Enter Activation Code button and type in the 32...

Страница 58: ...he license will be downloaded select the eLicenser to which you want the license to be downloaded and click the Download License button Simply downloading the license does not actually make the software available for use so start the usage period ...

Страница 59: ...59 When you see the screen shown below the eLicenser is working 5 2 Installing NUENDO Next launch the installer to install NUENDO Follow the steps in the installation window NUENDO Installer ...

Страница 60: ...60 Software License Agreement Choose Install Location ...

Страница 61: ...61 Enter Password to Proceed Installation Completed Installation of NUENDO is now complete ...

Страница 62: ...DAWs and switches Nuage controllers Please download the latest version of Tools for Nuage from the Yamaha Pro Audio website http www yamahaproaudio com and install it TOOLS for NUAGE Installer image file Follow the steps in the installation window TOOLS for NUAGE Installer TIPS After installing NUENDO from DVD it is necessary to download the latest updater from Steinberg website and install the ve...

Страница 63: ...63 Software License Agreement Choose Programs To Be Installed ...

Страница 64: ...64 Check Disk Space and Start Installation Password Required Installations Completed ...

Страница 65: ...65 Next move on to Dante Infrastructure installation Dante Infrastructure Installer Installation Type ...

Страница 66: ...66 Installation Completed For Windows after installing TOOLS for NUAGE the firewall setting for Nuage Workgroup Manager will pop up allow the following access settings Windows Security Alert ...

Страница 67: ...te Website registration required TIPS Only one Workgroup Manager is needed to be installed and started up for Nuage system For example If Workgroup Manager is already installed for DAW A it is not necessary to install it again If it is necessary to install Extension and Nuage PT Bridge for Mac uncheck the Workgroup Manager from the installation options mentioned above and continue ...

Страница 68: ...cintosh by double clicking on the installer icon you will not be able to install it This is because of a feature in Mac OS X called Gatekeeper The easiest way to circumvent this is to hold down the Control key and click on the installer icon and then select Open A warning message will appear click on the Open button to run the installer Gatekeeper Alert ...

Страница 69: ...69 Open with Ctrl Key If this happens when installing NUENDO you can circumvent it in the same way Dante Controller Installer Software License Agreement ...

Страница 70: ...70 Choose Install Location Enter Password to proceed Installation Completed ...

Страница 71: ...may not be installed as default in case of Windows so please make sure to install the latest version of QuickTime Essentials You may download QuickTime 7 7 9 for Windows via Apple Software Update Apple Software Update to install QuickTime 7 7 9 TIPS Official support for QuickTime for Windows has already been discontinued and it is recommended that the previous version of QuickTime Player is update...

Страница 72: ...72 Follow the steps in the installation window License Agreement Downloading QuickTime 7 7 9 ...

Страница 73: ...onjour For Windows only Dante Controller assumes that Bonjour is available This is included by default with Mac OS X only Windows users will need to install Bonjour Bonjour can be downloaded from Apple s website http support apple com kb DL999 ...

Страница 74: ...74 Follow the steps in the installation window Bonjour Installer License Agreement ...

Страница 75: ...75 System Requirements etc Installation Options Installation Completed ...

Страница 76: ... the driver for Dante Accelerator Next download the driver for Dante Accelerator from the Yamaha Pro Audio website http www yamahaproaudio com and run the installer Dante Accelerator Installer Software License Agreement ...

Страница 77: ...77 Choose Install Location Rebooting Required After Installation Installation Completed and Reboot ...

Страница 78: ...teinberg website and run the installer http www steinberg net en support downloads_hardware downloads_NUENDO_syncstation html From this point on download what is shown below and follow the instructions in the installer to perform the installation 1 SyncStation driver and firmware uploader Gatekeeper ...

Страница 79: ...79 As described earlier to bypass Gatekeeper hold down the Control key click on the installer icon and select Open SyncStation Driver Installer Choose Install Location ...

Страница 80: ... firmware on hand so download the latest firmware Firmware will be located at the same place as the driver The file name and dot extension for the downloaded file should be something like this syncstation sw130123 hw120302 chf 3 Launch the firmware updater and run the firmware update Launch the updater downloaded in Step 1 SyncStation Firmware Updater ...

Страница 81: ...81 SyncStation Firmware Updater Select SyncStation as the MIDI Input MIDI Output ports Choose MIDI Ports Click Verify SyncStation the SyncStation s current version information will be displayed ...

Страница 82: ...avigate to the location of the latest firmware data the chf file select it confirm that it is the version to be used for the update and begin the update Specify New Firmware If the update finishes without incident you will see the following message ...

Страница 83: ...on on the SyncStation to display the menu and then press the down arrow button repeatedly from the Unit line to open Unit07 InstallTemplate select Factory and hold down the down arrow button SyncStation Factory Reset Then turn the SyncStation off wait for 5 seconds and turn it back on The SyncStation update should now be complete ...

Страница 84: ...erse the above order 1 Powered speakers or power amp 2 NUENDO 3 Nuage I O 4 Video equipment SyncStation outboard gear 5 Computers computer monitors and computer peripherals 6 Nuage controller Nuage Fader Nuage Master 6 2 Starting up controller Switch on the Nuage Fader Nuage Master in any order Tip The Nuage Controller has an all lit mode for operational checks when started up in all lit mode all ...

Страница 85: ...AMT or Active Management Technology is Intel s remote management function intended for client computers used in a corporate environment This makes it possible to remotely start up and troubleshoot a computer Nuage does not use this function and moreover because it periodically transmits data used for remote monitoring that traffic can interfere with communications between the Nuage Controller and ...

Страница 86: ... hold down F10 on the keyboard when the HP logo appears to access BIOS Setup mode In BIOS Setup mode Select AMT Configuration from Advanced menu and press Enter HP Z series BIOS Setup Select Disabled for AMT and press F10 to accept Disable AMT ...

Страница 87: ...87 Next select OS Power Management from Power menu OS Power Management Set Idle Power Savings to Normal and press F10 to accept it Set Idle Power Savings to Normal ...

Страница 88: ...88 When the above setting is done select Save Changes and Exit from File menu Save Changes and Exit ...

Страница 89: ...he numbers that are displayed for each monitor Then arrange the monitor icons in Windows in that order and click Apply To confirm that Windows now has the screens laid out to match the physical layout of the monitors move the mouse so that the cursor runs across all the screens and observe whether it moves across them sequentially Display Arrangement Windows Tip The HP Z series has a known issue w...

Страница 90: ...itors will appear drag them around so that their layout is the same as the physical layout To confirm which display icon corresponds to which physical monitor click and hold on the icon a red frame will appear on that monitor Use that feedback to arrange the displays Next to make it so that the monitor positioned at the Nuage Master is treated as the main display drag the white bar representing th...

Страница 91: ...s for computer that are connected to the Internet 3 If you need to use pagefiles increase virtual memory swap space Although this depends somewhat on other factors you should generally aim for virtual memory to have double the capacity of RAM However that much RAM may not be needed if you already have enough memory If you do not need to use pagefiles disable this function on all your drives Refer ...

Страница 92: ...13 If you know of any unnecessary startup services use services msc to set those to manual If you are not sure what service s settings you should change either skip this step or refer to this BlackViper services settings page http www blackviper com service configurations black vipers windows 7 service pack 1 service configurations 14 Use DPC Latency Checker http www thesycon de eng latency_check ...

Страница 93: ...rmit you to record and play back more tracks simultaneously Furthermore if there are any disk problems having separate system and audio drives will make it that much easier to replace the drive to recover the system We recommend that you install NUENDO on the same drive as the operating system the system drive and use the other drive exclusively for reading and writing audio data although this is ...

Страница 94: ... keyboard shortcut for Spotlight and prevent Spotlight from searching the audio drive Disable Spotlight shortcut keys Prevent Spotlight from searching the audio drive 6 Disable the keyboard shortcut for Mission Control ...

Страница 95: ... If Tools for Nuage has been installed Nuage Workgroup Manager will launch automatically when the computer is started so it should not be necessary to launch the program you may need to launch Nuage Workspace Manager if you quit the program manually Nuage Workgroup Manager Windows Nuage Workgroup Manager Mac OSX ...

Страница 96: ...see the following in the Nuage Workgroup Manager window Nuage devices recognized on the Workgroup Manager Select each device one at a time and click the up arrow button to add it to the upper pane Add this following the setup procedure for Nuage I O in Section 3 3 Adding devices to the Workgroup ...

Страница 97: ...nte Controller Details for patching in NUENDO will be explained in 6 10 Tip If you are using more than one Nuage Fader add them in order starting with the one you want to treat as the first Fader eg if you have two Faders next to each either treat the left one as Fader 1 and the right one as Fader 2 To select the right unit from the Device DAW List click the Identify button this will cause an LED ...

Страница 98: ... the Dante Accelerator card and Nuage I O are connected you should see the following Select the port that Dante Controller connects to If you don t select the correct port Nuage I O and Dante Accelerator will not be displayed ...

Страница 99: ...99 The device names can be changed so it is easy to remember not mandatory Open the Device Config window Device Config window ...

Страница 100: ...in Dante Controller shows output ports transmitters in columns and input ports receivers in rows Click the button above Dante Accelerator to expand it horizontally this lets you check Dante Accelerator s 128 channels of output TIPS Do not change Y001 Yamaha written at the beginning of Dante Accelerator s name or Y00X Yamaha witten at the beginning of Nuage I O If you change the name they may not b...

Страница 101: ...101 Dante Transmitters Click the button again to close up the Dante Accelerator grid Next disclose the 16 channels of output for each Nuage I O ...

Страница 102: ...y Check Dante Accelerator s 128 channels of input and each Nuage I O s 16 channels of output Dante Receivers Once you understand how the Dante Controller grid works you can set up the patches between the Dante Accelerator outputs and the Nuage I O inputs and between the Nuage I O outputs and the ...

Страница 103: ...y the first 16 channels clicking the intersection point between device names while holding down the Control key will patch the inputs and outputs for those 16 channels one at a time in order Clicking while holding down the Control and Shift keys will remove all the patches for those 16 channels at once The 17th channel and beyond need to be patched manually one at a time It can take a few seconds ...

Страница 104: ... 5 you set up the physical order of the computer monitors and how they are addressed by the operating system but the first time NUENDO is launched it will not recognize which monitor to use for Nuage Fader so you need to force NUENDO to recognize it The NUENDO Workspace window will be displayed on the monitor that the operating system recognizes as being the main monitor so Nuage Master should be ...

Страница 105: ... edges of the window to the correct positions Adjust left right end of the screen Tip To check whether the mixer window is displayed on the right monitor open a project or create a new one and then press any SEL button on the Nuage Fader Check to see whether the channel strip corresponding to that channel has a white outline If it is shown correctly above the SEL button that you pressed then your ...

Страница 106: ...ows If you would like to display the video add window full screen open the video window press the F8 key drag it to the screen where you want it displayed and then double click the window 6 9 Device Setup settings You should make sure that the following have been set in advance in Device Setup VST Audio System and Yamaha AIC128 D below it and VST System Link Select the Dante Accelerator card Yamah...

Страница 107: ... Audio System Next open Yamaha AIC128 D and and if you want to use the Direct Monitoring feature check on Direct Monitoring Click the Control Panel button and set up the settings as shown below Yamaha AIC128 D ...

Страница 108: ...m Link screen There is no screen for setting an Extended System Link for synchronizing SyncStation and samples System Link settings should be handled using the Project Synchronization Setup described below If anything has been set in the System Link screen an error message will be displayed after a certain period of time after which the System Link will be removed ...

Страница 109: ...e from video device via RS422 Frame Reference Video SyncStation receives video sync Clock Reference User Frame Rate SyncStation generates word clock based on video sync signal Machine control related Machine Control Output Destination Steinberg SyncStation Machine control sent from SyncStation Machine Control Output Settings Machine Control Destination RS422 out Machine control sent via RS422 Mach...

Страница 110: ...ision Time Alignment System Link Check on Send Data via System Link If the Nuage I O s System Link Out jack connects to the SyncStation s AES jack BNC using a BNC cable select AIC128 D Output 16 in NUENDO and select AES2 Right in SyncStation Select LTC VITC for the Position Source in Aditional RS422 out Settings ...

Страница 111: ...nching NUENDO set up audio patches VST Connections in NUENDO Open the VST Connections press the F4 key window from the NUENDO 6 Devices menu Tip The best settings for synchronizing with video devices will vary depending on the make and model of video equipment you are using You will need specialized knowledge and some experimentation to find the best settings We do not go into a detailed discussio...

Страница 112: ...Inputs in order based on the input channels you set up in Section 4 4 First add five channels of mic line input Click the Add Bus button type Mic Line in the resulting dialog set the number of channels to 5 and click the Add Bus button Add Bus You should see the following once you have added the input channels ...

Страница 113: ... the same method to add 5 1 channels for a DVD player and for a stereo video recorder VST Connections Inputs External FX Tab Here the Outboard inputs are assigned to channels 15 16 but because this is being used as a send return external effect do not patch them from the Inputs tab patch them from the External FX tab ...

Страница 114: ...create a bus under the Outputs tab and set that as the main mix By setting the Audio Device and Device Port to Not Connected you can define a bus that has no physical output The orange icon indicates the current main mix If 5 1 channel sound is not selected right click on the bus name and choose Set 5 1ch Speakers as Main Mix Under the Outputs tab do not set up the same device names and device por...

Страница 115: ...rol room are defined as Monitor under the Studio tab Here add the 5 1 speaker system and patch the Dante Accelerator s output Add the stereo speaker system stereo cue for artists in the studio and headphones for monitoring in the control room in the same way Also to hear sound from DVD players or video recorders playing in the control room add their input channels as Monitor Sources This completes...

Страница 116: ... Mixer screen Tip In some cases even if you play back a 5 1 channel project you will only be able to hear it as left right stereo This is because even with the control room s main mix set to 5 1ch it is converted by MixConvert so that it can be monitored in stereo To find out what channel format will be used for playback in the control room check the Control Room section of the Control Room Mixer ...

Страница 117: ...e Master s control room Switch the downmix to set 5 1ch 5 1ch Control Room on Nuage Master Tip To change this click the right most button under Speakers in the Control Room Mixer window to open MixConvertV6 then click the downward pointing triangle next to Stereo at the top to select 5 1 channels ...

Страница 118: ...ections The Talkback button on Nuage Master and Mute button on CUE will be activated TIPS To make the changes click the first button from the right hand side on speaker in the Control Room Mixer window to open MixConvertV6 and choose 5 1ch by clicking the triangle button on the right hand side below the Stereo on top ...

Страница 119: ...aster TIPS When add Talkback and Cue on VST Connection the Talkback button the Mute button on CUE and Signal indicator will be active as shown in above fig The above fig shows CUE 1 3 after setup CUE 1 3 with Mute on while CUE2 is off ...

Страница 120: ...ote Setup First open Nuage HA Remote Setup window from Devices menu of Nuendo If cables are correctly connected it will automatically start finding the COM port If the COM port is found either 8 channel group of 8 can be selected for each ID so select the channel numbers to which each Nuage I O to which input channel group is connected ...

Страница 121: ...121 Select a Nuage I O input channel to which either AD8HR is connected press PRE and 2 on the Section Control and HA GAIN and HA TRIM parameters are displayed on the Nuage Fader screen ...

Страница 122: ...not recognized and displayed in the Workgroup Manager HA remote control can be done by adding the input channels on Nuendo that have been patched on Dante Controller TIPS The only parameters that can be displayed controlled are HA GAIN and HA TRIM If you want to change more parameters such as HPF High Pass Filter on off and frequency and 48V on off press e button for each channel to open Channel S...

Страница 123: ...re Rio3224 D Rio1608 D Ri8 D The parameters that can be controlled are HA Gain gain level HA GC gain compensation HA On Off head amp on off HA HPF high pass filter HA 48V phantom power on off R series Ri8 D Ro8 D n a Rio1608 D Rio3224 D from top down ...

Страница 124: ...up window from Devices menu on Nuendo move to R Series tab and select the Dante Accelerator card in use or a DVS TIPS R series units will not appear on the Workgroup Manager even if they are correctly recognized by the system That is no problem As described below if you have patched those Dante channels on Dante Controller to Nuendo input channels on VST Connections they will appear on the Fader u...

Страница 125: ...put channels of Dante Accelerator In this example two outputs from each R unit are patched to total six input channels of Dante Accelerator TIPS The area below the Dante Interface box are empty simply because the height needs to be consistent with the adjacent AD8HR page Nothing will appear in this area in any condition ...

Страница 126: ...ut channels of Nuendo as shown below by adding input busses and assigning the input port of Dante Accelerator card to each bus Now the inputs from R series are connected to Nuendo and the HA remote can be controllable In the SECTION CONTROL area of the Nuage Fader unit press PRE button Nuage Fader unit Section Control ...

Страница 127: ...ries becomes controllable PRE section screen 4 Here are the parameters that can be controlled HA GAIN adjust the HA gain level HA GC Gain Compensation on off to prevent from unexpected gain level changes this allows the output level to keep consistent no matter how you change the gain level locally If turned on the output level from R series is fixed ...

Страница 128: ...power Also if you press e button on each channel of Fader unit the channel edit screen including the HA section will appear and you can control from that Try to connect a microphone or an audio playback device bring up the gain level and see if the input level will change TIPS If you accidentally provide phantom power to microphones that do not require it such as passive type ribbon microphones it...

Страница 129: ...Mio64 D Dante MADI converter can be connected to Nuage and change various parameters on Nuage Workgroup Manager RMio units will be recognized as I O and up to total eight Nio and RMio units can be controlled Version 1 6 or later RMio64 D Rear Panel ...

Страница 130: ... displayed on the Device DAW List of Workgroup Manager Nuage Workgroup Manager Without adding the unit to the Workgroup only Identify works and configuration window cannot be open until the RMio unit is added to the Workgroup by pressing the uparrow button between the both lists ...

Страница 131: ...or General Purpose Input Output is a general interface for controlling external devices by using the voltage change In case of Nuage this may be used for external devices such as a RECORDING sign and external talkback button and so on About JLC GPIO products JLC s eBOX series are interfacing boxes for converting GPI General Purpose Interface input output signal to Ethernet signal Currently up to t...

Страница 132: ...f eBOX and the network switch using CAT cables Next open Nuage MASTER Setup window from Device menu of Nuendo move to GPIO tab and set and IP address for Nuage Master If possible use the following unique IP address IP address can be directly typed in the textboxes ...

Страница 133: ...192 168 254 103 eBOX 192 168 254 102 eBOX GPI8 192 168 254 104 Nuage MASTER Setup GPIO Device The IP address can also be set by using the DIP switches on the rear panel as well as the bundled app DIP switches rear panel ...

Страница 134: ...N 192 168 254 104 ON OFF OFF OFF 192 168 254 105 ON OFF OFF ON 192 168 254 106 OFF ON OFF OFF 192 168 254 107 OFF ON OFF ON eBOX Configuration Utility When the IP address is correctly set the link status and packet send receive status are indicated on the front panel of eBOX Status indicators ...

Страница 135: ... the Master In the Output area select Nuendo as target Control Room as Function 1 Talkback as Function2 1 and 2 as Device respectively 1 as Port and High as Terminal Nuage MASTER Setup GPIO Port TIPS Like R series eBOX is not displayed on Nuage Workgroup Manager even when connected and recognized which is no problem ...

Страница 136: ...ECEIVE indicator will light If GPI RECEIVE lights as soon as you press the TALKBACK button it shows it works correctly 6 16 Connecting and setting up Pro Tools system The Pro Tools control function of Nuage is compatible to the following two types of Pro Tools platforms Pro Tools HDX system Pro Tools Software ...

Страница 137: ...ion using SMPTE timecode is not required MTC MIDI Timecode can substitute If that s the case prepare MIDI interfaces and cables Pro Tools HDX system configuration example Pro Tools System front w SyncStation TIPS For Mac users Core MIDI is not tested for this application and we do not recommend that you use the function for the MTC synchronization between Nuendo and Pro Tools ...

Страница 138: ...138 Pro Tools System rear w SyncStation Insert HDX card to the PCIe slot of Mac Pro Before connecting the card to the motherboard make sure to connect the black and yellow cable to the motherboard ...

Страница 139: ...oop Sync LS on HD I O and that on Sync HD by connecting LS OUT on Sync HD and LS IN on HD I O and connecting LS OUT on HD I O and LS IN on Sync HD using BNC cables By using XLR cables connect TIMECODE OUT on SyncStation and LTC IN on Sync HD Similarly connect LTC OUT on Sync HD and TIMECODE IN on SyncStation ...

Страница 140: ...140 Next for wordclock synchronization connect WORDCLOCK A on SyncStation and WC IN on Sync HD also connect WORDCLOCK B to WC IN on HD I O ...

Страница 141: ...141 Connect USB port on SyncStation and an available USB port on the computer Connect the serial port on HDX card and HOST SERIAL connector on Sync HD using a 9 pin serial cable ...

Страница 142: ...First configure the Workclock source on Pro Tools Open Hardware Setup window and in the ClockSourse area chose Wordclock xx xxkHz TIPS In this scenario Nuendo and Pro Tools are synchronized by using SMPTE Timecode LTC where Nuendo SyncStation is the clock Master while Pro Tools Sync HD is the Slave ...

Страница 143: ...HD Make Pro Tools online make chase able as Slave Click on the Sync button on the transport Now Pro Tools is waiting for the LTC signal coming in Next configure the Nuend system Open Device Setup window and choose SyncStation If the Revisioin numbers are shown the SyncStation is correctly recognized ...

Страница 144: ...e network and use one input and output channels of Dante Accelerator cards of both platforms On Dante Controller patch the ourput 128 of Nuendo to the input 128 of Cubase Similarly patch the output 128 of Cubase to the input 128 of Nuendo TIPS For Nuendo Cubase synchronization VST System Link will need to be used When locked via VST System Link the synchronization is bi directional so the transpor...

Страница 145: ...rce area and press SYNC button below that area Do the same thing on the Cubase side as well Next open Device Setup windows and move to VST System Link page Choose the Dante input and output channels that you have patched on Dante Contrller earlier Do the same thing on the Cubase side as well ...

Страница 146: ...r platform TIPS In this scenario Nuendo is always the Master while Pro Tools is always Slave so even if you playback a session on the Pro Tools side it always will be brought back to the Nuendo time position Switching DAW on the Nuage control surface does not change that In order to control Pro Tools independently press SYNC ONLINE button to make the Pro Tools offline ...

Страница 147: ...147 ...

Страница 148: ...patible with Dolby Atmos 9 1ch format Nuendo 7 1 and later and those Atmos channels can be controlled from NUAGE Fader Master NUAGE V1 8 Speaker placement Dolby Atmos 9 1ch bus is available with Nuendo7 1 and below is an example of speaker placement for monitoring Dolby Atmos 9 1 Ex Dolby Atmos 9 1 7 1 2 Speaker Placement ...

Страница 149: ...149 Front Speakers Left Center Right Side Rear Speakers Left Surround Side Left ...

Страница 150: ...150 Ceiling Speakers Top Side Left Top Side Right Subwoofer Lfe ...

Страница 151: ...e diagram below shows an example of the angle of each speaker and its distance from the listening position An example of speaker placement against the listening position L R C Ls Rs Sl Sr Lfe Tsl Tsr Tsl Tsr ...

Страница 152: ... Connected because if you directly set the Device ports here you won t be able to control speaker volume or mute via Control Room which may damage your speaker system In the Studio tab add a Dolby Atmos 9 1 monitor bus and assign the output channels to each speaker Here assign the output channels of Dante Accelerator card which are patched to each output channel of NUAGE I O ...

Страница 153: ... If you create a mono stereo 5 1 9 1 Atmos track you will see the pan position of each track on the NUAGE Fader screen as below Pan section on NUAGE Fader Up to two parameters can be displayed and controlled on the Fader screen at the same time but you can access more parameters by switching the Section Control button 1 8 ...

Страница 154: ...154 NUAGE Fader Section Control Section Control 1 ...

Страница 155: ...155 Section Control 2 Section Control 3 Section Control 4 Section Control 5 ...

Страница 156: ...trol 6 Section Control 7 Section Control 8 On the NUAGE Master Touchscreen Dolby Atmos panning can be performed more intuitively by simply dragging the color balls or turning the knobs Dolby Atmos on NUAGE Master Mono ...

Страница 157: ...157 Dolby Atmos on NUAGE Master Stereo Dolby Atmos on NUAGE Master 5 1 Dolby Atmos on NUAGE Master 9 1 Dolby Atmos ...

Страница 158: ...we have outlined how to configure the panning of Bed channels In order to pan the Object channels you must obtain an RMU unit from Dolby and install the RMU Connection Kit for Nuendo For details please refer to Mixing with VST MultiPanner document ...

Страница 159: ......

Отзывы: