background image

E-

5

Mount the rear speakers on a shelf, rack or directly on the
floor, or hang them on the wall.

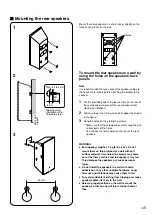
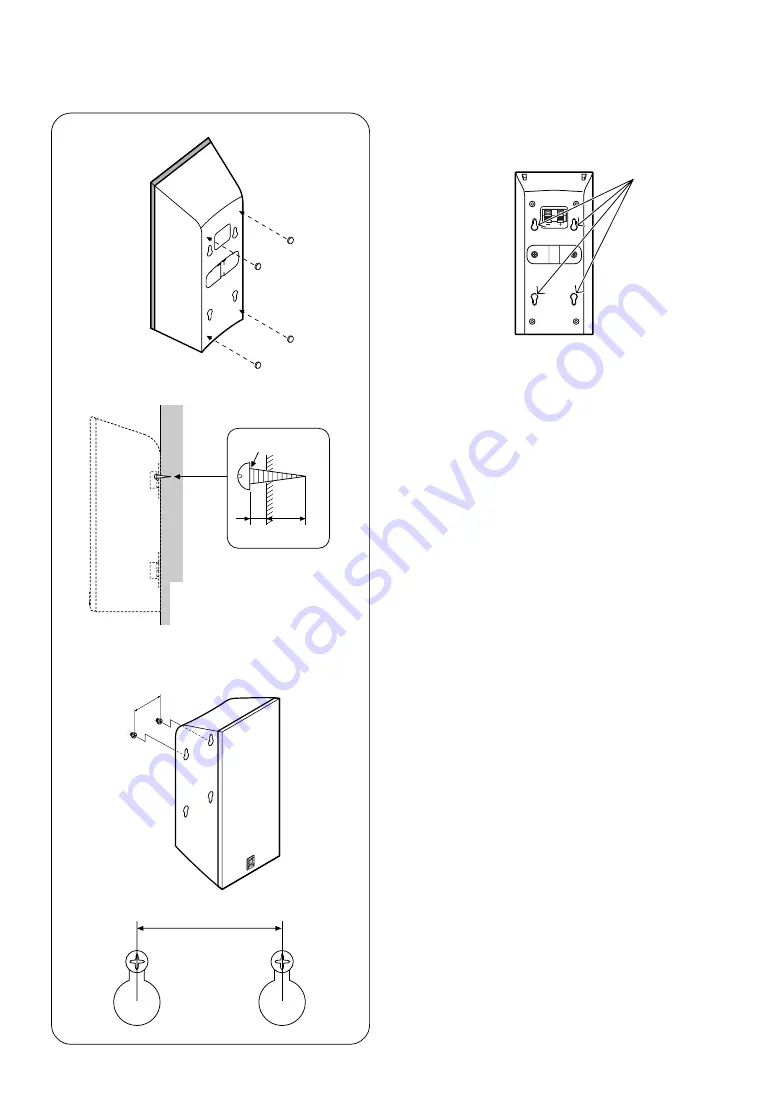
To mount the rear speakers on a wall by
using the holes on the speakers’ back
panels

Note

It is recommended that you connect the speaker cables to
the speaker’s terminals before attaching the bracket to the
speaker.

1

Put the provided pads at the four corners on the rear of
the rear speakers to prevent the rear speakers from
moving by vibrations.

2

Fasten screws into a firm wall or wall support as shown
in the figure.

3

Hang the holes on the protruding screws.
* Make sure that the screws are securely caught by the

narrow parts of the holes.

* You can use the lower holes on the rear of the rear

speakers.

WARNING

Each speaker weighs 1.1 kg (2 lbs. 6 oz.). Do not
mount them on thin plywood or a wall with soft
surface material. If mounted, the screws may come
out of the flimsy surface and the speakers may fall.
This damages the speakers or causes personal
injury.

Do not install the speakers to a wall with nails,
adhesives, or any other unstable hardware. Long-
term use and vibrations may cause them to fall.

To avoid accidents resulting from tripping over loose
speaker cables, fix them to the wall.

Select a proper position on the wall to mount the
speaker so that no one will injure his/her head or
face.

Mounting the rear speakers

1

3

W

all/ w

all

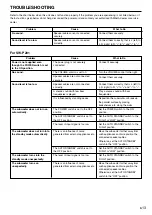
suppor

t

Tapping screw
(Available at the
hardware store)

Min.
20 mm

60 mm

Diam. 3.5 to 4 mm

6 mm

Holes

2

Содержание NS-P320

Страница 1: ...I NS P320 Including SW P201 subwoofer system HOME CINEMA 5 1CH SPEAKER PACKAGE OWNER S MANUAL U B ...

Страница 2: ...to WARNING TO REDUCE THE RISK OF FIRE OR ELECTRIC SHOCK DO NOT EXPOSE THIS APPLIANCE TO RAIN OR MOISTURE CAUTION CAUTION TO REDUCE THE RISK OF ELECTRIC SHOCK DO NOT REMOVE COVER OR BACK NO USER SERVICEABLE PARTS INSIDE REFER SERVICING TO QUALIFIED SERVICE PERSONNEL IMPORTANT Please record the serial number of this system in the space below Model Serial No The serial number is located on the rear o...

Страница 3: ...nch circuit breaker or fuse circuits or install AC line filter s In the case of radio or TV interference relocate reorient the antenna If the antenna lead in is 300 ohm ribbon lead change the lead in to coaxial type cable If these corrective measures do not produce satisfactory results please contact the local retailer authorized to distribute this type of product If you can not locate the appropr...

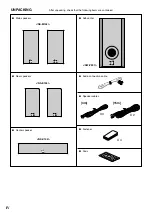
Страница 4: ...fter unpacking check that the following items are contained Main speakers Rear speakers Center speaker NS M104 NS C104 SW P201 NS E104 X 4 4m 15m X 3 X 2 Subwoofer Audio connection cable Speaker cables Fastener Pads ...

Страница 5: ...n of speakers For SW P201 only Never open the cabinet If something drops into the set contact your dealer Do not use force on switches controls or connection wires When moving the unit first disconnect the power plug and the wires connected to other equipments Never pull the wires themselves Be sure to read the TROUBLESHOOTING section regarding common operating errors before concluding that the un...

Страница 6: ...ting audio system by connecting to either the speaker terminals or the line output pin jack terminals of the amplifier The AUTO STANDBY switch saves you the trouble of setting the POWER switch to the ON or OFF position The speaker package NS P320 is designed for use in a multi channel audio system such as a home theater system The package includes two NS M104 speaker systems two NS E104 speaker sy...

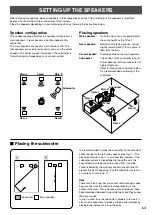
Страница 7: ...akers in their respective positions The positioning of the speakers is important because it controls the whole sound quality of this system Place the speakers depending on your listening position by following the instructions below Speaker configuration This speaker package employs a 6 speaker configuration 2 main speakers 2 rear speakers a center speaker and a subwoofer The main speakers are used...

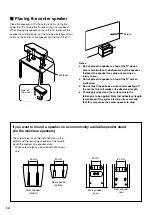
Страница 8: ...peaker on a commercially available speaker stand for the main rear speakers 60 mm Notes Do not place the speaker on top of the TV whose area is smaller than the bottom area of the speaker If placed the speaker may drop out causing an injury to you Do not place the speaker on top of the TV with an inclination Do not touch the adhesive surface after peeling off the seal as this will weaken its adhes...

Страница 9: ...w parts of the holes You can use the lower holes on the rear of the rear speakers WARNING Each speaker weighs 1 1 kg 2 lbs 6 oz Do not mount them on thin plywood or a wall with soft surface material If mounted the screws may come out of the flimsy surface and the speakers may fall This damages the speakers or causes personal injury Do not install the speakers to a wall with nails adhesives or any ...

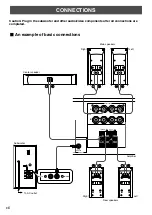
Страница 10: ...FROM AMPLIFIER OUTPUT TO SPEAKERS INPUT2 AUTO STANDBY STANDBY RED ON GREEN OFF LOW HIGH OFF POWER ON 0 I0 INPUT2 MONO CONNECTIONS Caution Plug in the subwoofer and other audio video components after all connections are completed 䡵 An example of basic connections Left Right Subwoofer Amplifier To AC outlet Center speaker Main speakers Left Right Rear speakers ...

Страница 11: ...e line output pin jack terminal s of the amplifier If your amplifier does not have any line output terminal connect the subwoofer to the speaker output terminals of the amplifier Refer to page 9 for details To connect with a YAMAHA DSP amplifier or AV receiver connect the SUBWOOFER or LOW PASS etc terminal on the rear of the DSP amplifier or AV receiver to the L MONO INPUT2 terminal of the subwoof...

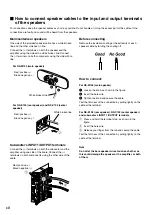
Страница 12: ...cables as short as possible Do not bundle or roll up the excess part of the cables If the connections are faulty no sound will be heard from the speakers Before connecting Remove the insulation coating at the extremity of each speaker cable by twisting the coating off How to connect For NS M104 main speaker 1 Loosen the knob as shown in the figure 2 Insert the bare wire 3 Tighten the knob and secu...

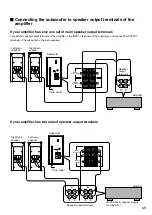
Страница 13: ... to speaker output terminals of the amplifier If your amplifier has only one set of main speaker output terminals Connect the speaker output terminals of the amplifier to the INPUT1 terminals of the subwoofer and connect the OUTPUT terminals of the subwoofer to the main speakers Left main speaker Right main speaker Subwoofer Amplifier Speaker output terminals To AC outlet If your amplifier has two...

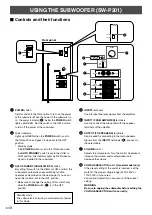
Страница 14: ...ting this switch to the HIGH or LOW position the subwoofer s automatic power switching function operates as described on the next page If you do not need this function set to the OFF position Make sure to change the setting of this switch only when the POWER switch 1 is in the OFF position Standby mode The subwoofer is still using a small amount of power in this mode 4 INPUT2 terminals Used to inp...

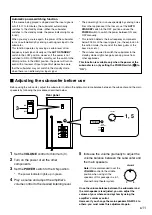
Страница 15: ...tic power switching function If the source being played is stopped and the input signal is cut off for 7 to 8 minutes the subwoofer automatically switches to the standby mode When the subwoofer switches to the standby mode the power indicator lights up in red When you play a source again the power of the subwoofer turns on automatically by sensing audio signals input to the subwoofer This function...

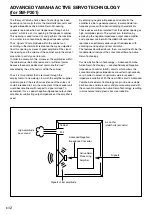
Страница 16: ...lish this a special negative impedance output drive amplifier for subtracting output impedance of the amplifier is used By employing negative impedance drive circuits the amplifier is able to generate precise low amplitude low frequency waves with superior damping characteristics These waves are then radiated from the cabinet opening as high amplitude signals The system can therefore by employing ...

Страница 17: ...r away from such appliances and or reposition the connected speaker cables Otherwise set the AUTO STANDBY switch to the OFF position Cause The power plug is not securely connected The VOLUME control is set to 0 Speaker cables are not connected securely Speaker cables are not connected correctly A source sound with few bass frequencies is played It is influenced by standing waves The POWER switch i...

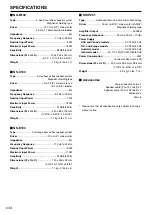
Страница 18: ... reflex speaker system Driver 10 cm 4 cone woofer Impedance 6Ω Frequency Response 110 Hz to 20 kHz Nominal Input Power 30W Maximum Input Power 110W Sensitivity 91 dB 2 83V m Dimensions W x H x D 120 x 250 x 92 mm 4 3 4 x 9 13 16 x 3 5 8 Weight 1 1 kg 2 lbs 6 oz 䡵 SW P201 Type Advanced Yamaha Active Servo Technology Driver 16 cm 6 5 16 cone woofer JA1678 Magnetic shielding type Amplifier Output 50W...

Страница 19: ... BEI HAMBURG F R OF GERMANY YAMAHA ELECTRONIQUE FRANCE S A RUE AMBROISE CROIZAT BP70 CROISSY BEAUBOURG 77312 MARNE LA VALLEE CEDEX02 FRANCE YAMAHA ELECTRONICS UK LTD YAMAHA HOUSE 200 RICKMANSWORTH ROAD WATFORD HERTS WD1 7JS ENGLAND YAMAHA SCANDINAVIA A B J A WETTERGRENS GATA 1 BOX 30053 400 43 VASTRA FRÖLUNDA SWEDEN YAMAHA MUSIC AUSTRALIA PTY LTD 17 33 MARKET ST SOUTH MELBOURNE 3205 VIC AUSTRALIA ...

Отзывы: