background image

37

Quick Guide

Playing the voices

Voice Editing

The following procedure shows you the fundamentals 
in creating and editing Voices. All Voice creation and 
editing is carried out in the Voice Edit Mode.
Each Normal Voice consists of up to four Elements. To 
edit the common parameters (common to all 
Elements), enter the Common Edit Mode. To edit 
parameters of individual Elements, enter the Element 
Edit Mode. 

n

When you select a Drum Voice, enter the Key Edit Mode 
and edit parameters of individual Keys of the Drum 
Voice.

Of course, this is just one example; you are free to set 
any parameters in any way you like. Details about each 
parameter are given in the Reference section of this 
manual (page 59).

n

All parameter settings are stored along with the Voice 
itself.

Enter the Voice Play mode by pressing the [VOICE] 
button. Select the Voice Number of the Voice you wish 
to edit (page 35).

n

When you’re creating a Voice by editing an existing one, 
it helps to select a Voice with a sound that’s relatively 
similar to the one you intend to create. In this way, you 
can avoid having to make large changes and many 
parameter edits — allowing you to create a Voice quickly 
and easily. If you are creating a Voice from scratch, use 
the convenient Initialize function (in the Utility Job 
mode) to initialize a Voice in the internal user memory. 
For details, see page 55.

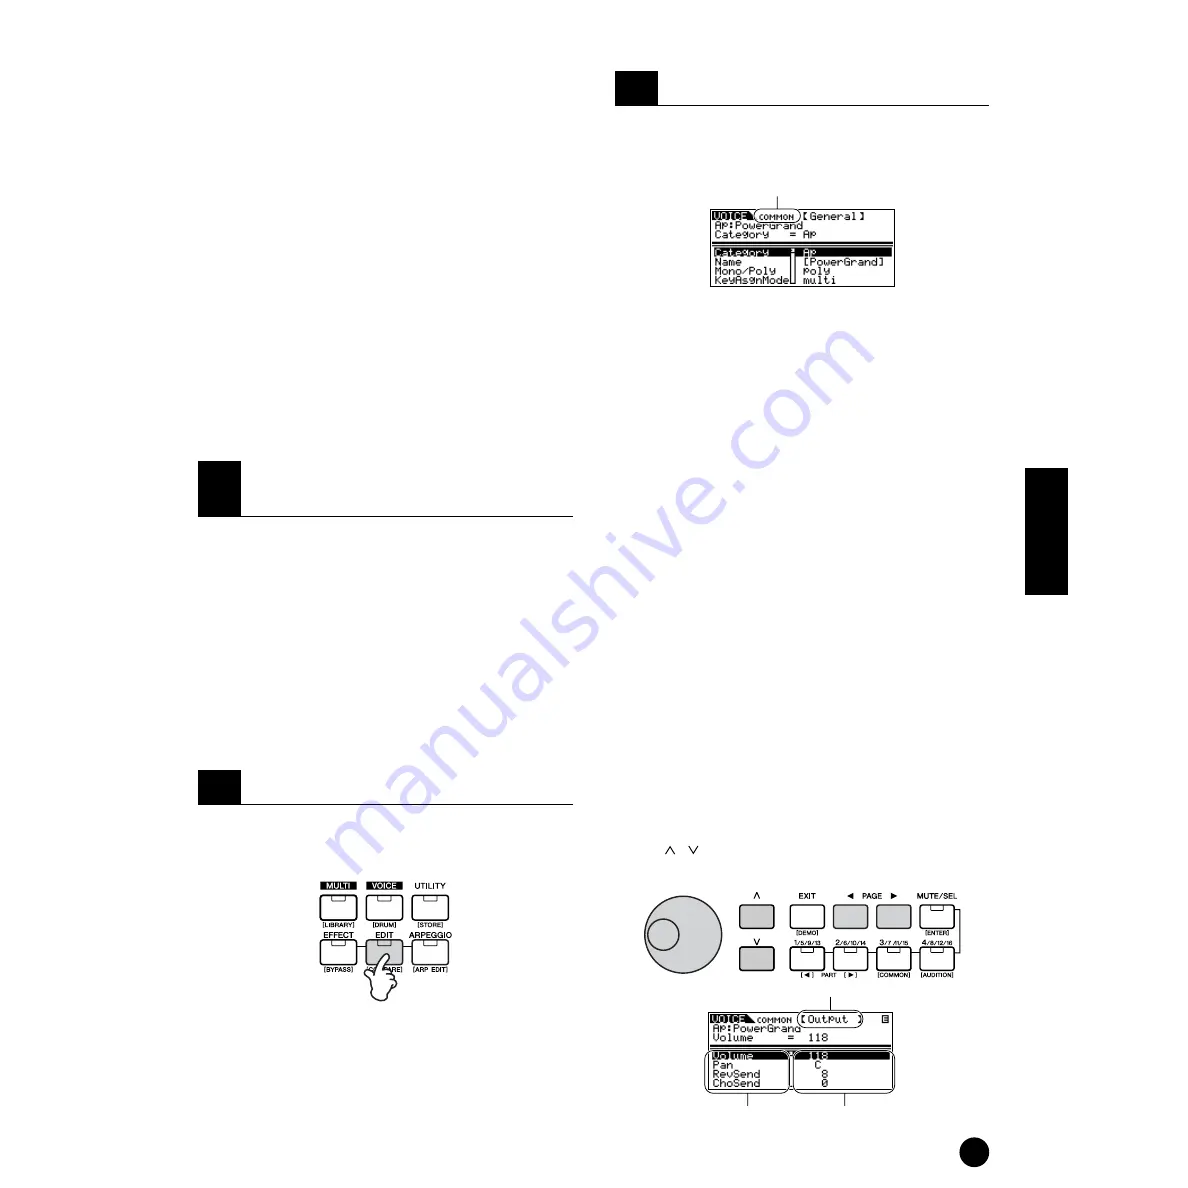
To enter the Voice Edit mode, press the [EDIT] button 
while in the Voice Play mode. The LED will light, 
indicating that the Voice Edit Mode is selected. 

Simultaneously hold down the [SHIFT] button and 
press the [COMMON] button to call up the Common 
Edit screen. 

The Common Edit Mode contains the following displays.

n

The following displays are examples of a Normal voice. If 
you select a Drum voice or Plug-in voice, the displays will 
be different.

• General

For setting general parameters in Common Edit, 
such as the Voice Name.

• Output

For setting the Voice output parameters such as the 
output level (volume) and pan position.

• EG/FLT (Envelope Generator/Filter)

For setting the time variance of how the pitch, filter,  
or level changes. You can also change some filter 
parameters here.

• CtrlSet (Controller Set)

For determining how the MOTIF-RACK performs 
when the MIDI control change data is received.

• LFO (Low Frequency Oscillator)

For setting the LFO parameters. The LFO uses a 
low frequency waveform to vary the pitch/filter/
amplitude characteristics, and can be used to create 
vibrato, wah, tremolo and other effects.

n

For more information about the LFO, see page 27.

To change the display page, use the PAGE [

E

E

E

E

][

F

F

F

F

buttons. Select the desired parameter with the 
cursor[ ][ ] buttons and change the settings by using 
the data dial. 

1

In the Voice Play Mode, select the 
Voice you wish to edit.

2

Enter the Voice Edit Mode.

3

Set the Common Parameters.

Indicates that the Common Edit Mode is selected.

Display name

Parameter name

Settings

Содержание MOTIF-RACK

Страница 1: ...TONE GENERATOR ...

Страница 2: ...nction or effect works when the unit is operating as designed are not covered by the manufacturer s warranty and are therefore the owners responsibility Please study this manual carefully and consult your dealer before requesting service ENVIRONMENTAL ISSUES Yamaha strives to produce products that are both user safe and environmentally friendly We sincerely believe that our products and the produc...

Страница 3: ...the users manual may cause interference harmful to the operation of other electronic devices Compliance with FCC regulations does not guarantee that interference will not occur in all installations If this product is found to be the source of interference which can be determined by turning the unit OFF and ON please try to eliminate the problem by using one of the following measures Relocate eithe...

Страница 4: ...plug becomes frayed or damaged or if there is a sudden loss of sound during use of the instrument or if any unusual smells or smoke should appear to be caused by it immediately turn off the power switch disconnect the adaptor plug from the outlet and have the instrument inspected by qualified Yamaha service personnel CAUTION Always follow the basic precautions listed below to avoid the possibility...

Страница 5: ... a physician Saving and backing up your data Voice Multi parameter settings are lost when you turn off the power to the instrument without saving Make sure to save important data to internal User memory see page 57 Saved data may be lost due to malfunction or incorrect operation Save important data to external media such as the Yamaha MDF3 MIDI data filer Never attempt to turn off the power while ...

Страница 6: ... Modular Synthesis Plug in System connectors and the optional Plug in Boards you can upgrade the MOTIF RACK with completely new sound processing engines These Plug in Boards give you more voices more effects more polyphony and more instrument parts Plus special Plug in voices have already been programmed and stored to the MOTIF RACK ready to be played as soon as you install the proper board Simple...

Страница 7: ...e Reference Numbers In addition to the regular page references this manual also includes special Reference Numbers e g Ref 15 These let you easily and quickly cross reference the corresponding parameters in the Function List on page 63 Copying of commercially available music sequence data and or digital audio files for any purpose other than your own personal use is strictly prohibited This produc...

Страница 8: ...it buffer Page 47 Copying Element key parameter settings of the Voice to another Element key Page 56 Copying Part parameter settings of the Multi to another Part Page 56 Copying an entire Voice Multi to another memory location Store function Page 57 Changing the sound Voice Edit structure Page 26 Editing a Voice Page 37 Effect structure and signal flow Page 23 Editing Voices using a computer Page ...

Страница 9: ... No 33 Pages 44 64 Adjusting the Voice volume affects all elements No 33 Page 64 Adjusting each Element key s volume No 111 Page 67 Adjusting the output gain of OUTPUT jacks No 42 No 43 Page 65 Setting the sound of a drum voice Setting the drum keys for independent open and closed hi hat sounds No 28 Page 64 Setting the key release response enabling a sound to decay naturally even when a key is re...

Страница 10: ...y outputting each part of a Multi via the ASSIGNABLE OUTPUT jacks No 96 Page 67 Independently outputting each key of a Drum Voice via the ASSIGNABLE OUTPUT jacks No 96 Page 67 Using the optional Plug in Boards Plug in board line up Page 19 Installing the Plug in Board Page 82 Using two identical Plug in Boards as one board to increase polyphony No 175 Page 70 Editing the Native Part parameters Pag...

Страница 11: ...ck 34 Playing the voices 35 Selecting a voice 35 Using the Category Search function 36 Voice Editing 37 Using Voice Effects 41 Using the Multi Mode 43 Playing in the Multi mode 43 Simple Mixer functions Mixing Edit Mode 44 Detailed Mixing function Multi Edit Mode 45 Multi Library 47 Using Multi Effects 49 Using the Arpeggio function 52 What is the Arpeggio function 52 Arpeggio playback 53 Change t...

Страница 12: ...ant button For example the EXIT button 6 has two functions EXIT and DEMO To select the Exit function press the EXIT button To select the Demo function hold down the SHIFT button and press the EXIT button Throughout this manual the secondary name of a button is used when describing the secondary function For example a description of the Demo function may contain the sentence Hold down the SHIFT but...

Страница 13: ...heral devices while the power to the computer is on THIS DEVICE COMPLIES WITH PART 15 OF THE FCC RULES OPERATION IS SUBJECT TO THE FOLLOWING TWO CONDITIONS 1 THIS DEVICE MAY NOT CAUSE HARMFUL INTERFERENCE AND 2 THIS DEVICE MUST ACCEPT ANY INTERFERENCE RECEIVED INCLUDING INTERFERENCE THAT MAY CAUSE UNDESIRED OPERATION THIS CLASS B DIGITAL APPARATUS COMPLIES WITH CANADIAN ICES 003 CET APPAREIL NUMÉR...

Страница 14: ...ll the way to zero then turn on the every device in your setup in the order of MIDI masters senders MIDI slaves receivers then audio equipment mixers amplifiers speakers etc This ensures smooth signal flow from the first device to the last first MIDI then audio n When powering down the setup first turn down the volume for each audio device then switch off each device in the reverse order audio dev...

Страница 15: ...of up to six Parts in the Multi mode page 31 You can specify the output routing of each Part in the Multi Edit Mode Ref 96 If your mixer or other audio device features digital input connections we recommend using the DIGITAL OUTPUT coaxial terminal or the OPTICAL OUTPUT terminal These ensure completely noise free distortion free sound output n Using the DIGITAL OUTPUT OPTICAL OUTPUT you can record...

Страница 16: ... example you can use the included Voice Editor program to edit the MOTIF RACK s voices There are two ways to connect your MOTIF RACK to a computer 1 USB connection 2 MIDI connection Depending on your particular computer the connections may differ See below 1 USB connection When using the USB terminal on the MOTIF RACK set the MIDI IN OUT parameter to USB in the Utility mode n When connecting the M...

Страница 17: ... data and even play back recorded data Use the setting suggestions below as a guideline specific instructions may differ depending on your computer and the software used n Make sure to set the MIDI IN OUT parameter Ref 160 to USB n When using the USB terminal MIDI IN OUT is set to USB the MOTIF RACK also receives and relays any data received via the MIDI IN terminal MIDI Echo is a function on sequ...

Страница 18: ...tput MOTIF RACK MIDI IN Computer with Application Software External MIDI keyboard MIDI Transmitting device Tone Generator Effect AWM2 Plug in Board Reverb Chorus Insertion 1 Insertion 2 Master Equalizer Headphone External Speaker Part Equalizer Changes the tonal quality of each Element output from the PITCH section Controls the pitch of each Element output from the OSC section Tone Generator OSC O...

Страница 19: ... want or need n The Effect Plug in Board cannot be used with the MOTIF RACK Plug in board line up Single Part Plug in Boards Analog Physical Modeling Plug in Board PLG150 AN Using Analog Physical Modeling AN synthesis the very latest digital technology is used to accurately reproduce the sound of analog synthesizers With this board installed you have real time control over the playback of vintage ...

Страница 20: ...es the polyphony figure of 128 is divided by the number of Elements in the Voice Part structure of the Tone Generator block The MOTIF RACK plays its sounds with the Tone Generator block in response to MIDI data received from the external keyboard or sequencer MIDI data is assigned to one of sixteen channels and the MOTIF RACK is capable of simultaneously playing sixteen separate parts via the sixt...

Страница 21: ...33 part 34 part 46 part 47 part 48 Tone Generator block Internal Plug in External MIDI keyboard External sequencer Part for Voice mode Parts 1 48 are not used Output PLG1 part Port 1 Port 2 Multi Part Plug in Board Port 3 Single Part Plug in Board Part 1 Part 2 Part 3 Part 4 Part 15 Part 17 Part 18 Part 30 Part 31 Part 32 Part 16 Part 33 Part 34 Part 47 Part 48 Tone Generator block example MIDI ca...

Страница 22: ... effects are mainly used to directly process a single part The depth of the effect is adjusted by setting the dry wet balance Since an Insertion effect can only be applied to one particular part it should be used for sounds you want to drastically change You can also set the balance so that only the effect sound is heard by setting Wet to 100 The MOTIF RACK features two Insertion effect systems In...

Страница 23: ... are not applied to the Parts of the Multi part Plug in board 1 2 2 1 2 1 1 2 Element 1 Element 2 Element 3 Element 4 This determines which Insertion system 1 or 2 is applied to each Element or to each key when the Drum Voice is selected The Insertion effect can also be bypassed You can select the Insertion connection from the three types shown below Insertion Effects System Effects parallel 1 to ...

Страница 24: ... Voices Preset 2 128 Voices 1 2 128 1 2 128 1 1 2 128 1 2 32 1 2 128 1 2 64 1 2 64 1 2 64 1 2 64 1 2 128 Preset 5 128 Voices GM Preset 128 Voices PLG1 Preset 64 Voices PLG1 User 64 Voices PLG2 Preset 64 Voices PLG2 User 64 Voices User 1 128 Voices User 2 128 Voices GM Drum 1 Voice User Drum 32 Voices Voices When the PLG150 VL is installed there are three Preset Banks and 192 preset voices Normal V...

Страница 25: ...ong data However keep in mind that the sound may not be exactly the same as played by the original tone generator Normal Voices Elements Each Normal Voice can consist of up to four Elements Each Element itself is a high quality waveform or instrument sound Since you can combine up to four Elements together in a voice highly expressive and richly textured sounds are possible You can also split diff...

Страница 26: ... the moment a Note On message is received to the point at which the sound stops As illustrated below the Pitch Envelope consists of five Time transition speed parameters and five Level pitch parameters This is useful for creating automatic changes in pitch Furthermore different PEG parameters can be set for each Element Filter This unit modifies the tone of each Element output from Pitch by cuttin...

Страница 27: ... can be set for each Element LFO Low Frequency Oscillator As its name suggests the LFO creates waveforms of a low frequency These waveforms can be used to vary the pitch filter or amplitude of each Element to create effects such as vibrato wah and tremolo These waveforms can be used to vary the pitch filter or amplitude of each Element to create effects such as vibrato wah and tremolo LFO can be s...

Страница 28: ...h Pass Filter 12dB oct A 2 pole 12db oct dynamic HPF Band Pass Filter This only passes a band of signals around the Cutoff frequency The width of this band can be varied The MOTIF RACK features four Band Pass filter types as follows BPF12D Band Pass Filter 12dB oct Digital BPF12s Band Pass Filter 12dB oct Staggered Basically same as BPF12D but with a shallower frequency curve BPF6 Band Pass Filter...

Страница 29: ...lter 12dB oct HPF12 High Pass Filter A combination of a LPF and HPF LPF12 Low Pass Filter 12dB oct BPF6 Band Pass Filter A combination of a LPF and BPF HPF12 High Pass Filter 12dB oct BPF6 Band Pass Filter A combination of a HPF and BPF thru The filters are bypassed and the entire signal is unaffected n Filter parameters are also available in Part editing in Multi mode Cutoff range Range passed Fr...

Страница 30: ...e referred to as Plug in Voices If the Plug in Board has been correctly installed the Voice data appropriate for the installed board is set up automatically as preset Plug in Voices and you can select the Plug in bank as well as the built in Voice bank You can also edit the Plug in Board Voices and store them as Plug in User Voices To select a desired Plug in Voice in the Voice mode first select t...

Страница 31: ...hown If you turn off the power without exiting from Utility Effect Bypass mode your custom settings will be lost Basic Operations Mode Selecting a mode Display Indications P 32 VOICE Mode Play Play a Voice VOICE A Edit Edit a Voice VOICE EDIT B Effect Edit Edit the Voice Effect settings VOICE EFFECT G Arpeggio Edit Edit the Arpeggio settings VOICE SHIFT ARPEGGIO H MULTI Mode Play Play a Multi MULT...

Страница 32: ...4 1 7 8 4 1 7 8 4 4 EDIT EXIT EDIT EDIT EDIT EXIT EXIT SHIFT LIBRARY EXIT MULTI A Voice Play B Voice Edit Common Edit SHIFT COMMON Drum Key Edit SHIFT PART E E E E F F F F Element Edit 1 5 9 13 4 8 12 16 C Multi Play E Mixing Edit D Multi Library F Multi Edit Common Edit SHIFT COMMON Part Edit 1 5 9 13 4 8 12 16 ...

Страница 33: ...s Settings changing values using the data dial Parameter list scroll using the cursor buttons Library list scroll using the cursor buttons Insertion Effect System Effect Effect type Edit indicator Indicates the current Voice Multi has been modified but not yet stored In the Compare condition the indicator is shown page 38 Settings of each Element Part parameter select the other Element Part using ...

Страница 34: ...are given in the section Setting Up on page 14 1 Press the DEMO button while holding SHIFT button DEMO screen is shown in the display 2 Select the song with the cursor buttons 3 Simultaneously hold down the SHIFT button and press the ENTER button to start playback of the DEMO song 4 To stop playback press the EXIT button Press it again to exit from the Demo mode Demo playback 2 1 4 1 3 3 Demonstra...

Страница 35: ...lay Mode Drum voice is selected Select a Voice Bank with the BANK E E E E F F F F buttons There are eight different memory sections for the Normal Voices page 24 PRE 1 5 GM and USR 1 2 For the Drum Voices you can select from three different memory sections PRE GM and USER If the Plug in Board s are installed PLG1 and PLG2 bank can be selected n You can also select a Board Voice Bank simultaneously...

Страница 36: ...tes After you ve checkmarked all the voice you want simultaneously hold the SHIFT button and press the FAVORITES button to store them to the Favorites Category All the voices you ve checkmarked and only those voices will be shown in the list To exit from the Favorites Category simply press the CATEGORY button Press the EXIT button to return the Voice Play mode When you exit from the Favorite Categ...

Страница 37: ...tails see page 55 To enter the Voice Edit mode press the EDIT button while in the Voice Play mode The LED will light indicating that the Voice Edit Mode is selected Simultaneously hold down the SHIFT button and press the COMMON button to call up the Common Edit screen The Common Edit Mode contains the following displays n The following displays are examples of a Normal voice If you select a Drum v...

Страница 38: ...uttons to select the desired key n You can also select the desired key by using a connected keyboard via incoming Note On data Simultaneously hold down the SHIFT button and press the appropriate key on the keyboard Switching Elements or Keys On Off Mute Each time you press the MUTE SEL button the on off status of the LED changes When the respective LEDs light the corresponding Part Element buttons...

Страница 39: ...AEG Amplitude Envelope Generator For setting the volume of each Element after the OSC Oscillator PITCH and FILTER parameters have been applied as well as the final overall volume of the signal sent to the outputs Also by setting the AEG you can control how the volume changes over time Native Native Part Parameters Plug in Voice only For editing the Native Part Parameters Refer to the Owner s manua...

Страница 40: ...ist booklet 3 Set the depth of control by changing the Set1Depth parameter setting n If you are editing a Normal Voice set the on off status of the Control Set for each Element with the Set1ElmSw parameter Repeat Steps 1 and 3 above to assign the remaining Control Sets 2 through 6 Controlling the Common parameters for the MOTIF RACK There are two controllers available for controlling parameters co...

Страница 41: ...process each individual element The thru setting lets you bypass the Insertion effects for the specific element key n When editing the Drum voice first select the key with the Ins EFOutKey parameter then determine which effect 1 or 2 is used for the selected key n You can also select the desired key by simultaneously holding down the SHIFT button and pressing the appropriate key on the connected k...

Страница 42: ...rus to Reverb Determines the send level from Chorus to Reverb Press the EFFECT button again to call up the following display Use the PAGE E E E E F F F F buttons to select the Effect type that you want to edit Select the desired parameter with the cursor buttons and change the setting by using the data dial n For information on the Effect Parameters refer to the separate Data List n If thru is sel...

Страница 43: ...that the Multi Play mode is selected The following display appears n You can also select numbers with the cursor buttons n Up to 128 Multis can be stored to User internal memory Internal memory contains the factory default Multis n The category Search function page 36 can also be used to select a Multi in the same way as in the Voice play mode Multi Categories can be edited in the Multi Edit mode ...

Страница 44: ... F F F F buttons Select the desired display by using the PAGE E E E E F F F F buttons then edit the parameters in each display The Mixing Edit mode has three edit displays Voice Output and Effect Voice From this display you can select a Voice for each Part Select a Voice Bank with the BankMSB BankLSB parameter and select the desired Voice with the VoiceNo parameter n By selecting the BankMSB BankL...

Страница 45: ...he ReceiveCh parameter Ref 32 page 64 in the Voice display of the Multi Part Edit mode The default settings are 1 for PLG1 part and 2 for PLG2 n You can assign the Plug in Part to any of the available ports with the PortNo parameter in the PLG1Sys PLG2Sys display of the Utility mode page 21 Detailed Mixing function Multi Edit Mode The Multi Edit mode has a detailed mixing function that lets you ch...

Страница 46: ... that can be selected with the PAGE E E E E F F F F buttons Voice For setting the Voice parameters to assigned to each Part n You can also use the Category Search function page 36 to select the desired Voice for assigning to each Part Output For setting the output parameters of the Voice assigned to each Part such as the output level volume and pan position n You can output each part independently...

Страница 47: ... make sure to set appropriate receive channel with the RcvCh parameter Ref 32 in the Multi Part Edit mode n When you play the Performance with the connected keyboard the volume is controlled in two ways Reception of MIDI Main Volume messages Control 7 page 78 sets the volume of all Parts to the same value and reception of MIDI Expression messages Control 11 page 78 independently adjusts the volume...

Страница 48: ... the Multi Edit Mode 2 Enter the Part Edit Mode and select the desired Power Grand Part by using the Part Element buttons 1 5 9 13 4 8 12 16 3 Use the PAGE E E E E F F F F buttons to select the Voice display and select the Number parameter with the cursor buttons 4 Press the CATEGORY button to set the Category Search function to on page 36 The Category Search function is convenient when you want t...

Страница 49: ...de 2 Parameters specific to individual Parts which include Part Equalizer settings edited in the Multi Part Edit mode On off status of Insertion effects and Send Level settings for System effects edited in the Mixing Edit mode Effect setting flow in the Multi mode n The Part Equalizer is not applied to the Parts of Plug in Board n The Insertion effects and System effect are not applied to the Part...

Страница 50: ... 9 13 4 8 12 16 Then use the data dial to set the Effect Send Level for each Part For example in the instructions below we ll increase the depth of the Reverb effect for Part 7 1 Select RevSend with the cursor buttons 2 Use the 3 7 11 15 button to select Part 7 3 Turn the data dial clockwise to increase the Reverb Send Level n The Reverb Chorus Effect is not applied to any Part for which RevSend o...

Страница 51: ...ttings with the data dial n For information on the Effect Parameters refer to the separate Data List n If thru or off is selected for the effect type none of the effect parameters can be edited The MOTIF RACK has two types of equalization independent three band equalizers for each Part and a five band equalizer that is applied to all Parts These are edited in the Multi Edit mode page 45 n For deta...

Страница 52: ... data is played back with the external sequencer Arpeggio On Off can be set individually for each part of a Song This inserts Arpeggios in the playback part of song sequence data Four playback categories of Arpeggio Arpeggio types are divided into the four following categories Sq Sequence Creates conventional arpeggio phrases mainly octave up down Ph Phrase Creates phrases that are more musical an...

Страница 53: ...n the ArpSwitch parameter page 54 of the selected part is set to on n When you play back arpeggios that include control change data the Voice may be changed and the edit indicator may appear in the top right of the display Change the Arpeggio settings A variety of Arpeggio types are provided with the MOTIF RACK You can change the tempo of the Arpeggio as desired The Arpeggio function is available ...

Страница 54: ...ach parameter refer to the Reference section You can set Arpeggio playback on or off for each part This parameter can be set in the Multi Part Edit mode Enter the Multi Part Edit mode page 46 and select the ArpSw parameter in the Voice screen Use the data dial to turn the desired part on The Arpeggio settings can be stored with each Voice Multi For details about storing Voices Multis see page 57 3...

Страница 55: ...Turning the power off in this state results in loss of all user data 8 Press the EXIT button to return to the Utility Mode To exit back to the previous mode press the EXIT button again Initialize Resetting parameters of a Voice Multi to their default settings This is useful for setting up a blank slate when you want to build a completely new Voice Multi from scratch Keep in mind that this does not...

Страница 56: ... edited on computer called Board Custom voices to MOTIF RACK s internal memory Because the Plug in boards do not have user memory and the edited voice data will be lost when turning the power off the edited Board Custom voice data should be saved with this operation n For details about Board voices refer to page 30 Select the destination to which you wish to save the settings with the cursor butto...

Страница 57: ...riginal display n You can press the EXIT button to cancel the Store operation and return to the original screen Never attempt to turn off the power while data is being stored while an Executing or Please keep power on message is shown Turning the power off in this state results in loss of all user data Edit Indicator If you alter any parameters the indicator will appear in the top right of the dis...

Страница 58: ...h quality Reverb Effect Insertion Effects for up to four parts and the three band Part EQ for each Part You can edit the received MOTIF6 MOTIF7 MOTIF8 Voices or Multis by using these parameters n The received voice or multi may not sound the same as on the original instrument n The following data of the MOTIF6 MOTIF7 MOTIF8 is not compatible with the MOTIF RACK User waves and User arpeggios in Use...

Страница 59: ...5 65 NoteLimit 66 65 VelLimit 67 65 UnitMltPly 68 66 VelocityRt 69 66 GateTimeRt 70 66 EFFECT CONNECT select with the EFFECT button EL1 4InsEFOut 163 69 Ins1Ctgry 165 70 Ins1Type 165 70 InsEFCnct 164 70 Ins2Ctgry 166 70 Ins2Type 166 70 ReverbSend 168 70 ChoCtgry 173 70 ChoType 173 70 ChoSend 168 70 ChoRtn 169 70 ChoToRev 171 70 ChoPan 170 70 ReverbType 167 70 ReverbRtn 169 70 ReverbPan 170 70 EFFE...

Страница 60: ...3 67 AttackTime 119 68 Decay1Time 119 68 Decay1Lvl 120 68 Decay2Time 119 68 LvVelSns 117 68 EQ Type 178 70 L Freq 179 70 L Gain 179 70 H Freq 181 70 H Gain 181 70 Freq 182 70 Gain 183 70 Q 184 70 Voice Edit Mode Plug in Common General Category 1 63 Name 2 63 Mono Poly 3 63 KeyAsgnMode 4 63 MEQ Low 6 63 MEQ LowMid 6 63 MEQ HighMid 6 63 MEQ High 6 63 PortaSwitch 7 63 Porta Time 8 63 PB Range 11 63 A...

Страница 61: ...EGAtk 131 68 AEGDcy 131 68 AEGSus 132 68 AEGRel 131 68 EQ L Freq 179 70 L Gain 179 70 M Freq 180 70 M Gain 180 70 M Q 184 70 H Freq 181 70 H Gain 181 70 RcvSw BnkSel 155 69 Pgm 156 69 CC 157 69 PB 151 69 MW 151 69 ChAT 151 69 BC 151 69 AS1 151 69 AS2 151 69 FC1 151 69 FC2 151 69 Volume 151 69 Pan 151 69 Sus 151 69 FS 151 69 Display name Parameter name Ref Page Select with the Select with the PAGE ...

Страница 62: ...EVEL AEG AEG VE Level AMP AMP VE LEVEL FEG FEG VE LEVEL PEG PEG VE LvlVel AEG AEG VE LvlVel FEG FEG VE LvlVel PEG PEG VE M M Freq Gain EQ MP M TuningNo General VC M Q EQ MP MEQ MEQ MC MEQ OFFSET General VC MC MIDI IN OUT MIDI U MIDI Sync MIDI U Mode Voice MP Molo Poly General VC MW AT AC CtrlSet CtrlSet VC N Name General VC MC Native Parameters Native VE PLG1Sys U PLG2Sys U NoteLimit ARP ARP VC MC...

Страница 63: ... offsets to the EQ settings with the exception of MID 3 7 PortaSwitch PrtSw Portamento Switch Determines whether Portamento a smooth transition in pitch from one note to the next is on or off 4 8 PortaTime PrtTm Portamento Time Determines the Portamento pitch transition time Higher values result in longer transition times The effect is applied according to the TimeMode setting 9 PortaMode PrtMd Po...

Страница 64: ...sages are received on or not off 12 28 AltnateGrp Alternate Group Assigns the same number to the drum notes you don t want to have sound simultaneously such as open and closed hi hats 29 VelSensDpt VelDpt Velocity Sensitivity Depth Determines the velocity sensitivity or how much the level of the voice changes in response to the received velocity 14 30 VelSensOfs VelOfs Velocity Sensitivity Offset ...

Страница 65: ...0 one octave is stretched out over twenty four notes For negative values the settings are reversed 22 56 CntrKy Pitch Key Follow Center Key Determines the basic pitch note number used by the PitchSens parameter above The note number in this setting is the same pitch as normal 100 22 57 FlwSns PEG Time Key Follow Sensitivity Determines the sensitivity of the PEG time the speed of the PEG change to ...

Страница 66: ...l fashion 29 80 HPF Cutoff HPCtof HPF Cutoff Frequency Determines the central frequency for the Key Follow parameter below of the HPF This parameter is available only when a filter type LPF12 or LPF6 is selected Normal Voice 28 81 HP Flw HPF Cutoff Frequency Key Follow Determines the Key Follow setting for the HPF Cutoff frequency Type LPF12 LPF6 only This parameter varies the center frequency acc...

Страница 67: ...rmines the depth of control of the Modulation Wheel Aftertouch Assignable Controller has over amplitude modulation tremolo effect 105 AT Pitch AT CAT Pitch Control Determines the degree to which aftertouch messages affect pitch over a range of two octaves in semitones 106 AC Source AC Source AC1 Control Number Determines the MIDI Control number used to control the filter PMod FMod and Amod 107 Arp...

Страница 68: ...hose parameters exclusive to the particular board Use the buttons to scroll through the display The parameters will vary depending on the Plug in Board For details about each parameter and its functions refer to the Owner s Manual or the on line help that came with your Plug in Board For details on the current lineup of available Plug in Boards see page 19 127 Detune Detune Determines the fine tun...

Страница 69: ...o Determines the MIDI Device Number This number must match the Device Number of the external MIDI device when transmitting receiving system exclusive messages 155 BankSelSw BnkSel Transmit Receive Bank Select Switch This switch enables or disables Bank Select Program Change messages both in transmission and reception When this is set to on the MOTIF RACK responds to incoming Bank Select messages a...

Страница 70: ...Parameters Effect Parameters The number of parameters and values available differs depending on the currently selected effect type For more information see the Effect Parameter List in the separate Data List 175 PolyExpand Poly Expand This parameter is accessible only when you have two identical Plug in boards installed The off setting enables two boards to work separately you can select them in t...

Страница 71: ...ategory Unassigned Ld Synth Lead Ap Acoustic Piano Pd Synth Pad Kb Keyboard Sc Synth Comping Or Organ Cp Chromatic Percussion Gt Guitar Dr Drums Ba Bass Se Sound Effects St Strings Orchestral Me Musical Effects Br Brass Co Combination Rp Reed Pipe No Type Key Comments 00 Equal tempera ment The compromise tuning used for most of the last 200 years of Western music and found on most electronic keybo...

Страница 72: ... a key the first note of the arpeggiator pattern is played From the second and subsequent key presses the arpeggiator note that is played back depends on the arpeggiator tempo and the timing of the arpeggio pattern For example in the case of a 1 bar arpeggio pattern if the second key press falls on the third beat of the bar the arpeggio pattern plays back from the third beat onward In other words ...

Страница 73: ... to understand Filter Scaling is by example For the settings shown in the example table below the basic Cutoff frequency value is 64 and the various Offset values at the selected Break point settings change that basic value accordingly The specific changes to the Cutoff frequency are shown in the diagram below The Cutoff frequency changes in a linear fashion between successive Break Points as show...

Страница 74: ...s a waveform at the phase specified by the Phase parameter 1st on Common Edit The LFO resets with every note you play and starts the waveform at the phase specified by the Phase parameter below However if you play a second note while the first is being held the LFO continues cycling according to the same phase as triggered by the first note In other words the LFO only resets if the first note is r...

Страница 75: ...t12 Boost 12dB Boost18 Boost 18dB These can be used to boost the level of the entire signal by 6dB 12dB and 18dB respectively thru If you select this the equalizers are bypassed and the entire signal is unaffected 54 Curve Type Short delay Long delay Key on Key on Fade in Max Delay Time Key on Low Fade in value results in faster fade in High Fade in value results in slower fade in Fade in Delay Ti...

Страница 76: ... data error An error occurred when receiving MIDI data Multi plug in is not in PLG2 The Multi Part Plug in board does not work because it has not been installed to PLG2 The Multi Part Plug in board should be installed to PLG2 Now checking plug in board The MOTIF RACK is checking the Plug in board installation status when powering the MOTIF RACK on Please keep power on Never attempt to turn off the...

Страница 77: ...nnel MIDI Transmit Channel via a single MIDI cable to the receiving instrument If the receiving instrument s MIDI channel MIDI Receive Channel matches the Transmit Channel the receiving instrument will sound according to the data sent by the transmitting instrument About MIDI Decimal Hexadecimal Binary 0 1 2 3 4 5 6 7 8 9 10 11 12 13 14 15 16 17 18 19 20 21 22 23 24 25 26 27 28 29 30 31 32 33 34 3...

Страница 78: ...A new bank selection will not become effective until the next Program Change message is received n When only the Program Change is received after entering any of the mode the corresponding voice in the currently selected Type Memory is called up Modulation Control 001 Messages which control vibrato depth using the Modulation Wheel Setting the value to 127 produces maximum vibrato and 0 results in ...

Страница 79: ... adjustment Decay Time Control 075 Messages which adjust the AEG decay time set for each Part The value set here is an offset value which will be added to or subtracted from the voice data Effect1 Depth Reverb Send Level Control 091 Messages which adjust the send level for the Reverb effect Effect3 Depth Chorus Send Level Control 093 Messages which adjust the send level for the Chorus effect Data ...

Страница 80: ...values of the following controllers will be reset to the defaults All Notes Off Control 123 Clears all notes currently on for the specified channel However if Hold1 or Sostenuto is on notes will continue sounding until these are turned off Mono Control 126 Performs the same function as when an All Sounds Off message is received and if the 3rd byte mono number is in the range of 0 16 sets the corre...

Страница 81: ...CK including master volume and master tuning tone generator mode effect type and various other parameters General MIDI GM System On Sequence Play mode only When General MIDI system on is received the MOTIF RACK will receive the MIDI messages which are compatible with GM System Level 1 and consequently will not receive NRPN and Bank Select messages F0 7E 7F 09 01 F7 Hexadecimal n Make sure that the...

Страница 82: ...low Improper installation can cause shorts which may result in irreparable damage and pose a fire hazard Do not disassemble modify or apply excessive force to board areas and connectors on optional units Bending or tampering with boards and connectors may lead to electric shock fire or equipment failures It is recommended that you wear gloves to protect your hands from metallic projections on opti...

Страница 83: ...PLG2 at the left n The Multi part Plug in Board PLG100 XG can be installed only to PLG2 When installing the optional Plug in board from when you remove the cover to when the cover is replaced securely all operations must be done with the AC power cord disconnected 4 Take out the Plug in board from the anti static bag When installing the board the side with a connector and ICs must be on top 5 Care...

Страница 84: ...ng the six flat head screws you removed in the step 2 above Removing the Plug in board from the MOTIF RACK 1 Press down the hooks 2 in the direction as shown in the illustration and take the board out from the hooks 2 by lifting up the one side 2 Pull out the other side of the board from the hooks 1 while pressing down hook 1 as shown in the illustration 3 Pull out the cable connector from the Plu...

Страница 85: ...ettings can result in no sound Pages 39 41 When the multi produces no sound has a voice been assigned to each part Ref 20 26 When the multi produces no sound is the note limit of each part set appropriately Ref 22 When the multi produces no sound is the volume of each part set appropriately Ref 33 When the multi produces no sound is the output select of each part set appropriately Ref 96 When the ...

Страница 86: ... at a value other than 0 Ref 31 When the multi produces a wrong pitch is the Detune parameter of each part set at a value other than 0 Ref 127 Only one note sounds at a time Is the Mono Poly parameter in the Voice mode set to mono Ref 3 No effect is applied Is the EFFECT BYPASS parameters set to bypass Ref 15 Have any or all of the elements Effect Output parameter been set to thru Ref 163 Have any...

Страница 87: ... the PLG150 AN DX PF DR PC 64 Preset for the PLG150 VL 192 User 64 for each Plug in connector Multi Multi User 128 Multi Library Performance 59 Multi 65 Effect Reverb 20 types Chorus 44 types Insertion 1 107 types Insertion 2 107 types Master Equalizer 5 bands High HighMid Mid LowMid Low Part Equalizer 3 bands High Mid Low Arpeggio Preset 1 128 types Preset 2 128 types Panel Buttons Controllers ST...

Страница 88: ...rtouch 81 Character list 58 ChoCtgry 42 51 ChoPan 42 51 ChoRtn 42 51 Chorus 22 Chorus Pan 70 Chorus Return 70 Chorus Send 64 70 Chorus Type 70 ChoSend 42 50 ChoToRev 42 51 ChoType 42 51 Coarse Tune 65 COMMON button 12 Common Edit Mode Multi 46 Common Edit Mode Voice 37 Common parameters Multi 45 Common Parameters Voice 37 COMPARE button 12 Compare Function 38 Connecting External MIDI Equipment 16 ...

Страница 89: ...8 LFO Wave 68 LIBRARY button 12 Low Pass Filter 27 M Main Volume Control 007 78 Master EQ 64 Master EQ Offset 63 Master Equalizer 22 Master Tune 70 Maximum Polyphony 20 MEQ 46 MEQ Multi Common 46 Micro Tuning 63 MIDI 77 MIDI channels 77 MIDI IN OUT 69 MIDI IN OUT THRU terminals 13 MIDI interface 17 MIDI Receive Channel 77 MIDI Sync 69 MIDI Transmit Channel 77 Mixing Edit Mode 44 MODE buttons 12 MO...

Страница 90: ...everbType 42 51 RevSend 42 50 RPN LSB Control 100 80 RPN MSB Control 101 80 S Scaling 67 Send Chorus to Reverb 70 Send Level 23 SHIFT button 12 Single Part Plug in Board 19 Sostenuto Control 066 79 Source Control Set 67 STANDBY ON switch 12 Store 57 STORE button 12 System Effects 22 System Exclusive Messages 81 System Realtime Messages 81 T Thru Port 69 Tone Multi 46 Tone Generator 18 Transmit Cha...

Страница 91: ... A Wettergrens Gata 1 Box 30053 S 400 43 Göteborg Sweden Tel 031 89 34 00 DENMARK YS Copenhagen Liaison Office Generatorvej 6A DK 2730 Herlev Denmark Tel 44 92 49 00 FINLAND F Musiikki Oy Kluuvikatu 6 P O Box 260 SF 00101 Helsinki Finland Tel 09 618511 NORWAY Norsk filial av Yamaha Scandinavia AB Grini Næringspark 1 N 1345 Østerås Norway Tel 67 16 77 70 ICELAND Skifan HF Skeifan 17 P O Box 8120 IS...

Страница 92: ...Manual Library http www2 yamaha co jp manual english This document is printed on recycled chlorine free ECF paper with soy ink U R G Pro Audio Digital Musical Instrument Division Yamaha Corporation 2003 Yamaha Corporation WA24890 000MWAP00 0 05D0 Printed in Japan ...

Отзывы: