background image

10

保証書

この度はヤマハ・クリックステーションをお買上げ戴きましてあ
りがとうございました。

本書は、

本書記載内容で修理を行なう事

をお約束するものです。

お買上げの日から下記期間中に故障が発

生した場合は、

本書をご提示の上お買上げの販売店に修理をご依

頼ください。

ご販売店様へ ※印欄は必ずご記入の上お渡しください。

クリックステーション    製番

本体:お買上げの日から1ヶ年間

      年     月     日

ご住所 〒

お名前                         様

電 話      (     )

                              印

            (     )

品 名 / 品 番

保 証 期 間

※お買上げ日

持込修理

1. 正常な使用状態

(取扱説明書、本体貼り付けラベルなどの注

意書に従った使用状態)

で故障した場合には、お買上げの販

売店が無料修理を致します。

2. 保証期間内に故障して無料修理をお受けになる場合は、お買

上げの販売店に商品と本書をご持参のうえご依頼ください。

3. ご贈答品、ご転居後の修理についてお買上げ販売店にご依頼

できない場合には、最寄りのヤマハ電気音響製品アフター
サービス拠点にお問い合わせください。

4. 保証期間内でも次の場合は有料となります。

(1) 本書のご提示がない場合。
(2) 本書にお買上げの年月日、お客様、お買上げの販売店の記入

がない場合、及び本書の字句を書き替えられた場合。

(3) 使用上の誤り、他の機器から受けた障害または不当な修

理や改造による故障及び損傷。

(4) お買上げ後の移動、輸送、落下などによる故障及び損傷。
(5) 火災、地震、風水害、落雷、その他の天災地変、公害、

塩害、異常電圧などによる故障及び損傷。

(6) 消耗部品の交換。
(7) お客様のご要望により出張修理を行なう場合の出張料金。

5. この保証書は日本国内においてのみ有効です。

 This warranty is valid only in Japan.

6. この保証書は再発行致しませんので大切に保管してください。
※ この保証書は本書に示した期間、条件のもとにおいて無料修理をお

約束するものです。したがってこの保証書によってお客様の法律上
の権利を制限するものではありませんので、保証期間経過後の修理
などについてご不明の場合は、お買上げの販売店、ヤマハ電気音響
製品アフターサービス拠点にお問い合わせください。

無償修理規定

■保証とアフターサービス

● 保証書

保証書は、販売店にて

「販売店印、お買い上げ年月日」

の押印、記入をしてお渡

し致しますので、お買い上げの際にご確認の上、大切に保管ください。

● 保証期間

お買い上げ日から1年間です。

● 保証期間中の修理

保証書記載内容に基づいて修理いたします。詳しくは保証書をご覧ください。

● 保証期間経過後の修理について

修理可能な部分は、ご要望により有料にて修理させて頂きます。但し、修理料
金の金額や補修部品の保有期間の都合により、相当品の代替購入をおすすめす
る場合もございます。

ヤマハ電気音響製品アフターサービス拠点

(修理受付および修理品お持込み窓口)

北海道サービスステーション

〒064-8543

札幌市中央区南10条西1丁目1-50 ヤマハセンター内

TEL (011) 512-6108

仙台サービスステーション

〒984-0015

仙台市若林区卸町 5-7 仙台卸商共同配送センター3F

TEL (022) 236-0249

首都圏サービスセンター

〒143-0006

東京都大田区平和島2丁目1番1号  京浜トラックターミナル内14号棟A-5F

TEL (03) 5762-2121

浜松サービスステーション

〒435-0016

浜松市和田町 200 ヤマハ(株)和田工場6号館2階

TEL (053) 465-6711

名古屋サービスセンター

〒454-0058

名古屋市中川区玉川町 2-1-2  ヤマハ(株)名古屋流通センター3F

TEL (052) 652-2230

大阪サービスセンター

〒565-0803

吹田市新芦屋下 1-16  ヤマハ(株)千里丘センター内

TEL (06) 6877-5262

四国サービスステーション

〒760-0029

高松市丸亀町 8-7  (株)ヤマハミュージック神戸  高松店内

TEL (087) 822-3045

九州サービスステーション

〒812-8508

福岡市博多区博多駅前 2-11-4

TEL (092) 472-2134

〒064-8543

札幌市中央区南10条西1丁目 1-50 ヤマハセンター内

TEL (011) 512-6113

〒980-0804

仙台市青葉区大町 2-2-10

TEL (022) 222-6147

〒108-8568

東京都港区高輪 2-17-11

TEL (03) 5488-5471

〒460-8588

名古屋市中区錦 1-18-28

TEL (052) 201-5199

〒542-0081

大阪市中央区南船場 3-12-9 心斎橋プラザビル東館

TEL (06) 6252-5231

〒812-8508

福岡市博多区博多駅前 2-11-4

TEL (092) 472-2130

〒108-8568

東京都港区高輪 2-17-11

TEL (03) 5488-5445

※住所及び電話番号、名称は変更になる場合があります。

ヤマハ株式会社 各営業所

(商品に関する問い合わせ先)

お客様ご相談窓口

(ヤマハギター・ドラム製品に対するお問合せ窓口)

ヤマハ管弦打楽器

インフォメーションセンター

Tel:053-411-4744

(月曜日〜土曜日 /10:30 〜 19:00)

* 日曜、祝日及びセンター指定休日を除く

E M 営 業 統 括 部

E

M

北 海 道

E

M

E

M

E

M

名 古 屋

E

M

E

M

E M 企 画 推 進 室

弦打楽器事業部 ギタードラム営業部 国内営業課

〒430-8650 静岡県浜松市中沢町10番1号 TEL. 053-460-2433

Содержание Metronome

Страница 1: ......

Страница 2: ...2 AC100V AC200V VOLUME 0...

Страница 3: ...3 35 300 BEAT 1 0 9 BEAT 2 9 0 16 LED C2 B6 438 446Hz 1Cent 86 10 20 1 TRIGGER IN MIDI IN DIN 5 AUX IN DC IN 9V PHONE 57mm x1 PA 3C 6LR61 x1 170 x 122 x 37 mm 395 g 6LR61...

Страница 4: ...4 q w e VIB r VOL t VIBRATION y u i o TAP START STOP 0 TEMPO 1 9 2 PHONES 3 POWER ON OFF 4 MIDI IN 5 AUX IN 6 TRIGGER IN 7 8 DC IN 9V MIDI DTX CD...

Страница 5: ...5 1 6LR61 9V S 006P 1 2 OFF 3 1 OFF DC DC IN 9V 2 A C AC100V 3...

Страница 6: ...e 4 VOL VOL VOL 0 r VIBRATION VIB q z TEMPO 35 300 z TYPE TEMPO x c START STOP v TYPE TEMPO TYPE TEMPO CLICK SEARCH TYPE TEMPO c START STOP c TYPE TEMPO B E A T BEAT BEAT 0 9 2 1 ACC 0 ACC 2 BEAT 2 BE...

Страница 7: ...G STEP 3 TEMPO BEAT CURSOR 4 START STOP STORE 2 S O N G STEP 1 SEARCH SEARCH 2 TEMPO 3 START STOP START STOP 1 TAP TAP 2 START STOP TAP 3 CLICK START STOP TAP TRIGGER IN DTX START STOP TAP TAP 35 300...

Страница 8: ...CHAIN CHAIN 2 S T O R E C H A I N STORE 3 CHAIN NO BEAT 0 9 4 TEMPO 1 0 5 START STOP STORE 2 1 6 SONG STEP 7 4 6 1 20 1 CHAIN CHAIN 2 CHAIN NO 3 START STOP 1 4 S T A R T STOP SONG STEP SONG STEP 0 85...

Страница 9: ...I OUT MIDI IN MIDI 2 MIDI MIDI STOP 3 MIDI START 4 START STOP MIDI START STOP CONT AUX IN START STOP MIDI 3 STOP 120 1 BACK LIGHT 20 2 BACK LIGHT 1 2 BACK LIGHT 1 TUNE TUNE 2 TEMPO 2C 6B 3 START STOP...

Страница 10: ...052 652 2230 565 0803 1 16 TEL 06 6877 5262 760 0029 8 7 TEL 087 822 3045 812 8508 2 11 4 TEL 092 472 2134 064 8543 10 1 1 50 TEL 011 512 6113 980 0804 2 2 10 TEL 022 222 6147 108 8568 2 17 11 TEL 03...

Страница 11: ...g Pitch Range C2 B6 Standard Pitch 438 446 Hz Accuracy 1 Cent Memory Memory Allocations 86 Total Number of Chain Programs 10 Steps 20 songs per chain program Input Output TRIGGER IN Standard Monaural...

Страница 12: ...ch circuit breaker or fuse circuits or install AC line filter s In the case of radio or TV interference relocate reorient the antenna If the antenna lead in is 300 ohm ribbon lead change the lead in t...

Страница 13: ...5 External Device Input Jack AUX IN 6 Trigger Input Jack TRIGGER IN 7 Holder Attachment 8 Power Adaptor Jack DC IN 9V Both standard phone and mini jacks can be used simultaneously MIDI device DTX pad...

Страница 14: ...ed when a battery is installed in the device power is automatically sup plied from the power adaptor Make sure only the specified power adaptor is used The use of any power adaptor other than the one...

Страница 15: ...amp lights the ten key pad is in the tempo setting mode Turn the TYPE TEMPO lamp off when you want to use the CLICK SEARCH or other function buttons To change the tempo when the metronome is in use If...

Страница 16: ...t to find 3 Press the START STOP button to display the song name that begins with the letter you selected Press the START STOP button again to display the next song name in the list Tap Function Set t...

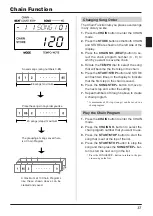
Страница 17: ...o the next step and enter the setting 7 Repeat numbers 4 through 6 above to create a chain program A maximum of 20 steps songs can be saved in a chain program Play the Chain Program 1 Press the CHAIN...

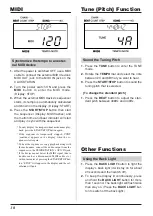
Страница 18: ...able to connect the external MIDI device s MIDI OUT jack to the MIDI IN jack on the CLICKSTATION 2 Turn the power switch ON and press the MIDI button to enter the MIDI mode Display STOP 3 When the ext...

Страница 19: ...ronisation au tempo battement Accordage de hauteur du son Gamme C2 B6 Hauteur de son standard 438 446 Hz Pr cision 1 cent M moire Allocation de m moire 86 Nombre total de programmes en cha ne 10 Pas 2...

Страница 20: ...ou de le buter contre une surface dure Par mesure de s curit retirez toujours la prise de l adaptateur d alimentation de la prise murale de sortie secteur s il existe un danger quelconque de chute de...

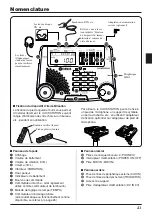
Страница 21: ...enchement TRIGGER IN 7 Accessoire support 8 Prise d adaptateur d alimentation DC IN 9V Les fiches t l phoniques standard et mini peuvent utilis es simultan ment P riph rique MIDI Tambourin DTX etc Lec...

Страница 22: ...p riph rique le courant d alimentation est automatiquement fourni partir de l adaptateur d alimentation Assurez vous que vous utilisez uniquement l adap tateur d alimentation sp cifi En effet l utili...

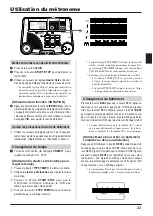
Страница 23: ...PO pour annuler le param trage La lampe s teint Lorsque la lampe TYPE TEMPO s allume le clavier dix touches est alors en mode de param trage de tempo tei gnez la lampe TYPE TEMPO lorsque vous voulez u...

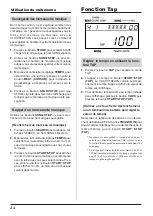
Страница 24: ...pour s lectionner la premi re lettre du nom du mor ceau de musique sauvegard que vous voulez retrouver 3 Pressez le bouton START STOP pour afficher le nom du morceau de musique qui commence avec la le...

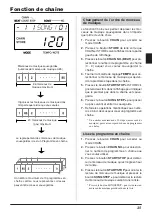
Страница 25: ...essus pour cr er un programme en cha ne Un nombre maximum de 20 tapes morceaux de musique peuvent sauvegard s dans un programme en cha ne Lisez le programme en cha ne 1 Pressez le bouton CHAIN pour ac...

Страница 26: ...er la prise MIDI OUT du p riph rique MIDI externe la prise MIDI IN du CLICKSTATION 2 2 Tournez l interrupteur d alimentation en posi tion ON et pressez le bouton MIDI pour acc der au mode MIDI Afficha...

Страница 27: ...linken Stimmtonh he Tonbereich C2 B6 Standardtonh he 438 446 Hz Genauigkeit 1 Cent Speicher Song Speicherpl tze 86 Chain Programme 10 Programmschritte 20 Songs pro Chain Programm Ein Ausg nge TRIGGER...

Страница 28: ...nd Regler nicht zu viel Kraft auf Bei Ihrem Yamaha CLICKSTATION handelt es sich um ein Pr zisionsger t Behandeln Sie es mit entsprechender Umsicht damit es nicht durch ei nen Sto oder Fall besch digt...

Страница 29: ...gsbuchse f r externes Ger t AUX IN 6 Trigger Eingangsbuchse TRIGGER IN 7 St ndergewinde 8 Netzadapterbuchse DC IN 9V Die Standard Klinkenbuchse und die Mini Klinkenbuchse k nnen gleichzei tig beschalt...

Страница 30: ...eine Bat terie eingelegt ist wird automatisch auf Netz adapter Stromversorgung geschaltet Achten Sie darauf dass Sie einen geeigneten Netz adapter verwenden Der Gebrauch von Netz adaptern die in diese...

Страница 31: ...chtet be findet sich die Zifferntastatur im Tempo Eingabemodus Wenn Sie die CLICK SEARCH oder eine andere Funktionstaste verwenden m chten m ssen Sie die TYPE TEMPO Anzeigelampe ausschalten Wenn Sie d...

Страница 32: ...e Zeichen des Namens zu w hlen unter dem Sie den gesuchten Song abgespeichert ha ben 3 Dr cken Sie die START STOP Taste Der erste Song dessen Name mit dem gew hl ten Zeichen beginnt wird angezeigt Dan...

Страница 33: ...sten Schritt berzugehen und die sen zu programmieren 7 Wiederholen Sie Schritte 4 bis 6 um das Chain Programm zu vervollst ndigen Das Chain Programm kann maximal aus 20 Schrit ten Songs bestehen Abspi...

Страница 34: ...DI Ger ts ber ein MIDI Kabel mit der MIDI IN Buchse des CLICKSTATION 2 Schalten Sie die Ger te ein ON Dr cken Sie die MIDI Taste um den MIDI Modus auf zurufen STOP wird auf dem Display ange zeigt 3 We...

Страница 35: ...con el tempo tiempo Tono de afinaci n Margen C2 B6 Tono est ndar 438 446 Hz Precisi n 1 cent sima Memoria Asignaciones de memoria 86 N mero total de programas en cadena 10 Pasos 20 canciones por prog...

Страница 36: ...los interruptores ni controles Su CLICKSTATION Yamaha es un instrumento musical de precisi n Manip lelo con cuidado y procure que no se caiga al suelo ni reciba golpes Por razones de seguridad desench...

Страница 37: ...tivo externo AUX IN 6 Toma de entrada de circuito activador TRIGGER IN 7 Colocaci n del soporte 8 Toma del adaptador de alimentaci n DC IN 9V Pueden utilizarse simult neamente las tomas telef ni ca y...

Страница 38: ...istrar autom ticamente desde el adaptador de alimentaci n Aseg rese de emplear s lo el adaptador de alimentaci n especificado El empleo de cualquier otro adaptador que no sea el especificado puede oca...

Страница 39: ...Cuando se enciende la luz de TYPE TEMPO el teclado de diez teclas estar en el modo de ajuste del tempo Apa gue la luz de TYPE TEMPO cuando desee emplear los botones CLICK SEARCH u otros botones de fun...

Страница 40: ...canci n almace nada que desee encontrar 3 Presione el bot n START STOP para visualizar el nombre de la canci n que em pieza por la letra que usted haya selecciona do Presione el bot n START STOP otra...

Страница 41: ...Repita los pasos 4 al 6 anteriores para crear un programa de cadena Podr n almacenare un m ximo de 20 pasos cancio nes en un programa en cadena Reproducci n del programa en cadena 1 Presione el bot n...

Страница 42: ...la toma MIDI OUT del dispositivo MIDI exter no a la toma MIDI IN del CLICKSTATION 2 Conecte el interruptor de la alimentaci n y presione el bot n MIDI para establecer el modo MIDI Visualizaci n STOP 3...

Страница 43: ...battuta Nota di accordatura Gamma Do2 Si6 Altezza standard 438 446 Hz Accuratezza un centesimo Memoria Locazioni di memoria 86 Numero totale di programmi di concatenazione 10 Passi 20 canzoni per prog...

Страница 44: ...ad interruttori e comandi Il vostro CLICKSTATION uno strumento musica le di precisione Trattarlo con la dovuta cura ed evitare di farlo cadere o esporlo ad urti Per motivi di sicurezza togliere la spi...

Страница 45: ...sa di ingresso trigger TRIGGER IN 7 Attacco supporto 8 Presa adattatore di corrente alternata DC IN 9V Si possono usare contemporanea mente lo spinotto standard e quello mini Dispositivo MIDI Pad DTX...

Страница 46: ...a contiene una batteria l adattatore inizia automaticamente ad alimentare l apparecchio sostituendo la batteria Usare esclusivamente l adattatore di corrente alter nata in dotazione L uso di adattator...

Страница 47: ...Il suo indicatore si spegne Quando l indicatore TYPE TEMPO si accende i pulsanti numerici si trovano nella modalit di impostazione del tempo Far spegnere l indicatore TYPE TEMPO se si intendono usare...

Страница 48: ...ma lettera del nome della canzone salvata da trovare 3 Premere il pulsante START STOP per visualizzare il nome della canzone che inizia con la lettera da voi scelta Premere il pul sante START STOP un...

Страница 49: ...la successiva e finalizzare l impostazione fatta 7 Ripetere i numeri da 4 a 6 per creare altre concatenazioni Ciascun programma di concatenazione pu contenere al massimo 20 passi 20 canzoni Riproduzio...

Страница 50: ...M I D I I N d e l CLICKSTATION 2 Portare l interruttore di accensione su ON e premere il pulsante MIDI per passare alla modalit MIDI Display STOP 3 Quando il sequencer del dispositivo MIDI si avvia il...

Страница 51: ...mmen Bereik C2 B6 Standaard toonhoogte 438 446 Hz Zuiverheid 1 Cent Geheugen Geheugenposities 86 Totaal aantal ketenprogramma s 10 Stappen 20 muziekstukken per ketenprogramma In uit TRIGGER IN Standaa...

Страница 52: ...nen Uw Yamaha CLICKSTATION is een precisie mu ziekinstrument Behandel het daarom zorgvuldig en laat het niet vallen of ergens tegenaan stoten Om veiligheidsredenen dient u altijd wanneer het in de buu...

Страница 53: ...uur AUX IN 6 Ingangsaansluiting externe schakelaar TRIGGER IN 7 Aansluiting standaard 8 Gelijkstroomaansluiting netstroomadapter DC IN 9V U kunt tegelijker tijd zowel een standaard als een mini stereo...

Страница 54: ...it zal de stroom voorziening automatisch via de netstroomadapter plaatsvinden U mag alleen de opgegeven netstroomadapter ge bruiken Gebruik van een andere dan de opgegeven netstroomadapter kan leiden...

Страница 55: ...taan de cijfertoetsen in de instelfunctie voor het tempo Zorg er voor dat het TYPE TEMPO lampje uit is voor u CLICK SEARCH of andere functietoetsen gaat gebruiken Als u het tempo wilt veranderen terwi...

Страница 56: ...n de naam van het eerder op geslagen muziekstuk dat u zoekt 3 Druk op START STOP om naar het eerste muziekstuk dat met de opgegeven letter be gint te springen Druk nog eens op START STOP om de volgend...

Страница 57: ...ap en uw instelling in te voeren 7 Herhaal de stappen 4 t m 6 hierboven om een ketenprogramma samen te stellen U kunt maximaal 20 stappen muziekstukken opne men in een ketenprogramma Afspelen van het...

Страница 58: ...saansluiting van de externe MIDI apparatuur te verbinden met de MIDI IN ingangsaansluiting van uw CLICKSTATION 2 Zet de aan uit schakelaar op ON en druk op de MIDI toets om de MIDI functie in te scha...

Страница 59: ...59...

Страница 60: ......

Отзывы: