background image

L S 9 ’ S   S C E N E   F U N C T I O N  

Now that everything has power and is turned on, let’s set up the LS9 for use. To do this, 
first we need to ‘recall’ the appropriate Scene. A Scene is a saved file for all the parameters 
of the LS9, it saves everything from the I/O to fader positions. If you would like to know 
more  detail  about  Scenes  and  how  they  work,  please  contact  Pascal  Hausamman  or  Ryan 
Jones. 

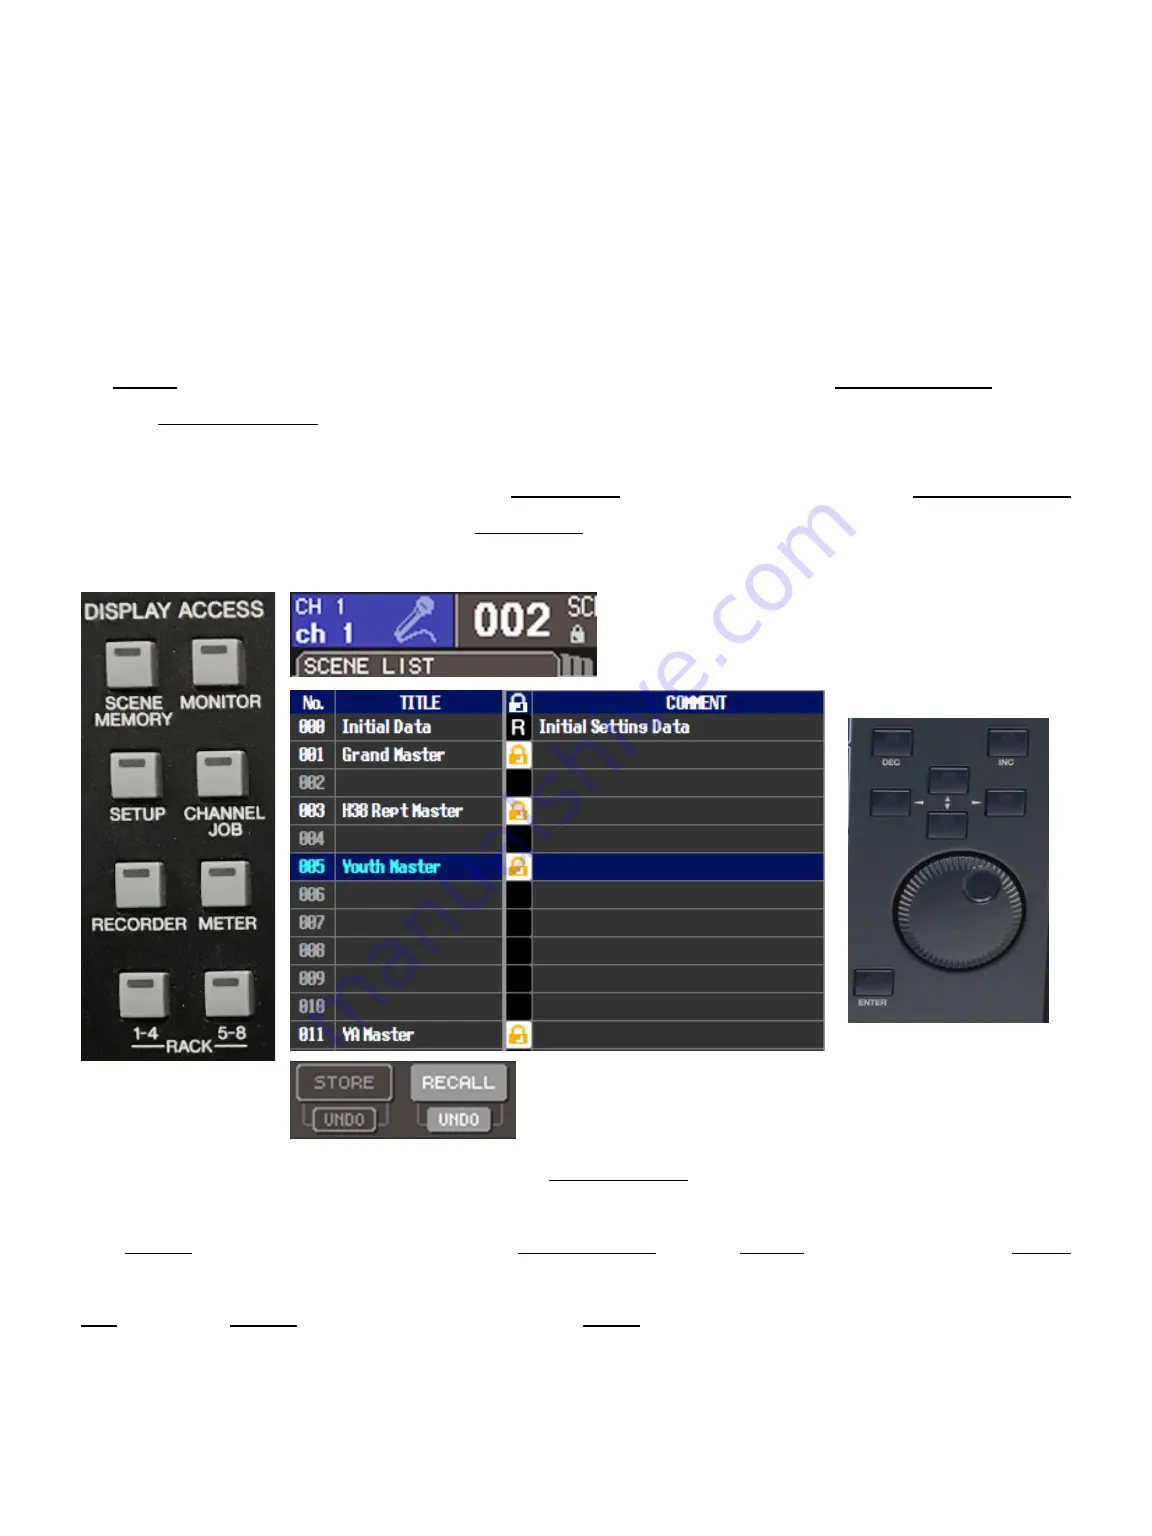
To Recall (load a saved scene) a scene from the LS9 for use, select the Scene Memory button 
on the Display Access section of the desk. This will open a menu on the LCD screen where       
you  can  operate  the  Scene  Functions.  This  screen  will  have  tabs  just  under  the  top  left 
corner of the LCD Screen. We need the Scene List tab, to get there press the Scene Memory 
button until you have arrived on the Scene List tab. You should see a scene table like the one 
below. 


To select your desired scene use the large Scroll Wheel over in Data Entry Section on the 
right side to highlight the scene. Once selected, move the cursor down to the bottom using 
the Arrow buttons just above the large Scroll Wheel to the Recall function. Use the Enter 
button use the function. A dialogue box will appear asking you for your confirmation. Select 
OK using the Arrow buttons and confirm with Enter.  

5

Содержание LS9-32

Страница 1: ...1 YA M A H A L S 9 3 2 Q U I C K S T A R T G U I D E F I R S T E D I T I O N E N G L I S H ...

Страница 2: ... by step instructions from when you walk in to when you leave It s important to not only turn the system on correctly but to also make sure EVERYTHING is turned off before you leave Therefore please follow these instructions carefully to ensure minimum damage to the system during power up and down 2 ...

Страница 3: ... need to turn on the General Neon and Lights Scene switches from 0 to I DO NOT touch any other power switch Step 2 Make your way back into the main room over to the sound desk Turn on both power boards so they light up Once that is done turn on the LS9 32 with the switch on the back the wireless microphone receivers and antenna which are located under the desk 3 ...

Страница 4: ...ant to turn off the system safely The process is the reverse of turning the system on but here are detailed steps to help IMPORTANT Power boards should always be turned off last on each step Step 1 Turn off all FOH amps and the A 16D Pro After they are all turned off you may switch off the power board Step 2 Turn off the LS9 Desk and the wireless receivers and antenna After they are all turned off you ma...

Страница 5: ...s will open a menu on the LCD screen where you can operate the Scene Functions This screen will have tabs just under the top left corner of the LCD Screen We need the Scene List tab to get there press the Scene Memory button until you have arrived on the Scene List tab You should see a scene table like the one below To select your desired scene use the large Scroll Wheel over in Data Entry Section...

Страница 6: ...p so any iPad with the LS9 StageMix app can connect You can find the LS9 StageMix app by searching the App Store on the iPad please install the app first before moving on Once you have installed the LS9 StageMix app you will need to connect to the network that the LS9 is connected to Open the wifi settings on the iPad and connect to the H38 Yamaha LS9 network The password required is happysky311 P...

Отзывы: