background image

Using the Lesson feature

EZ-220  Owner’s Manual

25

1

Select the desired Song for your lesson (page 18). 

Song 000 cannot be used with the Song Lesson feature. 

2

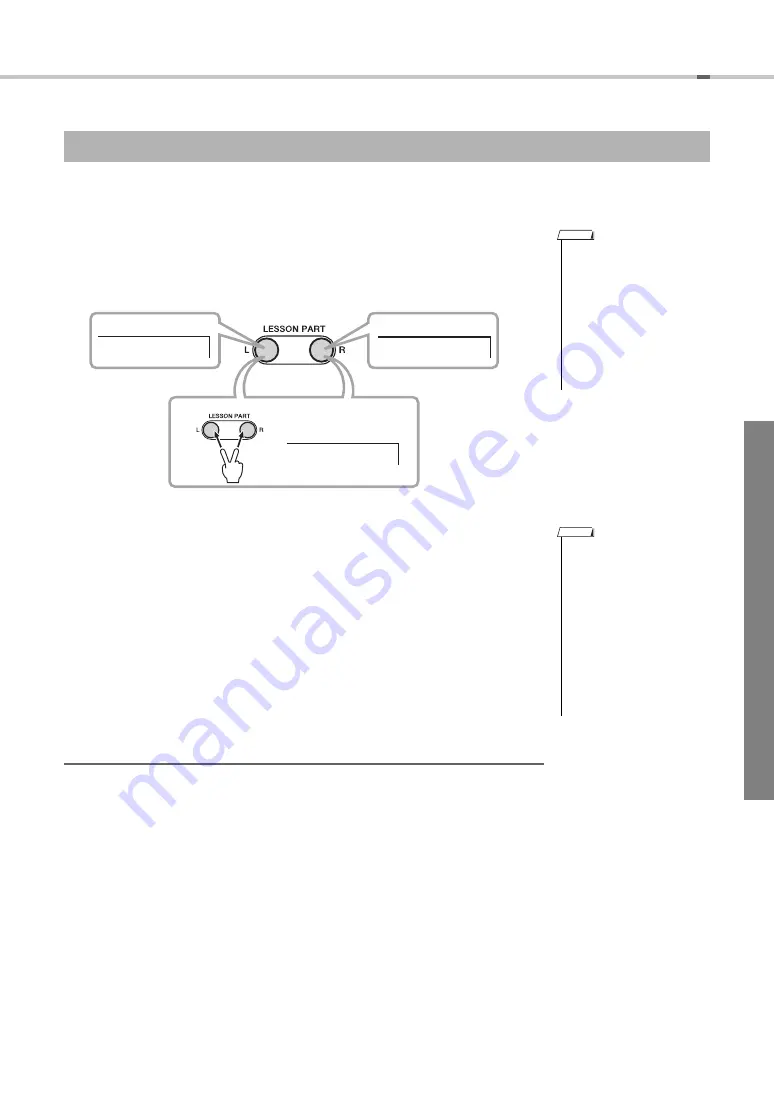
Turn off the part you want to practice. 

For the right-hand lesson, press the [RIGHT] button to turn off the right-hand 
part. For the left-hand lesson, press the [LEFT] button to turn off the left-hand 
part. For the lesson of both hands, press both buttons simultaneously. 

3

Select the Lesson type.

Referring to page 24, press the [LISTEN & LEARN], [WAITING] or [TIM-
ING] button to start Lesson playback. 

4

Start the Lesson. 

Practice the selected Song according to the selected Lesson type. 

5

Stop the Lesson. 

You can stop the Lesson at any time by pressing the [START/STOP] button.

Grade

When playback of Timing and Waiting reaches to the end, you can confirm your 
Grade on the display. 

OK
Good
Very Good
Excellent

Trying the Song Lesson 

• A “No LPart” message is 

shown in the display if you 
select the left part in Songs 
which does not have left part 
data. These Songs cannot 
be used for left-hand or 
both-hands lessons.

• If a Song is being played 

back via the [START/STOP] 
button, stop playback then 
select the part. 

NOTE

Left

Right

BothHand

Left-hand lesson

Right-hand lesson

Both-hands lesson

• You can change the Lesson 

type during Lesson play-
back by pressing the corre-
sponding button. 

• You can change the Lesson 

part during Lesson play-
back. 

• The Split Point is fixed and it 

cannot be changed. For the 
left-hand lesson, it is fixed at 
59 or B2; for the left-hand 
chord lesson, it is fixed at 54 
or F

#

 2.

NOTE

Содержание EZ-220 Page Turner

Страница 1: ...is Yamaha Digital Keyboard We recommend that you read this manual carefully so that you can fully take advantage of the advanced and convenient functions of the instrument We also recommend that you keep this manual in a safe and handy place for future reference Before using the instrument be sure to read PRECAUTIONS on pages 4 5 ...

Страница 2: ...tteries Batteries MUST be installed cor rectly Mismatches or incorrect installation may result in overheating and battery case rupture Warning Do not attempt to disassemble or incinerate any battery Keep all bat teries away from children Dispose of used batteries promptly and as regulated by the laws in your area Note Check with any retailer of household type batteries in your area for battery dis...

Страница 3: ...nd the environment which could otherwise arise from inappropriate waste handling For more information about collection and recycling of old products and batteries please contact your local municipality your waste disposal service or the point of sale where you purchased the items For business users in the European Union If you wish to discard electrical and electronic equipment please contact your...

Страница 4: ... not put burning items such as candles on the unit A burning item may fall over and cause a fire Follow the precautions below Failure to do so might result in explosion fire overheating or battery fluid leakage Do not tamper with or disassemble batteries Do not dispose of batteries in fire Do not attempt to recharge batteries that are not designed to be charged Keep the batteries separate from met...

Страница 5: ...is not in use Even when the Standby On switch is in standby status display is off electricity is still flowing to the instrument at the minimum level When you are not using the instrument for a long time make sure you unplug the power cord from the wall AC outlet Make sure to discard used batteries according to local regulations NOTICE To avoid the possibility of malfunction damage to the product ...

Страница 6: ...w to use it refer to this introductory book The online materials above are available for down loading from the Yamaha website Yamaha Manual Library http www yamaha co jp manual Access the Yamaha Manual Library then enter your model name EZ 220 for example in the Model Name area to search the manuals Owner s manual this book Song Book Music rest Clip Felt pad AC Power Adaptor May not be included de...

Страница 7: ... Changing the Voice for the Keyboard 28 Playing With a Variety of Effects 28 Adding Reverb 29 Adding Panel Sustain 30 Controlling the Pitch 30 Transposing the Pitch in Semitones 30 Fine Tuning the Pitch 31 Changing the Touch Sensitivity 32 Using the Metronome 34 Playing with a Style 36 Using the Style Sections 37 Playing Chords for Style Playback 39 Style Playback Settings 39 Adjusting the Style V...

Страница 8: ...yback of all the preset Songs in numerical order 3 METRONOME ON OFF button pages 32 33 Starts stops the metronome 4 A B REPEAT button page 21 Turns Song Repeat playback on off 5 REW button page 20 Returns to an earlier point in the Song 6 FF button page 20 Rapidly skips ahead to a later point in the song 7 PAUSE button page 20 Stops Song playback at the current position Pressing this button while ...

Страница 9: ...YPE switch page 10 For selecting battery type 5 SUSTAIN jack page 27 For connecting an optional Footswitch 6 USB TO HOST terminal page 40 For connecting a computer 7 PHONES OUTPUT jack page 11 For connecting headphones and external audio equip ment 8 DC IN 12V jack page10 For connecting the power adaptor Rear Panel 1 3 2 1 u 0 o i 2 1 0 4 5 6 7 8 Voice List page 45 The PRESS AND HOLD FOR A WHILE S...

Страница 10: ...low the polarity markings on the side of the compart ment 5 Replace the compartment cover making sure that it locks firmly in place Power requirements Use the specified adaptor page 54 only Using the wrong adaptor can result in damage to the instrument or overheating When setting up the product make sure that the AC outlet you are using is easily accessible If some trou ble or malfunction occurs i...

Страница 11: ...harge the batteries Use only the specified charger device when charging Power will be automatically drawn from the AC adaptor if an AC adaptor is connected while batteries are installed in the instrument Turning the power on off Even when the power switch is turned off the display is blank electricity is still flowing to the product at the minimum level When you are not using the product for a lon...

Страница 12: ...ess the button to increase the vol ume Pressing this twice will add one bar Press the button to lower the vol ume Pressing this twice will delete one bar The Volume setting is reset to the default value whenever the power is turned off NOTE Play the keyboard After the power is turned on playing the keyboard will produce the Piano sound Select a Voice Page 26 Although the grand piano Voice is autom...

Страница 13: ...utton again Play with a Style Page 34 Try playing a Style to recreate the sound of a full band or orchestra 1 Press the STYLE button o 2 Use the number buttons to select a Style 3 Press the ACMP ON OFF button 4 to turn accompaniment on 4 Press the SYNC START button 8 to turn Sync Start on 5 Press the INTRO ENDING rit button 5 6 Play a chord in the left area of the key board to start playback 7 Pla...

Страница 14: ...ghting Keyboard Page 23 for details During Lesson playback the notes you should play will light This is available when the LIGHT ON OFF 1 is turned on Page Turner for the iPad Page 42 for details By turning on the Page Turner function you can view the score of the current Song on your iPad screen The notation page is automatically turned according to the playback progression Use the Metronome Page...

Страница 15: ...ning Tuning 427 0Hz 440 0Hz 453 0Hz Page 30 Split Point SplitPnt 000 127 C 2 G8 Page 39 Touch Sensi tivity TouchSns 1 4 Page 31 Reverb On Off on Reverb ON OFF Page 28 Reverb Type Reverb 01 10 Page 28 Reverb Level RevLevel 000 127 Page 29 Panel Sus tain Sustain ON OFF Page 29 Keyboard Volume M Volume 000 127 Adjusts the vol ume of your key board performance Keyboard Octave M Octave 2 0 2 Adjust the...

Страница 16: ... lists of the Songs Styles and Voices indicated on the front panel see page 19 and pages 45 53 3 Start playing After selecting a Song or Style press the START STOP button to start stop playback After selecting a Voice play the keyboard Basic Operation Number buttons 0 9 The Number buttons can be used to directly enter a Song Style or Voice number or parameter value Example Selecting Voice 002 Brig...

Страница 17: ...is from 0 14 One bar repre sents 2 steps in the value MASTER VOLUME indicator Sound level is 13 14 Sound level is 3 4 Sound level is 1 2 Sound level is 0 no indication Indicates the chord currently being played back or being played in the left hand area of the keyboard when the ACMP is turned on Indicates which fingers to use to play the melody during Song play back page 23 During Song playback yo...

Страница 18: ... Song mode is active Song number Song name 001 Scarboro 03 You can change the Melody Voice of the current Song during playback To do this select the desired Voice page 26 then hold down the VOICE button for lon ger than a second Repeat Playback of all Songs Pressing the DEMO button will play all the preset Songs in sequence This playback will continue repeatedly starting again from the first Song ...

Страница 19: ...Chanson De L adieu F Chopin 046 Turkish March W A Mozart 047 Valse op 64 1 Petit Chien F Chopin 048 Menuett Beethoven L v Beethoven 049 24 Preludes op 28 7 F Chopin 050 Melodie Album für die Jugend R Schumann 051 Fröhlicher Landmann Album für die Jugend R Schumann 052 Träumerei Kinderszenen R Schumann 053 Thema Impromptus D 935 3 F Schubert 054 Invention Nr 1 J S Bach 055 Gavotte J S Bach J S Bach...

Страница 20: ... tempo of the Song and Style can be set over a range of 11 to 280 1 Press the TEMPO TAP button to call up the current tempo value 2 Use the Number buttons to set the tempo over a range of 11 to 280 Tap Start You can supply a count in at any tempo you like to start playback Simply tap the TEMPO TAP button at any tempo four times for time signatures in 4 and three times for time signatures in 3 and ...

Страница 21: ...ng will now play repeatedly To cancel Repeat Playback Press the A B REPEAT button oFF REPEAT will appear on the display and normal playback of the Song will continue Repeat Playback A B Repeat playback of this section You can also set the A B Repeat function when the Song is stopped Simply use the REW and FF buttons to select the desired mea sures pressing the A B REPEAT button for each point then...

Страница 22: ... L part or R part on the panel During Song playback pressing the R button will mute the right hand part while pressing the L button will mute the left hand part To cancel the mute status press the corresponding Part buttons R or L again dur ing Song playback or select a different Song Adjusting the Song Volume 100 SongVol Hold for longer than a second Current Song volume Press the and buttons simu...

Страница 23: ...en the Song is started the fingering guide appears on the display and shows you which fingers you should use while playing Lighting Keyboard Playing while looking at the lights for a long period of time may cause eye strain or stiffness in your neck and shoulders For your health and comfort we recommend that you take a ten minute break after every hour of playing CAUTION on LIGHT Fingering Guide 1...

Страница 24: ...isplay will sound Your Tempo Lesson 3 Waiting In this Lesson try playing the correct notes shown on the display The Song pauses until you play the right note and playback tempo changes to match the speed at which you are playing Three types of Lessons When the melody Voice of the Song is changed the key position shown in the display may be shifted in octave units depending on the selected Voice NO...

Страница 25: ...son at any time by pressing the START STOP button Grade When playback of Timing and Waiting reaches to the end you can confirm your Grade on the display OK Good Very Good Excellent Trying the Song Lesson A No LPart message is shown in the display if you select the left part in Songs which does not have left part data These Songs cannot be used for left hand or both hands lessons If a Song is being...

Страница 26: ...List on page 45 Keyboard Volume and Octave settings 3 Play the keyboard Try selecting and playing different Voices When you want to reset various settings to default and simply play a Piano sound press the PORTABLE GRAND button The Voice for the entire keyboard will be set to 001 Grand Piano 1 Selecting a Voice 001 GrandPno 03 Voice number Appears after the VOICE button is pressed Voice name Selec...

Страница 27: ...a s h C y m b a l 1 H a n d C l a p H i H a t C l o s e d H i H a t P e d a l O p e n R i m S h o t S i d e S t i c k C a s t a n e t S t i c k s B r u s h T a p B r u s h S l a p C o n g a H O p e n T i m b a l e L A g o g o L M a r a c a s G u i r o S h o r t C l a v e s C u i c a M u t e T r i a n g l e M u t e S h a k e r C h i n e s e C y m b a l R i d e C y m b a l C u p S p l a s h C y m b ...

Страница 28: ...everb type The ideal type is automatically selected whenever you select a Song or Style but you can select any of the available Reverb Types 1 Press the FUNCTION button several times until Reverb appears Reverb is located next to the on Reverb or oFF Reverb indications The current Reverb type appears after the Reverb indication 2 Select the desired Reverb Type by using the number buttons 0 9 Refer...

Страница 29: ... appears 2 Press the button to turn Panel Sustain on Panel Sustain will be added to the notes you play on the keyboard To turn it off press the button RevLevel 064 Current value Press the and buttons simultaneously to instantly reset the value to the default of 64 NOTE Adding Panel Sustain Sustain oFF Current setting You can apply Sustain to the keyboard sound by pressing an optional Footswitch Fo...

Страница 30: ...ter a while the current value is shown on the display 2 Use the and buttons to set the Tuning value over a range of 427 0Hz to 453 0Hz Transposing the Pitch in Semitones 00 Transpos Current value Transpose cannot be applied to Drum Kits 141 and 142 Voice numbers However Transpose can be applied to Drum Kits 143 153 keep in mind though that the instrument sounds are not tuned but simply shifted to ...

Страница 31: ...play After a while the current value is shown on the display 2 Use the 1 4 and buttons to select the Touch Sensitivity The default Touch Sensitiv ity value is 2 NOTE TouchSns 2 Medium Current value Touch Sensitivity Description 1 The volume level changes very widely from pianis simo to fortissimo to facilitate dynamic and dramatic expression You have to hit the keys hard to produce a loud sound 2 ...

Страница 32: ...ly the first beat is accented with a bell sound To stop the metronome press this button again 1 Press the TEMPO TAP button to call up the current Tempo value 2 Use the number buttons to set the tempo over a range of 11 to 280 Starting Stopping the metronome Metronome volume This can be set by using the FUNCTION button page 15 Adjusting the Tempo 001 GrandPno 1 1 Indicates the beat number 155 Tempo...

Страница 33: ... to the numerator of the Time Signature is shown on the display 2 Use the number buttons to set the Beat over a range of 0 to 60 3 Press the FUNCTION button The denominator of the Time Signature is shown on the display 4 Use the and buttons to select a note The available values are as follows Setting the Time Signature 04 TimeSigN Hold for longer than a second Beat The Time Signature settings for ...

Страница 34: ...o turn on ACMP To turn ACMP off press this button again 001 8BtModrn 001 Style number Appears when the instru ment is in the Style mode Style name Playing only the Rhythm Part After you ve selected a Style pressing the START STOP button starts playback of the Rhythm part of the Style To stop playback press the START STOP but ton again If you select one of the Pianist category Styles 093 100 which ...

Страница 35: ...d Dic tionary function page 38 which shows you how to play specific chords on the display and with the key lamps Play a variety of left hand chords while playing a melody with your right hand 6 To stop playback press the START STOP button You can stop playback also by pressing the INTRO ENDING rit button page 36 so that the Ending of the current Style will play and then Style playback will stop Yo...

Страница 36: ...e two variations A and B and the Style playback sound changes harmonically based on the chords you play with your left hand AUTO FILL This is automatically added before changing to Main A or B Recommended method for using Sections Setup 1 Press the STYLE button and then select a Style 2 Press the ACMP ON OFF button to turn ACMP on 3 Press the INTRO ENDING rit button 4 Press the MAIN AUTO FILL butt...

Страница 37: ...cannot be recognized as a chord no chord name is shown on the display In this case only the Rhythm and Bass parts will be played back Basic Chords Major Minor Seventh Minor Seventh Major Seventh C Cm 7 C Cm7 CM7 D Dm 7 D Dm7 DM7 E Em 7 E Em7 EM7 C F Fm 7 F Fm7 FM7 G Gm 7 G Gm7 GM7 A Am 7 A Am7 AM7 B Bm 7 B Bm7 BM7 Easy Chords This method lets you easily play chords in the Auto Accompaniment range ...

Страница 38: ...companiment range of the key board checking the indications in the display When you ve played the chord properly a bell sound signals your success and the chord name in the display flashes To call up possible inversions of the chord press the buttons 4 To exit from the Chord Dictionary display press the SONG or STYLE button Looking up Chords Using the Chord Dictionary DICTIONA Dict Hold for longer...

Страница 39: ... default Split Point is key number 54 the F 2 key but you can change it to another key 1 Press the FUNCTION button several times until SplitPnt appears The current Split Point key is lighted 2 Use the Number buttons to set the Split Point Adjusting the Style Volume StyleVol 100 Current Style volume Hold for longer than a second Press the and buttons simultaneously to instantly reset the value to i...

Страница 40: ...o the USB TO HOST terminal make sure to observe the following points Fail ing to do so risks freezing the computer and corrupting or losing the data If the computer or the instrument freezes restart the application software or the computer OS or turn the power to the instrument off then on again NOTICE Connecting a computer which does not satisfy the above OS may cause computer malfunction Yamaha ...

Страница 41: ...tronome playback is synchronized to the internal clock of this instrument OFF or to the clock signal from a computer connected to the USB TO HOST terminal ON ON Playback will be synchronized to the clock from a computer While no clock is being received from a computer playback cannot be done OFF This is the normal default setting in which the instrument uses its own internal clock This can be set ...

Страница 42: ...e Turner to your iPad This application can be downloaded from the App Store 2 Attach your iPad to the music rest 2 1 After removing the backing paper attach the included long felt to the bottom center of the music rest The felt protects the bottom of the music rest 2 2 As necessary attach the small felts to the clip as shown after removing the backing paper Although the clip can be used without fe...

Страница 43: ...nto the instrument Before moving the instru ment make sure to remove the iPad from the music rest Never slide the iPad along the music rest or submit it to strong shock such as pushing or hitting it when on the music rest Never put anything else on the music rest together with the iPad such as a song booklet or another iPad Doing so may make the music rest unstable Never place the instrument with ...

Страница 44: ...lecting one of the Style numbers 093 100 Pianist This is not a malfunction Style numbers 093 100 Pianist have no rhythm parts so no rhythm will play The other parts will begin playing when you play a chord in the accompaniment range of the keyboard if Auto Accompani ment is turned on Not all of the voices seem to sound or the sound seems to be cut off The instrument is polyphonic up to a maximum o...

Страница 45: ...th Brass 057 0 115 63 Funky Analog 058 0 114 63 Techno Brass 059 0 0 63 Synth Brass 1 060 0 0 64 Synth Brass 2 SAXOPHONE 061 0 0 67 Tenor Sax 062 0 0 66 Alto Sax 063 0 112 65 Soprano Sax 064 0 0 68 Baritone Sax 065 0 112 69 Oboe 066 0 0 72 Clarinet 067 0 0 70 English Horn 068 0 0 71 Bassoon FLUTE 069 0 115 74 Flute 070 0 0 73 Piccolo 071 0 0 76 Pan Flute 072 0 0 75 Recorder 073 0 0 77 Blown Bottle...

Страница 46: ...4 Bird Tweet 137 0 0 125 Telephone Ring 138 0 0 126 Helicopter 139 0 0 127 Applause 140 0 0 128 Gunshot DRUM KITS 141 127 0 1 Standard Kit 1 142 127 0 2 Standard Kit 2 143 127 0 9 Room Kit 144 127 0 17 Rock Kit 145 127 0 25 Electronic Kit 146 127 0 26 Analog Kit 147 127 0 28 Dance Kit 148 127 0 33 Jazz Kit 149 127 0 41 Brush Kit 150 127 0 49 Symphony Kit 151 126 0 1 SFX Kit 1 152 126 0 2 SFX Kit 2...

Страница 47: ...3 50 Stereo Slow Strings 256 0 8 50 Legato Strings 257 0 40 50 Warm Strings 258 0 41 50 Kingdom 259 0 3 53 Stereo Choir 260 0 32 53 Mellow Choir Voice No Bank Select Program Numbers 1 128 Voice Name MSB 0 127 LSB 0 127 261 0 40 53 Choir Strings 262 0 40 55 Synth Voice 2 263 0 41 55 Choral 264 0 64 55 Analog Voice 265 0 35 56 Orchestra Hit 2 266 0 64 56 Impact 267 0 32 57 Warm Trumpet 268 0 18 58 T...

Страница 48: ...Flute Key Click 356 64 0 33 Shower 357 64 0 34 Thunder 358 64 0 35 Wind 359 64 0 36 Stream 360 64 0 37 Bubble 361 64 0 38 Feed 362 64 0 49 Dog 363 64 0 50 Horse 364 64 0 51 Bird Tweet 2 365 64 0 56 Maou 366 64 0 65 Phone Call 367 64 0 66 Door Squeak 368 64 0 67 Door Slam 369 64 0 68 Scratch Cut 370 64 0 69 Scratch Split 371 64 0 70 Wind Chime 372 64 0 71 Telephone Ring 2 373 64 0 81 Car Engine Ign...

Страница 49: ... SD Room L SD Rock L SD Rock L 51 D 2 39 D 1 Hand Clap 52 E 2 40 E 1 Snare H Hard Snare H Hard 2 SD Room H SD Rock Rim SD Rock H 53 F 2 41 F 1 Floor Tom L Room Tom 1 Rock Tom 1 E Tom 1 54 F 2 42 F 1 1 Hi Hat Closed 55 G 2 43 G 1 Floor Tom H Room Tom 2 Rock Tom 2 E Tom 2 56 G 2 44 G 1 1 Hi Hat Pedal 57 A 2 45 A 1 Low Tom Room Tom 3 Rock Tom 3 E Tom 3 58 A 2 46 A 1 1 Hi Hat Open 59 B 2 47 B 1 Mid To...

Страница 50: ...4 57 A 2 45 A 1 Low Tom Analog Tom 3 Analog Tom 3 Jazz Tom 3 Brush Tom 3 58 A 2 46 A 1 1 Hi Hat Open Analog HH Open Analog HH Open 2 59 B 2 47 B 1 Mid Tom L Analog Tom 4 Analog Tom 4 Jazz Tom 4 Brush Tom 4 60 C 3 48 C 2 Mid Tom H Analog Tom 5 Analog Tom 5 Jazz Tom 5 Brush Tom 5 61 C 3 49 C 2 Crash Cymbal 1 Analog Cymbal Analog Cymbal 62 D 3 50 D 2 High Tom Analog Tom 6 Analog Tom 6 Jazz Tom 6 Brus...

Страница 51: ...L Jazz Tom 4 Rooster 60 C 3 48 C 2 Mid Tom H Jazz Tom 5 Dog 61 C 3 49 C 2 Crash Cymbal 1 Hand Cym L Cat 62 D 3 50 D 2 High Tom Jazz Tom 6 Owl 63 D 3 51 D 2 Ride Cymbal 1 Hand Cym Short L Horse Gallop 64 E 3 52 E 2 Chinese Cymbal Flute Key Click Car Engine Ignition Horse Neigh 65 F 3 53 F 2 Ride Cymbal Cup Car Tires Squeal Cow 66 F 3 54 F 2 Tambourine Car Passing Lion 67 G 3 55 G 2 Splash Cymbal Ca...

Страница 52: ...fect Type List Reverb Types No Reverb Type Description 01 03 Hall 1 3 Concert hall reverb 04 05 Room 1 2 Small room reverb 06 07 Stage 1 2 Reverb for solo instruments 08 09 Plate 1 2 Simulated steel plate reverb 10 Off No effect ...

Страница 53: ...lub 043 Swing1 044 Swing2 045 Five Four 046 Dixieland 047 Ragtime R B 048 Soul 049 DetroitPop 050 6 8Soul 051 CrocoTwist 052 Rock Roll 053 ComboBoogie 054 6 8Blues Country 055 CountryPop 056 CountrySwing 057 Country2 4 058 Bluegrass Latin 059 BrazilianSamba 060 BossaNova 061 Tijuana 062 DiscoLatin 063 Mambo 064 Salsa 065 Beguine 066 Reggae Ballroom 067 VienneseWaltz 068 EnglishWaltz 069 Slowfox 07...

Страница 54: ...TART STOP INTRO ENDING rit MAIN AUTO FILL Other Features One Touch Setting OTS Yes Songs Preset Number of Preset Songs 100 Demo Other Features Page Turner iPad Yes Functions Lesson LISTEN LEARN TIMING WAITING Chord Dictionary Overall Controls Metronome Yes Tempo Range 11 280 Transpose 12 0 12 Tuning 427 0 440 0 453 0 Hz Miscellaneous Portable Grand Button Yes Connectivity USB TO HOST DC IN 12V PHO...

Страница 55: ...ft part 17 Lesson 24 Light Guide 23 Local Control 41 M MAIN 36 MASTER VOLUME 17 Measure 17 Melody Voice 18 Metronome 32 Metronome volume 32 MIDI 41 Music Rest 6 Mute 22 N Notation 17 Number buttons 16 O Octave 26 One Touch Setting 26 Option 54 P Page Turner 42 Panel Sustain 29 Part 22 Pause 20 Pitch 30 Power Supply 10 54 R Repeat Playback 18 21 Reverb 28 Rhythm Part 34 Right part 17 Root 37 38 S S...

Страница 56: ......

Страница 57: ...of of purchase documents will cause this warranty to be void This warranty covers only the Original Owner and is not transferable In Order to Obtain Warranty Service Warranty service will only be provided for defective products within the Warranted Area Contact your local authorized Yamaha dealer who will advise you of the procedures to be followed If this is not successful contact Yamaha at the a...

Страница 58: ...GREECE Philippos Nakas S A The Music House 147 Skiathou Street 112 55 Athens Greece Tel 01 228 2160 SWEDEN Yamaha Music Europe GmbH Germany filial Scandinavia J A Wettergrens Gata 1 Box 30053 S 400 43 Göteborg Sweden Tel 031 89 34 00 DENMARK Yamaha Music Europe GmbH Tyskland filial Denmark Generatorvej 6A DK 2730 Herlev Denmark Tel 44 92 49 00 FINLAND F Musiikki Oy Kluuvikatu 6 P O Box 260 SF 0010...

Страница 59: ......

Страница 60: ...U R G Digital Musical Instruments Division 2012 Yamaha Corporation 202POTY A0 Printed in China WZ93480 Yamaha Global Site http www yamaha com Yamaha Manual Library http www yamaha co jp manual ...

Отзывы: