background image

ELB-01 Owner’s Manual

176

Appendix

10

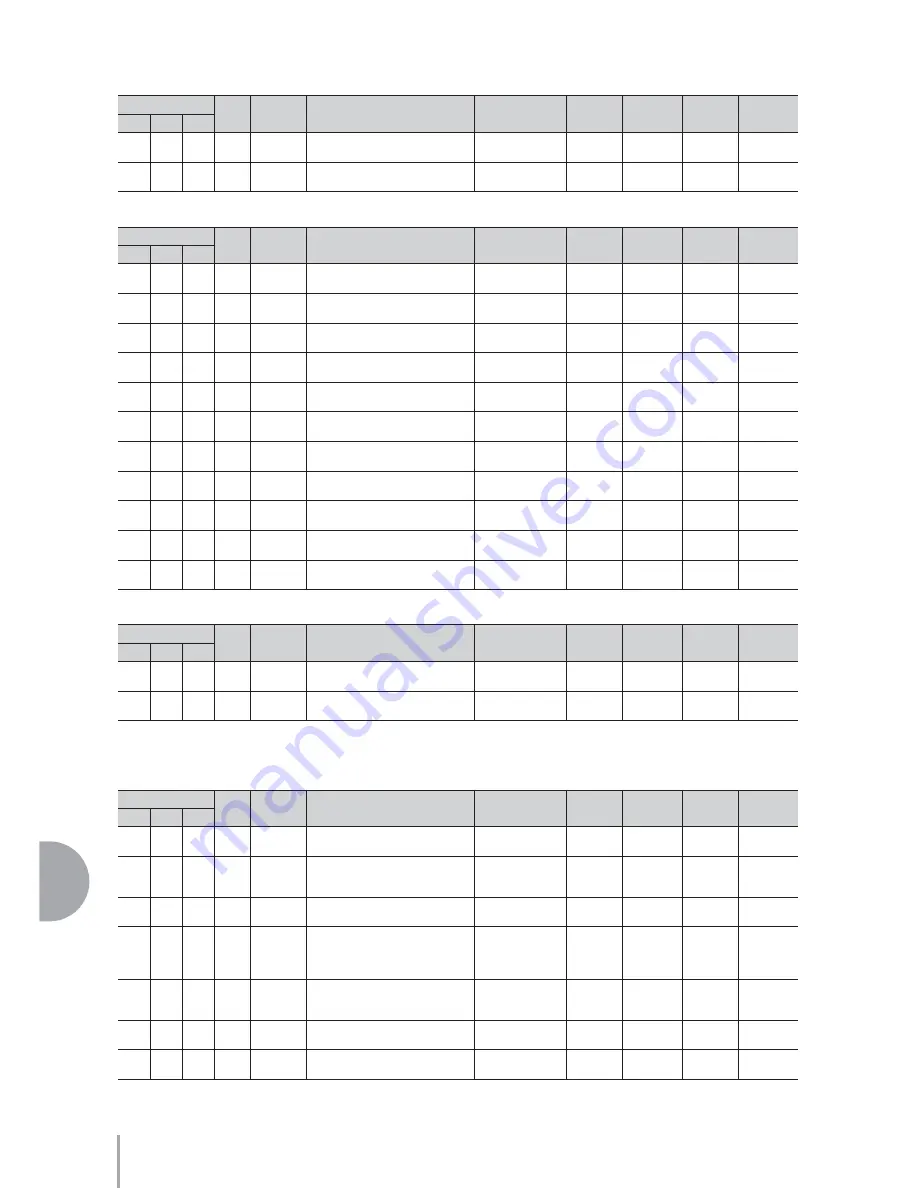
M.O.C. Function Parameters

Section Parameters

Keyboard Percussion Parameters

Overall

System Parameters

Address

Size

Data

Parameter

Data

Receive

Rx Range

Transmit

Tx Range

hh

mm

ll

13

04

00

1

00-7F

Melody On Chord Mode

00:OFF
01:ON

Ø

00-7F

Ø

00-01

13

04

01

1

00-7F

M.O.C. Knee Lever Control
 (On/Off)

00:OFF
01:ON

Ø

00-7F

˛

00-01

Address

Size

Data

Parameter

Data

Receive

Rx Range

Transmit

Tx Range

hh

mm

ll

13

05

00

1

00-7F

Intro 1 (On/Off)

00:OFF
01:ON

Ø

00-7F

Ø

00-01

13

05

01

1

00-7F

Intro 2 (On/Off)

00:OFF
01:ON

Ø

00-7F

Ø

00-01

13

05

02

1

00-7F

Intro 3 (On/Off)

00:OFF
01:ON

Ø

00-7F

Ø

00-01

13

05

08

1

00-7F

Main A (On/Off)

00:OFF
01:ON

Ø

00-7F

Ø

00-01

13

05

09

1

00-7F

Main B (On/Off)

00:OFF
01:ON

Ø

00-7F

Ø

00-01

13

05

0A

1

00-7F

Main C (On/Off)

00:OFF
01:ON

Ø

00-7F

Ø

00-01

13

05

0B

1

00-7F

Main D (On/Off)

00:OFF
01:ON

Ø

00-7F

Ø

00-01

13

05

18

1

00-7F

Break (On/Off)

00:OFF
01:ON

Ø

00-7F

Ø

00-01

13

05

20

1

00-7F

Ending 1 (On/Off)

00:OFF
01:ON

Ø

00-7F

Ø

00-01

13

05

21

1

00-7F

Ending 2 (On/Off)

00:OFF
01:ON

Ø

00-7F

Ø

00-01

13

05

22

1

00-7F

Ending 3 (On/Off)

00:OFF
01:ON

Ø

00-7F

Ø

00-01

Address

Size

Data

Parameter

Data

Receive

Rx Range

Transmit

Tx Range

hh

mm

ll

13

10

11

1

00-7F

Volume

00:MIN
7F:MAX

Ø

00-7F

Ø

00-7F

13

10

12

1

00-7F

Reverb (Send Level)

00:MIN
7F:MAX

Ø

00-7F

Ø

00-7F

Address

Size

Data

Parameter

Data

Receive

Rx Range

Transmit

Tx Range

hh

mm

ll

14

00

00

1

00-7F

Disable (On/Off)

00:OFF
01:ON

Ø

00-7F

˛

-

14

00

02

1

3A-46

Transpose

3A:KeyDown
40:Normal
46:KeyUp

Ø

3A-46

Ø

3A-46

14

00

03

1

01-0C

2nd Expression Range

01:100 C
0C:1200 C

Ø

01-0C

˛

01-0C

14

00

04

1

00-7F

Footswitch Mode

00:OFF
01:Rhythm
02:Glide
03:Rotary Speaker

Ø

00-7F

Ø

00-03

14

00

05

1

00-7F

Pitch

00:PitchDown
40:Normal
7F:PitchUp

Ø

00-7F

Ø

00-7F

14

00

06

1

00-7F

Footswitch Glide Time

00:FAST
7F:SLOW

Ø

00-7F

Ø

04-1C

14

00

08

1

00-7F

MIDI Control Expression (INT/EXT)

00:Internal
01:External

Ø

00-7F

˛

-

Содержание Electone STAGEA ELB-01

Страница 1: ...Owner s Manual ELB 01 EN ...

Страница 2: ... service personnel CAUTION Always follow the basic precautions listed below to avoid the possibility of physical injury to you or others or damage to the instrument or other property These precautions include but are not limited to the following When removing the electric plug from the instrument or an outlet always hold the plug itself and not the cord Pulling by the cord can damage it Remove the...

Страница 3: ...earing loss If you experience any hearing loss or ringing in the ears consult a physician Do not place the bench in an unstable position where it might accidentally fall over Do not play carelessly with or stand on the bench Using it as a tool or step ladder or for any other purpose might result in accident or injury Only one person should sit on the bench at a time in order to prevent the possibi...

Страница 4: ...ELB 01 The Yamaha Electone combines the most advanced tone generation technology with state of the art digital electronics and features to give you stunning sound quality with maximum musical versatility In order to make the most of your Electone and its extensive performance potential we urge you to read the manual thoroughly while trying out the various features described Keep the manual in a sa...

Страница 5: ... registered trademarks of their respective companies The illustrations and LCD screens as shown in this owner s manual are for instructional purposes only and may appear somewhat different from those on your instrument The ELB 01 is compatible with the following formats GM General MIDI is one of the most common Voice allocation formats GM System Level 2 is a standard specification that enhances th...

Страница 6: ...hythm from an External Media 65 Rhythm List 67 Accompaniment 68 Automatic Accompaniment Auto Bass Chord A B C 71 Melody On Chord M O C 74 Keyboard Percussion 77 Using the Preset Keyboard Percussion 77 Changing the Keyboard Percussion volume reverb 78 Preset Keyboard Percussion List 80 Assigning sounds to the User Keyboard Percussion 88 Recalling the User Keyboard Percussion 92 Kit Assign List 93 R...

Страница 7: ...e Through an External Audio System 153 Recording the Sounds of the Electone to an External Recorder 154 Controlling External MIDI Devices from the Electone 154 Controlling the Electone from an External Device 155 Connecting USB storage devices 155 Connection with Computer 156 Using the USB terminal 156 Using the MIDI IN OUT terminals 157 MIDI 157 What is MIDI 157 MIDI Messages of the Electone 159 ...

Страница 8: ...your performance Each rhythm contains 15 variations sections such as Main Fill In Intro Ending and Break that you can easily switch while you play to make your performance even more dynamic and professional Each rhythm has its own matching accompaniment divided into five instrument parts providing basic backing as well as embellishments Keyboard Percussion page 77 This powerful feature allows you ...

Страница 9: ...yout Overview Music Rest Upper Keyboard USB TO DEVICE A terminal Lower Keyboard MIDI IN OUT terminals USB TO DEVICE B terminal USB TO HOST terminal Right Footswitch Left Footswitch Expression Pedal Pedalboard Front Panel Jacks Speaker ...

Страница 10: ...e current settings of the Electone VOICE SECTION button page 25 Switches between Voice sections 1 and 2 UPPER KEYBOARD VOICE 1 2 page 21 Selects the Voices for Upper Keyboard LOWER KEYBOARD VOICE 1 2 page 22 Selects the Voices for Lower Keyboard KEYBOARD PERCUSSION page 77 Turns Keyboard Percussion On or Off RHYTHM CONTROL page 59 Starts and stops the rhythm and adds changes to the rhythm RHYTHM p...

Страница 11: ...75 SUSTAIN button page 49 PAGE buttons page 18 Selects the Page of the display DATA CONTROL dial page 17 Selects the setting in the display M Memory button page 97 D Disable button page 99 REGISTRATION MEORY buttons Records panel settings made on the panel and LCD MASTER VOLUME dial page 13 USB TO DEVICE A terminal page 151 Allows communication with USB flash memory devices POWER switch page 12 Fo...

Страница 12: ...lectone the following displays will appear one after the other on the LCD display This last display Voice Display shows you the currently assigned voice settings for each Voice section page 23 1 Getting Started Only use the voltage specified as correct for the Electone The required voltage is printed on the name plate of the Electone Yamaha products are manufactured specifically for the supply vol...

Страница 13: ...control that affects the volume of the entire instrument Press the Expression pedal down with your foot Once you have set the MASTER VOLUME control to a suitable level you can use the Expression pedal to change the volume with your foot as you play 3 Increases the volume Decreases the volume 4 Maximum volume Minimum volume ...

Страница 14: ... different Registrations for different music genres For example if you want to play Jazz press the 4 button For details on the Registration Menu see page 15 From this main category select the specific Registration you want to use Each Registration Menu button actually contains many hidden Registrations and only the currently selected Registration is shown in the display Select the hidden Registrat...

Страница 15: ...Pop C 40 16Beat Pop D 41 Top Gear Rock A 42 Top Gear Rock B 43 Top Gear Rock C 44 Top Gear Rock D 45 Southern Pop A 46 Southern Pop B 47 Southern Pop C 48 Southern Pop D No Regist Name 01 Organ Ballad 02 Dramatic Ballad 03 Love Ballad 04 Smooth Lead 05 Pop Ballad 06 Guitar Ballad 07 Acoustic Ballad 08 Healing Guitar 09 Chillout 10 Sweetheart 1 11 Sweetheart 2 12 Slow Easy 13 Euro Trance 14 6 8 Tra...

Страница 16: ... 15 Sound Effect 3 16 Sound Effect 4 17 Sound Effect 5 18 Sound Effect 6 19 Sound Effect 7 20 Sound Effect 8 21 Sound Effect 9 22 Sound Effect 10 23 Sound Effect 11 24 Sound Effect 12 25 Sound Effect 13 26 Sound Effect 14 27 Sound Effect 15 28 Sound Effect 16 29 Strings Combi 1 30 Strings Combi 2 31 Strings Combi 3 32 Strings Combi 4 33 Strings Combi 5 34 Strings Combi 6 35 Strings Combi 7 36 Stri...

Страница 17: ...e DATA CONTROL dial counter clockwise selects in the reverse order Similarly when the first item is reached turning the DATA CONTROL dial clockwise does not wrap around to the last item Also you can change the desired value setting by successively pressing the corresponding A D button in this case the B button The value or setting changes in steps each time the button is pressed 2 Continuously lit...

Страница 18: ...he desired Voice Rhythm button on the panel in this example the STRINGS button in Upper Keyboard Voice 1 The selected Voice Rhythm is shown in the display Select the desired Voice Rhythm by turning the DATA CONTROL dial When the final item is reached turning the DATA CONTROL dial clockwise does not wrap around to the first item Similarly when the first item is reached turning the DATA CONTROL dial...

Страница 19: ...ctone has a huge amount of available Voices and Rhythms so many that it may be difficult to find the ones you want To help you find the best Voice Rhythm for the selected instrument category we ve prepared some recommended or popular selections in that category Simply press the A B or D button while the Voice Rhythm menu is displayed to call up one of the recommended selections 4 Basic Operation S...

Страница 20: ...r important data to external media such as a USB flash memory Turn off the power While holding down the ENDING 1 button turn the power back on Release the ENDING 1 button after the Voice Display appears Confirming the Version of Your Electone You can confirm the version of your Electone by the following procedure Press the UTILITY button The Utility display appears Select Page 7 by using the PAGE ...

Страница 21: ... Voice 2 and Lead Voice Upper Keyboard Voice 1 and Upper Keyboard Voice 2 can be selected from the panel s Upper Keyboard Voice 1 2 section while the Lead Voice is selected from the Lead Voice section The Lead Voice sounds only the highest note or last note played if two or more keys are played together This makes the Lead Voices ideal for solo instruments such as Trumpet and Saxophone instruments...

Страница 22: ...Keyboard Voice 1 2 section Voices for Pedalboard Up to two different Voice sections are available on the Pedalboard for playing together Pedal Voice 1 and Pedal Voice 2 Voices for each section can be selected from the panel s Pedal Voice 1 2 section The Pedal Voice sounds one note at a time when you simultaneously press two or more keys only the highest note will sound Voices for the Lower Keyboar...

Страница 23: ... Voice section 2 To select a Voice you need to first select the desired Voice section For this reason the Voice Display actually has two separate displays one for checking the Voice selected in Voice section 1 and the other for Voice section 2 To switch between the Voice sections press the VOICE SECTION button at the top left on the panel Successive presses of the VOICE SECTION button at the top l...

Страница 24: ... shown only in the Voice section 1 display When the Voice section 2 lights up From this display you can check which Voices have been selected for Voice section 2 on each keyboard Upper Keyboard Voice 2 Lower Keyboard Voice 2 and Pedal Voice 2 The Lead Voice is not shown in this display Strings1Î Violin3 Ò Piano1 FingrBs1 Upper Keyboard Voice 1 Lower Keyboard Voice 1 Lead Voice Pedal Voice 1 Piano1...

Страница 25: ...case the Upper Keyboard Voice 1 from the panel s Upper Keyboard Voice 1 2 section The Lead Voice can be selected regardless of whether Voice section 1 or Voice section 2 is lit Press one of the Voice buttons in the Upper Keyboard Voice 1 2 section For example if you have pressed the ORGAN button the following display Voice Menu will appear 3 Selecting Voices with the Voice buttons 1 Indicates that...

Страница 26: ... volume using the Volume buttons on the panel and setting the volume in the display The Volume buttons let you make coarse adjustments to the volume while the setting in the display gives you fine control Using the VOLUME buttons on the panel coarse Press one of the Volume buttons of each Voice section on the panel to set the desired level for each Voice The controls have seven volume settings fro...

Страница 27: ...g The range of the Fine volume control is 0 24 NOTE Depending on the volume value set in the display two adjacent Volume button lamps may be lit at the same time indicating an intermediate position Reference Page Selecting from the Voice Condition display page 41 Voice Condition Display VOL 24 REV 20 1 TOUCH 8 FEET PRESET Pressing a Voice button once calls up the Voice Menu display for the selecte...

Страница 28: ...ection 2 On Off settings Press the A D buttons corresponding to the items or parameters you want to change to alternate between On and Off Selecting Off effectively mutes the sound of the corresponding Voice even when the keys are played Setting this to Off results in a Volume value of 0 If you increase the Volume by using the Volume buttons the On Off status here changes to On The On Off status f...

Страница 29: ...ect the Voice from each section by switching between sections 1 and 2 by pressing the VOICE SECTION button Each press of the VOICE SECTION button alternates between the available Voice sections 1 and 2 The lamp of the selected available Voice section number lights up 3 Selecting a Voice for Voice section 2 NOTE Switching between Voice sections 1 and 2 has no effect on which Voice is sounded by the...

Страница 30: ...n 1 lamp is lit instead press the VOICE SECTION button so that Voice section 2 lights Press one of the Voice buttons in the Upper Keyboard Voice 1 2 section Select the Voices you want to play by using the DATA CONTROL dial 1 Indicates that you can select a Voice for Voice section 2 in this case Upper Keyboard Voice 2 2 PERCUSSION 2 01 Vibraphone 1 Indicates Upper Keyboard Voice 2 is selected NOTE ...

Страница 31: ...set the Volume level specifically for Voice section 2 Now set the Voices for Lower keyboard Voice 2 and Pedal Voice 2 as you did for Upper keyboard Voice 2 above If you want to turn off the Voices of Voice section 2 set the volume level to minimum by using the Volume buttons of the selected Voice sections on the panel or select the Off status in the Voice Display when the lamp of the Voice section...

Страница 32: ...eyboards or Pedalboard You can play on the Upper Keyboard for example Voices from the sixteen Voice Menu pages including the four Voice Menu pages of the Pedal Voice section and not be limited to only the twelve buttons equivalent to twelve Voice Menu pages that make up the Upper Voice section For having two different Voices from the same Voice Menu page available for selection in the same song Fo...

Страница 33: ...ned Bell Pad 3 to be called up by User button 1 in Upper Keyboard Voice 1 You can set voices to the User buttons in any other Voice sections just as you did for Upper keyboard Voice 1 above 2 WOODWIND FLUTE 1 17 Alto Sax 1 3 PAD 1 01 Smooth Pad 1 Currently selected Page Directly selecting the category To directly select the desired category hold down one of the User buttons and simultaneously pres...

Страница 34: ...azz and country western Tonal variations include bright voices and soft ones 17 Violin 2 18 Violin 3 19 Viola Slightly larger and deeper than a violin Used for mid range parts 20 Cello Warm and deep sounds 21 Pizzicato Violin Violin sound played by plucking CONTRABASS 01 Contrabass 1 A Used for the lowest pitched parts Variations range from deep to solo type sounds 02 Contrabass 2 03 Contrabass 3 ...

Страница 35: ...nd baroque music It has a relatively hard and round sound 06 Ocarina This instrument has a long history and features a simple warm sound The pitch and the sound quality are changed by the strength of the breath 07 Whistle Recreation of a human whistling sound 08 Clarinet 1 B This instrument has a wide sound range and distinctive character with rich sound in the low end and crisp bright tones in th...

Страница 36: ...re of unique character and distinctiveness than the other synth pads and feature sweeping filter effects and other dynamic sound variations when held 06 Resonance Pad 2 07 Resonance Pad 3 08 Resonance Pad 4 B 09 Resonance Pad 5 10 Bell Pad 1 D These continuous pad voices feature gentle bell sounds There are several types of voices here including an initial bell sound as a bright bell that pulses s...

Страница 37: ...heaters skating rinks restaurants especially pizzerias and baseball stadiums 07 Theatre Organ 2 08 Accordion 1 D A versatile multi purpose instrument that has a home in a wide variety of genres including French chanson Argentinian tango polka and Tex Mex music 09 Accordion 2 10 Bandoneon This musical instrument is often used for tango and features a characteristic initial attack 11 Reed Organ This...

Страница 38: ...re connected by rod to a motor which produces the distinctive warm tremolo effect heard in some jazz music 02 Vibraphone 2 03 Marimba B This instrument is similar to the xylophone and has resonant tubes under the sound plates However the wooden keys give it a soft more organic sound and it has an especially rich lower register giving it a wide expressive range and making it useful as a solo instru...

Страница 39: ...B This traditional Japanese instrument features three strings and a small body covered with animal skin The bright slightly buzzy sound is similar to the banjo yet has a very strong Oriental flavor 07 Koto Japanese Koto 08 Taishokoto Japanese Taisho Koto 09 Erhu D Also known as the Chinese violin this is a two stringed bowed instrument capable of producing sad mysterious or joyful melodies 10 Shen...

Страница 40: ...for the entire system Controls and Effects Reference page for changing the settings Voice sections to which the controls effects are applied Upper Keyboard Lead Voice Lower Keyboard Pedal board Upper Keyboard Voice 1 2 Lead Voice Lower Keyboard Voice 1 2 Pedal board Voice 1 2 Selecting from the Voice Condition display Pages 1 6 Page 1 Volume page 42 O O O O Reverb send level page 42 O O O O Initia...

Страница 41: ...parameters You can change the items or parameters when the arrow indicator in the display is flashing Press the A D buttons corresponding to the items or parameters you want to change to make the indicator flash then use the DATA CONTROL dial to select the desired control setting With the indicator flashing you can also directly change the items or parameters by using the DATA CONTROL dial For det...

Страница 42: ... timbre according to the velocity at which you play the keys The harder you play the keys the greater the volume and the brighter the timbre will become Higher settings make the change wider The minimum setting produces no effect This function is not applied to the Pedal Voices Press the C button to make the indicator flash then use the DATA CONTROL dial to change the setting Range 0 14 4 Feet Det...

Страница 43: ...ach Voice section letting you create a warmer richer sound by slightly detuning one Voice relative to another Press the C button to make the indicator flash then use the DATA CONTROL dial to change the setting Range 64 63 3 Transpose Changes the pitch in semitones for each Voice section Press the D button to make the indicator flash then use the DATA CONTROL dial to change the setting Range 6 6 Vo...

Страница 44: ...nes the intensity of the vibrato effect Higher settings result in a more pronounced vibrato The minimum setting cancels the vibrato effect Press the B button to make the indicator flash then use the DATA CONTROL dial to change the setting Range 0 14 3 Delay Determines the amount of time that elapses between the playing of a key and the start of the vibrato effect Higher settings increase the delay...

Страница 45: ...nimated FLANGER This creates a metallic periodic sweeping effect similar to Chorus but with a brighter more resonant sound PHASER Similar to Flanger this produces rolling timbre changes and a pronounced up down filter sweep effect TREMOLO AUTO PAN This periodically changes the volume and has the effect of moving the sound image both front and back and left and right ROTARY SPEAKER This popular eff...

Страница 46: ... type so there is no need to follow the steps below unless you want to change the setting If you want to change the setting select the parameter then change the value Since selection of Parameters and setting of value follow the same procedure throughout all Effect Type instructions for only Hall 1 of Reverb are given here For details see page 52 1 Parameters Effect parameters are displayed corres...

Страница 47: ... effective within a one octave range for the Lead Voice 1 Slide On Off Determines the on off status of the Slide effect Each press of the A button toggles between On and Off 2 Slide Time Determines the speed of the slide or portamento effect The higher the value the slower the speed Press the C button to make the indicator flash then use the DATA CONTROL dial to change the setting Range 0 14 Voice...

Страница 48: ...is on 1 Type Selects the Reverb Type Press the C button to make the indicator flash then use the DATA CONTROL dial to change the setting 2 Depth Determines the depth of reverberation or the level of the reflected sounds This allows fine control over the depth When this parameter is set to the minimum the settings in Voice Condition display Page 2 page 43 have no effect Press the B button to make t...

Страница 49: ...r Pedal Voices press the corresponding D button to toggle between On and Off Sustain cannot be applied to the Lead Voices The lamp of the SUSTAIN button lights up when you turn on the Sustain effect for one of the Upper Lower and Pedal Voices in the Sustain display When you turn off the Sustain effect for all Voices in the Sustain display the lamp turns off Remember to check whether the sustain ef...

Страница 50: ...of the Rotary Speaker Press the ROTARY SP SPEED button to call up the Rotary Speaker display The settings in this display are common to all Voice sections 1 Speed Determines the speed of the speaker rotation Press the C button to make the indicator flash then use the DATA CONTROL dial to change the setting Range 2 69Hz 39 7Hz 2 Mode Determines the slow stop mode when the ROTARY SP SPEED button is ...

Страница 51: ...l the Rotary Speaker effect from the panel or from the Left Footswitch You can control Rotary Speaker on off not only from the panel but also by using the Left Footswitch if the Footswitch has been properly assigned See 4 Rotary Speaker on page 149 for details 3 ...

Страница 52: ...ec Determines the time that elapses between the original sound and the delayed repeat in the right channel C DelayTime 0 1 743 0 msec Determines the time that elapses between the original sound and the delayed repeat in the center of the stereo image L R Delay 0 1 371 5 msec Determines the time for the sound to move from left to right when using Cross Delay R L Delay 0 1 371 5 msec Determines the ...

Страница 53: ...eat in the left channel R DelayTime 0 0 50 0 msec Determines the time that elapses between the original sound and the delayed repeat in the right channel Dry Wet D63 W D W63 Determines the balance of the original sound and the effect sound No Type 01 FLANGER 1 02 FLANGER 2 03 XG FLANGER 1 04 XG FLANGER 2 05 XG FLANGER 3 06 GM FLANGER Parameter Value Description LFO Freq 0 00 39 7 Hz Determines the...

Страница 54: ... 04 ROTARY SP 3 05 ROTARY SP 4 Parameter Value Description EQ LowFreq 32 2 0k Hz Determines the central frequency of the low frequency range that is boosted or cut EQ Low Gain 12 12 dB Determines the amount over which the low frequency range is boosted or cut EQ Hi Freq 500 16k Hz Determines the central frequency of the high frequency range that is boosted or cut EQ Hi Gain 12 12 dB Determines the...

Страница 55: ...change in input The range here is 1 1 no change in output signal hence no compression to 20 1 Higher ratios result in greater compression OutputLevel 0 127 Determines the overall output of the compressed signal Use this to bring up the overall level after you ve reduced the dynamic range with compression No Type 01 ST 2BAND EQ 02 ST 3BAND EQ 03 XG 3BAND EQ 04 EQ DISCO 05 EQ TEL Parameter Value Des...

Страница 56: ...llows you to directly play drum and percussion sounds from the Upper Lower keyboards and Pedalboard A total of 133 rhythms can be instantly selected with the ten rhythm buttons on the front panel To select and play a rhythm Press one of the Rhythm buttons in the RHYTHM section on the front panel For example if you have pressed the DANCE button the following display Rhythm Menu will appear The Rhyt...

Страница 57: ...Set the volume using the panel rhythm volume buttons The buttons have seven volume settings from a minimum of 0 or no sound to a maximum of full volume Fine adjustments in the volume of the rhythm can also be made from the Rhythm Condition display page 62 2 DANCE 04 UK Pop You can select the rhythm in the Rhythm Menu display by pressing the C button one or more times Each press of the C button sel...

Страница 58: ...esigned for use as a temporary and regular rhythmic pattern to spice up a repeating rhythm There are four Fill In sections that can be played by pressing the selected lit MAIN FILL IN A D buttons as desired When one measure pattern of Fill In finishes playing the rhythm is automatically shifts to the Main section BREAK This lets you add dynamic variations and breaks in the rhythm pattern The Break...

Страница 59: ...buttons then press the START or SYNCHRO START button to actually start the rhythm While the introduction is playing the BAR BEAT display shows the countdown to the first measure of the pattern For example if there is a four measure lead in for a pattern in 4 4 time the display at right appears ENDING Pressing one of the ENDING 1 3 buttons automatically adds an ending phrase before stopping the rhy...

Страница 60: ...se the Auto Fill In function Fill Ins will be played automatically The Auto Fill In function is set in the Page 1 of the Rhythm Condition display To call up the Rhythm Condition display select the desired rhythm and press the same rhythm button again When Auto Fill is set to On in the right side of the display the Fill In pattern is automatically played whenever you switch the Main sections Each p...

Страница 61: ...to the original setting 2 TEMPO Display BAR BEAT Indicator TEMPO display shows the current tempo Displayed values are given in beats per minute The tempo range is 40 to 240 beats per minute When the rhythm begins playing the TEMPO indicator changes function to a BAR BEAT indicator The number on the left in the BAR BEAT indicator indicates the current bar or measure and the one on the right indicat...

Страница 62: ...e Fill In pattern is automatically played whenever you switch the Main sections For details on how to set to On see page 17 2 Volume Fine Adjustment of rhythm volume Press the C button to make the indicator flash then use the DATA CONTROL dial to change the setting Range 0 24 3 Reverb Determines the amount of reverb applied to the rhythm Press the D button to make the indicator flash then use the ...

Страница 63: ...e rhythms from the same category to be selected from different buttons one from the original Rhythm button and the others from the User buttons For example to call up Modern R B select the R B category Press one of the User buttons at the right of the Rhythm buttons Select one of the pages with the Page buttons In this case select Page 5 R B Select the Modern R B rhythm with the DATA CONTROL dial ...

Страница 64: ...To call up the User rhythm load back the registration containing the User rhythm to Electone in advance For details on loading back the Registration see Playing Back a Song on page 132 This procedure assigns the User rhythms to the User numbers 1 48 Press one of the User buttons at the right of the Rhythm buttons Use the PAGE buttons to select Page 11 User Page Select the User rhythm number by tur...

Страница 65: ...tons Use the PAGE buttons to select Page 11 User Page Select the User number to which you want to load back the pattern file Press the B button corresponding to FILE in the display to turn on the file loading function The File Select display appears 1 2 3 USER FILE 01 User 1 4 USER FILE 04 User 4 5 FILE SELECT Ã001 USB 01 Õ USER FILE 04 User 4 NOTE File loading cannot be done while the M D R funct...

Страница 66: ... page 111 Press the D button corresponding to the EXE in the display to load the file back to the Electone This step assigns the pattern file to the User number selected in the step 4 For details on playing back the User rhythm see To call up a User rhythm on page 64 6 FILE SELECT 001 SoftRock EXE 7 8 NOTE To play back the User rhythm first quit the File Select display ...

Страница 67: ...go 2 WORLD MUSIC 01 Bolero 02 Flamenco 03 Pop Flamenco 04 Pasodoble 05 Polka 1 A 06 Polka 2 07 Banda Polka 08 Irish Dance B 09 Tarantella 10 Enka 11 Sheriff Reggae 12 Bluegrass 13 Hoedown 14 Hawaiian D 15 Mexican Dance BALLAD 01 Power Ballad 02 Dramatic Ballad 03 Movie Ballad 04 Carpenters Pop 05 Love Song 06 16Beat Ballad 1 A 07 16Beat Ballad 2 08 Easy Ballad 09 Guitar Ballad 10 Organ Ballad 11 C...

Страница 68: ... and you can visually confirm the On Off status for all parts in Page 3 and Page 4 of the Rhythm Condition display These parts with the exception of the Main Drum and Add Drum are Accompaniment parts The Accompaniment consists of five parts Chord 1 Chord 2 Pad Phrase 1 and Phrase 2 and each of them can be set to on or off by pressing corresponding button If you turn all the parts off the Accompani...

Страница 69: ... 5 Phrase 2 These parts are used for various embellishments and riffs that enhance the song such as brass section accents and chord arpeggios To set the On Off status for Phrase 1 use the C button in Page 4 of the Rhythm Condition display for Phrase 2 use the D button Not all parts contain accompaniment data Some parts may be empty depending on the selected rhythm and rhythm section Main Drum and ...

Страница 70: ...nd volume settings 1 Volume Determines the accompaniment volume Press the C button to make the indicator flash then use the DATA CONTROL dial to change the setting Range 0 24 2 Reverb Determines the amount of reverb applied to accompaniment When the Reverb Depth for entire instrument is set to the minimum the setting here will have no effect Press the D button to make the indicator flash then use ...

Страница 71: ... C M O C button The A B C display appears Select the desired mode by turning the DATA CONTROL dial A B C Mode You can select modes in sequence Off Single Finger Fingered Chord Custom A B C by turning the DATA CONTROL dial clockwise Turning the DATA CONTROL dial counter clockwise selects in the reverse order When you start the rhythm with the SYNCHRO START button set the Lower Pedal Memory to on Wh...

Страница 72: ...y produces bass accompaniment for chords played in the Lower keyboard It allows you to use a wider range of chord types than in the Single Finger mode In the Fingered Chord mode you play full chords while the Auto Bass Chord function automatically selects the appropriate bass pattern If you play only one or two notes in the Lower keyboard the appropriate chord will sound on the basis of the previo...

Страница 73: ...ord down to keep the accompaniment going When A B C is turned off but Memory is on the auto accompaniment of the rhythmic chords and bass pattern do not sound but the sound of the Lower keyboard and or Pedalboard continues until you play the next chord bass note 1 Lower Memory When this is set to on the Lower keyboard Voices and chord accompaniment keep playing even after you release your fingers ...

Страница 74: ... C button The A B C display appears Use the PAGE buttons to select Page 2 M O C display appears Turn the M O C on Successive pressing of the C button alternates between On and Off On Produces harmonies of up to two notes in a range close to the melody played Off Cancels the Melody On Chord function Melody On Chord can be heard only when the Upper Keyboard Voice section s volume is set to the appro...

Страница 75: ...nce contains Registration Sequence data or Next Registration data these data also can be loaded and played on the ELB 01 While a rhythm is playing sequence data in the Registration data cannot be loaded Insert the media that contains the desired rhythm sequence data into the USB TO DEVICE terminal Press the MDR button and select the desired song you want to load back to Electone This is necessary ...

Страница 76: ...lternates between On and Off Use the A button for Sequence 1 B for Sequence 2 C for Sequence 3 and D for Sequence 4 Press the START button in the Rhythm section to play back the rhythm sequence Only those sequences set to On can be played Two or more rhythm sequences can be played back in succession in numeric order After playing back the solid square indication turns to a hollow square in the dis...

Страница 77: ...rn off the Upper Lower and or Pedal Voices by setting each Voice s volume to MIN Turn on the Keyboard Percussion function by pressing the Keyboard Percussion 1 or 2 button Press the 1 button to play Percussion sounds on the Upper Lower keyboards and press the 2 button for the Pedalboard Select the desired percussion kit You can select a kit from a total of 15 different kits Press the D button to m...

Страница 78: ...ard Percussion List on page 80 Changing the Keyboard Percussion volume reverb You can make settings in Page 2 of the Keyboard Percussion display Turn off the Upper Lower and or Pedal Voices by setting each Voice s volume to MIN Press the Keyboard Percussion button Use the PAGE buttons to select Page 2 of the Keyboard Percussion display 3 KBP1 PRE1 KIT Wonder 4 Reference Page On Off status of Voice...

Страница 79: ...the DATA CONTROL dial to select the kit Range 0 24 2 Reverb Determines the amount of reverb applied to the Keyboard Percussion When the Reverb depth for entire instrument is set to the minimum the setting here will have no effect Press the D button to make the indicator flash then use the DATA CONTROL dial to select the kit Range 0 24 Page 2 Keyboard Percussion Display KBP1 VOL 16 REV 8 1 2 Refere...

Страница 80: ...ht Footsteps HH Closed HH Closed Synth Tom 1 Tom 3 Puddle Cymbal Cymbal SD Rim 1 HH Open HH Open Tom 2 Tambourine Tambourine HH Close FingerSnaps FingerSnaps Tom 1 Castanet Castanet HH Open Triangle M Triangle M Ride Cym 1 Woodblock L Woodblock L Orch SD Triangle O Triangle O Crash Cym 1 Woodblock H Woodblock H SD Roll Handclap Handclap Orch Cym Jingle Bell Jingle Bell OrchCymRoll Bell Tree Bell T...

Страница 81: ...Shot H Kick Tight Kick Tight Kick Bongo H Kick Short Bongo H Side Stick Bongo L SideStick L Bongo L Snare CongaH Mute Snare Short CongaH Mute Hand Clap CongaH Open Hand Clap CongaH Open Snare Tight Conga L SnareTightH Conga L Floor Tom L Timbale H Floor Tom L Timbale H HH Closed Timbale L HH Closed Timbale L Floor Tom H Agogo H Floor Tom H Agogo H HH Pedal Agogo L HH Pedal Agogo L Low Tom Cabasa L...

Страница 82: ...t Kick Wet Kick Tight KickTight H Bongo H Kick Bongo H StickAmbien Bongo L Side Stick Bongo L SnareAmbien CongaH Mute SnareSnappy CongaH Mute Hand Clap CongaH Open Hand Clap CongaH Open SnareTight2 Conga L SnrTightSnp Conga L HybridTom 1 Timbale H Tom Room 1 Timbale H HH Closed 2 Timbale L HH Closed Timbale L HybridTom 2 Agogo H Tom Room 2 Agogo H HH Pedal 2 Agogo L HH Pedal Agogo L HybridTom 3 Ca...

Страница 83: ...t Kick 2 Kick Gate Kick Gate Bongo H KickGateHvy Bongo H Side Stick Bongo L Side Stick Bongo L Snare Rock CongaH Mute SnareNoisy2 CongaH Mute Hand Clap CongaH Open Hand Clap CongaH Open SnRockTight Conga L SnareNoisy3 Conga L Tom Rock 1 Timbale H TomElectro1 Timbale H HH Closed Timbale L HH Closed Timbale L Tom Rock 2 Agogo H TomElectro2 Agogo H HH Pedal Agogo L HH Pedal Agogo L Tom Rock 3 Cabasa ...

Страница 84: ...Sht Kick Tight Kick Analog Bongo H Kick Jazz Bongo H SideStickAn Bongo L SideStick L Bongo L SnareAnalog CongaAnlg H SnareJazz L CongaH Mute Hand Clap CongaAnlg M Hand Clap CongaH Open SnareAnlg 2 CongaAnlg L SnareJazz M Conga L TomAnalog 1 Timbale H Floor Tom L Timbale H Hat CloseAn Timbale L HH Closed Timbale L TomAnalog 2 Agogo H Floor Tom H Agogo H HatCloseAn2 Agogo L HH Pedal Agogo L TomAnalo...

Страница 85: ...hot Kick Tight Gran Cassa Kick Jazz Bongo H GranCassa M Bongo H SideStick L Bongo L Side Stick Bongo L BrushSlap 3 CongaH Mute Band Snare CongaH Mute Hand Clap CongaH Open Hand Clap CongaH Open Brush Tap 2 Conga L BandSnare 2 Conga L Tom Brush 1 Timbale H Floor Tom L Timbale H HH Closed Timbale L HH Closed Timbale L Tom Brush 2 Agogo H Floor Tom H Agogo H HH Pedal Agogo L HH Pedal Agogo L Tom Brus...

Страница 86: ...2 Door Squeak Coaster Door Slam Submarine String Slap Scratch Cut Scratch H 3 Wind Chime Phone Ring Shower Laugh Thunder Scream Wind Punch Stream Heart Beat Bubble Foot Steps Feed Fl KeyClick CarEngnIgni CarTiresSql Car Passing Car Crash Siren Train Jet Plane Starship Dog Machine Gun Horse Laser Gun Bird Tweet Explosion Firework Ghost Maou C 1 D 1 F 1 G 1 A 1 C 2 D 2 F 2 G 2 A 2 C 3 D 3 F 3 G 3 A ...

Страница 87: ...em Tak Snare Soft Katem Sak Arabic Clap Katem Tak Snare Drum Doff Tak Floor Tom L Tabla Dom HH Closed Tabla Tak 1 Floor Tom H Tabla Tik HH Pedal Tabla Tak 2 Low Tom Tabla Sak HH Open Tabla Roll Mid Tom L Tabla Flam Mid Tom H Sagat 1 Crash Cym 1 Tabel Dom High Tom Sagat 3 Ride Cym 1 Tabel Tak Crash Cym 2 Sagat 2 Duhulla Dom Rik Dom Tambourine Rik Tak 2 Duhulla Tak Rik Finger1 Cowbell Rik Tak 1 Duhu...

Страница 88: ...below drum sounds are assigned to User 1 and called up with Keyboard Percussion 1 button Turn on the Keyboard Percussion function by pressing the Keyboard Percussion 1 button The Keyboard Percussion display appears Select User 1 here Press the C button to make the indicator flash then use the DATA CONTROL dial to select User 1 Select the desired percussion kit Press the D button to make the indica...

Страница 89: ... buttons Refer to the Kit Assign List on page 93 3 Set Assigns the selected instrument to the desired key See the following explanation in step 7 4 Clear This function is used to erase the User assignment for User 1 Clear works in two ways either to erase a single instrument or to erase all instruments See the following explanation on page 91 Select the desired percussion group Press the A button ...

Страница 90: ...ch the instrument is to be assigned The currently displayed instrument will be assigned to the key you press down as a part of User 1 Repeat the operation steps above as necessary to construct your own User Keyboard Percussion set 6 BASS DRUM SET 02 BD Heavy CLR 7 NOTE Though eight User Keyboard Percussion setups can be created they cannot be memorized to Registration Memory Only on off data and t...

Страница 91: ...orresponding to CLEAR in the display The following display appears prompting confirmation of the operation You can cancel the operation at this point by pressing the D button corresponding to Cancel Press the C button to erase all data When the C button is pressed a Completed message momentarily appears on the display The Keyboard Percussion setting you have created is automatically saved when you...

Страница 92: ...Percussion Press the Keyboard Percussion button Select the desired User Keyboard percussion kit Press the C button to make the indicator flash then use the DATA CONTROL dial to select the desired User number Play some notes on the keyboards and or Pedalboard 1 2 KBP1 USER1 KIT Wonder ...

Страница 93: ...ngo Slap Bongo Mute CUICA SURDO Cuica H Cuica M Cuica L Tamborim O Tamborim M Surdo Open Surdo Mute Surdo Rim Surdo Muff TIMBALE COWBELL Timbale 1 H Timbale 1 L Timbale 2 H Timbale 2 L Timbale 3 H Timbale 3 L Timbale 4 H Timbale 4 L Cowbell 1 Cowbell 2 Cowbell 3 Cowbell 4 PERCUSSION 1 Cabasa Shaker Maracas H Maracas L Guiro Short Guiro Long WoodBlock H WoodBlock M WoodBlock L Claves Castanet Vibra...

Страница 94: ...his H SambaWhis L PERCUSSION 3 TambourineL Castanet JingleBells Bell Tree Triangle O Triangle M WoodBlock H WoodBlock L Sticks Whip Slap Finger Snap Hand Clap PERCUSSION 4 Hi Q Click Noise Scratch H Scratch L Seq Click L Seq Click H Metro Click Metro Bell CYMBAL Crash Cym 1 Crash Cym 2 Splash Cym Chinese Cym Ride Cym 1 Ride Cym 2 RideCym Cup HH Open HH Closed HH Pedal SNARE DRUM SnareSnappy SnrTig...

Страница 95: ...6 BASS DRUM Kick Analog KickAnlgSht Kick 3 PERCUSSION 1 CongaAnlg M CongaAnlg L CongaAnlg H Bongo H Bongo L Timbale H Timbale L CowbellAnlg Claves 2 Guiro Long Guiro Short Maracas 2 Vibraslap PERCUSSION 2 Surdo Mute Surdo Open Scratch H 2 Scratch L 2 Cabasa Shaker Agogo H Agogo L SambaWhis H SambaWhis L PERCUSSION 3 Tambourine Hi Q 2 JingleBells Bell Tree Triangle O Triangle M WoodBlock H WoodBloc...

Страница 96: ...aker Agogo H Agogo L SambaWhis H SambaWhis L PERCUSSION 3 Tambourine Castanet JingleBells Bell Tree Triangle O Triangle M WoodBlock H WoodBlock L Sticks Whip Slap Finger Snap Hand Clap PERCUSSION 4 Hi Q Click Noise Scratch H Scratch L Seq Click L Seq Click H Metro Click Metro Bell SFX CutingNoiz1 CutingNoiz2 String Slap Fl KeyClick Shower Thunder Wind Stream Bubble Feed Ghost Maou Dog Horse Bird T...

Страница 97: ...ons 1 8 with additional Registration Memory presets 9 16 which can also be called up easily You can of course record your own Registration settings to a numbered button but keep in mind that the preset Registration for that button will be overwritten and erased You can recall the original factory preset settings and delete your own by initializing the Registration Memory Basic Registration Your ne...

Страница 98: ...on in this case indicated as 1 8 to which you wish to save your Registration When the Registration is stored the numbered button s LED flashes momentarily Do not turn the power off while the Registration is being saved Functions and settings that cannot be memorized Pitch page 150 MIDI Control settings page 161 LCD related settings page 19 The following settings are common to all Registration Memo...

Страница 99: ... different Registration Memory buttons There may be times during your performance when you want to keep the same rhythm going even when you make Registration Memory changes Pressing the D Disable button allows you to keep the same rhythm accompaniment patterns tempo and so on throughout all your Registration changes or make your own rhythm selections if you want to When the D button is on the foll...

Страница 100: ...details on how to initialize the Electone refer to Factory Set Initializing the Electone on page 20 You can save your Registration Memory settings to an external storage device such as USB flash memory with sixteen Registrations stored to a single file For details about using other external storage devices see Chapter 6 Music Data Recorder M D R The instructions below explain how to save the Regis...

Страница 101: ...age appears indicating the Registration data is currently being saved When the operation is completed the message closes Your Registration Memory settings are saved to the external storage device with sixteen Registrations stored to a single file 3 ÃUSB 01 ___ new song 4 ÃUSB 01 ___ new song REG SAVE EXE ___ new song __ 5 REG SAVE EXE ___ new song __ REG SAVE EXE 001 SONG 1 01 Reference Pages Reca...

Страница 102: ...utton to switch to the Registration Shift Page Registration Shift has three modes Shift Jump and User These are set in the Regist Shift display by turning the DATA CONTROL dial Select each in order Shift Jump User by turning the DATA CONTROL dial clockwise Turning the DATA CONTROL dial counter clockwise selects in the reverse order The C button can also be used to select the modes 5 Registration S...

Страница 103: ...egistrations 9 16 are selected 3 Jump Pressing the Right Footswitch jumps to select the designated panel Registration Press the D button to make the indicator flash then select the Jump destination with the DATA CONTROL dial or D button 4 User In the User mode each press of the Right Footswitch selects Registrations according to the order you ve specified You can also specify an end point for the ...

Страница 104: ...ed Repeat steps 2 through 4 above to set additional numbers in the Registration order Up to 80 steps Registrations can be memorized 1 REG SHIFT MODE USER END STOP REG SHIFT INS T DEL Enter the Registration Number 2 NOTE When you want to set Registration Memory 9 16 press the desired numbered button while holding down the VOICE DISPLAY button The Voice display appears Press the FOOTSWITCH button to...

Страница 105: ...ry position to a numbered position Then press the desired Registration Memory button and press the B button corresponding to INS Insert in the display The new Registration number is inserted at the cursor position and all other numbers to the right of the cursor are moved to accommodate the new numbers Registration numbers cannot be entered beyond the Registration Shift function s capacity of 80 I...

Страница 106: ... preset is reached the next Registration data in the Song is called up This function is available only when two or more Registration data sets are saved in one Song This function is handy when you need to play a song with more than sixteen Registrations The Shift End mark Top N Next will automatically be put at the end of the Registrations you entered when Top or Next Regist is selected as the Shi...

Страница 107: ... to the ELB 01 you can play songs stored to floppy disks For information on how to install the UD FD01 see page 167 Keep in mind however that you cannot save special Protected Original Songs or the Protected Edit Songs to floppy disks For details about these protected songs see page 139 Before using a USB device read through the important section Precautions when using the USB TO DEVICE terminals ...

Страница 108: ... such as deleting or converting songs make sure to return to Page 1 Song Select display 1 Using the M D R Function NOTE If you press the MDR button even when no media is inserted into the USB TO DEVICE terminal the selection Internet appears at the bottom of the display However the Internet function is not available MDR Display Display Page Function Page 1 Song Select Select a song Page 2 Playback...

Страница 109: ...n on the panel to call up the M D R display Select the desired media you want to format To format a USB flash memory device select USB xx xx indicates the number of the device If you insert two media devices the media inserted first will be shown as USB 01 and the latter one will be shown as USB 02 Select the desired media by turning the DATA CONTROL dial or by successive pressing of the C button ...

Страница 110: ...ing to Cancel Press the C button corresponding to Format in the display to format the media When the operation is completed the LCD returns to Page 12 Format display Simultaneously press the PAGE buttons to return to Page 1 Song Select display 4 SONG SELECT Ã001 USB 01 Õ FORMAT EXE USB 01 Currently selected media name 5 OK to format Format Cancel FORMAT EXE USB 01 6 OK to format Format Cancel CAUT...

Страница 111: ...Insert the media into the USBTO DEVICE terminal then press the MDR button The Song Select display Page 1 appears In the Song Select display you can select a blank song for recording your performance or saving the Registration settings or you can select a desired song for playback 3 Selecting a Song What is a Song You can think of a song as a container for storing the Electone data for a piece of m...

Страница 112: ...display However the Internet function is not available Select a Song Press the D button corresponding to the Õ in the display to call up the desired song or folder in the selected media If the selected media has no data new song blank song will be selected automatically If the selected media contains both folders and songs the folder will be selected first and you can use the DATA CONTROL dial to ...

Страница 113: ...inkle Little Star Songs or folders in the same level can be selected in sequence by turning the DATA CONTROL dial or by successively pressing the C button ÃUSB 01 ___ new song NOTE The new song is a blank song which is automatically created in the media folder if the number of the songs in the media folder is less than 100 Reference Page Recording page 117 ÃUSB 01 001 SONG 1 Reference Pages Changi...

Страница 114: ...A CONTROL dial or successively pressing the C button Press the D button to call up the song in the FOLDER_002 at the bottom of the display In this case new song is displayed Select the desired song Twinkle Twinkle Little Star by turning the DATA CONTROL dial or by successively pressing the C button 1 SONG SELECT Ã001 USB 01 Õ ÃUSB 01 001 FOLDER_001 Õ 2 ÃUSB 01 002 FOLDER_002 Õ 3 ÃUSB 01 002 FOLDER...

Страница 115: ... Upper level folder or media This shows the upper level folder media which contains the currently selected folder song The media icon à and the folder icon shown at the top left of the display indicates the current location in the media For example à FOLDER_002 indicates that the folder named FOLDER_002 in the root directory of the media For folders deeper in the hierarchy lower than the third lev...

Страница 116: ...roups If you ve saved hundreds of songs to a USB flash memory device it may be difficult to find the desired song quickly Organizing your songs in folders with similar songs grouped together for example according to genre or tempo makes it easier to find the songs you want Songs A song is a container for storing the Electone data for a piece of music recorded to external media A single song can co...

Страница 117: ...on Press the PLAY PAUSE button The lamp above the PLAY PAUSE button lights up and a small arrow indicator flashes across from left to right at the top right of the LCD display This indicates that the M D R is reading the registrations After REC appears at the top right of the LCD display begin playing Files in the song 4 Recording File Explanation Extension Performance data This file contains perf...

Страница 118: ... starting point of the song The lamp above the PLAY PAUSE button starts flashing indicating that you can re record the song Press the PLAY PAUSE button again Re recording starts from the beginning of the song and replaces the previously recorded performance with the newly recorded performance Recording Each Part Separately You can also record the parts of your performance independently This functi...

Страница 119: ... red LEDs above the LOWER button and the PEDAL button are lit as shown in the lower illustration above Press the PLAY PAUSE button After REC appears at the top right of the LCD display begin playing Press the Stop button when you are finished with your performance to stop recording Now you ve recorded the first parts of your performance Setting up recording of the next part Upper part in this case...

Страница 120: ...d parts 7 Separately recording for Lead Voice and or Keyboard Percussion parts The Lead voice and the Keyboard Percussion can be recorded played back separately although there are no buttons for these parts Set these in the display shown in step 2 on page 119 Press the PAGE buttons to select Page 3 Press the B button to make the indicator flash then use the DATA CONTROL dial to select the status f...

Страница 121: ...at the point you want to execute punch in recording The current song is stopped momentarily Press the RECORD button The lamp above the RECORD button lights indicating that the M D R is ready to record Set the parts which you want to change to Rec status and other parts to Play Press the PLAY PAUSE button to start punch in recording Play the new phrase as you want it to be changed Press the STOP bu...

Страница 122: ...s to select the Rename display Page 4 The Rename display appears Move the cursor to the desired point by using the C D buttons Pressing the D button moves the cursor one step to the right while pressing the C button moves it to the left Change the character at the cursor position Replace the current character at the cursor by using the DATA CONTROL dial Turn it clockwise to select the characters i...

Страница 123: ... steps 4 through step 5 above to finish entering the song name Up to 36 characters can be entered After finishing press the B button corresponding to EXE Execute in the display A message appears prompting confirmation of operation You can cancel the operation at this point by pressing the D button To actually enter the change press the C button corresponding to Rename in the display The renamed so...

Страница 124: ...nsert the media into the USB TO DEVICE terminal First make all the desired Electone settings to create your original Registration An error message This name is not available may appear when pressing the C button to finish entering the name If this message appears the name is invalid and you ll need to enter a different name The following names cannot be used The letters xx indicate numbers MDR_xx ...

Страница 125: ...st make all the desired settings you want to save then select the destination blank song as you did in steps 1 and 3 above Press the RECORD button to enable recording on the M D R Press the PLAY PAUSE button to record the Registrations then press the STOP button before the REC indication is shown at the top right of the display This is the same procedure as the one shown when you start recording T...

Страница 126: ... already contains the previous Registrations For details on selecting a song see steps 2 and 3 on page 112 Use the PAGE buttons to select Page 9 Any Registration banks previously been saved to the song are indicated in the display as 01 or similar Select the blank Registration bank __ to which you want to save the additional Registration bank by using the DATA CONTROL dial You can also select the ...

Страница 127: ...sert the media into the USB TO DEVICE terminal Press the MDR button and then select the desired song containing the Registration you wish to replace For details on selecting a song see steps 2 and 3 on page 112 Use the PAGE buttons to select Page 9 The Registration bank number will be shown at the bottom right of the display Select the Registration bank number you wish to overwrite by using the DA...

Страница 128: ...ed to a song Insert the media into the USB TO DEVICE terminal Press the MDR button and then select the song containing the Registrations you wish to delete For details on selecting a song see steps 2 and 3 on page 112 Use the PAGE buttons to select the Registration Delete display Page 10 The Registration Delete display appears Select the Registration bank number you want to delete by using the DAT...

Страница 129: ...ration numbers you can have two or more Registration banks saved to a single song and recall them one by one as you play the song This function that makes this possible is called Next Regist Insert the media into the USB TO DEVICE terminal Set the Registration Shift mode to User and select Next as the Shift End in Page 1 of the Registration Shift display In Page 2 set the Use Registration order Fo...

Страница 130: ...istration order in Page 2 of the Registration Shift display As you play the Electone press the Right Footswitch Each press of the Right Footswitch selects Registrations according to the order you ve specified After finishing the play back of the 01 the next Registration bank 02 begins loading automatically and can be selected by pressing the Right Footswitch 5 6 7 8 Expression Pedal Right Footswit...

Страница 131: ...g a song see steps 2 and 3 on page 112 Use the PAGE buttons to select the Registration Load display Page 8 Select the Registration bank you want to load to the Electone Select the desired Registration bank number by turning the DATA CONTROL dial Press the B button corresponding to EXE Execute in the display A message appears indicating the Registration data is currently being loaded After the Regi...

Страница 132: ...fter reading the Registration data The elapsed time will be showed on the display and song playback starts if the song contains performance data In general all parts recorded to the song are played back however you can mute specific parts and playback only selected parts page 133 When the end of the recorded performance is reached playback automatically stops You can however stop playback in the m...

Страница 133: ...ected part s Before or during playback press each part button to turn the part you want to playback to Play and the part you want to mute to Off Custom Play If you want to play back the song without resetting the Registrations press the CUSTOM PLAY button instead of the PLAY PAUSE button This displays the song time and starts playback immediately When you play the song using the Next Regist functi...

Страница 134: ...g the Tempo You can change the tempo of the song as the song is playing in the M D R display either while the song is stopped or while it is playing The TEMPO buttons on the panel cannot be used to change the tempo for the Music Data Recorder To Change the Tempo Press the MDR button The Song Select display appears Select the song to be played back See steps 2 and 3 on page 112 for instructions on ...

Страница 135: ...ayback Setting display Page 2 The Repeat mode is shown at the bottom right of the display Select the repeat mode Press the D button to make the indicator flash then use the DATA CONTROL dial to select the setting 1 Off Cancels repeat playback 2 All Repeats all songs in the currently selected folder in order 3 Single Repeats the currently selected song indefinitely 4 Random Repeats all songs in the...

Страница 136: ...L to specify the part to mute play or to change the volume Press the A button to make the indicator flash then use the DATA CONTROL dial to select the setting 2 Playback Off Sets the selected part for playback or mute off Select Play for the part you want to play back and select Off for the part you want to mute Press the B button to make the indicator flash then use the DATA CONTROL dial to selec...

Страница 137: ...tination media in advance If memory space is insufficient or if the folder already contains 100 songs Song Copy is not available Insert the media into the USB TO DEVICE terminal If you want to copy the song between two different media you will need to insert the appropriate destination media Press the MDR button then select the song to be copied See steps 2 and 3 on page 112 for instructions on se...

Страница 138: ... folder Press the D button to execute Song Copy When the operation is completed the LCD returns to the Copy display The name of the destination song is the same as the one of the source song except that is attached at the beginning not including XG songs For instructions on changing the song name see page 122 About Copying Protected Songs Protected Original songs or Protected Edit songs can be cop...

Страница 139: ...ed song can be played back in the same way as songs you ve created but it cannot be converted to XG format or EL format Registration data in the Protected song cannot be edited nor can the performance data be overwritten If you want to edit a Protected song first copy it within one media folder then edit the copy You cannot copy to another media folder The copied song called Protected Edit song is...

Страница 140: ...sing both PAGE buttons simultaneously Creating folders Insert the media then press the MDR button Select the media folder in which you want to create the folder then press the D button Use the PAGE buttons to select the Create Folder display Page 11 Press the B button corresponding to EXE Execute in the display To see the newly created folder first return to Page 1 by pressing both PAGE buttons si...

Страница 141: ...the Convert operation is not available Insert the media containing the song created with the Electone and the floppy disk as the destination Press the MDR button then select the song to be converted to the EL series format See steps 2 and 3 on page 112 for instructions on selecting songs Use the PAGE buttons to select the Convert display Page 7 Select the conversion format Select EL by using the D...

Страница 142: ...t songs to ELB You can convert the songs in a floppy disk created with an EL series Electone such as the EL 900 to the ELB 01 format and save it to a USB flash memory device The songs in write protected or copy protected media for the EL series can be converted only one time To use a floppy disk you ll need to install the optional UD FD01 floppy disk drive Depending on the original song data the s...

Страница 143: ...t display Page 7 Press the B button corresponding to EXE Execute in the display The Convert Destination display appears Select the blank song as the destination in the USB flash memory device Press the D button corresponding to EXE Execute in the display A message appears prompting confirmation of operation You can cancel the operation at this point by pressing the D button Press the C button corr...

Страница 144: ...ecting songs Use the PAGE buttons to select the Convert display Page 7 Select the conversion format Select XG by using the DATA CONTROL dial or successively pressing the A button Press the B button corresponding to EXE Execute in the display The Convert Destination display appears Select the blank song as destination Press the D button corresponding to EXE Execute in the display A message will app...

Страница 145: ...u can check the remaining memory in the media Insert the media and press the MDR button Select the desired media by using the DATA CONTROL dial or by successively pressing the C button Use the PAGE buttons to select Page 13 The remaining memory is displayed 1 2 3 REMAIN USB 01 xx xx MB ...

Страница 146: ...itch can be set to control one of three functions Rhythm Glide or Rotary Speaker Instructions for setting the Left Footswitch in the Footswitch Page are given here For details on the Registration Shift function and Right Footswitch see Registration Shift on page 102 Press the FOOTSWITCH button Left Footswitch Right Footswitch Expression Pedal Left Footswitch 1 REG SHIFT MODE OFF NOTE Pressing the ...

Страница 147: ...1 Off The Left Footswitch will not control any function 2 Rhythm When this is selected one of the control settings appears at the right bottom of the display Press the D button to make the indicator flash then use the DATA CONTROL Dial to select the desired control setting 2 1 Stop Switches the rhythm on off whenever you press the Left Footswitch 2 2 Break This function corresponds to the BREAK bu...

Страница 148: ...NG1 is selected in this display and you press the Left Footswitch the rhythm section is switched to Ending 1 After the ending pattern is played the rhythm stops 3 Glide This lets you control the Glide effect by using the Left Footswitch Pressing the Left Footswitch immediately lowers the pitch of the selected Voice or Voices by a half step and releasing it slowly returns the pitch to the original ...

Страница 149: ...n to make the indicator flash then use the DATA CONTROL dial to change the setting Range 1 5 4 Rotary Speaker You can control the Rotary Speaker effect on off by using the Left Footswitch When the ROTARY SPEAKER is selected in this display and you press the Footswitch the Rotary Speaker effect is switched on or off This function corresponds to the ROTARY SP SPEED button on the panel To use this fu...

Страница 150: ... coarse pitch setting of all the Voices and is adjustable in half steps semitones Press the C button to make the indicator flash then use the DATA CONTROL Dial to change the setting Range 6 6 2 Pitch Determines the fine pitch setting of all the Voices Each step changes the pitch by 0 2 Hz The default Pitch setting is 440 0 Hz corresponding to key A3 Press the D button to make the indicator flash t...

Страница 151: ...plifier speaker The output level is fixed and cannot be controlled 2 PHONES jack For connection of a stereo headphone set When headphones are connected to this jack sound to the Electone s built in speaker system is automatically cut off allowing you to play without disturbing others 3 USB TO DEVICE A terminal For connecting USB storage devices such as Flash Memory 1 Accessory Jacks and Controls 1...

Страница 152: ...t an appropriate USB MIDI driver is installed to the computer 6 USB TO DEVICE B terminal For connecting USB storage devices such as Flash Memory 4 5 6 Reference Pages Controlling External MIDI Devices from the Electone page 154 Controlling the Electone from an External Device page 155 Connection with Computer page 156 What is MIDI page 157 Reference Page Connection with Computer page 156 USB USB i...

Страница 153: ...e AUX OUT jacks RCA you can connect your Electone to external speakers 2 Connection Examples External Devices Before connecting the Electone to other electronic components turn off the power to all the components Before turning the power of the components on or off set all volume levels to minimum 0 Otherwise electrical shock or damage to the components may occur PHONES AUX OUT L R Speaker Left Sp...

Страница 154: ...e channels of the MIDI keyboard must match the transmit channels on your Electone The Electone transmits a variety of performance messages along with note information as digital data including values that indicate how far the expression pedal is pressed down and how hard you play the keyboard How the connected external device responds to these messages depends on the particular device MIDI termina...

Страница 155: ...UCTION SYNTHESIZER MIDI keyboard or synthesizer MIDI cable MIDI messages NOTE When you are using the M D R MIDI data cannot be received Reference Pages Installing the Floppy Disk Drive page 167 Formatting External Media page 109 NOTE If necessary use a USB hub Only self powered battery or external power supply types can be used USB hubs of up to two levels can be used Precautions when using the US...

Страница 156: ...iver software from the Yamaha web site at http music yamaha com download NOTE When you are using the M D R MIDI data cannot be transferred to from the computer Precautions when using the USB TO HOST terminals When connecting the computer to the USB TO HOST terminal make sure to observe the following points Failing to do so may result in freezing of the computer corrupting data and even losing data...

Страница 157: ...rument In the world today these are the two main categories of instruments Let s consider a grand piano and a classical guitar as representative acoustic instruments They are easy to understand With the piano you strike a key and a hammer inside hits some strings and plays a note With the guitar you directly pluck a string and the note sounds But how does a digital instrument go about playing a no...

Страница 158: ...nd when was it released Then each piece of information is changed into a number value and sent to the tone generator Using these numbers as a basis the tone generator plays the stored sampled note Example of Keyboard Information As described above your keyboard performance and panel operations such as Voice selection are handled as MIDI events All rhythm related data including rhythm patterns auto...

Страница 159: ...ed when a key is released Velocity Indicates how strongly the key is played The range is 1 127 For more detailed information see MIDI Data Format on page 168 and MIDI Implementation Chart on page 178 Program Change Program Change messages allow you to change Voices in the middle of a song With these messages you can change the Registrations of the Electone For more detailed information see MIDI Da...

Страница 160: ...IDI Transmit Channel via a single MIDI cable to the receiving instrument If the receiving instrument s MIDI channel MIDI Receive Channel matches the Transmit Channel the receiving instrument will sound according to the data sent by the transmitting instrument The receive channel of the Electone is fixed at channel 1 for the Upper Keyboard channel 2 for the Lower Keyboard and channel 3 for the Peda...

Страница 161: ...sh then use the DATA CONTROL dial to select the setting Internal The Lead Voice is played from the Upper Keyboard of the Electone If the To Lower function is on it is played from Lower Keyboard External The Lead Voice is played from the connected instrument via MIDI channel 4 2 Synchro Determines the source of the timing control for rhythm synchronization purposes Press the C button to make the in...

Страница 162: ...n each keyboard will be sent on the channels set here You must set the transmit channel here to match the receive channel of the connected device 1 Upper Keyboard You can select the channel for the Upper Keyboard Press the B button to make the indicator flash then use the DATA CONTROL dial to select the setting 2 Lower Keyboard You can select the channel for the Lower Keyboard Press the C button t...

Страница 163: ...arts in the correct direction by following the procedures given below Be sure to assemble the Electone with two or more people Don t use any screws other than the ones specified and included in this package Use of incorrect screws can cause damage and malfunction Be sure to tighten all screws upon completing assembly Make sure to perform all assembly operations on a flat surface To disassemble rev...

Страница 164: ...nger s between the Speaker unit and Sideboard 4 3 While holding the Sideboard s to the Speaker unit fasten the four short screws from the rear to secure the Speaker unit to the Sideboards Cover the four screw holes on the rear side with the corresponding screw caps Mount the Main Unit 5 1 As shown in the illustration hold the Main unit horizontally with two people and place it on the front side of...

Страница 165: ... that the latches on each plug of the cords face toward you and connect them to each socket securely Fix the Pedalboard cord to the Sideboard using the Pedalboard cord clamps 8 1 Affix the two Pedalboard cord clamps to the rear side of the Speaker unit and the lower inside of the Left Sideboard as shown in the illustration 8 2 Insert the Pedalboard cord in the clamps Long screw Long screw 6 Fasten...

Страница 166: ... check the following items Are there any parts left over Review all assembly procedures Is the Electone clear of doors and other movable fixtures Move the Electone to an appropriate location Does the Electone make a rattling noise when you shake it Tighten all screws Can the Electone be turned on Confirm that the AC power cord plug is securely connected to an appropriate power outlet Does the Elec...

Страница 167: ... Phillips head screwdriver ready Remove the three backing papers from the adhesive tape in the case and fit the floppy disk drive into the case Fold the USB cable inside the case as shown Attach the drive and case assembly to the right underside of the instrument using the included four screws 4 mm x 10 mm Connect the USB cable to the USB TO DEVICE B terminal Installing Optional Hardware 1 Dual si...

Страница 168: ... Pan 5 14ch XG Bn 0B 00 7F Expression 16ch 5 14ch 16ch Control XG Bn 40 00 7F Hold 5 14ch XG Bn 41 00 7F Portamento 5 14ch XG Bn 42 00 7F Sostenuto 5 14ch XG Bn 43 00 7F Soft Pedal 5 14ch XG Bn 47 00 7F Resonance 5 14ch XG Bn 48 00 7F Release Time 5 14ch XG Bn 49 00 7F Attack Time 5 14ch XG Bn 4A 00 7F Brightness 5 14ch XG Bn 4B 00 7F Decay Time 5 14ch XG Bn 4C 00 7F Vibrato Rate 5 14ch XG Bn 4D 0...

Страница 169: ...n 00 00 7F Bn 20 00 7F Bank select 1 16ch Bn 01 00 7F Modulation 1 16ch Bn 04 00 7F 2nd Expression Bn 05 00 7F Portamento Time 1 16ch Bn 06 00 7F Bn 26 00 7F Data Entry 1 16ch Bn 07 00 7F Volume 1 16ch Bn 0A 00 7F Pan 1 16ch Bn 0B 00 7F Expression 1 16ch 16ch Control Bn 40 00 7F Hold 1 16ch Bn 41 00 7F Portamento 1 16ch Bn 42 00 7F Sostenuto 1 16ch Bn 43 00 7F Soft Pedal 1 16ch Bn 47 00 7F Resonan...

Страница 170: ...ntrol Dn 00 7F After Touch 1 16ch 1ch 2ch 3ch UK LK PEDAL En 00 7F 00 7F Pitch Bend 1 16ch Code Hexadecimal Function Receive Transmit Remarks EL mode XG mode F8 Clock Ø Ø FA Start Ø Ø FC Stop Ø Ø FE Active Sensing Ø Ø Ø FF Reset Code Hexadecimal Message Receive Transmit F0 7F 7F 04 01 SS TT F7 XN GM2 Master Volume Ø F0 7F 7F 04 03 SS TT F7 XN GM2 Master Fine Tuning Ø F0 7F 7F 04 04 00 TT F7 XN GM2...

Страница 171: ...essage Receive Transmit F0 43 73 01 02 F7 03 Request for Internal Synch Mode Request for External Synch Mode Ø Ø Code Hexadecimal Message Receive Transmit F0 43 60 7A F7 Rhythm Start Ø F0 43 60 7D F7 Rhythm Stop Ø Code Hexadecimal Message Receive Transmit F0 43 70 70 00 data F7 78 ID Bulk Dump Data Ø Ø Ø Ø F0 43 70 ID 00 F7 Model ID Data Ø F0 43 70 70 30 F7 Request to Send Model ID Data Ø F0 43 70...

Страница 172: ...00 MAX 7F MIN 18 Pedal Voice 2 Volume Ø 00 7F Ø 00 7F Volume Data 00 MAX 7F MIN 1A Percussion Volume Ø 00 7F Ø 00 7F Volume Data 00 MAX 7F MIN 1B Reverb Depth Ø 00 7F Ø 00 7F Depth Data 00 MAX 7F MIN cc Switch dd Remarks Code Receive Rx Range Transmit Tx Range 36 Lead Voice 1 To Lower TO LOWER Ø 00 01 Ø 00 01 00 OFF 01 ON 37 Pedal Voice 1 To Lower TO LOWER Ø 00 01 Ø 00 01 00 OFF 01 ON 38 Pedal Voi...

Страница 173: ... 1 00 7F Volume 00 MIN 7F MAX Ø 00 7F 10 00 07 12 1 00 7F Reverb Send Level 00 MIN 7F MAX Ø 00 7F Ø 00 7F 10 00 07 14 1 00 04 Feet 00 PRESET 01 16 02 8 03 4 04 2 Ø 00 7F Ø 00 04 10 00 07 15 1 00 7F Pan 00 LEFT 40 CENTER 7F RIGHT Ø 00 7F Ø 08 78 10 00 07 16 1 00 7F Touch Tone Initial Touch 00 MIN 7F MAX Ø 00 7F Ø 00 7F 10 00 07 19 1 00 7F User Vibrato 00 PRESET 01 USER Ø 00 7F Ø 00 01 10 00 07 1A 1...

Страница 174: ...ameter 8 MSB LSB 0000 7F7F 0000 7F7F 0000 7F7F 10 00 07 49 2 0000 7F7F Effect 1 Parameter 9 MSB LSB 0000 7F7F 0000 7F7F 0000 7F7F 10 00 07 4A 2 0000 7F7F Effect 1 Parameter 10 MSB LSB 0000 7F7F 0000 7F7F 0000 7F7F 10 00 07 4B 2 0000 7F7F Effect 1 Parameter 11 0000 7F7F 0000 7F7F 0000 7F7F 10 00 07 4C 2 0000 7F7F Effect 1 Parameter 12 0000 7F7F 0000 7F7F 0000 7F7F 10 00 07 4D 2 0000 7F7F Effect 1 P...

Страница 175: ...ff 00 OFF 01 ON Ø 00 7F Ø 00 01 13 00 17 1 00 7F Chord 1 On Off 00 OFF 01 ON Ø 00 7F Ø 00 01 13 00 18 1 00 7F Chord 2 On Off 00 OFF 01 ON Ø 00 7F Ø 00 01 13 00 19 1 00 7F Pad On Off 00 OFF 01 ON Ø 00 7F Ø 00 01 13 00 1A 1 00 7F Phrase 1 On Off 00 OFF 01 ON Ø 00 7F Ø 00 01 13 00 1B 1 00 7F Phrase 2 On Off 00 OFF 01 ON Ø 00 7F Ø 00 01 13 00 1C 1 00 7F Auto Fill On Off 00 OFF 01 ON Ø 00 7F Ø 00 01 Ad...

Страница 176: ... 00 7F Ø 00 01 13 05 18 1 00 7F Break On Off 00 OFF 01 ON Ø 00 7F Ø 00 01 13 05 20 1 00 7F Ending 1 On Off 00 OFF 01 ON Ø 00 7F Ø 00 01 13 05 21 1 00 7F Ending 2 On Off 00 OFF 01 ON Ø 00 7F Ø 00 01 13 05 22 1 00 7F Ending 3 On Off 00 OFF 01 ON Ø 00 7F Ø 00 01 Address Size Data Parameter Data Receive Rx Range Transmit Tx Range hh mm ll 13 10 11 1 00 7F Volume 00 MIN 7F MAX Ø 00 7F Ø 00 7F 13 10 12 ...

Страница 177: ...00 7F Ø 00 45 14 01 02 3 00 00 7F 00 7F Reverb Type Panel 00 00 7F 00 7F Ø 00 00 7F 00 7F Ø 00 00 7F 00 7F Address Size Data Parameter Data Receive Rx Range Transmit Tx Range hh mm ll 14 03 00 1 00 7F Rotary Speaker Speed On Off 00 OFF 01 ON Ø 00 7F 14 03 01 1 00 7F Rotary Speaker Speed Control Mode 00 STOP 01 SLOW Ø 00 7F Ø 00 01 14 03 02 2 0000 007F Rotary Speaker Speed Control Speed 0000 SLOW 0...

Страница 178: ...27 9nH v 0 or 8nH Ø 5 Ø Ø 5 Ø 5 Ø 6 Ø 5 Ø 5 6 Ø 5 Ø 5 Ø 5 Ø 5 Ø 5 Ø 10 Ø 8 Ø Ø 120 5 Ø 121 5 Ø 123 127 5 Ø Mode 3 0 127 4 Ø Ø 5 Bank Select 2nd Expression Data Entry Expression Data Entry SW Sound Controller NRPN RPN FAH FCH Ø Yes No Date 03 Mar 2005 Version 1 00 YAMAHA Electone EL mode Model ELB 01 Mode 2 OMNI ON MONO Mode 4 OMNI OFF MONO Transmitted Function Recognized Remarks Basic Channel Note...

Страница 179: ... NRPN RPN Date 03 Mar 2005 Version 1 00 YAMAHA Electone XG mode Model ELB 01 Mode 1 OMNI ON POLY Mode 3 OMNI OFF POLY Ø Yes No Mode 2 OMNI ON MONO Mode 4 OMNI OFF MONO Ø Ø 120 Ø 121 Ø 123 127 Ø Transmitted 1 Function Recognized Remarks Basic Channel Note Number Velocity After Touch Pitch Bend Control Change Program Change System Exclusive System Common System Real Time Aux Messages Notes Mode Defa...

Страница 180: ... the Voice section 2 sounds as for the Lower Keyboard or Pedalboard Turn off the Voice of the Voice section 2 in the Voice display or set the volume setting to minimum after switching to the Voice section 2 page 29 As for the Upper Keyboard the Lead Voice may sound in addition to the Voice of the Voice section 2 Turn off the Lead Voice in the Voice display after switching to the Voice section 2 Th...

Страница 181: ...e memorized Refer to page 98 MUSIC DATA RECORDER Recording or playback cannot be performed The part buttons may have been turned off Turn the desired part to REC or PLAY The performance data is too large The maximum limit for recording performance data is 1 MB The media is write protected Cancel the write protect The media folder may contain EL format songs You cannot record to the media folder th...

Страница 182: ...ts Main Drum Add Drum Sections Intro 1 3 Ending 1 3 Main Fill In A D Break Auto Fill ACCOMPANIMENT Accompaniment Parts Chord 1 Chord 2 Pad Phrase1 Phrase 2 Auto Bass Chord OFF Single Finger Fingered Chord Custom A B C Memory Lower Pedal Melody On Chord KEYBOARD PERCUSSION Settings Preset 1 2 User 1 8 Kits Wonderland Kit EL Standard Kit 1 2 Hit Room Rock Electro Analog Jazz Brush Symphony SFX1 2 Ar...

Страница 183: ...45 Effect List 52 Effect Parameters 46 52 Effect Type Voice 46 ENDING 58 EQ ENHANCER 45 55 Expression Pedal 162 Expression pedal 13 F Factory Set 20 Fast Forward 134 Feet 42 File 116 FILL IN 58 Fingered Chord 72 FLANGER 45 53 floppy disk 107 Folder 113 116 Folder Delete 139 Folder Name 122 FOOTSWITCH 102 146 Footswitch Left 146 Footswitch Right 102 Format M D R 109 G Glide 148 H Headphones 153 I I...

Страница 184: ...tion 45 Rewind 134 Rhythm 56 Rhythm buttons 56 Rhythm Condition 62 RHYTHM CONTROL Panel 10 Rhythm List 67 Rhythm Menu 56 Rhythm Sequence 75 ROTARY SP SPEED 50 ROTARY SPEAKER 45 54 Rotary Speaker 50 S section 58 Shift Registration Shift 103 Shift End 106 Single Finger 72 Slide 47 Song 111 116 Song Copy 137 Song Delete 139 Song Name 122 Specifications 182 Speed Rotary Speaker 50 Speed Vibrato 44 STA...

Страница 185: ...01 Owner s Manual 185 Appendix 10 VOICE SECTION 25 Voice section 1 25 Voices 21 Volume Accompaniment 70 Volume Keyboard Percussion 78 Volume Rhythm 57 62 Volume Voice 26 42 Volume XG 136 W WAH 45 54 X XG 5 ...

Страница 186: ...Memo ...

Страница 187: ...730 Herlev Denmark Tel 44 92 49 00 FINLAND F Musiikki Oy Kluuvikatu 6 P O Box 260 SF 00101 Helsinki Finland Tel 09 618511 NORWAY Norsk filial av Yamaha Scandinavia AB Grini Næringspark 1 N 1345 Østerås Norway Tel 67 16 77 70 ICELAND Skifan HF Skeifan 17 P O Box 8120 IS 128 Reykjavik Iceland Tel 525 5000 OTHER EUROPEAN COUNTRIES Yamaha Music Central Europe GmbH Siemensstraße 22 34 25462 Rellingen G...

Страница 188: ...U R G Pro Audio Digital Musical Instrument Division Yamaha Corporation 2005 Yamaha Corporation WF12580 512MWAP3 3 02B0 Printed in China Yamaha Manual Library http www yamaha co jp manual ...

Отзывы: