background image

Getting Started

8

Home theater

º

Settings for your Home Theater

¤

1 If you have connected an AV amplifier with built-in Dolby Pro Logic decoder, you may need to connect center and rear speakers.

¤

2 Connect speakers if necessary and make the speaker settings on the amplifier.

º

Upgrading your television

³

You can connect CRT projectors, LCD projectors, and projection televisions.

³

See “Connection to a television” (

á

 pages 12 and 13) for details on connection.

Note

³

The equipment connections described are examples.

³

Peripheral equipment and optional cables sold separately unless otherwise indicated.

º

Before connections

³

Ensure that this player and other equipment to be connected are switched to the standby mode or off and disconnect the AC power supply cord
before commencing connection.

³

Do not block ventilation holes of any of the equipment and arrange them so that air can circulate freely.

³

Read through the instructions before connecting other equipment.

³

Ensure that you observe the color coding when connecting audio and video cables.

Note

³

TV volume may be lower when playing DVDs than during television broadcasts. Turn the volume up while playing DVDs and reduce it to the
previous level 

before

 switching the source back to television to avoid sudden changes in volume.

³

When you have finished connection, select the appropriate screen type at the initial setting “6 TV Aspect” according to your television (4:3/16:9)
(

á

 page 31). No changes are needed if you connect the player to a conventional television (4:3).

Conserving power

³

The unit consumes approx. 2.0 W even when it is turned off with [STANDBY/ON]. To save power when the unit is not to be used for a long time,
unplug it from the household AC outlet.

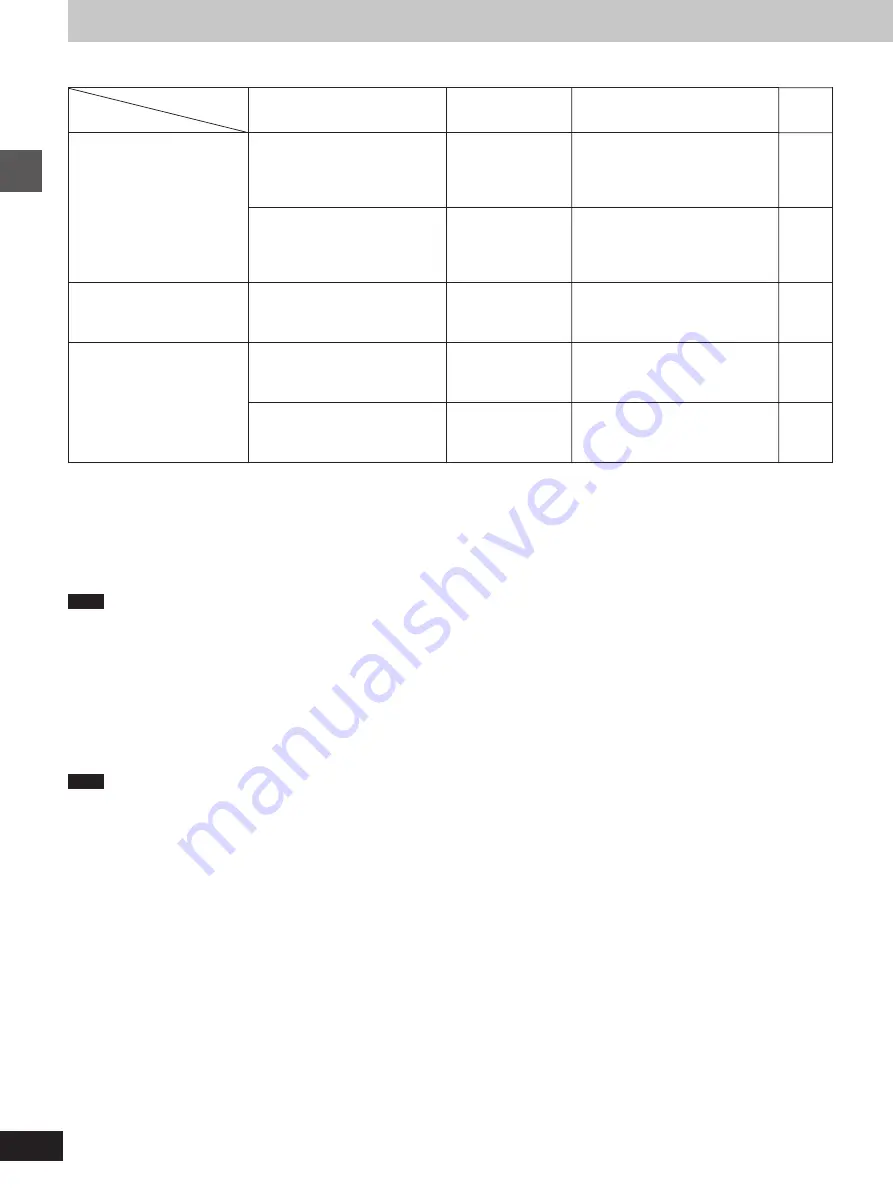
Set up

System

To enjoy 5.1 channel
surround sound

To enjoy Dolby surround
sound

¤

1

To enjoy linear PCM sound

Equipment to be connected

AV amplifier with digital input and
built-in Dolby Digital/DTS decoder

AV amplifier with digital input and
built-in Dolby Digital decoder
(without DTS decoder)

AV amplifier with built-in Dolby
Pro Logic decoder

Stereo amplifier with digital input
and built-in high sampling DA
converter rated at 96 kHz

Stereo amplifier with digital input
and built-in conventional DA
converter

Speakers

³

Main L/R

³

Center

¤

2

³

Rear L/R

¤

2

³

Subwoofer

¤

2

³

Main L/R

³

Center

¤

2

³

Rear L/R

¤

2

³

Subwoofer

¤

2

³

Main L/R

³

Center

³

Rear L/R

Main L/R

Main L/R

Settings in

“7 Digital Audio Output”

1. PCM down Conversion

“Yes”

2. Dolby Digital

“Bitstream”

3. DTS

“Bitstream”

1. PCM down Conversion

“Yes”

2. Dolby Digital

“Bitstream”

3. DTS

“Off”

1. PCM down Conversion

“Yes”

2. Dolby Digital

“PCM”

3. DTS

“Off”

1. PCM down Conversion

“No”

2. Dolby Digital

“PCM”

3. DTS

“Off”

1. PCM down Conversion

“Yes”

2. Dolby Digital

“PCM”

3. DTS

“Off”

Page

9

9

10

11

11

Содержание DVD-S796

Страница 1: ... S796 Operating Instructions DVD Video CD CD Player Before connecting operating or adjusting this product please read these instructions completely Please keep this manual for future reference VQT8677 1 U ...

Страница 2: ...am play 23 Random play 24 Using On Screen Menu Icons 25 Common procedures 25 Detailed descriptions of each icon 26 Changing initial settings 28 Common procedures 28 1 Disc Languages 29 2 Ratings 30 3 Menu Language 31 4 On Screen Messages 31 5 FL Display 31 6 TV Aspect 31 7 Digital Audio Output 32 9 Other Settings 34 How different kinds of software appear on your television 35 For Your Reference Tr...

Страница 3: ...CEABLE PARTS INSIDE REFER SERVICING TO QUALI FIED SERVICE PERSONNEL Note Use this player only in areas with the same power supply Units for the U S A and Canada AC 120 V 60 Hz SAFETY INFORMATION CAUTION DVD VIDEO CD CD PLAYER IS A CLASS 1 LASER PRODUCT HOWEVER THIS DVD VIDEO CD CD PLAYER USES A VISIBLE LASER BEAM WHICH COULD CAUSE HAZARDOUS RADIATION EXPO SURE IF DIRECTED BE SURE TO OPERATE THE DV...

Страница 4: ... product is found to be the source of interference which can be determined by turning the unit OFF and ON please try to eliminate the problem by using one of the following measures Relocate either this product or the device that is being affected by the interference Utilize power outlets that are on different branch circuit breaker or fuse circuits or install AC line filter s In the case of radio ...

Страница 5: ...ks from the batteries consult your dealer Wash thoroughly with water if electrolyte comes in contact with any part of your body B Correct method of use Operation notes Do not place obstacles between the remote control signal sensor and remote control unit Do not expose the remote control signal sensor to direct sunlight or to the bright light of a fluorescent light Take care to keep the remote con...

Страница 6: ...sections chapters The numbers allocated to these sections are called title numbers and chapter numbers Track VCD CD Video CDs and CDs are divided up into sections called tracks and the numbers allocated to these sections are called track numbers Playback control VCD If a Video CD has playback control written on its disc or jacket it means that particular scenes or information can be selected for v...

Страница 7: ...en the RESUME function is ON Illuminates during repeat play Illuminates in the still picture pause mode Elapsed playing time from the start of the title track during play Audio channel information recorded in the disc being played back e g 2ch or 5 1ch A A DVD is loaded B It is possible to change the angle DVD C Illuminates during program play VCD CD D Title chapter number DVD Track number VCD CD ...

Страница 8: ...en changes in volume When you have finished connection select the appropriate screen type at the initial setting 6 TV Aspect according to your television 4 3 16 9 á page 31 No changes are needed if you connect the player to a conventional television 4 3 Conserving power The unit consumes approx 2 0 W even when it is turned off with STANDBY ON To save power when the unit is not to be used for a lon...

Страница 9: ...ker You can connect from 3 to 5 speakers including the main two Main speaker L R Center speaker Rear speaker L R Subwoofer Note when connecting the optical fiber cable Remove the dust protection cap from the optical digital audio output terminal and connect the cable firmly so that the configurations of both the cable and the terminal match Keep the dust protection cap and reattach when not using ...

Страница 10: ...ect an AV amplifier with built in Dolby Pro Logic decoder you will also need to connect center and rear speakers to enjoy surround sound Read the instructions for the equipment for connection details Turn off V S S á page 21 and subwoofer output á item C on page 27 Dolby Pro Logic will not function correctly if they are on º If connecting audio equipment which has no subwoofer output terminal Ampl...

Страница 11: ... cap Align the plug with the terminal Remove the dust protection cap from the optical digital audio output terminal and connect the cable firmly so that the configurations of both the cable and the terminal match Keep the dust protection cap and reattach when not using the terminal Optical fiber cable Do not bend the optical fiber cable when connecting it System component or amplifier with digital...

Страница 12: ...n through a video cas sette recorder the picture may not be played back correctly due to the copy guard So we strongly recommend you do not con nect the player to your video cassette recorder when setting up your home entertainment system Connect to the television section if you connect the player to a combined television video player Do not place the player on amplifiers or other equipment which ...

Страница 13: ... output the color difference signals PB PR and luminance signal Y separately in order to achieve high fidelity in reproducing colors The description of the component video input terminals depends on the television or monitor e g Y PB PR Y B Y R Y Y CB CR and so on Connect to terminals of the same color Television Audio video cable included Video cable Back of the player Connecting to a television ...

Страница 14: ...c tray Insert inside the guides Do not load more than one disc 4 Press 1 The disc tray is automatically closed and play begins When a menu screen appears on the A TV monitor Press the cursor buttons 3 4 2 1 and press ENTER or press the numeric buttons to select the item Play of the selected item now begins The cursor buttons are not effective for selecting items for Video CDs º Other buttons used ...

Страница 15: ... during playback This feature remains active if the player is switched to the standby mode and then turned back ON C Chapter preview function DVD This function plays the first few seconds of each chapter from the beginning of the title up to the point where operation was stopped This makes it possible to review previous chapters 1 Press 1 while is flashing on the FL display The message illustrated...

Страница 16: ...le paused For your reference When 9 SKIP or SKIP 9 on the player is pressed during menu play of Video CDs with playback control a menu screen may sometimes be recalled C Frame advance Frame reverse DVD VCD Press the cursor buttons 2 1 while paused The disc is advanced reversed by one frame each time the cursor buttons 2 1 are pressed When the cursor buttons 2 1 are kept pressed consecutive frame a...

Страница 17: ... to normal play Press 1 PLAY For your reference When 6 5 SLOW SEARCH or 6 SEARCH 5 on the player is pressed during menu play of Video CDs with playback control a menu screen may sometimes be recalled B Rapid advance Rapid reverse Press 6 5 SLOW SEARCH or 6 SEARCH 5 during play Each press increases the speed of the search There are five speeds of advance reverse To return to normal play Press 1 PLA...

Страница 18: ...rned for the track numbers Press 1 to start play from the beginning of the disc To return to menu play Press º STOP to stop play press MENU and press the numeric buttons to select an item PBC lights on the player s FL display B Using menus to play DVD By calling up menus during play you can start play from a specific title or chapter or change the soundtrack and subtitle languages Press TOP MENU o...

Страница 19: ... If resume á page 15 is canceled or if you stop play of an interac tive DVD the soundtrack revert to the initial settings á page 29 Some discs allow changes to soundtrack only by using the disc s menus Switching vocals ON or OFF for Karaoke B discs DVD VCD 1 Press AUDIO during play 2 Press the cursor buttons 3 4 2 1 or press AUDIO to change the setting DVD Karaoke 2 1 Solo Duet Vocal OFF Vocal OFF...

Страница 20: ...orting closed captions is played the subtitles and closed captions may overlap each other on the TV monitor In this case turn the subtitles off For your reference You can only select languages if they have been recorded on the disc you are playing If resume á page 15 is canceled or if you stop play of an interac tive DVD the subtitle languages revert to the initial settings á page 29 Some discs al...

Страница 21: ... green when the V S S function is ac tivated Note V S S effect does not work with Karaoke DVDs V S S will not work or will have less effect with some discs Turn off the TV surround sound and other surround sound effects when using this effect Sound will only come from the two main speakers if V S S is on For your reference B For optimum effect it is recommended that the distance between the televi...

Страница 22: ...til OFF is displayed Note Repeat play may not work correctly with some DVDs Repeat play does not work with an interactive DVD or during menu play of a Video CD with playback control There is no mode for repeating the whole DVD B To enjoy program repeat play VCD CD If REPEAT is pressed during program play á page 23 the display changes as illustrated i Program play j Repeat of track being played k R...

Страница 23: ...sor buttons 3 4 to select a track Press ENTER to register the track number Repeat step 2 to select another track 3 Press 1 PLAY Play now begins in the programmed sequence To exit the screen Press PLAY MODE twice To add tracks 1 Press º STOP twice during program play to show the program play screen 2 Select the available item with the cursor buttons 3 4 then repeat step 2 Press 6 5 SLOW SEARCH to t...

Страница 24: ...1 Advanced operations Random play VCD CD The player plays the tracks on the disc in random order 1 Press PLAY MODE while stopped until the illustrated screen appears If appears on the television press º STOP to cancel the RESUME function then press PLAY MODE 2 Press 1 PLAY Play now begins in random order To exit the screen Press PLAY MODE once To return to normal play 1 Press º STOP twice during r...

Страница 25: ...pressed When numbers are displayed e g title No the numeric buttons are also effective for setting instead of the cursor buttons 3 4 When numbers are entered with numeric buttons press ENTER to register the setting To clear the On Screen Menu Icons Press RETURN or CANCEL For your reference The On Screen Menu Icons may not be displayed when playing some kinds of DVD software or if the television s ...

Страница 26: ...E Vietnamese THA Thai Others f Audio attribute Shows the audio attributes of the selected soundtrack LPCM ë Digital DTS Signal type k Sampling frequency kHz b Number of bits bit ch Number of channels Vocal Vocals indication You can switch vocals ON or OFF with the cursor buttons 3 4 DVD Karaoke Solo OFF or ON DVD Karaoke Duet OFF V1iV2 V1 or V2 g Subtitle language No Change the No with the cursor ...

Страница 27: ...ard DVD VCD Press the cursor buttons 3 1 Maximum speed DVD j100 Video CD j40 CD j50 Maximum speed DVD i100 Video CD i40 CD i50 For your reference Each time the cursor buttons 2 1 are pressed the speed of rapid reverse advance and slow motion play increases up to 5 steps d Marker Marking parts you want to watch or listen to again Press ENTER during play and press ENTER again at the pre ferred point...

Страница 28: ...called a parental lock 3 Menu Language á page 31 Change the language used for the on screen displays and initial settings menus 4 On Screen Messages á page 31 Choose whether Play Still and other displays will be displayed or not and the color and position of these dis plays as well as On Screen Menu Icons 5 FL Display á page 31 Change the brightness for the FL display 6 TV Aspect á page 31 Change ...

Страница 29: ...ian 7285 Hungarian 7289 Armenian 7365 Interlingua 7378 Indonesian 7383 Icelandic 7384 Italian 7387 Hebrew 7465 Japanese 7473 Yiddish 7487 Javanese 7565 Georgian 7575 Kazakh 7576 Greenlandic 7577 Cambodian 7578 Kannada 7579 Korean 7583 Kashmiri 7585 Kurdish 7589 Kirghiz 7665 Latin 7678 Lingala 7679 Laotian 7684 Lithuanian 7686 Latvian Lettish 7771 Malagasy 7773 Maori 7775 Macedonian 7776 Malayalam ...

Страница 30: ... Playback of all DVDs is prohibited e g to prohibit playback of DVDs for adults which are not encoded with rating information Note The rating method differs from disc to disc There are discs designed for adults that do not have these ratings recorded on them These discs can be played as normal To prevent play of these discs set the rating limit to 0 Lock All 2 Ratings DVD See page 28 for operation...

Страница 31: ...hen a wide screen television is connected For your reference For further details on the images which appear on the TV screen see page 35 The optimum settings for your television may differ to those shown above 6 TV Aspect See page 28 for operation Preparation Switch the video input mode on the television to suit the type of connection you have made e g VCR 2 Press RETURN to exit Select the languag...

Страница 32: ... quality sound If the DVD is copyright protected no digital signal will be output unless converted to 48 kHz Signal of 48 kHz linear PCM can be output from digital audio output terminal irrespective of the setting 2 Yes When playing a DVD recorded in 96 kHz linear PCM signal is converted to 48 kHz 16 bit and can be output from digital audio output terminal even if the DVD is copyright protected 1 ...

Страница 33: ...eakers For your reference Dolby Digital is a digital sound compression technique developed by Dolby Laboratories Supporting 5 1 channel surround sound as well as stereo 2 channel sound this technique enables a large quantity of sound data to be efficient ly recorded on a disc DTS Digital Surround is a 5 1 channel surround sound system which is widely used in movie theaters around the world The sep...

Страница 34: ... the still picture mode 6 Black Level Control To select the black level of the picture Lighter or Darker 1 Automatic Factory preset 2 Field Select this setting when jittering occurs in the still picture mode when 1 Automatic is selected 3 Frame Select if small text or fine patterns cannot be seen clearly in the still picture mode when 1 Automatic is selected 1 On Factory preset 2 Off 1 Pan Scan Fa...

Страница 35: ...een so the apparent resolution is low However there is no blurring on the screen How different kinds of software appear on your television DVD software is recorded in a variety of picture formats and how they appear on your TV depends on the software the kind of TV you have and the picture mode your TV is set to Letterbox refers to pictures where black bands appear at the top and bottom Pan and sc...

Страница 36: ...egion numbers including 1 can be played 6 The disc may be dirty and may require cleaning V Ensure that the disc is installed with the label of the side to be played facing upwards Ensure that the equipment is connected properly Ensure the television s video input setting e g VCR2 is correct Ensure that the equipment is connected properly 8 Ensure that the input settings for the television and ster...

Страница 37: ... output on K If you have connected this player to an AV amplifier with built in decoder through the digital audio output terminal go to the initial settings menu 7 Digital Audio Output and change the settings to Bitstream for 2 Dolby Digital or 3 DTS Digital Surround P Sound will only come from the two main speakers if V S S is on Turn V S S off E K While stopped press and hold and on the player a...

Страница 38: ...er static electric ity prevention liquids or any other solvent Do not attach labels or stickers to discs Do not use discs with ex posed adhesive from tape or left over peeled off stickers Do not use scratch proof protectors or covers other than those specified for use with this player º Do not place or store discs in the following places Locations exposed to direct sunlight Humid or dusty location...

Страница 39: ...B output level 0 7 Vp p 75 PR output level 0 7 Vp p 75 Output terminal Pin jack Y green PB blue PR red Scart video terminal U K and Europe models Audio output Output level 2 Vrms 1 kHz 0 dB Output terminal Pin jack Mixed output L R 1 system Subwoofer output 1 system Audio signal output characteristics 1 Frequency response DVD linear audio 2 Hz 22 kHz 48 kHz sampling 2 Hz 44 kHz 96 kHz sampling CD ...

Страница 40: ...BEI HAMBURG F R OF GERMANY YAMAHA ELECTRONIQUE FRANCE S A PA PARIS EST RUE AMBROISE CROIZAT CROISSY BEAUBOURG BP70 77312 MARNE LAVALLEE CEDEX 2 FRANCE YAMAHA ELECTRONICS UK LTD YAMAHA HOUSE 200 RICKMANSWORTH ROAD WATFORD HERTS WD1 7JS ENGLAND YAMAHA SCANDINAVIA A B J A WETTERGRENS GATA 1 BOX 30053 400 43 VÄSTRA FRÖLUNDA SWEDEN YAMAHA MUSIC AUSTRALIA PTY LTD 17 33 MARKET ST SOUTH MELBOURNE 3205 VIC...

Отзывы: