background image

CVP-809/CVP-805 Owner’s Manual

81

So

ng

 R

eco

rd

in

g – Reco

rd

in

g Y

our

 P

er

fo

rma

nce

 –

6

NOTICE

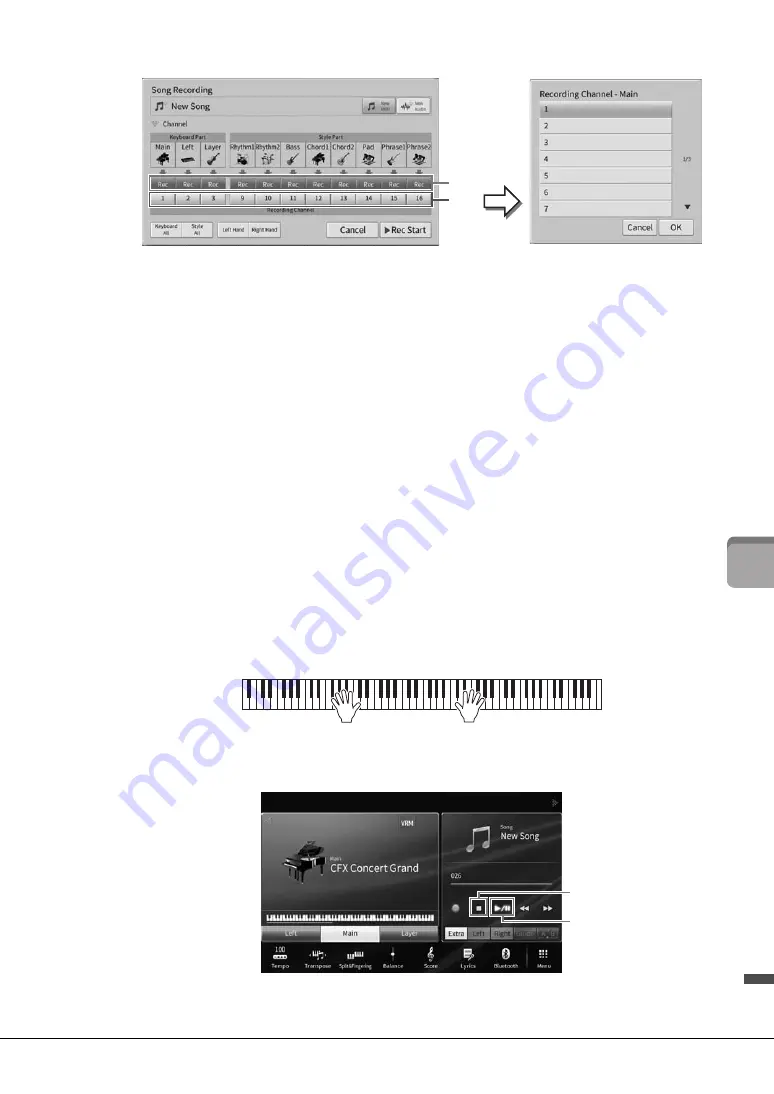
Previously recorded data will be overwritten if you set channels which have recorded data to [Rec].

NOTE

• Multiple parts can not be recorded to one channel.

• If you want to cancel recording, touch [Cancel] in the display or press the SONG CONTROL [

I

] (Rec) button before 

going on to step 5.

To make the settings quickly, simply select the keyboard part ([Keyboard All], [Style All], [Left 
Hand] or [Right Hand] located at the bottom left).

[Keyboard All]: 

You can turn all of the Keyboard parts (Main, Left and Layer) [Rec] or [Off] 

together. The Main part, Left part and Layer part will be recorded to channels 1 – 3 by 
default.

• [Style  All]:

 You can turn all of the Style parts [Rec] or [Off] together. The Style parts will be 

recorded to channels 9 – 16 by default.

[Right Hand]:

 This can be selected when recording only the right-hand part. The Main part 

of the Voice will be recorded to channel 1, and the Layer part will be recorded to channel 3.

[Left Hand]:

 This can be selected when recording only the left-hand part. The Left part of 

the Voice will be recorded to channel 2. When the Left part of the Voice is off, the Main part 
will be recorded to channel 2 and the Layer part will be recorded to channel 4.

5

Play the keyboard to start recording.

Make sure to play the part(s) you specified in step 4. You can also start recording by touching 
[Rec Start] or pressing the SONG CONTROL [

R

/

K

] (Play/Pause) button. 

6

After you finish your performance, touch [

] (Stop) on the Home display to stop 

recording. 

7

To hear the recorded performance, touch [

R

/

K

] (Play/Pause).

4-1
4-2

7

6

Содержание Clavinova CVP-805

Страница 1: ...ctions polyvalentes Nous vous conseillons de lire attentivement ce mode d emploi afin de tirer pleinement profit des fonctions avancées et pratiques de votre instrument Nous vous recommandons également de garder ce manuel à portée de main pour toute référence ultérieure Avant d utiliser l instrument lisez attentivement la section PRÉCAUTIONS D USAGE aux pages 5 et 6 Pour plus d informations sur le...

Страница 2: ...e that our products and the production methods used to produce them meet these goals In keeping with both the letter and the spirit of the law we want you to be aware of the following Battery Notice This product MAY contain a small non rechargeable battery which if applicable is soldered in place The average life span of this type of battery is approximately five years When replacement becomes nec...

Страница 3: ... the problem by using one of the following mea sures Relocate either this product or the device that is being affected by the interference Utilize power outlets that are on different branch cir cuit breaker or fuse circuits or install AC line filter s In the case of radio or TV interference relocate reori ent the antenna If the antenna lead in is 300 ohm rib bon lead change the lead in to co axial...

Страница 4: ...ement of the obsolete outlet 10 Protect the power cord from being walked on or pinched particularly at plugs convenience receptacles and the point where they exit from the apparatus 11 Only use attachments accessories specified by the manufacturer 12 Use only with the cart stand tripod bracket or table specified by the manufacturer or sold with the apparatus When a cart is used use caution when mo...

Страница 5: ...sonnel Never insert or remove an electric plug with wet hands Do not put burning items such as candles on the unit A burning item may fall over and cause a fire Radio waves may affect electro medical devices Do not use this product near medical devices or inside areas in which the use of radio waves is restricted Do not use this product within 15cm 6 in of persons with a heart pacemaker or defibri...

Страница 6: ...nect the plug from the outlet Even when the power switch is turned off electricity is still flowing to the product at the minimum level When you are not using the product for a long time make sure to unplug the power cord from the wall AC outlet Before connecting the instrument to other electronic components turn off the power for all components Before turning the power on or off for all component...

Страница 7: ...rded Song and edited Song Style Voice MIDI setup data etc are lost when you turn off the power to the instrument This also occurs when the power is turned off by the Auto Power Off function page 19 Save the data to the instrument or to USB flash drive page 32 You can back up the data and settings of this instrument to the USB flash drive as a backup file page 43 as well as restore a backup file to...

Страница 8: ...ler Compatible formats for this instrument GM2 GM General MIDI is one of the most common Voice allocation formats GM System Level 2 is a standard specification that enhances the original GM and improves Song data compatibility It provides for increased polyphony greater Voice selection expanded Voice parameters and integrated effect processing XG XG is a major enhancement of the GM System Level 1 ...

Страница 9: ...Styles etc as well as MIDI related information of this instrument Smart Device Connection Manual Explains how to connect the instrument to a smart device such as smartphone or tablet etc You can choose from two versions iOS and Android depending on your device Computer related Operations Includes instructions on connecting this instrument to a computer and operations related to transferring files ...

Страница 10: ...Metronome 39 Adjusting the Tempo 39 Setting the Touch Sensitivity of the Keyboard 40 Transposing the Pitch in Semitones 41 Adjusting the Volume Balance 42 Restoring the Factory programmed Settings Initializing 42 Data Backup 43 2 Piano Room Enjoying the Piano Performance 44 Playing a Piano Performance in the Piano Room 44 Playing the Piano in Session with Other Instruments 45 Changing Resetting th...

Страница 11: ... Panel Setups 86 Saving and Recalling Custom Panel Setups with Registration Memory 87 Using Playlists to Manage a Large Repertoire of Panel Setups 91 9 Mixer Editing the Volume and Tonal Balance 95 Basic Procedure for the Mixer 95 Turning Each Channel of the Style or MIDI Song On Off 97 10 Connections Using Your Instrument with Other Devices 98 I O Connectors 98 Connecting USB Devices USB TO DEVIC...

Страница 12: ...nating from the piano even when listening to the sound through headphones The Piano Room features provide even greater piano performance enjoyment Piano Room lets you select the desired piano type as well as different room ambiences enabling a complete realistic piano experience as if you were playing an actual piano What s more you can play along with other virtual session players and enjoy a con...

Страница 13: ...onnected to the Clavinova and Song lyrics can be shown on the display you can enjoy singing along with your keyboard performance or along with Song playback Moreover a powerful Vocal Harmony effect automatically applies lush authentic sounding vocal harmonies to your singing voice You can also cancel the vocal part on audio recordings letting you sing along with or instead of your favorite artists...

Страница 14: ... STYLE CONTROL buttons page 59 For controlling Style playback LCD touch screen page 24 Allows you to select or change the parameters by simply touching the virtual buttons or sliders on the display Data Dial page 30 For selecting an item or changing the value HOME button page 30 For calling up the Home display or the first display when the power is turned on PIANO ROOM button page 44 For instantly...

Страница 15: ...page 16 Sheet music braces page 16 I O connectors page 98 Key cover page 16 Guide lamps page 71 Pedals page 37 Music rest page 17 Sheet music braces page 17 I O connectors page 98 Key cover page 16 Guide lamps page 71 Pedals page 37 Pedals page 37 Lid page 17 AC IN jack page 18 For connecting the power cord AC IN jack page 18 For connecting the power cord CVP 809 CVP 805 CVP 809 Grand Piano type A...

Страница 16: ...r is opened and may be nearly impossible to remove Once inside they could cause electric shock short circuit fire or other serious damage to the instrument CVP 809 Grand Piano type To raise the music rest 1 Pull the music rest up and toward yourself as far as it will go 2 Flip down the two metal supports at the left and right on the rear of the music rest 3 Lower the music rest so that the metal s...

Страница 17: ...se the sheet music braces then lift the music rest slightly and turn it back slowly CAUTION Before lowering the music rest close the sheet music braces Otherwise you may catch your fingers between the music rest and the music braces and injure them One long stay and one short stay are provided on the lid Use one of them to hold the lid open at the desired angle Opening the Lid 1 Raise the music re...

Страница 18: ...stay and carefully raise the lid 2 Continue to hold the lid in its raised position and lower the lid stay 3 Carefully lower the lid Connect the plugs of the power cord in the order shown in the illustration In some areas a plug adaptor may be provided to match the pin configuration of the AC wall outlets in your area WARNING Use only the supplied power cord CAUTION When setting up the product make...

Страница 19: ...played the power cannot be turned off even if you press the P Standby On switch If you want to turn off the power press the P Standby On switch after recording editing or after the message has disappeared If you need to force quit the instrument hold down the P Standby On switch for longer than three seconds Note that the force quit operation might cause data loss and damage to the instrument Auto...

Страница 20: ...early heard IAC Control affects only the sound output of the instrument speakers The default setting for this function is on You can turn the IAC setting on or off and set the depth For details refer to the Utility section in the Reference Manual on the website page 9 Connect a pair of headphones to the PHONES jack Since this instrument is equipped with two PHONES jacks you can connect two pairs o...

Страница 21: ...her than CFX Grand Stereophonic Optimizer is an effect which reproduces the natural sound distance like with the sound of Binaural Sampling even though you are listening to it on headphones When one of the VRM Voices page 53 other than CFX Grand is selected connecting the headphones automatically enables the Stereophonic Optimizer Using the Headphone Hanger A headphone hanger is included in the in...

Страница 22: ...advantage of this instrument we recommend that you upgrade your instrument to the latest version The latest firmware can be downloaded from the website below https download yamaha com Licenses Touch here to call up license information of the open source software which is used on this instrument Copyright Touch here to call up copyright information Language Determines the language used in the displ...

Страница 23: ...e Brightness of Display Touch Screen Sound Determines whether or not touching the display will trigger the click sound Calibration Lets you calibrate the display when it does not respond properly to your touching Normally you do not need this operation since it is calibrated by factory default Touch here to call up the Calibration display then touch the center of the plus marks in order Brightness...

Страница 24: ...e File Selection display page 27 You can call up the desired type of display by touching the Style name Voice name or Song name on the Home display Home display page 26 This is the portal or home base of the instrument s display structure By expanding the Style area you can call up the playback related controls on the display Menu display page 28 By touching each of the icons you can call up vario...

Страница 25: ...CVP 809 CVP 805 Owner s Manual 25 1 Basic Operations By expanding the Song area you can call up the playback related controls on the display Song Selection display Touchhere to expand ...

Страница 26: ...tyle name calls up the Style Selection display Touch at the upper left of this area to expand the area To reset the area to the default status touch which appears at the upper right of the Voice area 3 Song area Indicates the current Song page 66 Touching a Song name calls up the Song Selection display Touch at the upper right of this area to expand the area To reset the area to the default status...

Страница 27: ...e User tab is selected the current path or folder is shown here according to the folder structure 3 Selectable data files The files that can be selected are shown If two or more pages are available you can call up another page by touching or at the right NOTE You can call up another page also by flicking vertically on the list 4 Operation icons The functions save copy delete etc which can be opera...

Страница 28: ...rst touch and hold the icon on the Function list until the Shortcut list changes color then touch the desired location for entering the function For details refer to the Contents in the Reference Manual on the website page 9 To close the current display touch at the upper right of the display or window or Close at the lower right of the display or window When a message information or confirmation ...

Страница 29: ...may damage the display NOTE Keep in mind that operation by simultaneously touching two or more points on the display is not possible Touch To select an item lightly touch the corresponding indication on the display NOTE You can turn on off system sounds produced when touching the display page 23 Slide Hold down the display slider then slide your finger vertically or horizontally to change the para...

Страница 30: ...on the display the Data dial can be used in the following two ways Adjusting the parameter values After selecting the desired parameter use the Data dial to adjust the value This is useful if you have difficulty adjusting by touching on the display or want finer control over the adjustment Selecting an item from a list In File Selection displays page 27 and the List windows for setting parameters ...

Страница 31: ...e 28 can be assigned here as a shortcut 1 Call up the operation display via Menu Assignable Assignable 2 Touch the desired button number to call up the list 3 Select the desired item from the functions and shortcuts equivalent to the functions in the Menu display NOTE For details about the functions which can be assigned to these buttons refer to the Reference Manual on the website page 9 Using th...

Страница 32: ...h as Songs you ve recorded and Voices you ve edited as a file to the instrument or USB flash drive 1 In the relevant display touch Save to call up the display for selecting the saving destination 2 Select the location to which you want to save the file To show the next higher level folder touch Above You can create a new folder by touching New Folder 3 Touch Save here to call up the Character Entr...

Страница 33: ...ght corner to hide the File Management icons You can hide or show the File Management icons by flicking the bottom of the display horizontally 3 Touch New Folder to call up the Character Entry window 4 Input the name of the new folder page 36 Renaming a File Folder You can rename files folders NOTE Files in the Preset tabs cannot be renamed The Piano Room folder page 48 cannot be renamed 1 Call up...

Страница 34: ...l Touch Check All again to remove all the checkmarks 4 Touch Copy or Move to call up the display for selecting the destination 5 Select the desired destination path to paste the files folders You can create a new folder by touching New Folder NOTE To cancel this operation touch Cancel before going to step 6 6 Touch CopyHere or MoveHere to paste the files folders you ve selected in step 3 The paste...

Страница 35: ...delete the original file touching the corresponding file name in the Favorite tab cannot call up the file Within the Favorite tab to actually remove the file you need to touch the colored star then close or switch the display Sorting the File Order in the Favorite Tab You can change the order of the files such as Voices and Styles in the Favorite tab 1 In the Voice Selection display or Style Selec...

Страница 36: ...If no files are listed try this step again with another word NOTE On the Registration Bank Selection display you can narrow the search by filtering For details refer to page 89 4 Select the desired file After selecting the file touch the appropriate button such as OK or Add to Playlist for desired operation Touching Cancel calls up the display which was opened before the Search display was called ...

Страница 37: ...into Kanji when the Language is set to Japanese When the entered hiragana characters are shown in reverse display highlighted touch several times to call up the conversion options You can change the reversed area by touching or When you find the desired Kanji touch To change the converted kanji back to hiragana touch To clear the reversed area at once touch NOTE To cancel this operation touch Canc...

Страница 38: ...held All subsequent notes will not sustain When a Voice other than piano is selected a specific function appropriate for the Voice is automatically assigned to the center pedal Soft Pedal Left When the Piano Voice is selected pressing this pedal reduces the volume and slightly changes the timbre of the notes you play When a Voice other than piano is selected a specific function appropriate for the...

Страница 39: ...Time Stretch function on page 74 TEMPO buttons Press the TEMPO or button to call up the Tempo pop up display Use the TEMPO buttons to decrease or increase the tempo over a range of 5 500 beats per minute Holding down either button changes the value continuously Pressing both TEMPO and buttons calls up the default tempo of the last selected Style or Song TAP TEMPO button During playback of a Style ...

Страница 40: ...ing the corresponding part will produce a fixed velocity regardless of your playing strength NOTE The Touch Sensitivity settings may have no effect with certain Voices Hard2 Requires strong playing to produce high volume Best for players with a heavy touch Hard1 Requires moderately strong playing for high volume Medium Standard Touch Sensitivity Soft1 Produces high volume with moderate playing str...

Страница 41: ... transpose it NOTE Transpose can be done on the display also via Menu Transpose Transposing the Pitch in Semitones Master Transposes the pitch of the entire sound with the exception of the Audio Song the input sound from the MIC LINE IN jack and the Audio Input Sound from the external device Keyboard Transposes the keyboard pitch including the chord root for triggering Style playback Song Transpos...

Страница 42: ...cted While holding the C7 key right most key on the keyboard turn the power on This restores or initialize all of the settings to their factory defaults with the exception of Language page 22 Owner Name page 22 and Bluetooth pairing information page 106 NOTE You can also restore the factory default value of specified settings or delete all files folders in the User memory on the display called up ...

Страница 43: ...ct the USB flash drive to the USB TO DEVICE terminal as backup destination 2 Call up the display via Menu Utility Factory Reset Backup page 2 2 If you want to back up the Audio Songs WAV MP3 saved to the User memory enter a checkmark to the Include Audio Files box Since audio files use large memory remove the checkmark if you do not want to save them 3 Touch Backup to save the backup file to the U...

Страница 44: ...ing a Piano Type Touch the picture of the piano to call up the piano list and then select the desired one When a grand piano Voice is selected you can open or close the lid by sliding up or down on the lid or by rotating the data dial Selecting an Environment Reverb Type Touch the background picture of the piano to call up the environment list and then select the desired one This sets the Reverb T...

Страница 45: ...of the list 4 Touch Start The Intro starts playing back If you want to adjust the tempo tap L or R in the display called up in step 3 Tapping Tap twice at the desired tempo can also change the tempo 5 Play the keyboard following the Intro The Session players provide accompaniment for your performance Jazz or Pop is recommended 6 Touch Stop to stop the accompaniment Accompaniment stops after an end...

Страница 46: ... list of step 3 on page 45 to call up the setting display 1 Turns all parts except those of rhythm and bass on or off 2 Turns the rhythm parts and bass parts on or off 3 Turns the bass part on or off 4 Move the slider to adjust the volume of the accompaniment 5 Touch here to go back to the accompaniment type list 5 4 1 2 3 ...

Страница 47: ...oice is selected Tune Determines the pitch of this instrument in 1 Hz steps Dynamics Control Determines how the volume of the accompaniment responds to the strength with which you play the keys Off The accompaniment volume does not respond to your playing strength Narrow The accompaniment volume changes over a narrow range in response to your playing strength In other words you must play very stro...

Страница 48: ...ave operation 5 To hear the recorded performance touch Song then touch R Play on the display that is called up Touch J Stop to stop playback NOTE The Songs recorded in the Piano Room are shown in the PianoRoom folder in the User tab MIDI on the Song Selection display page 67 Playing Back Recorded Songs Changing Song Names Deleting Songs 1 Touch Song on the Piano Room display to call up the Song li...

Страница 49: ...Main and Layer parts The key which divides the keyboard into the left hand and right hand areas is referred to as Split Point and its guide lamp lights when the Left part is turned on The Voices of the parts which are turned on can be confirmed on the Home display NOTE You can also play only the Layer part by turning the Main part off The Split Point can be changed page 52 The guide lamp lights up...

Страница 50: ...Voice of the second pressed button is assigned to the Layer part You can change the sub category by pressing the same Voice category button twice or more 2 Touch the desired Voice NOTE The Others tab contains XG Voices and so on For details about how to select those Voices refer to the VoiceSetting section in the Reference Manual on the website page 9 3 Make sure that the desired keyboard part is ...

Страница 51: ...acteristics however only the following ones are covered here For detailed explanations refer to the VoiceSetting section in the Reference Manual on the website page 9 VRM Voices page 53 These recreate the characteristic string resonance of a real acoustic piano Super Articulation S Art S Art2 Voices page 54 The word articulation in music usually refers to the transition or continuity between notes...

Страница 52: ...Chord section for Style playback page 58 and the Main or Left part area Though both Split Points are at the same key FP2 by default you can also set them individually as shown NOTE The guide lamp located at the Split Point lights up when the Left part is turned on or the ACMP ON OFF button is turned on 1 Call up the Split Point Fingering window Menu Split Fingering NOTE The Split Point Fingering w...

Страница 53: ...Piano Lock press and hold the PIANO ROOM button again for two seconds or longer If you turn off the power with Piano Lock enabled turning on the power next time will call up the Piano Lock display Simply by selecting a VRM Voice you can enjoy the VRM effect see below An icon VRM is shown at the left side of the Voice name of a VRM Voice on the Voice Selection display The default setting of the VRM...

Страница 54: ... which have those types of Voices installed Any Song or Style data you ve created on the instrument using these Voices will not sound properly when played back on other instruments S Art and S Art2 Voices sound differently depending on the keyboard range velocity touch etc Hence if you turn on a Keyboard Harmony effect change the transpose setting or change the Voice Settings unexpected or undesir...

Страница 55: ... and switches letting you adjust the sound with much the same feel as on an actual instrument Vintage Simulating the iconic sound of an American vintage jazz and rock organ Euro A well known European Pops organ with the iconic rotary sound captured in the sample Home A traditional American tabs organ of the 70s and 80s suited for middle of the road standards 1 On the Voice Selection display select...

Страница 56: ...s Voices other Voices can be edited by calling up the Voice Edit display after selecting the desired Voice For details refer to the Reference Manual on the website page 9 1 Volume Determines the volume of the entire Organ Flutes sound 2 Rotary Tremolo Alternately switches the Rotary Speaker speed between Slow and Fast This parameter is available only when an effect type which contains Rotary in it...

Страница 57: ...r left hand This lets you automatically recreate the sound of a full band or orchestra even if you re playing by yourself Try out Style accompaniment with the following song After you understand how to use the Style try out other songs by using various Styles Mary Had a Little Lamb Style Country 8Beat 2 NOTE The Fingering type page 64 of Multi Finger default setting or Single Finger can be used fo...

Страница 58: ...age 52 By default the chord section Chord Detection Area is set to the left hand section but you can change it to the right hand section page 65 if desired When the ACMP ON OFF button is off only the rhythm part is played back auto accompaniment is not played back 4 Return to the Home display touch at the upper left to expand the Style area then touch SYNC START to enable Sync Start Here and in th...

Страница 59: ...y be played back on instruments that are compatible with the SFF GE format To do this use the on screen buttons called up by touching L in the Style area of the Home display or use the STYLE CONTROL buttons NOTE For instructions on adjusting the tempo refer to page 39 ACMP ON OFF AUTO FILL IN and SYNC STOP can be controlled only by using the panel buttons Style Characteristics The Style type and i...

Страница 60: ...ing Style playback automatically shifts to the Main section NOTE When you select INTRO II or III you need to play chords in the chord section to play the complete Intro section ENDING I III The instrument features three different Ending sections to add an ending before stopping Style playback When you press or touch one of the ENDING I III buttons while a Style is playing back the Style will autom...

Страница 61: ...ou play chords in the chord section of the keyboard However by using the Chord Looper function you can record chord progressions you want to play over and the Style can be played back in a loop responding to the chord progression data For example if you play the chords C F G and C in order and record it the Style loops and keeps playing back as C F G C C F G C without the need for you to play chor...

Страница 62: ...ng in which the One Touch Settings change with MAIN VARIATION A D changes To do this touch Menu StyleSetting Setting then set the OTS Link Timing parameter For details refer to the Reference Manual on the website page 9 Calling up Panel Settings Appropriate for the Current Style One Touch Setting Confirming the One Touch Setting Contents In the Style Selection display touch Information to call up ...

Страница 63: ...ne Touch Setting 2 Make the desired panel settings such as those for Voices and Effects 3 Press the MEMORY button of REGISTRATION MEMORY 4 Press one of the ONE TOUCH SETTING 1 4 buttons A message appears prompting you to save the panel settings 5 Touch Yes to call up the Style Selection display for saving your data then save the current settings as a User Style For instructions on saving refer to ...

Страница 64: ... so you can use either type of fingering without having to switch fingering types Fingered Lets you finger your own chords on the chord section of the keyboard while the instrument supplies appropriately orchestrated rhythm bass and chord accompaniment in the selected Style The Fingered type recognizes the various chord types which are listed on the Split Fingering section in the Reference Manual ...

Страница 65: ...y not be suitable for use with this feature This type is similar to Full Keyboard with the exception that less than three notes can be played to indicate the chords based on the previously played chord etc 9th 11th and 13th chords cannot be played This type is available only for Style playback Specifying Chords with Your Right Hand for Style Playback Changing the Chord Detection Area By changing t...

Страница 66: ...performed sound itself This data is recorded in the same way as that used with voice recorders etc Audio data in WAV or MP3 format can be played back on this instrument just like playing it on your smartphone or portable music player etc Availability of functions differs between MIDI Songs and Audio Songs In this chapter the following icons indicate whether or not the explanation applies to MIDI S...

Страница 67: ...alls up a list of the Audio Songs NOTE The PianoRoom folder in the User tab MIDI contains the Songs recorded in the Piano Room page 48 On the Song Selection display or the Home display you can distinguish the data format of the Audio Song by the icon shown next to the Song name If it is in MP3 format MP3 appears in the icon and in case of WAV format nothing is shown 3 Return to the Home display to...

Страница 68: ...forward for MIDI Songs or one second for Audio Songs Holding one of them scrolls backward forward continuously When you press or touch LL Rewind or RR Fast forward a setting display appears showing the current position of the Song The Phrase Mark number appears only when a MIDI Song containing Phrase Marks is selected You can choose to rewind fast forward the Song in Bar or Phrase Mark units by to...

Страница 69: ...o practice 1 Select a MIDI Song steps 1 2 on page 67 2 Call up the Score display via Menu Score You can look through the entire notation by touching L or R when the Song playback is stopped As starting playback the ball bounces along through the score indicating the current position NOTE The instrument can display the music notation of commercially available music data or your recorded Songs The d...

Страница 70: ...l up the Lyrics display via Menu Lyrics When the Song data contains lyrics data the lyrics are shown on the display You can look through the entire lyrics by touching L or R when Song playback is stopped As Song playback starts the color of the lyrics changes indicating the current position NOTE The Lyrics can be displayed on an external monitor or television page 108 For details on the Lyrics dis...

Страница 71: ... Settings can also be controlled from the Home display and Lyrics display 3 Touch Guide to turn it on 4 Touch Right to turn off the right hand part The right hand part is muted and the Guide for the right hand part is enabled NOTE Usually Ch 1 is assigned to Right Ch 2 is assigned to Left and Ch 3 16 are assigned to Extra but you can change which channel is assigned to the right or left hand part ...

Страница 72: ... A B Repeat 1 Select a Song steps 1 2 on page 67 2 Touch R K Play Pause to start playback 3 Specify the repeat range When playback reaches the point you want to specify as the starting point A turn on A B Repeat When playback reaches the point you want to specify as the ending point B touch A B Repeat again The range from Point A to Point B will be played back repeatedly For MIDI Songs an automati...

Страница 73: ...epeatedly in either consecutive order or random order To reset the repeat setting select Off in Repeat Mode Like the Transpose function page 41 of the MIDI Song the pitch of an Audio Song in the USB flash drive can be adjusted in semitone steps from 12 to 12 on the Home display 1 Connect the USB flash drive containing Audio Songs to the USB TO DEVICE terminal NOTE Before using a USB flash drive be...

Страница 74: ...n cancel or attenuate the center position of the stereo sound This lets you sing karaoke style with just instrumental backing or play the melody part on the keyboard since the vocal sound is usually at the center of the stereo image in most recordings To turn the Vocal Cancel function on off first select an Audio Song then turn on off Vocal Cancel in the Song area of the Home display NOTE Though t...

Страница 75: ...ault they can be transmitted to and played on portable music players by using a computer The sound input from MIC LINE IN jack AUX IN jack etc is also recorded so you can record your singing voice through the microphone or the sound played back on the connected audio device The file format can be changed to MP3 via Menu SongSetting Rec Audio Rec Format This instrument allows you to record up to 80...

Страница 76: ...ecording If you want to cancel recording touch Cancel in the display or press the SONG CONTROL I Rec button NOTE Overwrite MIDI appears only when a MIDI Song has been selected before starting recording 4 Start Recording With MIDI Recording you can start recording either by playing the keyboard or touching Rec Start With Audio Recording start recording by touching Rec Start You can also start recor...

Страница 77: ...shown in the Song area The Song Selection display appears for selecting a destination to save the recorded Song 8 2 Save the recorded data as a file by following the instructions on page 32 steps 2 5 MIDI Songs can be saved to User MIDI Song tab In Audio Recording Since the Audio Song file is automatically saved to the USB flash drive or User memory while recording the Save operation is not requir...

Страница 78: ...t to specify the channels and parts to record refer to page 80 for instructions 1 Make necessary settings and call up the Song Recording window then touch New MIDI steps 1 3 on page 76 2 Touch R at the left of Channel to expand the Channel area 3 Select the first part for recording If you want to record the right hand parts touch Right Hand to set Main and Layer to Rec and other parts to Off If yo...

Страница 79: ...ch Left Hand to set Left to Rec and other parts to Off If you want to record a melody touch Keyboard All or Style All to set the desired keyboard part to Rec and all Style parts to Off NOTICE Previously recorded data will be overwritten if you set channels which already have recorded data to Rec NOTE When the Left part is turned off on the Home display touching Left Hand here turns Main and Layer ...

Страница 80: ... MIDI Song by recording each part to the desired channel one by one 1 Make necessary settings and then call up the Song Recording window steps 1 2 on page 76 If you want to re record an existing Song select the desired MIDI Song before calling up the Song Recording window 2 When recording from scratch touch New MIDI When re recording an existing MIDI Song confirm that Overwrite MIDI is selected 3 ...

Страница 81: ...turn all of the Style parts Rec or Off together The Style parts will be recorded to channels 9 16 by default Right Hand This can be selected when recording only the right hand part The Main part of the Voice will be recorded to channel 1 and the Layer part will be recorded to channel 3 Left Hand This can be selected when recording only the left hand part The Left part of the Voice will be recorded...

Страница 82: ...ure to read Connecting USB Devices on page 100 1 Call up the Song Selection display which contains the MIDI Song to be converted 2 Touch File to call up the File Management icons 3 Enter a checkmark to the MIDI Song to be converted NOTE Audio Conversion can only be done one file at a time 4 Touch Audio Convert to call up the Song Selection display for selecting the Save destination 5 Specify the S...

Страница 83: ...onventional dynamic microphone 3 Set the MIC LINE switch to MIC 4 Turn on the power of the instrument 5 If necessary turn on the microphone Adjust the INPUT VOLUME knob while singing into the microphone Adjust the control while checking the MIC lamp on the panel Make sure to adjust the control so the lamp lights in green Make sure that the lamp does not light in red since this indicates that the i...

Страница 84: ...ing meanings Blue pink Vocal Harmony type of Chordal mode In general blue icon types are to be used by male singers and pink by female singers Vocal Harmony type of Vocoder mode Vocal Harmony type having unusual effects such as a robotic voice Gray Vocal Harmony type without any effect NOTE For details on Vocal Harmony types refer to the Data List on the website page 9 Applying Vocal Harmony Effec...

Страница 85: ...d or play back a Song and sing into the microphone You ll notice that you don t actually have to sing pitched notes The Vocoder effect takes the words you say and applies them to the pitch of the instrument sounds Using the Talk Function This function lets you instantly change the microphone settings for talking or making announcements between song performances To call up the Talk setting touch Ta...

Страница 86: ...laylist contains links to call up Registration Memory Bank files for each piece you play Each link to the Registration Memory is called a Record and you can collectively store the Playlist Records as a single Playlist file Each Playlist Record can directly recall a specified Registration Memory number in the selected Registration Memory Bank file By using the Playlist you can select only the desir...

Страница 87: ...l setup previously memorized to the button will be erased and replaced by the new settings Hence you should memorize panel setups only to buttons that are turned off 4 Register various panel setups to other buttons by repeating steps 1 3 The registered panel setups can be recalled by simply pressing the desired number button NOTE You can also disable recall of specific item s when calling up the r...

Страница 88: ...h is linked to a Playlist Record the Registration Memory Bank cannot be called up from the Playlist Recalling a Registered Panel Setup The saved Registration Memory Bank files can be recalled by using the REGIST BANK buttons or the following procedure NOTE When recalling setups that include Song Style or text files selected from a USB flash drive make sure that the appropriate USB flash drive cont...

Страница 89: ...ion window This display consists of two pages Voice related and Style related You can alternate between the two via NOTE If a certain Voice part is set to off the Voice name for the corresponding part is shown in gray Select one of the Registration Memory numbers and touch the following icon to edit it Rename it Delete the data Add Tags page 90 or edit it Filtering a Search for Registration Bank F...

Страница 90: ...ch result Adding Tags on Registration Memory Bank for Search The tags of Registration Memory Banks help you to quickly find desired files when searching 1 On the Registration Bank Information window page 89 touch Tag to call up the Tag Edit window 2 Touch New Tag to call up the Character Entry window and then enter the desired text If you have already added any tags to another Registration Memory ...

Страница 91: ...ected the last time appears The sample preset Playlist will appear for the first time 2 If you want to create a new Playlist touch New 3 Add a Record to the Playlist To add a Record via the Registration Bank Selection display 3 1 Touch Add Record List to call up the Registration Bank Selection display 3 2 Select the desired Bank file to register as a Playlist Record Touching Add to Playlist closes...

Страница 92: ...ed Record touch the desired Record on the Playlist display Record name Determines the name of the Record Touching Rename calls up the Character Entry window Action Additional actions after selecting the Record and recalling the Bank Load Registration Memory Recalls the Registration Memory corresponding to the number selected here When no item is selected no Registration Memory is recalled View Dis...

Страница 93: ...d the Record also by touching the desired Record name twice Touching Info calls up the Registration Bank Information window page 89 Changing the Order of the Records in the Playlist 1 On the Playlist display touch the desired Record to move 2 Touch Up or Down to move the Record you selected in step 1 3 Touch Save to save the edited Playlist file Disabling Recall of Specific Panel Setups in the Reg...

Страница 94: ...cords from Another Playlist Append Playlist Append Playlist allows you to copy the existing Playlist file and add it to the current Playlist file 1 Touch Append Playlist to call up the Playlist File Selection display 2 Touch the desired Playlist file to append A confirmation message appears If you want to cancel the operation touch No here 3 Touch Yes to add the Records All Records in the selected...

Страница 95: ...t Mic part Audio Input part Main part Layer part and Left part Style Use this display when you want to adjust the balance among the parts of the Style Rhythm1 Rhythm2 These are the basic parts of the Style containing the drum and percussion rhythm patterns Bass The bass part uses various appropriate instrument sounds to match the Style Chord1 Chord2 These comprise the rhythmic chord backing common...

Страница 96: ...enu SongCreator Channel Edit 2 Touch Setup 3 Touch Execute to execute the Setup 4 Touch Save to call up the Song Selection display then save as a Song file page 32 To save the Audio Mixer settings Saving operation is not necessary Audio Mixer settings are retained even when the power is turned off Master Unlike the other displays use this display when you want to adjust the tonal characteristics o...

Страница 97: ...ame as necessary then touch OK to save the data The Mixer display lets you turn each channel of the current Style or MIDI Song on or off 1 In the Mixer display touch the Style tab Song Ch 1 8 tab or Song Ch 9 16 tab 2 Touch the Channel which you want to turn on or off If you want to solo a specific channel touch and hold the desired channel until the number turns green To cancel solo simply touch ...

Страница 98: ...even permanent hearing loss may occur NOTICE Do not place any external devices in an unstable position Doing so may cause the device to fall and result in damage To see where these connectors are located on the instrument refer to page 15 CVP 809 Grand Piano type CVP 809 CVP 805 I O Connectors 1 4 5 2 3 Right higher key side Left lower key side Front keyboard side 1 4 5 2 3 6 7 8 Right higher key ...

Страница 99: ...martphone or tablet page 102 4 AUX OUT L L R R jacks For connecting to external powered speaker systems page 107 5 USB TO DEVICE terminal For connecting a USB flash drive page 100 USB display adaptor page 108 or USB wireless LAN adaptor page 103 Before using the USB TO DEVICE terminal be sure to read Precautions when using the USB TO DEVICE terminal on page 100 6 MIC LINE IN jack MIC LINE switch I...

Страница 100: ...e is appropriate and that it is connected in the proper direction NOTICE When connecting a USB device to the USB TO DEVICE terminal on the top panel remove it before closing the key cover If the key cover is closed with the USB device connected the USB device may be damaged Avoid connecting or disconnecting the USB device while executing playback recording and file management operations such as Sa...

Страница 101: ...e that the USB flash drive you are formatting does not contain important data Proceed with caution especially when connecting multiple USB flash drives 1 Connect a USB flash drive for formatting to the USB TO DEVICE terminal 2 Call up the operation display via Menu Utility Storage 3 Touch the name of the USB flash drive to be formatted in the device list The indications USB 1 USB 2 etc are display...

Страница 102: ...ing a computer or a smart device to the USB TO HOST terminal via a USB cable digital audio data can be transmitted received This USB Audio Interface function provides the following advantages Playing back audio data with high sound quality This gives you direct clear sound in which the sound quality has less noise and deterioration than that from the AUX IN jack Recording performance on the instru...

Страница 103: ...ructions on connection by using a method other than via AUX IN jack or Bluetooth refer to the Smart Device Connection Manual on the website page 9 NOTICE Use an AB type USB cable of less than 3 meters USB 3 0 cables cannot be used NOTE The USB wireless LAN adaptor UD WL01 may not be available depending on your area When you use your smart device near the instrument we recommend that you set Wi Fi ...

Страница 104: ...by using an Audio Cable AUX IN jack You can connect the headphone jack of an audio player such as a smartphone and portable audio player to the instrument s AUX IN jack Audio playback on the connected device is output from the built in speakers of this instrument NOTICE To avoid damage to the devices first turn on the power to the external device then to the instrument When turning off the power f...

Страница 105: ...tooth function via wireless communication For proper operation the device must be compatible with A2DP Advanced Audio Distribution Profile The Bluetooth Audio function is explained here by using a smart device as an example of such Bluetooth equipped devices 1 Call up the Bluetooth display via Menu Bluetooth 2 Make sure that the Bluetooth function is set to On Before using the Bluetooth function b...

Страница 106: ...io data on the Bluetooth equipped device to confirm that the built in speakers of the instrument can output the audio sound When you turn on the instrument the next time the last connected Bluetooth equipped device will be connected to this instrument automatically if the Bluetooth function of the Bluetooth equipped device and the instrument is set to on If it is not connected automatically select...

Страница 107: ...e output from the AUX OUT jacks to the AUX IN jacks If you make this connection the signal input at the AUX IN jacks is output from the AUX OUT jacks These connections could result in a feedback loop that will make normal performance impossible and may even damage the equipment NOTE Use audio cables and adaptor plugs having no zero resistance Use only the L L R jack for connection with a monaural ...

Страница 108: ...you can duplicate the instrument display mirroring or separately show the lyrics text on an external monitor Use a USB display adaptor and a display cable which are compatible with both this instrument and the monitor to connect to the USB TO DEVICE terminal of this instrument For a list of compatible USB display adaptors visit the following website https download yamaha com NOTE Before using the ...

Страница 109: ...ions on and off while a foot controller controls continuous parameters such as volume Example 1 Using a foot controller to control the volume of the performance data played on the keyboard Connect an FC7 foot controller to the AUX PEDAL jack With the initial factory settings no special setup is necessary Example 2 Using a footswitch to control Song Start Stop Connect a footswitch FC4A or FC5 to th...

Страница 110: ... sound Effect For selecting an Effect type and adjusts its depth for each part Chorus Reverb For selecting a Chorus Reverb type and adjusts its depth for each part Pan Volume For adjusting panning and volume for each part Master Compressor Lets you turn on off the Master Compressor and edit related parameters Master EQ For editing the Master EQ Score For displaying the music notation score of the ...

Страница 111: ...2 Voice CVP 809 only Style Setting Setting For editing parameters for Style playback such as Stop ACMP Stop Accompaniment and OTS Link Timing Change Behavior Determines the Style condition sections tempo etc when selecting a different Style Song Setting Guide For selecting the type of the Guide function or changes the guide lamp settings Part Ch Determines which MIDI channel in the Song data is us...

Страница 112: ...hich parameters effect Split Point etc will not be changed when the panel setups are changed via Registration Memory Storage Indicates the capacity of the User memory and the connected USB flash drive or allows you to format it 101 System Indicates the firmware version of this instrument and lets you make basic settings such as the language for the display and voice guide 22 Factory Reset Backup F...

Страница 113: ... Lean the main unit against the wall with the key cover closed and the keyboard side on the bottom CAUTION Be careful not to pinch your fingers Have a Phillips head screwdriver of the appropriate size ready Power cord Legs To prevent the key cover from accidentally opening during assembly press down on the key cover making sure that the sheets shown remain in place MIC HPJ To prevent damage to the...

Страница 114: ...them to each of the legs using four thin screws 4 x 10 mm Make sure that the gradually inclined side of the leg beams faces the inside of the unit as shown 3 Attach the lyre braces 1 Attach the lyre braces using the four thin screws 4 x 16 mm 4 Raise the unit to the standing position Use the front legs as support to raise the unit Rear leg Front leg Front leg 6 x 40 mm fixing screws The gradually ...

Страница 115: ...e front side of the pedal box that were attached in step 5 2 5 Loosen the four screws that were attached in step 3 and then securely tighten the four screws again while pushing the lyre braces in the direction of arrows as illustrated 6 Insert the pedal cord plug into the pedal connector Insert the plug so the arrow side faces front toward the keyboard If the plug will not go in easily do not forc...

Страница 116: ...ll screws Does the pedal box rattle or give way when you step on the pedals Turn the adjuster so that it is set firmly against the floor Are the pedal and power cords inserted securely into the sockets CAUTION When moving the instrument always hold the bottom of the main unit Do not hold the key cover or top portion Improper handling can result in damage to the instrument or personal injury Transp...

Страница 117: ... of the music rest is not fixed Support the music rest with your hand so that the music rest will not fall Do not place the main unit upside down or with the rear side facing down Have a Phillips head screwdriver of the appropriate size ready 5 x 30 mm x 4 H 4 x 20 mm x 3 M 4 x 10 mm x 2 P To prevent the key cover from accidentally opening during assembly press down on the key cover making sure th...

Страница 118: ... A in the same way 3 Attach unit E to unit D Fix unit E to unit D using two screws L 4 Attach unit D to unit A 1 Fix unit D to the bottom surface of unit A using two screws L 2 Fix unit D to the speaker box of unit A using two screws J If the screw holes do not align loosen the other screws and adjust the position of unit D 3 CVP 809PWH Attach two caps K 5 Raise unit A into the upright position CA...

Страница 119: ...until the metal part of the cord plug disappears from view Otherwise the pedal may not function properly 2 Pass the pedal cord between units D and E 3 Align the pedal cord into the groove on unit D then install the cover onto the groove correctly Correct Incorrect 4 K CVP 809B CVP 809PE CVP 809PWH G G N 5 N 4 After completing the assembly please check the following Are there any parts left over Re...

Страница 120: ...mbled or you can disassemble the unit down to the condition it was in when you first took it out of the box Transport the keyboard horizontally Do not lean it up against a wall or stand it up on its side Do not subject the instrument to excessive vibration or shock When transporting the assembled instrument make sure all screws are properly tightened and have not been loosened by moving the instru...

Страница 121: ...C using four screws F Press D and E toward C while securing 2 Attach B 1 Align the holes on the upper side of B with the bracket holes on D and E then attach the upper corners of B to D and E by finger tightening two screws G These screws will be securely tightened in step 4 3 2 Secure the bottom end of B using four screws H 3 Mount A Be sure to place your hands at least 15 cm from either end of A...

Страница 122: ...ent clear of doors and other movable fixtures Move the instrument to an appropriate location Does the instrument make a rattling noise when you shake it Tighten all screws Does the pedal box rattle or give way when you step on the pedals Turn the adjuster so that it is set firmly against the floor Are the pedal and power cords inserted securely into the sockets CAUTION When moving the instrument a...

Страница 123: ... have a looping sound Some noise or vibrato is noticeable at higher pitches depending upon the Voice The overall volume is too low or no sound is heard The master volume may be set too low Set it to an appropriate level with the MASTER VOLUME dial page 20 All keyboard parts are set to off On the Home display touch Main Layer Left to turn on the part page 49 The volume of the individual parts may b...

Страница 124: ...MP function refer to the Reference Manual on the website page 9 Style The Style does not start even when the START STOP button is pressed The Rhythm channel of the selected Style may not contain any data Turn the ACMP ON OFF button on and play in the left hand section on the keyboard to sound the accompaniment part of the Style Only the rhythm channel plays accompaniment sounds are not heard Make ...

Страница 125: ... flash drive is unavailable appears and the recording is aborted Make sure to use a compatible USB flash drive page 100 Make sure that the USB flash drive has enough memory page 101 If you are using a USB flash drive to which data has already been recorded check first that no important data remains on the device then format it page 101 and try recording again The Song playback volume differs depen...

Страница 126: ...estore proper operation Connection The speakers do not switch off when a pair of headphones is connected to the PHONES jack The Speaker setting is On Set the speaker setting to Headphone Switch via Menu Utility Speaker Connectivity The Wireless LAN icon is not shown in the Menu display even though the USB wireless LAN adaptor is connected Disconnect the USB wireless LAN adaptor and connect it agai...

Страница 127: ...ny and ivory key tops escapement 88 key Linear Graded Hammers Yes Counter Weight Yes Touch Response Hard2 Hard1 Medium Soft1 Soft2 Pedal Number of Pedals 3 Damper with Half pedal function Sostenuto Soft Assignable Functions Sustain Sostenuto Soft Glide Song Play Pause Style Start Stop Volume etc GP Response Damper Pedal Yes Display Type TFT Color LCD Touch Screen Size 800 x 480 dots 9 0 inch 800 x...

Страница 128: ... each Style Chord Looper Yes Compatibility Style File Format SFF Style File Format GE SFF GE Songs MIDI Preset Number of Preset Songs 50 Classics 303 Lesson Songs 50 Popular Recording Number of Tracks 16 Data Capacity approx 3 MB Song Song Creator Yes Format Playback SMF Format 0 Format 1 XF Recording SMF Format 0 Songs Audio Recording Time max 80 minutes Song Format Playback WAV 44 1kHz 16bit ste...

Страница 129: ...evices access the Yamaha Downloads website Brightness Adjustment Yes display button lamps USB audio interface 44 1 kHz 24 bit stereo Storage and Connectivity Storage Internal Memory approx 2 GB External Drives USB flash drive Connectivity Headphones Standard stereo phone jack x 2 Microphone Mic Line in standard mono phone jack Input volume MIDI IN OUT THRU AUX IN Stereo mini jack AUX OUT L L R R A...

Страница 130: ...4 Copyright 22 D Damper Pedal 38 Data dial 30 Delete 34 Demo 13 Display 26 E Effect 96 Ending section 60 EQ 96 F Factory Reset 42 Fast Forward 68 Favorite 35 File 32 File Selection display 27 Fill in 61 Filter 96 Fingered 64 Fingered On Bass 64 Fingering type 64 Fixed Velocity 40 Folder 33 Foot Controller 109 Footswitch 109 Force quit 19 Format 8 101 Full Keyboard 64 G GP Responsive Damper Pedal 3...

Страница 131: ...estore 42 Reverb 96 Rewind 68 Rotary Speaker 56 S S Art S Art2 Voice 54 Save 32 Score 69 Search 36 Single Finger 64 Soft Pedal 38 Song 66 Song area 26 Sostenuto Pedal 38 Speed Tempo 74 Split Point 52 Stereophonic Optimizer 21 Style 57 Style area 26 Style Split Point 52 Super Articulation Voice 54 Synchro Start MIDI Song 69 Synchro Start Style 60 Synchro Stop 60 T Tag 90 Talk 85 Tempo 39 Text 70 Ti...

Страница 132: ...132 MEMO ...

Страница 133: ...hanged the files and the date of any change b You must cause any work that you distribute or publish that in whole or in part contains or is derived from the Program or any part thereof to be licensed as a whole at no charge to all third parties under the terms of this License c If the modified program normally reads commands interactively when run you must cause it when started running for such i...

Страница 134: ... the sharing and reuse of software generally NO WARRANTY 12 BECAUSE THE PROGRAM IS LICENSED FREE OF CHARGE THERE IS NO WARRANTY FOR THE PROGRAM TO THE EXTENT PERMITTED BY APPLICABLE LAW EXCEPT WHEN OTHERWISE STATED IN WRITING THE COPYRIGHT HOLDERS AND OR OTHER PARTIES PROVIDE THE PROGRAM AS IS WITHOUT WARRANTY OF ANY KIND EITHER EXPRESSED OR IMPLIED INCLUDING BUT NOT LIMITED TO THE IMPLIED WARRANT...

Страница 135: ...ing the free library to free software only so we use the Lesser General Public License In other cases permission to use a particular library in non free programs enables a greater number of people to use a large body of free software For example permission to use the GNU C Library in non free programs enables many more people to use the whole GNU operating system as well as its variant the GNU Lin...

Страница 136: ...ion to use the modified definitions b Use a suitable shared library mechanism for linking with the Library A suitable mechanism is one that 1 uses at run time a copy of the library already present on the user s computer system rather than copying library functions into the executable and 2 will operate properly with a modified version of the library if the user installs one as long as the modified...

Страница 137: ...e Foundation either version 2 1 of the License or at your option any later version This library is distributed in the hope that it will be useful but WITHOUT ANY WARRANTY without even the implied warranty of MERCHANTABILITY or FITNESS FOR A PARTICULAR PURPOSE See the GNU Lesser General Public License for more details You should have received a copy of the GNU Lesser General Public License along wi...

Страница 138: ...a product acknowledgment is not required but would be appreciated END OF COPYRIGHT NOTICE DISCLAIMER and LICENSE TRADEMARK The name libpng has not been registered by the Copyright owner as a trademark in any jurisdiction However because libpng has been distributed and maintained world wide continually since 1995 the Copyright owner claims common law trademark protection in any jurisdiction where c...

Страница 139: ...ion notice shall be included in all copies or substantial portions of the Software THE SOFTWARE IS PROVIDED AS IS WITHOUT WARRANTY OF ANY KIND EXPRESS OR IMPLIED INCLUDING BUT NOT LIMITED TO THE WARRANTIES OF MERCHANTABILITY FITNESS FOR A PARTICULAR PURPOSE AND NONINFRINGEMENT IN NO EVENT SHALL THE X CONSORTIUM BE LIABLE FOR ANY CLAIM DAMAGES OR OTHER LIABILITY WHETHER IN AN ACTION OF CONTRACT TOR...

Страница 140: ...te Music Co Inc and Black Bull Music Copyright Renewed All Rights Administered by Sony ATV Music Publishing LLC 424 Church Street Suite 1200 Nashville TN 37219 International Copyright Secured All Rights Reserved Eternal Flame Words and Music by Billy Steinberg Tom Kelly and Susanna Hoffs Copyright 1988 Sony ATV Music Publishing LLC and Bangophile Music All Rights on behalf of Sony ATV Music Publis...

Страница 141: ...Reserved Used by Permission Route 66 By Bobby Troup Copyright 1946 Renewed 1973 Assigned 1974 to Londontown Music All Rights outside the U S A controlled by Edwin H Morris Company A Division of MPL Music Publishing Inc International Copyright Secured All Rights Reserved Someone Like You Words and Music by Adele Adkins and Dan Wilson Copyright 2011 MELTED STONE PUBLISHING LTD BMG MONARCH and SUGAR ...

Страница 142: ...ment inapproprié des déchets Pour plus d informations à propos de la collecte et du recyclage des déchets d équipements électriques et électroniques veuillez contacter votre municipalité votre service de traitement des déchets ou le point de vente où vous avez acheté les produits Pour les professionnels dans l Union européenne Si vous souhaitez vous débarrasser des déchets d équipements électrique...

Страница 143: ...de l appareil doit accepter tout brouillage radioélectrique subi même si le brouillage est susceptible d en compromettre le fonctionnement This equipment complies with FCC IC radiation exposure limits set forth for an uncontrolled environment and meets the FCC radio frequency RF Exposure Guidelines and RSS 102 of the IC radio frequency RF Exposure rules This equipment has very low levels of RF ene...

Страница 144: ...LV Latvian VIENKĀRŠOTA ES ATBILSTĪBAS DEKLARĀCIJA Ar šo Yamaha Music Europe GmbH deklarē ka radioiekārta CVP 809GP CVP 809 CVP 805 atbilst Direktīvai 2014 53 ES Pilns ES atbilstības deklarācijas teksts ir pieejams šādā interneta vietnē https europe yamaha com en support compliance doc html LT Lithuanian SUPAPRASTINTA ES ATITIKTIES DEKLARACIJA Aš Yamaha Music Europe GmbH patvirtinu kad radijo įreng...

Страница 145: ......

Страница 146: ... Yamaha Music Europe GmbH Tyskland Generatorvej 8C ST TH 2860 Søborg Denmark Tel 45 44 92 49 00 FINLAND F Musiikki Oy Antaksentie 4 FI 01510 Vantaa Finland Tel 358 0 96185111 NORWAY Yamaha Music Europe GmbH Germany Norwegian Branch Grini Næringspark 1 1332 Østerås Norway Tel 47 6716 7800 ICELAND Hljodfaerahusid Ehf Sidumula 20 IS 108 Reykjavik Iceland Tel 354 525 5050 CYPRUS Nakas Music Cyprus Ltd...

Страница 147: ......

Страница 148: ...148 Manual Development Group 2019 Yamaha Corporation Published 05 2019 MWMA A0 VAH4330 Yamaha Global Site https www yamaha com Yamaha Downloads https download yamaha com ...

Отзывы: