background image

86

86

CVP-98/96/600

Freeze Function

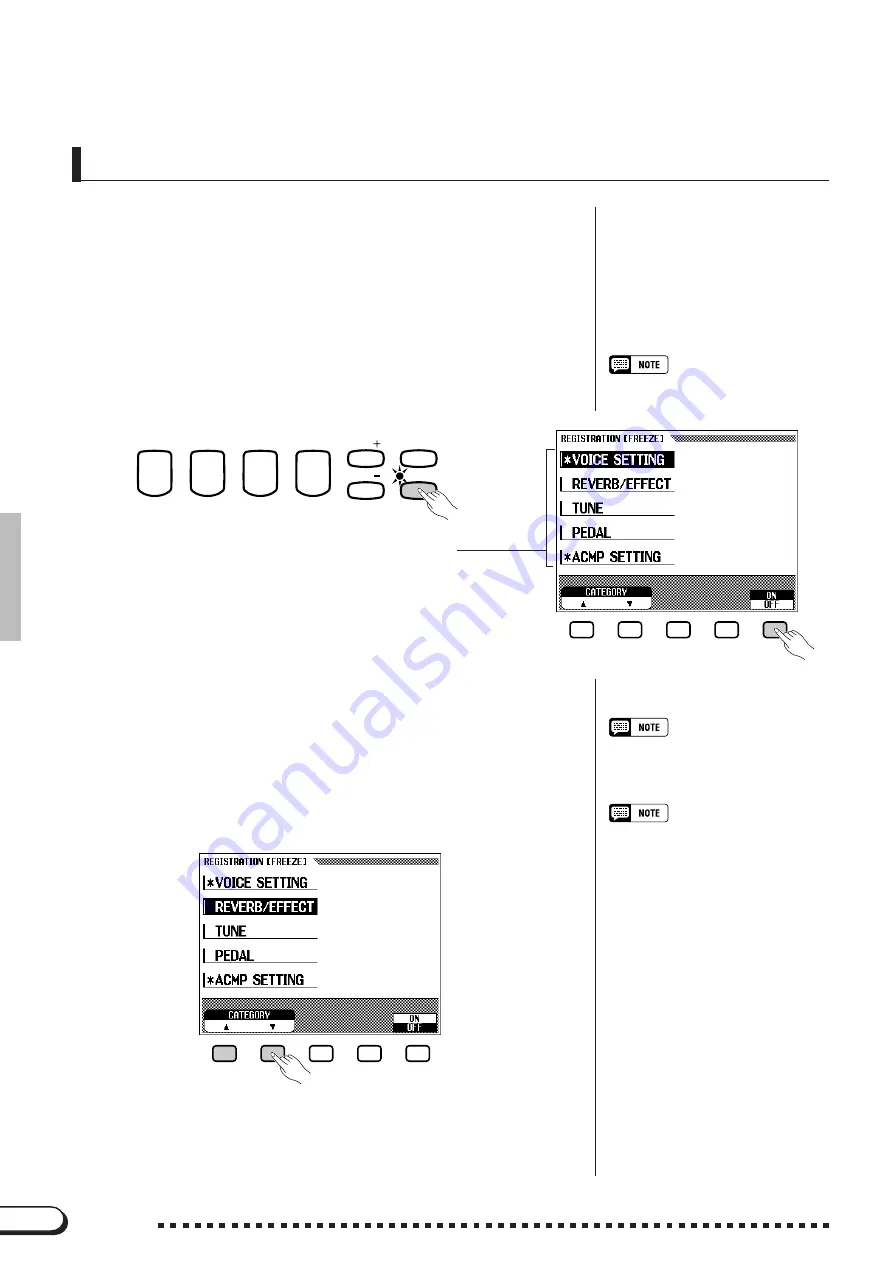
When the Registration Freeze function is set to on, the parameters set

in the FREEZE display will not be changed when a Registration is re-
called.  This allows you to recall different Registrations while using the
Auto Accompaniment, without suddenly changing the styles or volume
settings.

Z

Press [FREEZE] (the lamp lights), and the REGIS-
TRATION FREEZE pop-up display appears.

.......................

Parameters set to Freeze ON appear with

an asterisk (

*

), and “ON” (in the 

ON/OFF

section) is highlighted.

X

Select the desired parameter.

.............................................................

Select the desired parameter by using the left LCD buttons, then set

Freeze to ON or OFF by pressing the 

ON/OFF

 button.

You can also select the parameter by using the 

CATEGORY


▼ ▲

 but-

tons, data dial, or [–/+] buttons.

• The Registration Freeze function re-

mains on even if the banks are
changed.

Freeze Parameters
• Basic setting:  ACMP SETTING

Freeze ON (other parameters:  OFF)

• Backup of last settings: ON

○ ○ ○ ○ ○ ○ ○ ○ ○ ○ ○ ○ ○ ○ ○ ○ ○ ○ ○ ○ ○ ○ ○

Registrations 

(Registering/Recalling Panel Setups)

Freeze parameters

• For a list of the Freeze parameters,

see page 35 in the Reference Manual.

To cancel the Registration Freeze function, press [FREEZE] again

(the lamp turns off).

1

2

3

4

BANK

BANK

MEMORY

FREEZE

REGISTRATION

Содержание Clavinova CVP-600

Страница 1: ...ungs wert weist IMPORTANT Vérifiez la source d alimentation Vérifiez que la tension spécifiée sur le panneau inférieur correspond à la tension du secteur Dans certaines régions l instrument peut être équipé d un sélecteur de tension situé sur le panneau inférieur du clavier à proximité du cordon d alimentation Vérifiez que ce sélecteur est bien réglé en fonction de la tension sec teur de votre rég...

Страница 2: ...he safety in struction section SPECIAL MESSAGE SECTION Model _____________________________________ Serial No __________________________________ Purchase Date _____________________________ CAUTION RISK OF ELECTRIC SHOCK DO NOT OPEN CAUTION TO REDUCE THE RISK OF ELECTRIC SHOCK DO NOT REMOVE COVER OR BACK NO USER SERVICEABLE PARTS INSIDE REFER SERVICING TO QUALIFIED SERVICE PERSONNEL See bottom of Ke...

Страница 3: ...s frayed or damaged or if there is a sudden loss of sound during use of the instrument or if any unusual smells or smoke should appear to be caused by it immediately turn off the power switch disconnect the electric plug from the outlet and have the instrument inspected by qualified Yamaha service personnel Only use the voltage specified as correct for the instrument The required voltage is printe...

Страница 4: ... LCD Display and LCD Buttons 12 PAGE Buttons 14 EXIT Button 15 DISPLAY HOLD Button 15 Adjusting the Contrast of the LCD Display 15 Memory Backup 16 Display Messages 16 Adjusting the Volume 17 MASTER VOLUME 17 ACMP SONG VOLUME 17 MIXER 17 EXP PEDAL 18 Adjusting the Timbre of the Sound 19 MASTER EQUALIZER 19 Power Bass CVP 98 only 21 CHAPTER 2 Help Mode and Demo Play Using the Help Mode 22 Demo Play...

Страница 5: ...Playback 87 Playback 87 Part Cancel 91 Assignment of Tracks to 1 RIGHT and 2 LEFT and Voice Assignment 92 Overall Song Playback Volume Control 93 Individual Part Volume Control 94 Changing Settings in the TRACK MIXER Display 96 Repeat Functions 97 Other Playback Controls 99 Playing Other Types of Music Data 99 Guide Control 100 Guide Methods and Piano Roll 100 Using the Guide Function 101 Other Gu...

Страница 6: ...software the LCD display and guide lamps help you learn songs by showing you when and where to play the proper notes The three step system helps you to easily and quickly master each song See page 100 Fun Dynamic Automatic Accompaniment The Automatic Accompaniment of the Clavinova gives you full and ex citing instrumental backing in your favorite music styles according to the chords you play There...

Страница 7: ...tons corresponding to these items directly below or to the left or right are indicated in bold charac ters in this manual For example the term VOICE shown in the LCD display is written as VOICE Also the LCD buttons corresponding to VOICE in the display are indicated as VOICE in the manual VOLUME MASTER VOLUME ACMP SONG VOLUME MAX MIN MAX MIN When this mark is used words such as button slider jack ...

Страница 8: ...kup function page 147 you can have the Clavinova maintain your own edited settings or return to the basic settings after turning off the power The Recall function page 148 lets you restore the basic settings at anytime Main display This refers to the LCD display shown below which appears first when turning on the power Pop up When certain panel buttons are pressed the relevant display appears Some...

Страница 9: ...he floppy disk To remove a partially ejected disk try pressing the eject button once again or push the disk back into the slot then repeat the eject proce dure carefully Protecting Your Data Write Protect Tab Precautions Regarding Floppy Disk Use Never open the disk s shutter Dirt or dust on the Internal magnetic surface will cause data errors Never leave disks near a speaker TV or other device th...

Страница 10: ... is all the way down Do not try to use the music stand in a half raised position Also when lowering the stand make sure to press it until it is all the way down Key Cover To open the key cover ZLift the cover slightly not too much XSlide the cover open Hold the cover with both hands when moving it and do not release it until it is fully opened or closed Be careful to avoid catching fingers yours o...

Страница 11: ...E Press POWER again when turning off the power Both the display and the power lamp at the left of the panel will turn off Turning on the Power Setting Up the Clavinova POWER Standard stereo phone jack PHONES MIN MAX MIC VOL MIC To open the lid ZRaise the music stand as described in Music Stand on page 8 XRaise and hold the right side of the lid viewed from the keyboard end of the instrument CRaise...

Страница 12: ...ogo This indicates that the CVP 98 96 600 can playback XG compatible disk software See page 8 in the Reference Manual for more information on the XG format This is the Disk Orchestra Collection DOC format logo This indicates that the CVP 98 96 600 can play back DOC format disks See page 8 in the Reference Manual for more information on the DOC format This is the Style File logo This indicates that...

Страница 13: ... 13 E page 13 R SONG page 88 T MIXER page 17 Y MASTER EQUALIZER page 19 U FUNCTION page 128 Guide Control Section I EASY PLAY page 100 O NEXT NOTE page 100 P SOUND REPEAT page 101 Song Control Section a PAUSE page 99 s REW page 99 d FF page 99 f PLAY STOP page 89 g REC page 108 Voice Section h VOICE buttons page 27 j DUAL page 33 k SPLIT page 36 l REVERB page 41 EFFECT page 44 Registration Section...

Страница 14: ...e way LCD Display and LCD Buttons The five buttons located under the LCD display are referred to as the LCD buttons These buttons are used either to select the corresponding items displayed in the LCD or to change the values The five buttons located to the left and right of the LCD display are referred to as the left right LCD buttons These buttons are used to directly select parameters and settin...

Страница 15: ...ice by using the data dial or the buttons Display Highlight When selecting an item or parameter in the display the indication of the selected item is highlighted appears in reverse display When holding down a button In some cases when one of the LCD buttons or buttons is held down the value or setting changes continu ously For functions or parameters that have and or and indica tions you can reset...

Страница 16: ...ayback of the first song by pressing the LCD button under 1 Settings which can be selected by using the left and right LCD but tons are surrounded by hard rectangles Select these settings directly by pressing the left or right LCD buttons Some of the Clavinova s functions are contained on successive dis play pages To select the next page or previous page press the appropri ate PAGE button The curr...

Страница 17: ...mp flashes to indicate that it is the pop up display and that the previous display will appear after a few sec onds By pressing the DISPLAY HOLD at this point the lamp stays lit continuously and the selected display stays Pressing DISPLAY HOLD again turns the lamp off and the display returns to the previous one If DISPLAY HOLD is pressed for any non pop up display and the lamp is lit up the pop up...

Страница 18: ...up data is deleted and all the settings return to the basic settings For this reason you should turn on the power at least once a week and keep it on for a few minutes Backup of the Last Settings For parameters which can be set to Backup ON OFF the basic setting is indicated as Backup of last settings ON or OFF in the explanation of each parameter Items set to Backup ON can be re turned to the bas...

Страница 19: ...utomatic Accompaniment and individual parts of a song can be adjusted Press MIXER again or EXIT to return to the previous display There are three types of mixer display as shown below VOLUME MASTER VOLUME ACMP SONG VOLUME MAX MIN MAX MIN VOLUME STYLE START STOP AUTO ACCOMPANIMENT SONG CONTROL GUIDE CONTROL MASTER VOLUME ACMP SONG VOLUME MAX MIN MAX DEMO POP BALL ROOM LATIN POP TRADI TIONAL 16BEAT ...

Страница 20: ...ng volume page 95 for details Page 1 when using disk Page 2 when using disk Adjusting the Volume EXP PEDAL You can control the volume of your keyboard performance with your foot by connecting the optional Yamaha FC7 foot controller to the EXP PEDAL jack of the Clavinova The volume becomes louder when pressing the pedal down with your toes EXP PEDAL ...

Страница 21: ...nd USER The central frequency and the gain of the selected type will appear in the LCD display The gain becomes 0 for all frequencies when FLAT is selected Central frequency Gain VOLUME STYLE START STOP AUTO ACCOMPANIMENT SONG CONTROL GUIDE CONTROL MASTER VOLUME ACMP SONG VOLUME MAX MIN MAX DEMO POP BALL ROOM LATIN POP TRADI TIONAL 16BEAT ROCK BALLAD JAZZ DANCE POP HELP PIANIST INTRO MAIN A MAIN B...

Страница 22: ...hile listening to the changes in the sound The value is shown in the GAIN section of the display If you change the value even slightly when any type except USER is selected USER will be highlighted and the newly set value will overwrite the original USER setting Gain Range 12 0 12 dB EQ LOCK ON OFF When equalizer setting values are contained in the song data or when the equalizer setting data is r...

Страница 23: ... the emphasis can be changed by the VOLUME but tons in the POWER BASS display POWER BASS ON OFF Settings ON OFF Basic setting OFF Backup of last settings OFF VOLUME of POWER BASS Range 1 10 Basic value 6 Backup of last settings OFF To turn off the Power Bass function and return the sound to normal press the POWER BASS button again so that the lamp goes out DEMO HELP POWER BASS ...

Страница 24: ...bottom VOLUME STYLE START STOP AUTO ACCOMPANIMENT SONG CONTROL GUIDE CONTROL MASTER VOLUME ACMP SONG VOLUME MAX MIN MAX DEMO POP BALL ROOM LATIN POP TRADI TIONAL 16BEAT ROCK BALLAD JAZZ DANCE POP HELP PIANIST INTRO MAIN A MAIN B ENDING TAP SYNCHRO START STOP FADE IN OUT AUTO FILL HARMONY ONE TOUCH SETTING COUNTRY WALTZ DISK CUSTOM METRONOME PAGE RESET TEMPO BEAT CONTRAST POWER BASS ACMP ON VIRTUAL...

Страница 25: ...ish to stop the explanation while it is playing and return to the Help menu display press the STOP button You can select another menu and read through other explanations or you can exit from the Help mode and to go back to the main display by pressing HELP or by pressing EXIT Help Menus 1 Introduction 2 Basic Operation 3 Demo Songs 4 Voices 5 Styles The display pages are advanced automatically To ...

Страница 26: ... the song is finished playback stops automatically CSelect the song and start playback When the song is selected the Demo automatically plays back in the currently selected Play mode There are three ways to play back the song s as described below VOLUME STYLE START STOP AUTO ACCOMPANIMENT SONG CONTROL GUIDE CONTROL MASTER VOLUME ACMP SONG VOLUME MAX MIN MAX DEMO POP BALL ROOM LATIN POP TRADI TIONA...

Страница 27: ...y The currently selected song number is highlighted during play back Demo playback can also be started by pressing START STOP or PLAY STOP Playing the keyboard with Demo playback You can play the keyboard while the demo song is playing back You can also change the tempo page 49 and use the REW FF and PAUSE buttons The Guide function page 100 can also be used when playing back the 4 GUIDE Demo song...

Страница 28: ...g begins play ing back and continues according to the current mode Demo Play Demo Songs Some of the demonstration pieces listed above are specially arranged excerpts from the original compositions listed above All other songs are original 1997 by Yamaha Corporation SONG DEMO Title Composer Song1 Piano Concerto in A minor 1st Mov Robert Alexander Schumann Song2 She Wore A Yellow Ribbon Traditional ...

Страница 29: ...Backup function page 147 is set to ON the last selected voice will automatically be selected VOLUME STYLE START STOP AUTO ACCOMPANIMENT SONG CONTROL GUIDE CONTROL MASTER VOLUME ACMP SONG VOLUME MAX MIN MAX DEMO POP BALL ROOM LATIN POP TRADI TIONAL 16BEAT ROCK BALLAD JAZZ DANCE POP HELP PIANIST INTRO MAIN A MAIN B ENDING TAP SYNCHRO START STOP FADE IN OUT AUTO FILL HARMONY ONE TOUCH SETTING COUNTRY...

Страница 30: ...rameter page 131 Selecting Voices from the Main Display You can also select a voice by using VOICE even after the VOICE SELECT display has changed back to the main display ZPress either VOICE or VOICE is highlighted XSelect the voice Select the voice by using the data dial or buttons You can also select voices by pressing VOICE When selecting a voice in this way the voice can be selected not only ...

Страница 31: ...ate organ voices by adjusting several footage settings just as on conventional organs Vari ous organ voices can be created by the setting combinations shown be low FOOTAGE display Footage volume setting eight continuous voices corresponding to conven tional organ footages Setting the speed of the rotary speaker effect FAST SLOW ATTACK display Attack Footage volume setting three decay voices used a...

Страница 32: ...y using the CURSOR but tons then set the volume by using the data dial or buttons Setting the speed of the rotary speaker effect Press the middle LCD button to change between FAST SLOW To call up the ATTACK display press the CURSOR button when the cursor is at 1 Voice Type and Volume Image About Organ Footages The standard pitch is 8 feet A setting of 4 feet is one octave higher than 8 feet 2 feet...

Страница 33: ...le LCD button to change between the EACH FIRST settings When set to EACH the attack sound is applied to all played notes When set to FIRST the attack sound is applied only to the first played note in a legato sequence and is not applied to subsequent notes played in legato Selecting Voices To call up the FOOTAGE display press the CURSOR button when the cursor is at 4 Image of Attack Length and Res...

Страница 34: ...of the Standard Kit are marked by symbols above the assigned keys See the Drum Kit list on page 32 in the Reference Manual for the types of percussion sounds in each Drum Kit When a Drum Kit is selected only the keys with drum or percussion symbols printed above them will sound The Transpose page 130 Tune page 130 and Octave Shift page 35 38 functions do not affect the Drum Kits Selecting Voices P...

Страница 35: ...r buttons after pressing RIGHT2 VOICE it is highlighted Pressing RIGHT2 VOICE also advances through the available voices holding it down advances continuously Second Voice Range All voices Basic setting Strings Slow 1 Backup of last settings OFF VOLUME STYLE START STOP AUTO ACCOMPANIMENT SONG CONTROL GUIDE CONTROL MASTER VOLUME ACMP SONG VOLUME MAX MIN MAX DEMO POP BALL ROOM LATIN POP TRADI TIONAL...

Страница 36: ...e of the two voices by us ing the data dial or buttons Pressing BALANCE lets you increase the level of the second voice only Equal balance can be instantly reset by simultaneously pressing the buttons Volume Balance Basic setting Equal volume Backup of last settings OFF The Volume Balance setting globally affects all voice combinations Differ ent settings cannot be made for each voice The second v...

Страница 37: ...y It is highlighted XAdjust the Detune Depth by using the data dial or buttons You can also press DETUNE DEPTH to increase the value The higher the value the greater the Detune Depth Detune Depth Range 0 10 Basic setting 5 Backup of last settings OFF The Detune Depth setting globally affects all voice combinations Differ ent settings cannot be made for each voice Octave Shift Settings 1 1 octave l...

Страница 38: ...lding it down advances continuously The second voice can be selected from all available voices Left range voices Range All voices Basic setting Acoustic Bass 1 Backup of last settings OFF F 2 C3 C4 C5 C6 C7 C2 C1 C0 Right hand section Left hand section VOLUME STYLE START STOP AUTO ACCOMPANIMENT SONG CONTROL GUIDE CONTROL MASTER VOLUME ACMP SONG VOLUME MAX MIN MAX DEMO POP BALL ROOM LATIN POP TRADI...

Страница 39: ... lamp turns off and the Split mode is no longer active Changing the Split Point You can set the point dividing the right and left keyboard ranges at any desired key position The basic setting of the Split Point is F 2 To set the Split Point press the desired key while holding down the SPLIT button The Split Point key is included in the left range The keyboard guide lamp corresponding to the select...

Страница 40: ...ces up or down an octave Press either LEFT or RIGHT1 of the OCTAVE SHIFT parameter in the SPLIT pop up display The values change each time the LCD button is pressed Avail able settings are 1 0 and 1 Changing the Octave Setting of the Two Voices Octave Shift Settings 1 1 octave lower 0 no octave shift 1 1 octave higher Basic setting 0 no octave shift Backup of last settings OFF You can also set the...

Страница 41: ...nger or Fingered modes page 56 of the Automatic Accompaniment function with the Split mode In this case pressing the keys in the left range will sound the Automatic Accom paniment voices as well as the left range voice Using the Dual and Split Functions Simultaneously The DUAL and SPLIT buttons can be turned on simultaneously The right range set for the Split mode can be used with two voices Dual ...

Страница 42: ...played staccato Certain voices in the DRUMS or XG groups may not be affected by use of the sostenuto pedal Certain voices such as STRINGS or BRASS sustain continuously when the sostenuto pedal is pressed Soft Pedal Left Pressing this pedal reduces the volume and slightly changes the tim bre of the notes you play You can also assign one of many other functions to this pedal for example you can use ...

Страница 43: ...rb icon and the Reverb Type are indi cated in the main display Selecting the Reverb Type Select the Reverb Type by pressing the left right LCD buttons in the REVERB pop up display Reverb Type Range Refer to the Reverb Type list Basic setting Differs depending on the accompaniment style The as signed type for the selected style will automatically be selected In other words when you select a differe...

Страница 44: ... Different settings cannot be made for each voice Different Reverb Depth settings can be made for each part Refer to the next section Reverb Reverb Type List You can also select the Reverb Type by using the REVERB TYPE buttons or by pressing REVERB TYPE to highlight the parameter and using the data dial or buttons The Reverb Type setting globally affects all voices Different settings cannot be mad...

Страница 45: ...in the REVERB PART DEPTH display You can also select several parts and adjust their settings simultaneously Set the Reverb Depth of the highlighted part by using the data dial or buttons The values can be changed in 5 unit steps You can also advance the Depth value by pressing MIC BASS CHORD RHYTHM or KBD keyboard To reset the value to the basic setting of 50 simultaneously press the buttons Rever...

Страница 46: ...th is set to 0 the EF FECT lamp will not light To turn Effect off press EFFECT again The lamp turns off Effect ON OFF Basic setting Differs depending on the voice Backup of last settings OFF VOLUME STYLE START STOP AUTO ACCOMPANIMENT SONG CONTROL GUIDE CONTROL MASTER VOLUME ACMP SONG VOLUME MAX MIN MAX DEMO POP BALL ROOM LATIN POP TRADI TIONAL 16BEAT ROCK BALLAD JAZZ DANCE POP HELP PIANIST INTRO M...

Страница 47: ...f the second voice of Dual mode or of the left range voice of SPLIT mode the effects will be applied to both voices Voice Effects STAGE1 STAGE2 Reverb for solo instruments STAGE3 HALL1 HALL2 Concert hall reverb HALL3 ROOM1 ROOM2 Small room reverb ROOM3 Reverb Types selectable from the Effect display Effect Types DELAY L R Initial delay for each stereo channel and two separate feedback delays ECHO ...

Страница 48: ...asic setting Differs depending on the voice microphone 0 Backup of last settings OFF Pressing R1 DPT or MIC DPT also advances the value To reset the value to the basic setting simultaneously press the buttons If the Effect Depth is set to 0 the EF FECT lamp will not light You can easily restore the basic settings of the selected voice s EF FECT TYPE and R1 DPT parameters by pressing RESET in the d...

Страница 49: ...T ROCK BALLAD JAZZ DANCE POP HELP PIANIST INTRO MAIN A MAIN B ENDING TAP SYNCHRO START STOP FADE IN OUT AUTO FILL HARMONY ONE TOUCH SETTING COUNTRY WALTZ DISK CUSTOM METRONOME PAGE RESET TEMPO BEAT CONTRAST POWER BASS ACMP ON VIRTUAL ARRANGER MIN EXIT DISPLAY HOLD PAUSE REW EASY PLAY SONG MIXER PIANO E PIANO VIBES GUITAR ORGAN XG DRUMS BASS BRASS DUAL SPLIT REVERB EFFECT STRINGS CHOIR SAX FLUTE DI...

Страница 50: ...tyle Select the desired style by pressing the appropriate left right LCD button The data dial and buttons also can be used You can also select the style by pressing the STYLE buttons Selecting Accompaniment Styles Selecting styles from the Main Display You can also select a style by using STYLE even after the STYLE SELECT display has changed back to the main display When Style Buttons are Inactive...

Страница 51: ... side in the main dis play Unless you try changing the style during playback in which case the same tempo is maintained Press the TEMPO buttons The tempo indication in the main display is highlighted Use the data dial or buttons to set the tempo You can also press either TEMPO button briefly to decrement or increment the tempo value by one or hold the button for continuous decrementing or incremen...

Страница 52: ...d by pressing the MAIN A or MAIN B buttons The lamp of the cuurently selected pattern lights Main A is the basic pattern of the style and Main B is a variation or rearrangement of the Main A Judicious switching between Main A and Main B patterns within a song can add variety and make the overall rhythm more interesting Switching during playback automatically plays a fill in Auto Fill before changi...

Страница 53: ...ree times for 3 beat styles and five times for 5 beat styles When playing a 4 beat song tap 4 times The TAP button can also be used to change the tempo during style playback by tapping the button twice In this case the tap click will not sound If you do not tap the TAP button the required number of times i e 3 times for a 3 beat style the Tap Start func tion will be canceled after a few sec onds S...

Страница 54: ... to start the style by setting the the Left Pedal function page 133 to Start Stop The pedal can also be set to control Break Fade in out Fill in or Ending This setting is exception ally convenient since it lets you control the style with your foot while leaving both hands free to play BEAT During style playback the left most beat lamp red flashes on the first beat of each measure and the other lam...

Страница 55: ...ovided for the MAIN A and MAIN B variations The ENDING lamp lights during ending playback The MAIN A lamp also lights when changing from the Main A pattern and the MAIN B lamp lights when entering from Main B The ending begins from the top of the next measure if the ENDING button is pressed on or after the second beat of a measure You can have the accompaniment fade out gradually decrease in volum...

Страница 56: ... stop the metronome sound The METRONOME lamp turns off Adjusting the Tempo and Volume of the Metronome As with the same parameter for the style you can set the tempo over a range of 32 280 by using the TEMPO buttons Press the TEMPO buttons The tempo indication in the Main Dis play is highlighted Use the data dial or buttons to set the tempo You can also press either TEMPO button briefly to decreme...

Страница 57: ... the value with the data dial or buttons You can also select the value by holding down BEAT or When NORMAL is selected the metronome click sounds continu ously at the current tempo with no accented beats The 2 3 4 and 5 selections produce a bell accent on the first beat of each measure Using Style and Metronome Together If a style is started by pressing the START STOP button while the metro nome i...

Страница 58: ...cally produces appropriate automatic accom paniment for virtually anything you play on the keyboard in any range See page 59 Types of Auto Accompaniment Detailed explanations of the use of Single Finger Multi Finger Fingered and Full Keyboard are given on pages 58 and 59 ZSelect a style Select the desired style See page 47 When Style Buttons are Inactive Accompaniment style cannot be se lected in ...

Страница 59: ...s to call up the various pages XSet the tempo When the Auto Accompaniment func tion is set to ON Synchro Start is automatically set to stand by Press the ACMP ON button again to turn off the lamp and set Auto Accompaniment to OFF When the ACMP ON Button is Inac tive The ACMP ON button cannot be turned on during playback of commer cially available disk software When playing back songs recorded with...

Страница 60: ... root note of the chord Single Finger Chords The following four chord types can be played with Single Finger The illustration below shows the corre sponding keys for each root note Playing with the Auto Accompaniment Chord name Cm C7 Cm7 C Minor Simultaneously press the root note of the chord and any black key to the left of it Seventh 7 Simultaneously press the root note of the chord and any whit...

Страница 61: ... nearest the root note of the chord Full Keyboard When the Full Keyboard mode is selected the Clavinova will auto matically create appropriate accompaniment while you play just about anything using both hands anywhere on the keyboard You don t have to worry about specifying the accompaniment chords The name of the detected chord will appear in the display Although Full Keyboard is designed to work...

Страница 62: ...as strings organ and choir PHRASE The Phrase part is used for embellishments such as punchy brass stabs arpeggiated chords and other extras that make the accompaniment more interesting RHYTHM This is the main rhythm part The Rhythm part usually plays one of the drum kits By adjusting the volume balance of the various parts and setting some parts volume to 0 you can create different types of accomp...

Страница 63: ...OLUME is relative to the MASTER VOLUME Each part volume of the Auto Accom paniment is relative to the ACMP SONG VOLUME KBD keyboard volume is relative to the MATER VOLUME The Harmony part volume is relative to the KBD part volume Reverb Depth of Each Part For details on setting the Reverb Depth for each part see page 43 Changing the The split point also can be set by pressing the SPLIT POINT or bu...

Страница 64: ...armony type by using the HARMONY buttons The Harmony feature cannot be turned on when Full Keyboard is selected for the Auto Accompaniment XPlay the keyboard Play the keyboard along with the Auto Accompaniment With some Harmony types the voice used for the Harmony will be different from the currently selected voice The Harmony feature can be used while playing back the intro or ending or while the...

Страница 65: ...the PI ANIST or DISK CUSTOM groups Using the One Touch Setting Function ZSelect the desired style in the normal way then press the ONE TOUCH SETTING button The lamp lights and the One Touch Setting pop up display ap pears When using the ONE TOUCH SET TING function the Auto Accompani ment turns on automatically If the ONE TOUCH SETTING button is turned on before starting the style Synchronized Star...

Страница 66: ... melodic Auto Accompaniment may sometimes not match with the melody or chord progression of the song being played When a DISK CUSTOM style is selected the Virtual Arranger function has no effect even if set to on This function lets you have the Auto Accompaniment sound only when you hold down keys in the left hand range below and including the split point Auto Accompaniment automatically stops whe...

Страница 67: ...tion lets you mute some of the se lected Auto Accompaniment parts creating a simpler and smaller orches tration and accompaniment Press ACMP ON to call up the ACCOMPANIMENT MODE pop up display To turn Small Accompaniment on press the SMALL ACMP button so that it is highlighted To turn Small Accompaniment off press the SMALL ACMP button again Small Accompaniment SMALL ACMP SMALL ACMP can be set to ...

Страница 68: ...ngered method are indicated by the keyboard guide lamps ZSet the Chord Assist function to ON To do this first press the ACMP ON button to call up the ACCOM PANIMENT MODE pop up display Press CHORD ASSIST to set the Chord Assist function to on The CHORD ASSIST display appears and the chord indication auto matically changes to Fingered XStart the Auto Accompaniment Press START STOP or use Synchroniz...

Страница 69: ...h dim7 Flatted fifth b5 Seventh flatted fifth 7 b5 Minor major seventh mM7 All the Fingered chords can be entered from the keyboard The root and type of the chord name entered from the LCD appears in the ROOT and TYPE parameter locations while the chord name recognized from the keyboard or entered by the ENTER button appears at the side of the keyboard icon located at the left of the LCD A flashin...

Страница 70: ...or lights then press the CUSTOM STYLE LCD button The Please select a source style message will appear on the display for a few seconds before going to the CUSTOM STYLE display page 1 and the current DISK CUSTOM style will begin playing VOLUME STYLE START STOP AUTO ACCOMPANIMENT SONG CONTROL GUIDE CONTROL MASTER VOLUME ACMP SONG VOLUME MAX MIN MAX DEMO POP BALL ROOM LATIN POP TRADI TIONAL 16BEAT RO...

Страница 71: ...was selected when the Cus tom Style function was engaged As for FILL IN FILL IN from A to A or FILL IN from B to B is used Beat of the selected style Current measure number of the selected section Total measure number of the selected section XSelect a source style Select a preset style that is close to the style you want to create Preset style selection is carried out in the normal way page 47 If ...

Страница 72: ... meas ures for the selected section or the data dial or buttons once the MEASURE parameter has been selected As soon as you choose to change the number of measures in the section the Clear section prompt will appear since you will have to clear all parts of the currently selected section and start recording from scratch if you change the number of measures Press OK to clear the section or CANCEL t...

Страница 73: ...used The R1 part is initially selected and set to the record mode Any part you select can be set to the record mode by using the rightmost LCD button to select RECORD after selecting the part the part number will be highlighted Since parts other than R1 and R2 must be cleared before they can be recorded if the source style is a preset style or a style loaded from the optional Style File disk the C...

Страница 74: ... the Custom Style mode data cannot be recorded while playback is stopped MQuantize the recorded part if necessary You can tighten up the timing of a recorded part by aligning all notes to specified beats via the PART QUANTIZE function in CUSTOM STYLE display page 2 press the PAGE button Press the LCD but ton below the note symbol to select quantize size i e the beats to which the notes in the curr...

Страница 75: ...ustom style When your custom style is complete use the PAGE buttons to select CUSTOM STYLE display page 3 and press the STYLE NAME LCD button to go to the style naming page The current style name appears in the upper right corner of the dis play Use the CHAR LCD button to position the underline cursor at the character you want to change style names can be up to 12 characters in length Use the data...

Страница 76: ...at the time the Custom Style is stored becomes the preset tempo for that style If the selected memory number already contains a style the style name will appear next to the memory number The existing style will be overwritten when a new style is stored Other Custom Style Functions In addition to the various functions described in the basic custom style recording procedure above the CUSTOM STYLE di...

Страница 77: ...lected the SECTION parameter is fixed at ALL and the VALUE range is from 50 to 50 relative to the preset volume of the source style The REVERB and EFFECT DEPTH ranges are from 0 to 100 The PAN VALUE settings are L10 full left C center R10 full right When EFFECT is selected the TYPE parameter appears and you can also select the effect type via the TYPE LCD button The available effect types are list...

Страница 78: ...ered a name for the Custom Style itself page 73 Press SAVE when the name has been entered If a file with the same name already exists the Same name Overwrite confirmation prompt will appear Press OK to overwrite the existing file or CANCEL to abort Saved Custom Style files can be loaded via the STYLE FILE LOAD function described in the Style File Load section page 80 Save to Disk A complete set of...

Страница 79: ...e Are you sure confirmation prompt will appear Press YES to delete the custom style file or NO to abort Press the EXIT button to exit from the Custom Style mode and return to the normal play mode Custom Style Once created your original custom styles can be selected for play back by pressing the DISK CUSTOM button its LED will light and then using the STYLE and LCD buttons or the data dial or butto...

Страница 80: ...y to either delete a style you don t need or simplify the style you are currently recording Press CANCEL to re turn to CUSTOM STYLE display page 1 at which point you can sim plify the current style by clearing a part etc or DELETE to go to the Delete style display Use the MEMORY No and buttons to select the number of the style you want to delete then press OK to delete the style or CANCEL to abort...

Страница 81: ... the style and then select the new source style or press CANCEL to return to the Custom Style mode If you want to select a different source style without storing the current style exit from the CUS TOM STYLE mode without storing the style see Exit Before Store above and then re enter the CUSTOM STYLE mode Press OK to return to CUSTOM STYLE display page 1 and simplify the style by clearing a part e...

Страница 82: ... and identifies the disk When an appropriate Style File disk is inserted the STYLE FILE LOAD display see step 2 below will appear automatically If the disk is already inserted and the STYLE FILE LOAD display is not showing press the DISK CUS TOM selector to call the DISK CUSTOM STYLE display and press the LOAD SINGLE button Loading Disk Styles If a disk containing both song and style files is load...

Страница 83: ...a for LISTEN function Please load data alert display will appear In this case load the style directly as in step 3 ABC is automatically turned on when the LOAD SINGLE button is pressed and the style is played back automati cally with the ABC accompaniment in C Major when the LISTEN LCD button is pressed You can also change the chord or try playing on the keyboard if you like CSelect a Memory Numbe...

Страница 84: ...nd used with ABC auto accompaniment in exactly the same way as the preset styles page 47 The amount of memory being used for the selected style is also shown on the display in approximate kilobytes so as to set up the approximate standard which style to delete in relation to the total 300 KB memory space Style File Load It is not necessary to select a memory number when ALL LOAD is selected in ste...

Страница 85: ...LUME STYLE START STOP AUTO ACCOMPANIMENT SONG CONTROL GUIDE CONTROL MASTER VOLUME ACMP SONG VOLUME MAX MIN MAX DEMO POP BALL ROOM LATIN POP TRADI TIONAL 16BEAT ROCK BALLAD JAZZ DANCE POP HELP PIANIST INTRO MAIN A MAIN B ENDING TAP SYNCHRO START STOP FADE IN OUT AUTO FILL HARMONY ONE TOUCH SETTING COUNTRY WALTZ DISK CUSTOM METRONOME PAGE RESET TEMPO BEAT CONTRAST POWER BASS ACMP ON VIRTUAL ARRANGER...

Страница 86: ...ding to the desired Registration Then simply press the corresponding REGISTRATION 1 4 button to recall the desired Registration The recalled Registration number bank button number and the Registration name will appear below and to the right of the style name in the LCD display A pencil icon appears at the right of the Registration name in the display as soon as any change is made to the panel butt...

Страница 87: ...ers in length You can also select the Registra tion number by using the BANK or REGIST buttons Use the data dial or buttons to select and high light the character or mark you wish to enter Press the CHAR SET button to enter the selected character to the current cursor position in the file name Continue entering other characters or marks in this way until you complete the name To delete the charact...

Страница 88: ... highlighted XSelect the desired parameter Select the desired parameter by using the left LCD buttons then set Freeze to ON or OFF by pressing the ON OFF button You can also select the parameter by using the CATEGORY but tons data dial or buttons The Registration Freeze function re mains on even if the banks are changed Freeze Parameters Basic setting ACMP SETTING Freeze ON other parameters OFF Ba...

Страница 89: ...UME STYLE START STOP AUTO ACCOMPANIMENT SONG CONTROL GUIDE CONTROL MASTER VOLUME ACMP SONG VOLUME MAX MIN MAX DEMO POP BALL ROOM LATIN POP TRADI TIONAL 16BEAT ROCK BALLAD JAZZ DANCE POP HELP PIANIST INTRO MAIN A MAIN B ENDING TAP SYNCHRO START STOP FADE IN OUT AUTO FILL HARMONY ONE TOUCH SETTING COUNTRY WALTZ DISK CUSTOM METRONOME PAGE RESET TEMPO BEAT CONTRAST POWER BASS ACMP ON VIRTUAL ARRANGER ...

Страница 90: ... are displayed including song numbers that contain no song data However no song names are displayed for song numbers that contain no data Select ALL if you want all songs on the disk to be played in order Select RANDOM if you want all songs on the disk to be played at random For either selection ALL or RANDOM the songs will be repeated until playback is stopped File Icons There are four icons show...

Страница 91: ...p automatically The current measure number and tempo will be shown in the display during playback You can also start playback of the selected song by pressing the START STOP button Press the panel PLAY STOP button to stop playback Song playback stops You can also stop playback by pressing the START STOP button You can exit from the song play mode by pressing the SONG button The lamp turns off and ...

Страница 92: ...d from 99 to 99 at maximum the range differs depending on the software The beat lamp may not flash for songs not having rhythm With some songs the displayed measure numbers may not match those marked on the score Make sure not to take out the disk while the DISK IN USE lamp is lit or while a song is being played back Volume Adjustment for Each Part The volume of each Part can be ad justed in the M...

Страница 93: ...ft files DOC files and XG ESEQ files the part indication does not appear for the parts without data Turning Individual Accompaniment Parts On or Off Normally pressing the ORCH accompaniment LCD button turns all orchestra parts tracks 3 16 or all parts other than 1 RIGHT and 2 LEFT on or off at once You can however turn these parts on or off individually from the SONG PLAY TRACK PLAY display displa...

Страница 94: ...lo function Assignment of Tracks to 1 RIGHT and 2 LEFT and Voice Assignment Assigning Tracks to 1 RIGHT and 2 LEFT Specific tracks can be assigned to the 1 RIGHT and 2 LEFT in the SONG PLAY MAIN display allowing you to selectively turn playback of assigned tracks on or off TRACK OFF can be assigned to 2 LEFT The same track cannot be assigned to both parts The track assignments of DOC files and Yam...

Страница 95: ...der s position After that moving the slider will set the volume to the corresponding level If Auto Accompaniment is turned on during the playback of an original song that was recorded without Auto Ac companiment the ACMP SONG VOLUME control will affect the level of the Auto Accompaniment rather than that of song playback However Auto Accompaniment cannot be turned on when playing back data transfo...

Страница 96: ...the Song Play mode to call up the MIXER display The display corresponding to the software being played back appears in display page 1 and you can control the volume balance of the keyboard sound and the orchestra accompaniment Each track can be adjusted in display page 2 Page 1 Press one of the LCD buttons to highlight the desired parameter then use the data dial or buttons to adjust the volume of...

Страница 97: ...c The parameters below can be changed See the indicated reference pages for each parameter Available parameters in the TRACK MIXER display Song Playback The parameters Program Change Number PRG Bank LSB BNK LSB and Bank MSB BNK MSB which are used to select voices via MIDI are displayed when VOICE is selected When track 1 16 is selected VOLUME See page 94 VOICE See page 27 PAN See page 132 REVERB D...

Страница 98: ... the parameters while the song is playing back let ting you immediately hear the results of your edits Selecting TTL and changing the RE VERB DEPTH value will also affect the sound of your keyboard performance The voices of tracks to which data of Auto Accompaniment rhythm and or harmony have been recorded can also be changed Volume range 0 100 One EFFECT TYPE can be set to a single song If anothe...

Страница 99: ...fic phrase numbers as indicated on the accompanying sheet music and repeatedly practice only the selected phrase Phrase Repeat can be used for the four songs for which notation is provided in the included Music Book If you select PHRASE by using the REPEAT MODE or buttons the PHRASE display for selection of the phrase number will appear at the right of the button Press PHRASE or to highlight the c...

Страница 100: ...PLAY STOP button The specified A B points will be erased when a new song number or another Repeat mode is selected A lead in count automatically plays before the specified section A B Repeat playback is started However for free tempo songs a lead in count is not available To specify the A point as the beginning of the song press A before play back starts In this case a lead in count is not availab...

Страница 101: ...cation formats GM System Level 1 XG DOC Refer to the section MIDI and Data Compatibility page 8 in the Refer ence Manual for information on the voice allocation formats and sequence formats The internal tone generator of the CVP 98 96 600 automatically resets for compatibility with song data of the Yamaha XG format including GM Sys tem Level 1 page 8 in the Reference Manual or of Yamaha DOC voice ...

Страница 102: ...ts you check which notes to play by looking at the piano roll display and the keyboard guide lamps Since the Clavinova waits to play the accompaniment until you play the correct note you can practice at your own pace The keyboard guide lamps indicate the timing in which to play by changing from lit up to flashing When the keyboard guide lamps do not flash The guide lamps may not flash in the case ...

Страница 103: ... duration hold the note for as long as the bar remains in the display ZSet up the desired song for practicing Check that the disk is properly inserted in the disk drive before call ing up the Guide function Select the song and cancel the part that you wish to practice your self from the SONG PLAY MAIN display display page 1 Using the Guide Function Before Practicing Before starting to practice pla...

Страница 104: ... be changed for songs in which SPECIAL is indicated in the GUIDE MODE loca tion in SONG PLAY GUIDE MODE display page 5 The PAUSE button cannot be used in the Next Note or Sound Repeat meth ods VStop your practice session The Guide function stops automatically when playback reaches the end of the song You can also stop song playback by pressing the PLAY STOP button To turn off the Guide function pr...

Страница 105: ... MODE Change the indication to ENSEMBLE by pressing the GUIDE MODE button the part which was set to Part Cancel in the SONG PLAY MAIN display display page 1 can then be played with the regular Part Cancel function and the other part not set to Part Cancel can be played with the Easy Play function The ENSEMBLE mode is effective only for songs which have data in both the 1 RIGHT and 2 LEFT parts The...

Страница 106: ...display off press the LYRICS button to set the function to OFF Piano Roll Settings AUTO ON OFF Basic setting AUTO Backup of last settings OFF Keyboard Guide Lamp ON OFF To turn off the keyboard guide lamps press the LAMP button to set the function to OFF Guide Control Setting the Piano Roll Indication The piano roll settings AUTO ON OFF can be changed by pressing the PIANO ROLL button When AUTO is...

Страница 107: ...r information on using floppy disks Songs recorded by the CVP 98 96 600 are saved as XG SMF format 0 files See page 8 in the Reference Manual for information on the XG SMF format 0 format Recorded song data is not output through the MIDI OUT terminal when played back Track 1 Piano Part right hand Track 2 Piano Part left hand Track 3 Bass Part Track 4 Strings Part Track 9 Rhythm Part Track 10 Rhyth...

Страница 108: ...Insert a disk Gently insert the included blank disk for recording into the disk drive face up as shown in the illustration until it clicks into place A few seconds after inserting the disk into the disk drive a Start disk format message appears in the display To start formatting press the OK button To cancel the format operation press CAN CEL XExecute the format operation An Are you sure message a...

Страница 109: ... matically be called up even after inserting the disk in disk related Func tion operations and the CUSTOM STYLE display Using Style File Disks When using Style File disks first load the desired data from the Style File disk page 80 then insert the record ing disk XSelect the song number to be recorded Select the desired song number for recording by using the SONG or buttons data dial or buttons Th...

Страница 110: ... function or record two different parts by using the Dual or Split functions Harmony is recorded to tracks 6 7 and 8 When using Dual with recording of the 1 RIGHT part data is recorded to tracks 1 and 3 when using Split with recording of the 1 RIGHT part data is recorded to tracks 1 and 5 When using Dual with the 2 LEFT part data is recorded to tracks 2 and 4 when using Split with the 2 LEFT part ...

Страница 111: ...Recording With out a Disk page 127 for more information Song Recording NStart recording There are several ways to start recording as described below Recording your keyboard performance 1 RIGHT or 2 LEFT Start playing the keyboard or press the PLAY STOP button Recording the Auto Accompaniment or rhythm ACMP RHY Start playing the keyboard in the left range when the keyboard is split with the Synchro...

Страница 112: ...hort time after you stop recording DO NOT eject the disk while the DISK IN USE lamp of the disk drive is lit When a song has been recorded a temporary name SONG is the number will automatically be given to the song You can change the name as desired See page 120 The ACMP ON and or HARMONY lamp s automatically go out when recording of these parts has finished When recording is finished ACMP SONG VO...

Страница 113: ...e turned on the recording track numbers are automatically fixed as described below If Auto Accomapniment is turned on tracks 9 through 16 are auto matically record enabled for recording the Auto Accompaniment data If the Harmony function is turned on tracks 6 through 8 are automatically record enabled for recording the Harmony data When the RHYTHM button is pressed tracks 9 and 10 are automati cal...

Страница 114: ... If Auto Accompaniment and or Har mony are already on when the Track Recording page is selected the corre sponding tracks are automatically record enabled and the Synchronized Start mode is automatically turned on If you want to re record part of the song for example if you ve made a mistake in the recording you can easily do so with the Punch in out Recording function page 113 Backing Up Your Dat...

Страница 115: ...e s for recording as described above You can record while playing back and monitoring the previously recorded tracks letting you assemble a complete song by repeating this process If you record on a track that has al ready been recorded the previous material will be erased and the new material will be recorded in its place Punch in out Recording With the Punch in out Recording function you can sel...

Страница 116: ... indicated by an underline mark Use the LCD button at the far right to set the selected track to RECORD record enable or OFF record playback disable PLAY can only be selected for tracks which contain data When a track is muted the track number is ghosted shown in lighter indication in the dis play Only tracks which allow Punch in out Recording will appear and can be selected The rhythm Auto Accomp...

Страница 117: ... by using the center LCD button Two modes are available as described below REPLACE When recording is stopped all data following the stopped point will be erased PNCH OUT When recording is stopped all data following the stopped point will remain intact Song Recording MStart playback and recording Press the PLAY STOP or PAUSE button to start playback from the current paused location To start Punch i...

Страница 118: ...e Record mode by using the PAGE buttons Set Up for Step Recording of the Data You can enter the chords with the SINGLE FINGER MULTI FIN GER or FINGERED Auto Accompaniment modes or by specifying the chord name manually from the LCD display If you wish to enter chords with one of the Auto Accompaniment modes select the desired mode at this point Song Recording When the PEDAL mode is selected recordi...

Страница 119: ...n every 8th note or 8th note triplet For other time signatures one chord can be entered for each measure Entering Accompaniment Style and Section Changes One style change or section change page 118 can be made at the beginning of each measure The Intro pattern can only be en tered at the beginning of a song However Auto Fill data can be entered anywhere you desire CMove the cursor to the entry poi...

Страница 120: ...using the PLAY STOP button The data recorded by the Chord Sequence function is listed below Data Recorded By the Chord Sequence Function Accompaniment style Section MAIN A B Intro Ending Auto fill Fade in out Break Chord name Auto accompaniment part volume MIXER settings Tempo Rhythm on off ACMP SONG volume as an initial setting only SMALL ACMP VIRTUAL ARRANGER one ON OFF setting for an entire son...

Страница 121: ...rmal track recording will be replaced by the preset accompaniment style data For example even if you ve recorded your own bass part it will be erased and replaced by the original bass pattern if you correct the data in the Chord Sequence display Page 2 of the CHORD SEQUENCE display contains a number of versatile functions that help you enter chords more efficiently Finally press the REC button and...

Страница 122: ...ata at the beginning of a song such as voice reverb and effect settings To select the Record Edit function call up the RECORD EDIT dis play Record display page 3 after selecting the song you wish to edit Song Recording Record Edit Function The Record Edit functions can only be used for song data recorded with the CVP 98 96 600 or 94 92 End Mark Unless an end mark is entered the song will end one m...

Страница 123: ...e char acter or mark you wish to enter Press the CHAR SET button to enter the selected character to the cur rent cursor position and move to the next position Continue entering other characters or marks in this way To delete the character at the previous position press the BACK SPACE button The character before the underline cursor is deleted and the cursor moves back to the deleted position To ab...

Страница 124: ...track to which you want to record the mixed data You can also specify the track for the mixed data by highlighting the appropriate section using the TRACK C button then using the data dial or buttons Any previous data in the destination track will be erased CExecute the Track Mix operation Press the MIX button to begin execution of the Track Mix operation An Are you sure confirmation prompt will a...

Страница 125: ...not be used for data recorded to internal RAM see page 127 XExecute the Delete operation Press the DELETE button At the Are You Sure confirmation prompt press YES to execute the Delete operation or NO to cancel The DELETE display will change to the UNDO display after the De lete operation is executed If the result is not what you expected press the UNDO button to restore the data of the deleted tr...

Страница 126: ...anged the quantize size selected another track or exited from this mode The Undo feature cannot be used for data recorded to internal RAM see page 127 32nd notes 16th note triplets 16th notes 8th note triplets 8th notes quarter note triplets quarter notes 3 3 3 Song Recording ZSpecify the track to be quantized Use the TRACK or button to highlight the Track parameter then use the data dial or butto...

Страница 127: ...ameters Program Change Number PRG Bank LSB BNK LSB and Bank MSB BNK MSB which are used to select voices via MIDI are also displayed when VOICE is selected XSelect the parameters to be changed Select the parameters to be changed by pressing the SELECT or button Making Settings in the INITIAL EDIT Display ZSelect the track to be edited Select the track whose parameters you wish to change by pressing...

Страница 128: ...o UNDO allowing you to undo the Write operation and restore the data of the ed ited track to what it was before you made any edits All edited data for any number of tracks within a single song can be written in a one time Write operation by pressing the WRITE button You can check if the results of the Initial Edit are as you expected or not by starting and stopping playback with the PLAY STOP butt...

Страница 129: ...M When entering the Song Play mode after recording the song to inter nal RAM the CVP indication is shown in the SONG section of the dis play allowing you to playback normally If you insert a song disk and select a song number when the internal RAM contains recorded song data a Delete CVP MEMORY confir mation prompt will appear Press YES to delete the song data recorded to the internal RAM The song...

Страница 130: ...Touch Page 131 Pan Page 132 Pedal Group Left Pedal Page 133 Damper Range Page 134 Damper Mode Page 134 Soundboard CVP 98 only Page 134 Disk Group Format Page 135 Song Copy Page 136 Song Delete Page 138 Registration Page 139 Transform Page 142 MIDI Group Send Channel Page 143 Local Control Page 144 Sync Page 144 MIDI Filter Page 144 MIDI Transpose Page 146 Auto Accompaniment Page 146 Harmony Transm...

Страница 131: ...ng the PAGE buttons You can also select the page from all the display pages by using the PAGE CFor the round edged parameter box press the appropriate LCD button to highlight the desired section of the display then use the data dial or button to change the settings For the sharp edged parameter box you can use the appropriate LCD button to select and execute the functions VPress the FUNCTION butto...

Страница 132: ...1 display Function display page 1 Transpose The Transpose function makes it possible to shift the pitch of the keyboard in semitone units allowing you to match the pitch of the keyboard to the range of other instruments or singers or letting you easily play in a different key without having to change your finger ing For example if the Transpose amount is set to 5 semitones playing C results in a p...

Страница 133: ...r types are available for tailoring the key board response to the selected voice type of song or your own playing preferences Select the type by pressing the KEY TOUCH button The data dial and buttons cannot be used Settings HARD This setting requires you to play the keys quite strongly to pro duce maximum loudness NORMAL This is the standard keyboard response and is used as the basic setting SOFT...

Страница 134: ... in the LCD display Backup of last settings OFF Restoring the Basic Setting To restore the basic setting simultane ously press both buttons The default Pan position for some voices features keyboard scaling This shifts the Pan position depending on what keys you play The lower you play on the keyboard the more the sound shifts to the left the higher you play the more the sound shifts to the right ...

Страница 135: ...MAIN B The left pedal performs the same function as the MAIN B button See page 50 ENDING RIT The left pedal performs the function same as the ENDING button You can have the song end ritardando slow down gradually by pressing the left pedal twice in succes sion See page 53 BREAK Pressing the left pedal during the style playback produces a break in the accompaniment and rhythm for as long as the ped...

Страница 136: ...ff switch or as a continuously changing sustain in eight step gradations in which the further down you press the pedal the longer the sound sustains To set the function press the DAMPER MODE button In this case the data dial and the buttons cannot be used Damper Mode Settings CONT continous changing system SW ON OFF switch system Basic Setting CONT Backup of the last settings OFF Soundboard Depth ...

Страница 137: ...formatting a disk that has al ready been used with the Clavinova and deleting all data on the disk Formatting a disk erases all the data on the disk Types of Format 2DD disks are formatted into 720 KB while 2HD disks are formatted into 1 44 MB XExecute the format operation Press the START button An Are you sure confirmation prompt will appear Press YES to execute the format or NO to cancel A bar g...

Страница 138: ...y go on to step 4 Press the SONG button to highlight the parameter then use the data dial or buttons to select the destination song number If the destination song number already contains data the name of the song file will appear in the middle section of the LCD display In this case the original data of the destination song number will be erased and overwritten by the source song data when execut ...

Страница 139: ...nging the source and destination disks as necessary The first time the destination disk is inserted the following LCD dis play will appear Use the data dial or buttons to select the destina tion song number If the destination song number already contains data the song name will appear in the LCD display In this case the original data of the destination song number will be erased and overwritten by...

Страница 140: ...ng the song data to be deleted into the disk drive XSelect the song to be deleted Use the data dial or buttons to select the song to be deleted The song data in the Clavinova s internal RAM can be also deleted with this operation To do this select the CVP MEMORY parameter instead of the song number CVP MEMORY appears only when the internal RAM contains song data CExecute the Delete operation Press...

Страница 141: ...ay PAGE 7 REGISTRATION Contains each or all Registration file s in 20 Registration memory locations ALL SETUP An All Setup file contains all panel setting data in the list on page 35 in the Reference Manual To save or load the data of REGISTRATION first set the REGIST Registration number parameter When saving press the REGIST but ton to select the desired Registration file number from ALL or A 1 E...

Страница 142: ...ters or marks and entering them in this way To delete the character at the previous position press the BACK SPACE button The character before the underline cursor is deleted and the cursor moves back to the deleted position To abort the name entry operation and return to the FUNCTION REGISTRATION display press the CANCEL button When the file name has been completely entered press the SAVE button t...

Страница 143: ...ired file to be deleted Press either of the two left most LCD buttons to select the file then press the OK button An Are you sure confirmation prompt will appear Press the YES button to delete the selected file or the NO button to abort the Delete operation First select the desired file to be named Press either of the two left most LCD buttons to select the file then press the OK button The name e...

Страница 144: ... the target for mat of the file the instrument for which the converted data is to be used The following three types are available CVP PERFORMANCE This type converts the selected data for playback on the CVP 50 70 55 65 75 83S 85A 87A 89 CLP 705 DOM 30 and DOU 10 PIANO FORMAT 1 This type converts the data for playback on the Disklavier excepting the MX100A and MX100B PIANO FORMAT 2 This type conver...

Страница 145: ...no transmission channels 1 16 Basic setting 3 Backup of last settings OFF RIGHT 1 setting OFF no transmis sion channels 1 16 Basic setting 1 Backup of last settings OFF RIGHT 2 setting OFF no transmis sion channels 1 16 Basic setting 2 Backup of last settings OFF MIDI Reception The Clavinova always receives MIDI data in the Multi Timbre mode This is a mode in which the Clavinova voices can be inde...

Страница 146: ...oices of con nected external MIDI devices can also be changed by program change messages transmitted from the Clavinova Program change messages are transmitted when changing voices on the panel of the Clavinova Depending on your particular MIDI setup you may find that this fea ture is convenient in some cases and not in others Set PROGRAM to off if you wish to disable the program change transmissi...

Страница 147: ...ngs OFF System Exclusive ON OFF System exclusive messages are used for more advanced or detailed MIDI control or for controls related to specific manufacturer s devices Set SYS EX to off if you desire not to transmit receive the system exclu sive messages Set SYS EX to Tx Rx enable transmission and re ception of these messages System exclusive data recognized by the Clavinova is listed in detail o...

Страница 148: ...g of ACMP RHY OFF not transmitted 9 16 ch transmitted Basic setting OFF not transmitted Backup of last settings OFF Setting of HARMONY OFF not trasmit 6 8 ch transmit Basic setting OFF not transmit Backup of last settings OFF When transmitting the Auto Accompa niment or Harmony data via MIDI do not select the Auto Accompaniment Harmony MIDI channels 6 8 or 9 16 for transmitting the data of your ke...

Страница 149: ...owing groups on the Clavinova VOICE SETTING REVERB EFFECT TUNE master tuning micro tuning scale tuning PEDAL ACMP SETTING Auto Accompaniment related settings SONG SETTING REGISTRATION MIDI SETTING UTILITY pop up time alert sound Refer to the list on page 35 in the Reference Manual for the specific parameters of each group Parameters that are backed up will be retained in memory for about a week if...

Страница 150: ...P SETTING Auto Accompaniment related settings SONG SETTING REGISTRATION MIDI SETTING UTILITY pop up time alert sound ALL all the above settings Refer to the list on page 35 in the Reference Manual for the specific parameters of each group The initial settings basic settings for the Help language and the above backup on off settings are not recalled by this function However these and all other sett...

Страница 151: ...he selected key If you set the parameter at the left most LCD button to ON you can play the key being tuned in order to check the sound during this operation The normal tuning of 0 cents for the selected key can be instantly recalled by simultaneously pressing both the TUNE or buttons Range 100 cents 1 semitone 100 cents 1 semitone Basic Value 0 for all keys Backup of last settings OFF CRepeat ste...

Страница 152: ...erament configurations when selecting PRESET in this display By selecting USER you can create your own user scale in which the tuning you set for a single octave takes effect for the entire keyboard The created tun ing can be saved to disk for future recall Preset Scale This function lets you select from various pre programmed tunings or temperaments Until equal temperament the most commonly used ...

Страница 153: ...ecting temperaments other than equal EQUAL tempera ment the central key reference pitch for the temperament must be set This allows you to produce the proper temperament in the desired key CPress the KEY button to highlight the parameter then use the data dial or buttons to select the central key Central Key Settings C C D D E F F G G A A B Basic setting C ZSelect PRESET with the left most LCD but...

Страница 154: ... 141 Utility VRepeat steps 2 and 3 until all the required keys have been tuned The completed tuning can be named as a tuning file and saved to disk It can also be loaded whenever necessary or deleted if not needed Make sure that a proper disk either containing the scale tuning data or set up for saving is inserted in the disk drive before executing these file operations ZSelect the desired file op...

Страница 155: ...isplayed only while the operating button is held If sec is selected the DISPLAY HOLD lamp will not flash and the pop up display will not close automatically In this case press the EXIT button to close the display Utility Alert Sound ALERT Display PAGE 17 This function allows you to select one of six Alert Voices which will sound when an error is encountered and set the alert volume Press the VOICE...

Страница 156: ...the AUX IN L L R and AUX OUT L L R jacks for mono input and mono output respectively To use headphones connect them to one of the PHONES jacks standard 1 4 phone jacks The internal speaker system of the Clavinova is automatically shut off when a pair of headphones are connected Two people can enjoy the sound together by connecting two pairs of headphones to the two available termi nals The sounds ...

Страница 157: ...ersonal Computer for details Personal Computer HOST SELECT TO HOST MIDI Mac PC 2 PC 1 AUX OUT L L R R Jacks R L L R AUX OUT Stereo System By connecting audio cables to the jacks as shown below output the sound of the Clavinova to a stereo system amplifier mix ing console or recording equipment Set the MASTER VOLUME of the Clavinova to around the middle position and adjust the volume level from the...

Страница 158: ... have to make on the computer side 2 HSK i 1 1 HSK 0 2 5 RxD 3 MINI DIN 8 PIN 4 GND 4 3 TxD 5 8 RxD 6 7 GP i 7 6 TxD 8 MINI DIN 8 PIN 8 CTS 1 7 RST 2 2 RxD 3 4 5 GND 8 3 TxD 5 MINI DIN 8 PIN D SUB 9 PIN Mac Cable Connections 8 pin system peripheral cable Data transfer rate 31 250 bps PC 2 Cable Connections 8 pin mini DIN 9 pin D SUB cable Data transfer rate 38 400 bps Apple Macintosh Series Comput...

Страница 159: ...sted below for installation instructions Windows 95 A driver win95 readme txt A driver win95 license txt Windows 3 1 IBM PC Series A driver win31 ibmpc cbxt3 txt A is the disk directory Connector Pin Numbers Trademarks Apple and Macintosh are trademarks of Apple Computer Inc IBM PC AT is a trademark of International Business Machines Corporation Windows is the registered trademark of Microsoft Cor...

Страница 160: ... 2 144 MIDI 3 146 MIDI filter settings 144 Mixer 17 60 94 Multi Finger 56 59 music stand 8 N Next Note 100 O One Touch Setting 63 Organ Combination 29 P Pan 132 Part Cancel 91 Part 71 pedals 40 133 Pianist 57 Piano Roll 101 Pop up Time 153 power 9 Power Bass CVP 98 21 Punch In Out recording 113 Q Quantize 72 123 Quick Recording 107 R Recall 148 Record Edit functions 120 Registration 83 139 Reverb ...

Страница 161: ...uit breaker or fuse circuits or install AC line filter s In the case of radio or TV interference relocate reorient the antenna If the antenna lead in is 300 ohm ribbon lead change the lead in to co axial type cable If these corrective measures do not produce satisfactory results please contact the local retailer authorized to distribute this type of product If you can not locate the appropriate re...

Страница 162: ...gisters and other devices that produce heat should be avoided 8 This product was NOT designed for use in wet damp loca tions and should not be used near water or exposed to rain Exam ples of wet damp locations are near a swimming pool spa tub sink or wet basement 9 This product should be used only with the components supplied or a cart rack or stand that is recommended by the manufacturer If a car...

Страница 163: ...a 12930 Indonesia Tel 21 520 2577 KOREA Cosmos Corporation 131 31 Neung Dong Sungdong Ku Seoul Korea Tel 02 466 0021 5 MALAYSIA Yamaha Music Malaysia Sdn Bhd Lot 8 Jalan Perbandaran 47301 Kelana Jaya Petaling Jaya Selangor Malaysia Tel 3 703 0900 PHILIPPINES Yupangco Music Corporation 339 Gil J Puyat Avenue P O Box 885 MCPO Makati Metro Manila Philippines Tel 819 7551 SINGAPORE Yamaha Music Asia P...

Страница 164: ...M D G EMI Division Yamaha Corporation 1998 V280810 809POCP15 2 01A0 Printed in Japan ...

Отзывы: