27
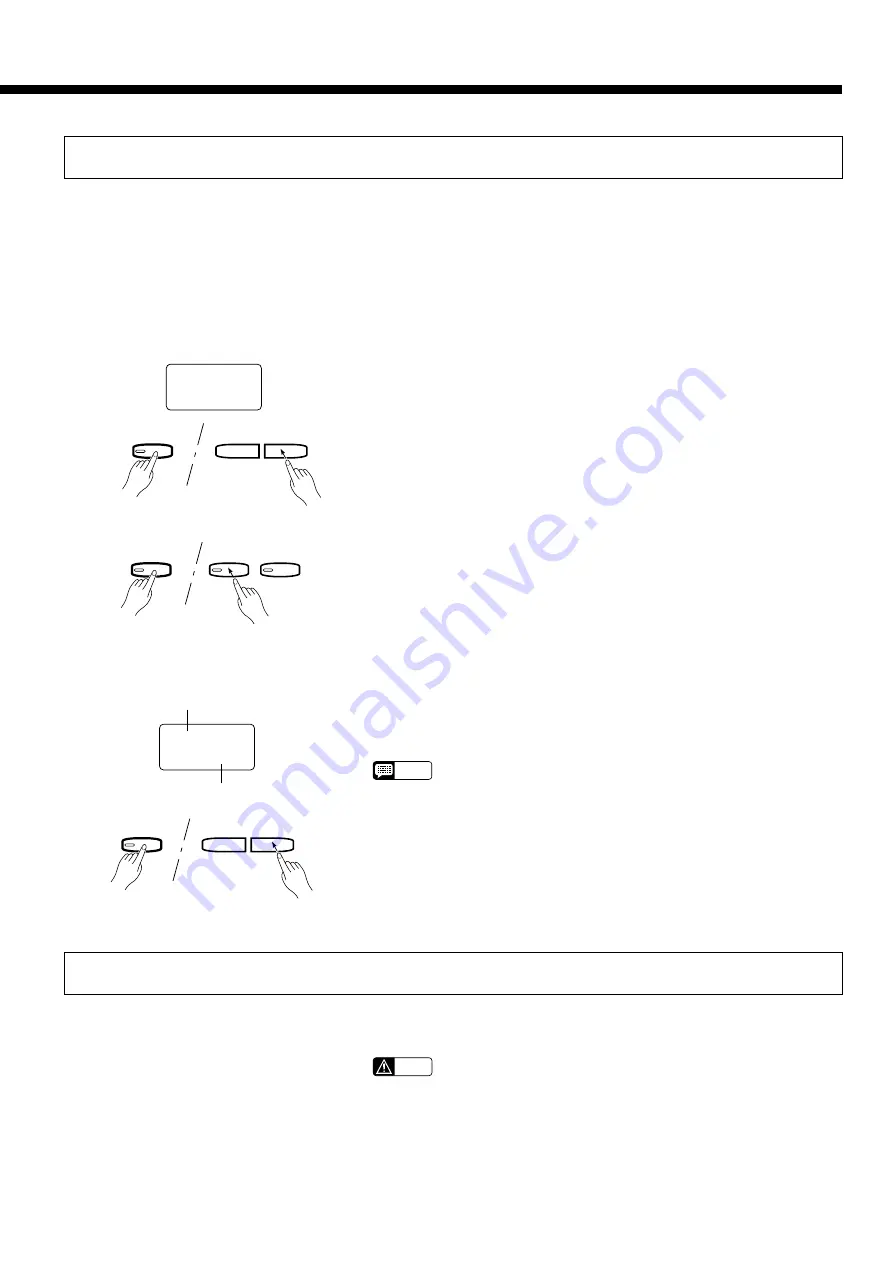
Utility 7: Disk Playback Track Selection
Normally the CLP-156 plays the track-1 and track-2 data on a disk. Some pre-recorded MIDI Standard File disks as well
as those recorded on sequencers or similar equipment have performance data on other tracks as well. This function lets you
select any two tracks for playback from among the 16 that may possibly be available.
Z
Select the Disk Playback
Track Selection Function
Hold the [MIDI/TRANSPOSE] button and press the SONG [
r
] or
[
f
] button as many times as necessary until “1 2” appears on the display
— don’t release the [MIDI/TRANSPOSE] button yet.
Still holding the [MIDI/TRANSPOSE] button, press either the [1/R] or
[2/L] track button, depending on which track you want to assign playback
of a disk track to.
Still holding the [MIDI/TRANSPOSE] button, use the TEMPO [
▲
] and
[
▼
] buttons to specify the disk track number you want played back via the
CLP-156 track selected in the previous step. You can select tracks 1
through 16, or “_ _” to turn playback off. The currently selected values will
appear on the display as long as the [MIDI/TRANSPOSE] button is held.
NOTE
• The disk playback track selection settings are cancelled as soon as you
remove the floppy disk from the disk drive.
MIDI/
TRANSPOSE
RECORDER
1/R
2/L
SONG
f
r
MIDI/
TRANSPOSE
1 2
X
Select a CLP-156 Track
●
Selecting the Playback Track for CLP-156 Track 1/R or 2/L
C
Select a Disk Track
1.16
Track 1/R.
Disk track 16 is assigned for play-
back via CLP-156 track 1/R.
TEMPO
▲
▼
MIDI/
TRANSPOSE
Utility 8: Convert to SMF
This function can be used to convert the performance data recorded by the CLP-156 (Yamaha ESEQ format) to Standard
MIDI File (SMF) format (format 0) so songs recorded on the CLP-156 can be played back on SMF-compatible devices.
CAUTION
• Data converted to SMF format cannot be re-converted to the CLP-156
format or re-recorded on the CLP-156 — “no” will appear on the display
when you press the [REC] button. It may therefore be a good idea to
make a copy of important data using the Song Copy function (page 25)
before converting it.
Insert the disk containing the data to be converted into the Clavinova
disk drive, then use the SONG [
r
] and [
f
] buttons to select the song
number you want to convert.
Z
Insert a Disk & Select a
Song Number


