background image

English

7

 En

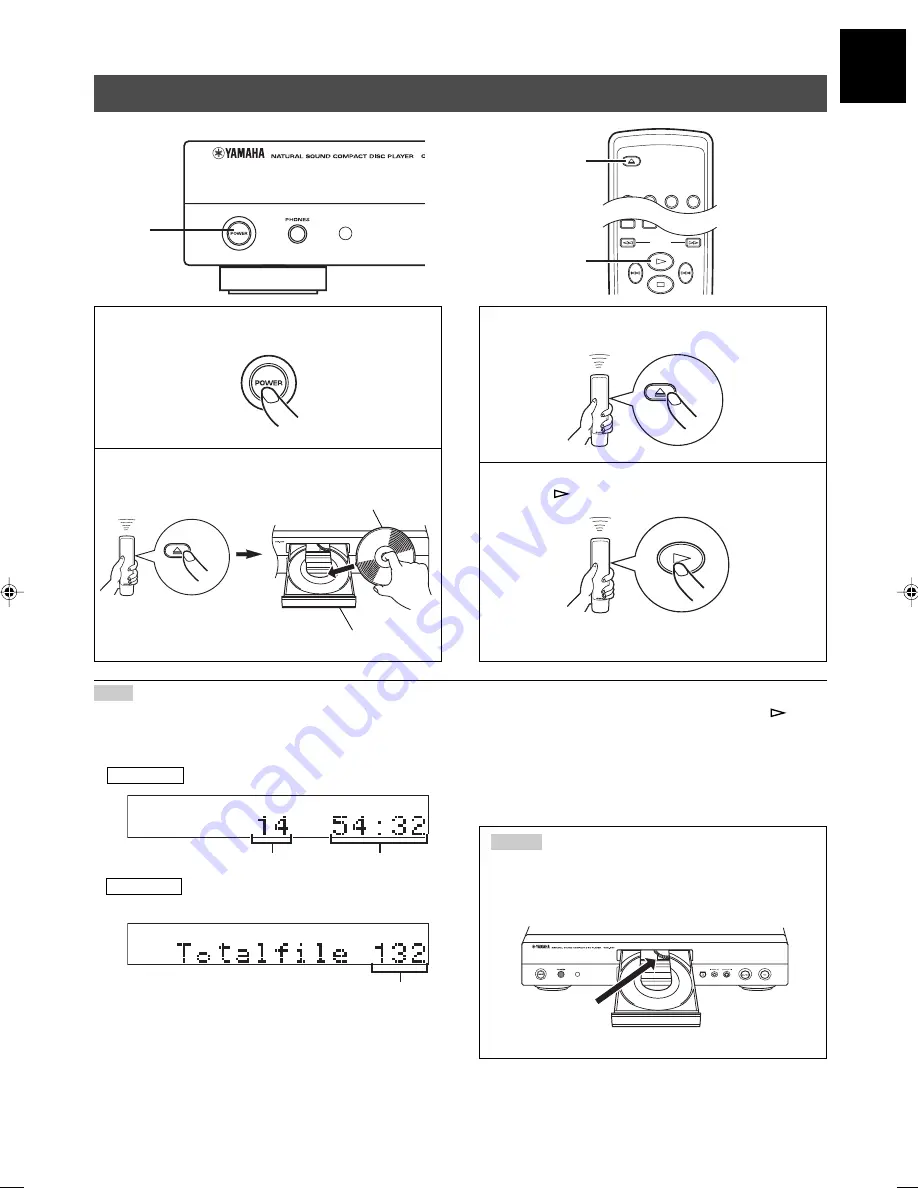
Notes

After closing the disc tray by pressing 

)


OPEN/CLOSE

, the

display shows the following information.

Caution

When the disc tray is open, 

do not touch the inside gear

wheel

.  If you touch the gear wheel, your finger may be

caught in the closing tray and injured.

1

Gear wheel

BASIC OPERATION

This manual describes how to operate this unit by using the remote control.
To operate this unit from the front panel, use the corresponding buttons on the front panel.

1

Press 

POWER

 to turn on the power.

2

Press 

)

 OPEN/CLOSE

 to open the disc tray, and

load a disc.

3

Press 

)


OPEN/CLOSE 

to close the disc tray.

4

Press 

 to start playback.

Playback starts from the first track of the disc

.

Label side up.

Disc tray

SEARCH

SYNCHRO

TAPE

2

4

3

OPEN/CLOSE

2, 3

4

OPEN/CLOSE

OPEN/CLOSE

CD

Total number

of tracks

Total recorded

time of a disc

Additionally, you can close the disc tray by pressing 

, a

numeric button or 

RANDOM

, or by pressing the front edge of

the disc tray gently.  If the tray is closed in one of these ways,
playback starts automatically; however, the display will not
show the total number of tracks nor the total recorded time of
the disc.

Total number

of files

MP3, WMA

(CDX-497 only)

Audio CD

01_En_02_BOD_CDX-397_497_G.pm

4/27/06, 3:06 PM

7

Содержание CDX-97

Страница 1: ... 497 397 COMPACT DISC PLAYER LECTEUR COMPACT DISQUE OWNER S MANUAL MODE D EMPLOI BEDIENUNGSANLEITUNG BRUKSANVISNING MANUALE DI ISTRUZIONI MANUAL DE INSTRUCCIONES GEBRUIKSAANWIJZING ИНСТРУКЦИЯ ПО ЭКСПЛУАТАЦИИ ...

Страница 2: ... damage to this unit and or personal injury 5 Avoid installing this unit where foreign object may fall onto this unit and or this unit may be exposed to liquid dripping or splashing On the top of this unit do not place Other components as they may cause damage and or discoloration on the surface of this unit Burning objects i e candles as they may cause fire damage to this unit and or personal inj...

Страница 3: ... about handling compact discs 22 TROUBLESHOOTING 23 SPECIFICATIONS 24 FEATURES 2 SUPPORTED DISC TYPES 2 UNPACKING 3 NOTES ABOUT THE REMOTE CONTROL 3 CONNECTIONS 4 IDENTIFICATION OF COMPONENTS 5 Front panel 5 Display 5 Remote control 6 BASIC OPERATION 7 To pause playback 8 To stop playback 8 To turn off the power 8 To play back the desired track 8 To search an folder file on an MP3 or WMA disc CDX ...

Страница 4: ...iles can not be played back with this unit 䢇 Automatic Peak Level Search Function 䢇 CD Synchronized Recording 䢇 Adjustable Display Brightness 䢇 Remote Control Capability 䢇 Optical Digital Output CDX 497 only 䢇 Coaxial Digital Output 䢇 MP3 WMA Disc Playability You can enjoy music discs with this unit Since some disc operations of this unit are limited to specific disc types the supported disc types...

Страница 5: ... clothing etc Clean the battery compartment thoroughly before installing new batteries Remote control operation range Notes There should be no large obstacles between the remote control and the main unit If the remote control sensor is directly illuminated by strong lighting especially an inverter type fluorescent lamp etc the remote control might not work properly In this case reposition the main...

Страница 6: ...plifier to max by using the OUTPUT LEVEL buttons LINE OUT OPTICAL COAXIAL DIGITAL OUT L R CD DIGITAL IN OPTICAL COAXIAL CONNECTIONS Before making any connection switch OFF the power to the unit and the amplifier or other component Connections should be made to the correct input terminals of the amplifier or another component If the placement of this unit causes noise to another equipment such as a...

Страница 7: ...de 2 Shows the time displays For details refer to on page 10 3 Shows the track number selected or being played back 4 Shows the file number 5 Lights up when a music disc is in the disc tray 6 Lights up when the MP3 disc is played back 7 Lights up when the WMA disc is played back CD PROG RANDOM ALL A B 1 2 3 5 WMA PROG RANDOM ALL A B MP3 7 1 2 4 6 play pause p 7 open close p 7 stop p 8 p 9 p 9 on t...

Страница 8: ...LOSE A B PROGRAM CLEAR DIMMER p 11 SYNCHRO p 21 SPACE p 11 TAPE p 16 Numeric buttons p 8 REPEAT p 12 RANDOM p 12 INDEX p 15 CLEAR p 15 PROGRAM p 14 PEAK p 20 pause p 8 skip p 9 stop p 8 SEARCH p 9 play p 7 TIME INFO p 10 OPEN CLOSE p 7 A B p 13 Cursor buttons p 8 OUTPUT LEVEL p 11 Remote control The shaded parts are provided for CDX 497 only ...

Страница 9: ...n the power 2 Press OPEN CLOSE to open the disc tray and load a disc 3 Press OPEN CLOSE to close the disc tray 4 Press to start playback Playback starts from the first track of the disc Label side up Disc tray SEARCH SYNCHRO TAPE 2 4 3 OPEN CLOSE 2 3 4 OPEN CLOSE OPEN CLOSE CD Total number of tracks Total recorded time of a disc Additionally you can close the disc tray by pressing a numeric button...

Страница 10: ...ack To play back the desired track The selected track file number is displayed To stop playback Press 0 5 If you press again the playback starts from the first track 1 Press FOLDER g g g g g h h h h h to select the desired folder 2 Press ENTER To search an folder file on an MP3 or WMA disc CDX 497 only You can play back the desired folder or file by using cursor buttons 3 Press FILE q q q q q w w ...

Страница 11: ...pidly Press and hold To advance or reverse playback rapidly Manual search To play back from the beginning of the next track To play back from the beginning of the current track To play back from the beginning of the preceding track These operations can also be performed when the unit is paused or stopped Pressing and holding or on the remote control skips tracks continuously toward lower or higher...

Страница 12: ...le artist name and track name 5 7 are also displayed 1 Elapsed time of the current track Default 2 Remaining time of the current track 3 Total recorded time of the disc 4 Remaining time of the disc Changing display You can select the following displays 1 9 by pressing TIME INFO Scrolling display shows the song title artist name and album name of the selected item 1 Scrolling display Default 2 Elap...

Страница 13: ...ightness of the display in three degrees by pressing DIMMER Adjusting the output level CDX 497 only You can adjust the level of signals output to the amplifier by pressing OUTPUT LEVEL If you record a disc onto tape with an insufficient time space between tracks the tape deck will not be able to perform blank search operations on the tape correctly To enable a track search operation use this funct...

Страница 14: ...ire disc are played back repeatedly During program play all programmed tracks are played back repeatedly If the power is switched off during full repeat play pressing POWER again to turn on the unit automatically restores full repeat You can play back the tracks on a disc in a random sequence RANDOM SEQUENCE PLAY To perform random sequence play Press RANDOM To cancel random sequence play Press or ...

Страница 15: ...and end point 1 Press A B to select the start point of repeat play 2 Press A B to select the end point of repeat play The selected section is played back repeatedly A lights up and B blinks A B lights up A B A B To cancel the repeat A B Press A B repeatedly until A B disappears from the display A B A B ...

Страница 16: ...programmed in sequence PROGRAM PLAY 3 Program a desired track by pressing the corresponding numeric button Repeat this operation to program more tracks You can select the same track again The file number is recognized per disc not per folder That is the number assigned to each file corresponds sequence of a disc 4 When programming is finished press PROGRAM 5 Press to start program play REPEAT DIMM...

Страница 17: ... clear program data There are several methods as described below Press or CLEAR while the unit is stopped Open the disc tray Switch off the power To check program data 1 If during program play press 2 Press PROGRAM 3 Each time is pressed the track numbers and sequential order of the programmed tracks can be checked one after another The display of the track number can be returned sequentially in r...

Страница 18: ...G FOR RECORDING TO TAPE If desired you can also enter the total possible recording time of the tape manually Example For a C 64 tape 32 minutes on each side press 6 and 4 4 Press REPEAT The unit automatically programs tracks for both side A and side B considering the total time of the tape 5 Start recording on the tape deck and then press on the remote control of this unit 6 This unit automaticall...

Страница 19: ... a tape that is longer than the actual playing time You can check cancel or correct program data For details refer to page 15 When checking program data note that Pu appears between track numbers for side A and side B Up to 40 tracks can be programmed A pause inserted between side A and B is counted as one track CD synchronized recording function can be used if your tape deck is compatible with th...

Страница 20: ...NCHRO TAPE PEAK SPACE REPEAT DIMMER RANDOM A B PROGRAM CLEAR 7 8 8 6 PROGRAM 0 9 6 5 8 7 2 1 4 3 0 9 6 5 8 7 2 1 4 3 PROG TAPE PROG This is for recording desired tracks in any order onto a tape Notes If in step 3 or 5 Err appears on the display the track number just selected cannot be programmed because there is not enough time remaining on the tape In step 3 or 5 each time a selection is made the...

Страница 21: ... your tape deck is compatible with it If so in step 3 and 4 press SYNCHRO and then press on the remote control of this unit Recording automatically starts For details refer to page 21 Random sequential tape programming for Audio CD 1 Follow steps 1 3 on page 16 2 Press RANDOM The unit automatically programs tracks at random for both side A and side B considering the total time of the tape 3 Start ...

Страница 22: ...level search is performed on the disc It takes a few minutes to search for the peak level After searching this unit plays back the part around the peak level for about 4 seconds repeatedly According to the peak level adjust the recording level on your tape deck For details refer to the owner s manual of the tape deck This unit automatically searches for the peak level of the disc and play back the...

Страница 23: ...s function you can record a CD on tape easily and precisely This recording method requires a YAMAHA tape deck compatible with this function Refer to the tape deck operation manual to find out whether it is compatible or not This unit and the tape deck must be placed close to each other so that both of them can simultaneously receive the signals from the remote control of this unit CD SYNCHRONIZED ...

Страница 24: ...ck an 8 cm CD Place it in the inner recessed area of the disc tray Do not put a normal 12 cm CD on top of an 8 cm CD Discs playable with this unit This compact disc player is designed only for playing back compact discs bearing the marks shown below Never attempt to load any other type of disc into the unit The unit can also play back 8 cm 3 inch compact discs Compact discs digital audio The most ...

Страница 25: ...s The disc is dirty Improper cable connections The tuner is too close to the unit The disc may be warped The OUTPUT LEVEL buttons are set at minimum The batteries of the remote control are too weak Remote control is too far away or tilted too much Direct sunlight or lighting of an inverter type fluorescent lamp etc is striking the remote control sensor of the main unit Remote control is being used...

Страница 26: ...80 nm Emission Duration continuous Laser Output max 44 6 µW This output is the value measured at a distance of about 200 mm from the objective lens surface on the Optical Pick up Block General Power requirements Australia model 240 V 50 Hz Europe and U K models 220 240 V 50 Hz General model 110 120 220 240 V 50 60 Hz Korea model 220 V 60 Hz China model 220 V 50 Hz Power consumption 13 W Dimensions...

Страница 27: ...LEN VARO AVATTAESSA OLET ALTTIINA NÄKYVÄLLE JA NÄKYMÄTTÖMÄLLE LASER SÄ TEILYLLE ÄLÄ KATSO SÄTEESEEN VORSICHT SICHTBARE UND UNSICHTBARE LASERSTRAHLUNG WENN ABDECKUNG GEÖFFNET NICHT DEM STRAHL AUSSETSEN DANGER VISIBLE AND INVISIBLE LASER RADIATION WHEN OPEN AVOID DIRECT EXPOSURE TO BEAM ATTENTION RAYONNEMENT LASER VISIBLE ET INVISIBLE EN CAS D OUVERTURE EXPOSITION DANGEREUSE AU FAISCEAU ПРЕДУПРЕЖДЕН...

Страница 28: ......

Отзывы: