background image

20

AUDIO SECTION

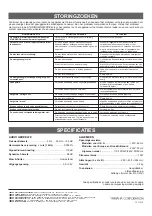
Frequency response ....................... 2 Hz 

20 kHz, 

5

0.3 dB

Harmonic dist noise (1 kHz)  ....................... 0.0022%

S/N ratio ........................................................................ 118 dB

Dynamic range ............................................................... 98 dB

Wow & flutter ................................................... Unmeasurable

Output voltage ......................................................... 2.0

5

0.5V

GENERAL

Power requirements

U.S.A. model .................................................. 120V, 60 Hz
Europe and U.K. models ................................230V, 50 Hz
General model ..................... 110/120/220/240V, 50/60 Hz

Power consumption ........................................................ 15W

Dimensions (W x H x D)  ........................ 280 x 82.5 x 354 mm

(11” x 3-1/4” x 13-15/16”)

Weight ....................................................... 3.8 kg (8 lbs. 6 oz.)

Accessories ................................................... Connection cord

Remote control transmitter

Batteries (size AA, R6, UM-3)

Please note that all specifications are subject to change
without notice.

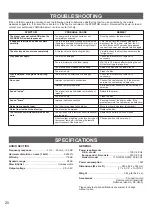
If the unit fails to operate normally, check the following points to determine whether the fault can be corrected by the simple
measures suggested.  If it cannot be corrected, or if the fault is not listed in the SYMPTOM column, disconnect the power cord and
contact your authorized YAMAHA dealer or service center for help.

SYMPTOM

The player does not switch ON when the
STANDBY/ON switch is pressed.

It happens that this unit does not work
normally.

The disc tray does not close completely.

Play does not begin.

Play is delayed, or begins at the wrong
place.

No sound.

Sound “skips”.

Sound “hums”.

Noise from a nearby tuner.

Noise from inside of the disc tray.

The remote control transmitter does not
work.

PROBABLE CAUSE

The power cord is not connected or not
completely connected.

There is an influence of strong external noise
(lightning, excessive static electricity, etc.) or a
misoperation on this unit while using this unit.

A foreign object is obstructing the tray.

The disc is damaged.

There is moisture on the laser pickup.

The disc has been loaded upside down.

The disc is dirty.

The disc may be scratched or damaged.

Improper output cable connections.

Improper amplifier operation.

The player is being subjected to vibrations or
impacts.

The disc is dirty.

Improper cable connections.

The tuner is too close to the player.

The disc may be warped.

The batteries of this remote control transmitter
are too weak.

Direct sunlight or lighting (of an inverter type of
fluorescent lamp etc.) is striking the remote
control sensor of the main unit.

REMEDY

Securely connect the power cord.

Turn this unit into the standby mode and
disconnect the AC power cord from the AC
outlet. After about 30 seconds have passed,
connect the power and operate this unit again.

Carefully check the disc tray and remove the
foreign object.

Check the disc carefully; replace it if
necessary.

Wait 20 to 30 minutes after switching the unit
ON before trying to play a disc.

Reload the disc with the label side up.

Clean the disc.

Check the disc carefully; replace it if
necessary.

Connect the cables properly. If the problem
persists, the cables may be defective.

Set the amplifier controls to the correct input
selection.

Relocate the player.

Clean the disc.

Securely connect the audio cables. If the
problem persists, the cables may be defective.

Move the tuner and player farther apart.

Replace the disc.

Replace the batteries with new ones.

Change position of the main unit.

TROUBLESHOOTING

SPECIFICATIONS

Содержание CDX-9

Страница 1: ...CIONES GEBRUIKSAANWIJZING Natural Sound Compact Disc Player Lecteur de disque audionumérique de la série Natural Sound Natural Sound CD Spieler Natural Sound Compact Disc spelare Lettore di compact disc a suono naturale Tocadiscos de Discos Compactos de Sonido Natural Natural Sound CD speler CDX 9 G B R ...

Страница 2: ...pparaten är ansluten till vägguttaget även om själva apparaten har stängts av ADVARSEL Netspændingen STANDBY ON til dette apparat er IKKE afbrudt sålænge netledningen sidder i en stikkontakt som er tændt også selvom der er slukket på apparatets afbryder VAROITUS Laitteen STANDBY ON kytkin ei kytke laitetta sähköverkosta AVVERTENZA L apparecchio rimane sotto tensione anche quando viene spento trami...

Страница 3: ...unit be sure to first disconnect the power cord from the household AC outlet and disconnect cords connected to other equipment 9 Do not attempt to clean the unit with chemical solvent as this might damage the finish Use a clean dry cloth 10 Be sure to read the TROUBLESHOOTING section for advice on common operating errors before concluding that your unit is faulty 11 Keep this manual in a safe plac...

Страница 4: ...s refer to the operation instructions for the amplifier being used The LINE OUT terminals of this unit are numbered 1 When connecting this unit with a YAMAHA amplifier or receiver whose terminals on the rear panel are numbered as 1 2 3 etc connect the LINE OUT terminals of this unit to the input terminals numbered 1 on the rear of the amplifier or receiver When the DIGITAL OUT OPTICAL terminal of ...

Страница 5: ...unit has both the functions of the PLAY button and the PAUSE button on the remote control transmitter FRONT PANEL STANDBY ON PLAY PAUSE STOP NATURAL SOUND COMPACT DISC PLAYER CDX 9 indicates the page number on which the control part is best described STANDBY ON switch p 7 STOP button p 8 PLAY PAUSE button p 7 8 OPEN CLOSE button p 7 SKIP SEARCH buttons p 8 9 Remote control sensor p 19 Display pane...

Страница 6: ...ge number on which the control part is best described DIMMER button p 10 TIME button p 10 OPEN CLOSE button p 7 CLEAR button p 13 PROG button p 12 INDEX button p 13 RANDOM button p 11 SEARCH button p 9 TAPE button p 14 SYNCHRO button p 18 PEAK button p 17 SPACE button p 9 Numeric buttons p 8 REPEAT button p 11 STOP button p 8 SKIP button p 8 PLAY button p 7 PAUSE button p 8 ...

Страница 7: ...in automatically however the display will not show the total number of tracks and the total recorded time of the disc STANDBY ON PLAY TOTAL OPEN CLOSE OPEN CLOSE 2 1 SPACE TAPE PEAK SYNCHRO 3 INDEX PROG CLEAR OPEN CLOSE 8 7 9 0 5 4 6 I0 DIMMER TIME REPEAT RANDOM SEARCH SKIP STOP PAUSE PLAY Label side upward Disc tray STANDBY ON 1 This manual describes how to operate this unit by using the remote c...

Страница 8: ...ng twice These operations can also be performed when the unit is in the pause or stop mode When using the SKIP button on the remote control transmitter If the button is pressed and held the track number is continuously changed to higher numbers or lower numbers When using the SKIP SEARCH buttons on the front panel Be careful not to press and hold a button otherwise the selected track is played for...

Страница 9: ...ck or returned to the beginning of the current track Automatic spacing If you record a disc onto tape with an insufficient time space between tracks the tape deck will not be able to perform blank search operations on the tape correctly Such a search mistake of the deck can be prevented by pressing the auto SPACE button to insert spaces of about 4 seconds between the tracks before recording Note W...

Страница 10: ...Dim DIMMER Selecting time displays You can select any of the four time displays by pressing the TIME display mode select button Note The remaining time will not be displayed if the track number is 25 or higher Elapsed time of the track now playing Remaining time of the track now playing Total remaining time on the disc Total disc play time REMAIN TOTAL REMAIN TOTAL TIME ...

Страница 11: ... disc will not be displayed during random sequence play REPEAT PLAY You can play any desired track or the entire disc repeatedly by pressing the REPEAT button The repeat play mode will change whenever you press the REPEAT button SINGLE REPEAT A single track is repeatedly played This is also available in the programmed play mode and the random sequence play mode If the repeat play mode is switched ...

Страница 12: ...mming the TIME display mode select button is pressed the program number display can be changed to display the total time of the programmed tracks To return to the previous display press the TIME display mode select button once again The SKIP and button can be used during playing but only within the range of the programmed tracks The SEARCH and button can be used during playing to search all tracks...

Страница 13: ...the program To cancel a program sequence There are several methods as described below Press the STOP button or the CLEAR button while the unit is stopped Open the disc tray Turn this unit into the standby mode To check program data 1 If during program play press the STOP button 2 Press the PROG button 3 Each time the SKIP button is pressed the track numbers and sequential order of the programmed t...

Страница 14: ... total time of programmed tracks for side A and B respectively 6 Begin recording on the tape deck and press the PLAY button on this unit at the same time 7 The unit will pause at the end of side A of the tape Turn the tape over to side B Resume recording and at the same time press the PLAY or PAUSE button on this unit Notes All tracks may not be programmed if the tape s length is not enough To pro...

Страница 15: ... CD synchronized recording function can be used if your tape deck is compatible with it If so in step 6 and 7 press the SYNCHRO button and then press the PLAY button on this unit s remote control transmitter Recording automatically begins For details refer to page 18 Notes on tape programming To check cancel or correct program data refer to page 13 In checking the program data note that Pu appears...

Страница 16: ... CD synchronized recording function can be used if your tape deck is compatible with it If so in step 3 and 4 press the SYNCHRO button and then press the PLAY button on this unit s remote control transmitter Recording automatically begins For details refer to page 18 Display information at step 2 1 Shows the number of programmed tracks for each side in turn just after the automatic programming is ...

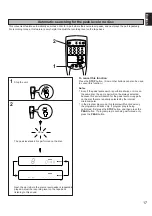
Страница 17: ...n Some other buttons can also be used to cancel this function Notes Even if the peak level search is performed twice or more on the same disc the same part will not be always selected because this unit will search for the peak level among parts on the disc that are randomly selected by the internal microcomputer In the program play mode this feature will function among the programmed tracks only I...

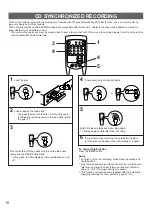
Страница 18: ... also be recorded with this function instead of recording an entire disc Refer to page 12 13 for the programming procedure This function can also be used together with the automatic tape programming function Refer to page 14 16 This unit can make a tape deck s recording synchronized with CD play automatically With this function you can record a CD on tape very easily and more precisely This record...

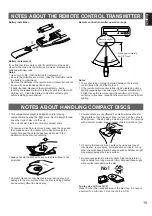
Страница 19: ...unit The unit will also play 8 cm 3 inch compact discs To remove a disc from its storage case open the case and then press down at the center with a finger through the center hole and the outer edges held as shown in the illustration lift the disc out carefully Always handle the disc with care so that its surface is not scratched Compact discs are not subjected to wear during play but damage to th...

Страница 20: ...ve static electricity etc or a misoperation on this unit while using this unit A foreign object is obstructing the tray The disc is damaged There is moisture on the laser pickup The disc has been loaded upside down The disc is dirty The disc may be scratched or damaged Improper output cable connections Improper amplifier operation The player is being subjected to vibrations or impacts The disc is ...

Страница 21: ...ls Verkeerde bediening van de versterker De speler is onderhevig aan trillingen of schokken De disc is verontreinigd Verkeerde aansluiting van de kabels De tuner bevindt zich te dicht bij de speler De disc is vermoedelijk kromgetrokken De batterijen van deze afstandbediening zijn te zwak Direct zonlicht of verlichting van een sterke fluorescerende lamp enz valt op de sensor van de afstandbediening...

Отзывы: