background image

A dynamics processor may also be used to expand the dynamic range of 

a track.  If a track lacks dynamic range, you can use an expander. An example of 
where this may be used is tracks from a keyboard or drum machine. 


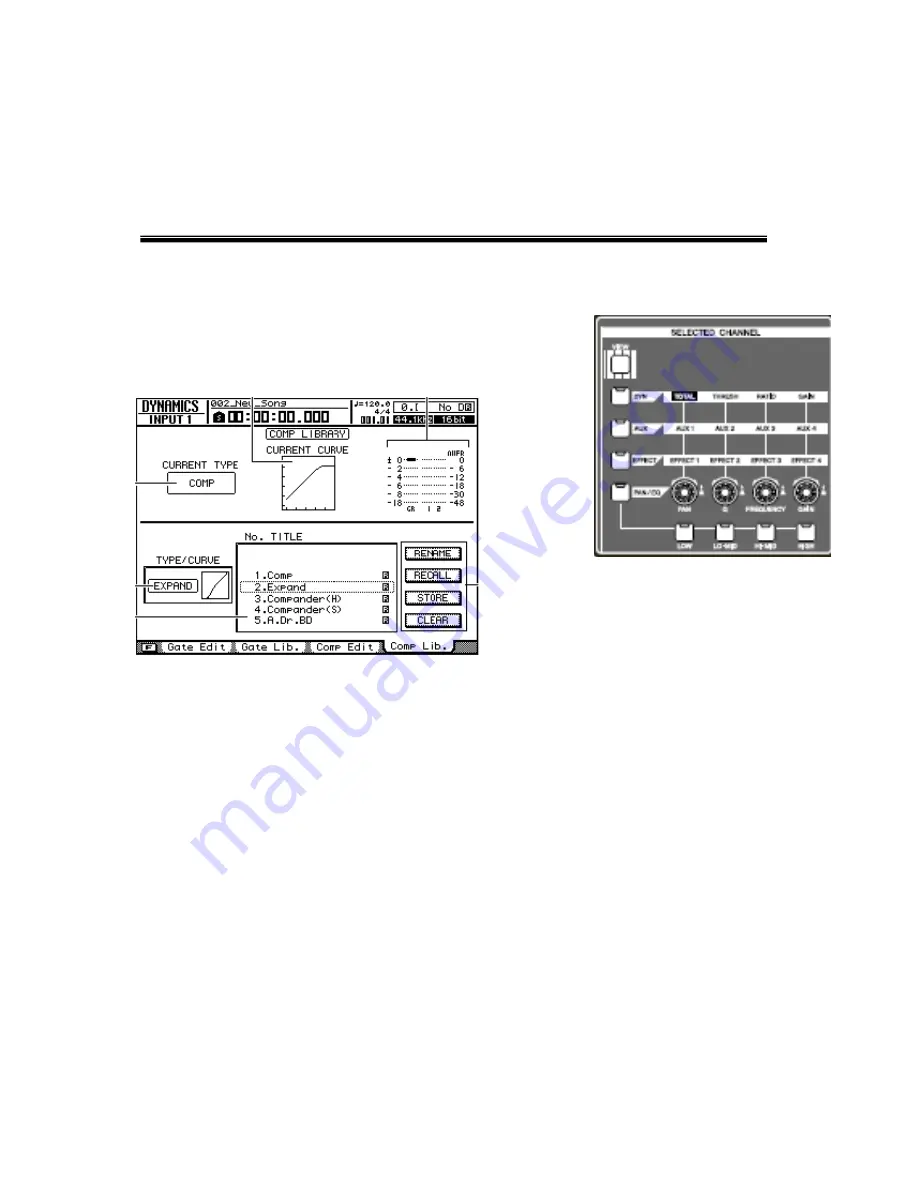
Using the Dynamic Processor Library 
 

1. Press 

the 

[TRACK SEL]

 key of the track that you use a dynamic 

processor on. 

 
2. Press 

the 

[DYN SEL]

 key until the Dynamics 

Library screen is displayed. 


3. 

Use the [

DATA/JOG]

 Wheel to select a desired preset. 

 
4.   

Cursor to the Recall button and press the 

[ENTER]

 key.  

 
5.  

To adjust the dynamic processor, turn the 

[Total]

 knob.  In the default 

settings of the AW2400 turning the 

[Total]

 knob will adjust all parameters 

of the dynamic processor simultaneously.  This allows for very quick and 
easy adjustment of the processor. 


This is for basic dynamic processor adjustments.  If you want more control you 

use the cursor keys to select the various parameters within the COMP EDIT screen and 
then use the DATA/JOG wheel to adjust them. 


20

Содержание AW2400

Страница 1: ...Recording 101 Yamaha Corporation of America 6600 Orangethorpe Ave Buena Park CA 90620 USA Customer Support 714 522 9000 Yamaha Solutions Network http solutionsnetwork yamaha com...

Страница 2: ...Instruments and or Microphones 3 Turning the Equipment on 5 Recording 6 Creating a New Song 6 Setting the Input Level 7 Assigning the Input Signal to a Track 8 9 Recording the First Track 10 Punching...

Страница 3: ...iii Using the EQ Library 18 Adjusting the Dynamic Processors 19 Using the Dynamics Library 20 Using the Internal Effects 21 Recording the Stereo Track 22 Creating an Audio CD 24 Glossary 26...

Страница 4: ...Track Hard Disk Recorder The AW2400 records onto an internal 40 Gigabyte GB desktop style hard drive There are 24 mono tracks for a total of 24 recording tracks 16 Input Channel Mixing Console with a...

Страница 5: ...ble to connect the AW2400 to powered monitors With Powered Monitors If un powered monitors are to be used with the AW2400 first connect the Monitor Outs of the AW2400 to the inputs of the power amp us...

Страница 6: ...r and then record the other instruments The final thing to be recorded is usually the vocals However if you are more comfortable recording other instruments first and then adding the drums later on th...

Страница 7: ...If an electric guitar or bass with passive electronics is going to be connected to the AW2400 it is suggested to use a direct box inline to an input If the guitar or bass has active electronics or is...

Страница 8: ...ey until the Song List page is displayed then cursor to SHUTDOWN and press the ENTER key 5 Turn off external devices such as audio sources and effects processors connected to the AW2400 Recording When...

Страница 9: ...or NO if you do not want to save the current song and press the ENTER key Another popup window will appear allowing you to choose 16 bit 24 bit 44 1kHz 48kHz recording 6 4 Move the cursor to either t...

Страница 10: ...ng a new song the next step is to set the input level for the instrument or other sound source that you will be recording 1 Raise the Stereo Fader the red fader to the 0 position This is all of the wa...

Страница 11: ...input level The meter on the right hand side of the Input Setting screen should be around the 12 to 6 dB mark when the instrument is at its maximum level Once you reach the 0 dB mark the signal will b...

Страница 12: ...that you are going to record from The INPUT SEL that was pushed will now be solid red and the remaining INPUT SEL keys will no longer be blinking 3 Press the TRACK SEL key of the track that you want...

Страница 13: ...he meter section press the METER key until you see the track meter section F1 for input meters and F2 for track meters Recording the First Track 10 You are now ready to record To begin recording simul...

Страница 14: ...o fix the mistake and not erase the rest of the track you can first punch in at the point where the mistake was and then punch out when you have fixed the mistake To perform a punch out first punch in...

Страница 15: ...put channel that you recorded from 3 Press the TRACK SEL key of the track that you recorded on The line that connected the input channel to the track will now disappear and the TRACK SEL key will no l...

Страница 16: ...Navigate section press the RECORD key until the DIRECT page of the RECORD screen is displayed The INPUT SEL keys and the TRACK SEL keys will now be red and blinking 4 Press the INPUT SEL key for the...

Страница 17: ...ise the fader of the track that you are recording on to the 0 mark 7 To begin recording simultaneously press the PLAY and REC keys in the transport section The lights above the PLAY and REC keys will...

Страница 18: ...meant only is a general guideline for mixing and the use of other resources is highly encouraged There are many good books on mixing as well as articles in recording magazines that will cover the proc...

Страница 19: ...n all of the instruments 7 Finally raise the faders of any vocal tracks to the desired listening level The L R meters should now read around the 0 dB mark If the meters are consistently going above th...

Страница 20: ...selected track 4 To adjust the panning for additional tracks first press the TRACK SEL key of the desired track and then turn the PAN knob to the desired pan position Panning Guidelines There are no...

Страница 21: ...are multiple background vocals they would normally be panned just a little off center to the left and the right For a wider sound you may prefer to pan some of the background vocals all of the way to...

Страница 22: ...CALL button in the LCD and press the ENTER key This is for basic EQ adjustment For complete control use the cursor keys to select the various parameters within the EQ EDIT screen and then use the DATA...

Страница 23: ...een is displayed 3 Use the DATA JOG Wheel to select a desired preset 4 Cursor to the Recall button and press the ENTER key 5 To adjust the dynamic processor turn the Total knob In the default settings...

Страница 24: ...record the tracks with effects but typically they are added during the mixdown process Since there are four of these internal effects processors it is not possible to have a different effect on each t...

Страница 25: ...ossible to send as many tracks as you want to any of the effects processors Recording the Stereo Track After you have recorded all of the tracks and adjusted the EQ dynamics processors and added effec...

Страница 26: ...ng of the Stereo Track 5 After the song has finished press the STOP key to end the recording of the Stereo Track 5 Press the SONG key until the SONG LIST is displayed Cursor to SAVE and then press the...

Страница 27: ...en is displayed 3 Select either TRACK AT ONCE or DISC AT ONCE and press the ENTER key An INIT CD LIST progress message will pop up Track At Once writes the audio to the CD and places an interval of tw...

Страница 28: ...n is that of the stereo track not the whole song To add more songs repeat steps 4 to 5 until number of desired songs are displayed 6 Cursor to EXECUTE and press the ENTER key 7 The AW2400 will display...

Страница 29: ...is used to reduce the dynamic range of the signal passing through it Condenser Microphone A microphone that has a gold coated plastic diaphragm mounted above a conductive back plate The diaphragm and...

Страница 30: ...icks or flashes at adjustable intervals Mixdown The process of mixing all of the individually recorded tracks down to a single stereo track Overdub To record additional tracks to an existing recording...

Отзывы: