background image

The Metronome

24

Owner’s Manual

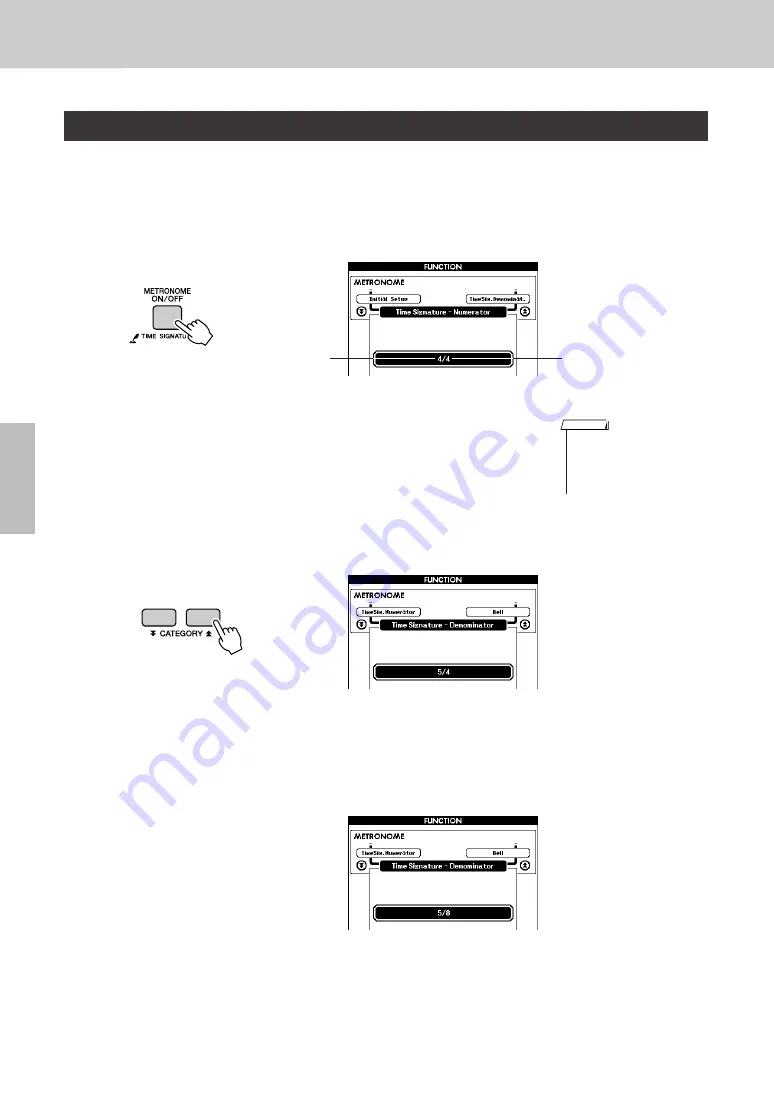
In this example we’ll set up a 5/8 time signature.

1

Press and hold the [METRONOME ON/OFF] button for 
longer than a second to select the function “Time Signa-
ture–Numerator”.

2

Use the dial to select the number of beats per measure.

The available range is from 1 through 60. Select 5 for this example.
A bell accent will be sounded at the first beat of each measure.

3

Press the CATEGORY [

] and [ ] buttons as many times 

as necessary to select the beat length function “Time Sig-
nature–Denominator”.

4

Use the dial to select the beat length.

Select the required length for each beat: 2, 4, 8, or 16 (half note, quarter 
note, eighth note, or 16

th

 note). Select 8 for this example.

Setting the Number of Beats per Measure, and the Length of Each Beat

Hold for longer 
than a second

Denominator 
(The length of 
one beat.)

Numerator 
(Number of 
beats per 
measure.)

• The metronome time signature 

will synchronize to a style or 
song that is playing, so these 
parameters cannot be changed 
while a style or song is playing.

NOTE

f

r

Содержание Arius YDP-V240

Страница 1: ...our obtenir des informations sur l assemblage du support du clavier reportez vous aux instructions à la fin de ce manuel IMPORTANT Contrôler la source d alimentation Vérifiez que la tension spécifiée sur le panneau inférieur correspond à la tension du secteur Dans certaines régions l instrument peut être équipé d un sélecteur de tension situé sur le panneau inférieur du clavier à proximité du cord...

Страница 2: ... friendly We sincerely believe that our products and the pro duction methods used to produce them meet these goals In keeping with both the letter and the spirit of the law we want you to be aware of the following Battery Notice This product MAY contain a small non rechargeable battery which if applicable is soldered in place The average life span of this type of battery is approx imately five yea...

Страница 3: ...ubsidiaries FCC INFORMATION U S A This applies only to products distributed by YAMAHA CORPORATION OF AMERICA class B This applies only to products distributed by YAMAHA CORPORATION OF AMERICA COMPLIANCE INFORMATION STATEMENT DECLARATION OF CONFORMITY PROCEDURE Responsible Party Yamaha Corporation of America Address 6600 Orangethorpe Ave Buena Park Calif 90620 Telephone 714 522 9011 Type of Equipme...

Страница 4: ...e power switch disconnect the electric plug from the outlet and have the instrument inspected by qualified Yamaha service personnel CAUTION Always follow the basic precautions listed below to avoid the possibility of physical injury to you or others or damage to the instrument or other property These precautions include but are not limited to the following When removing the electric plug from the ...

Страница 5: ...ringing in the ears consult a physician Do not place the bench in an unstable position where it might accidentally fall over Do not play carelessly with or stand on the bench Using it as a tool or step ladder or for any other purpose might result in accident or injury Only one person should sit on the bench at a time in order to prevent the possibility of accident or injury If the bench screws bec...

Страница 6: ...back any XG song data using an XGlite tone generator However keep in mind that some songs may play back differently compared to the original data due to the reduced set of control parameters and effects XF The Yamaha XF format enhances the SMF Standard MIDI File standard with greater functionality and open ended expandability for the future The instrument is capable of displaying lyrics when an XF...

Страница 7: ...tions Appendix page 110 This section introduces reference material Data List You can download various MIDI related reference materials such as the MIDI Data Format and MIDI Implementation Chart from the Yamaha Manual Library Connect to the Internet visit the following website type the model name of your instrument such as YDP V240 in the Model Name text box then click the Search button Yamaha Manu...

Страница 8: ...lody simply by tapping one key All you need is one finger Play a Variety of Instrument Voices Page 17 The instrument voice that sounds when you play the keyboard can be changed to violin flute harp or any of an extensive range of voices You can change the mood of a song written for piano for example by using violin to play it instead Experience a whole new world of musical variety Play Along with ...

Страница 9: ...cording Procedure 61 Song Clear Deleting User Songs 63 Track Clear Deleting a Specified Track from a User Song 64 Backup and Initialization 65 Backup 65 Initialization 65 Basic Operation 66 Basic Operation 66 The Displays 68 MAIN Display Items 69 Reference Play with a Variety of Effects 70 Adding Harmony 70 Adding Reverb 71 Adding Chorus 72 Adding DSP 73 Adding Sustain 74 Handy Performance Feature...

Страница 10: ...s all the way down Key Cover Be careful to avoid catching your fingers when opening or closing the cover CAUTION Hold the cover with both hands when opening or closing it Do not release it until it is fully opened or closed Be careful to avoid catching fingers yours or others especially children s between the cover and main unit CAUTION Do not place objects such as a piece of metal or paper on top...

Страница 11: ...ss the power switch again to turn the power OFF Backup data in the flash memory is loaded to the instru ment when the power is turned on If no backup data exists on flash memory all instrument settings are restored to the initial factory defaults when the power is turned on Connecting to a Computer USB TO HOST terminal USB TO HOST USB cable Computer USB TO HOST terminal Turning the Power On Power ...

Страница 12: ...them into either jack Using Headphones PHONES Standard stereo phone plug Bottom surface Using the Headphone Hanger A headphone hanger is included in the package so that you can hang the headphoneson this instrument Install the headphone hanger using the included two screws 4 x 10mm as shown in the figure Do not hang anything other than the headphones on the hanger Otherwise this instrument or the ...

Страница 13: ...stays perfectly in tune Transporting If you move to another location you can transport the instrument along with other belongings You can move the unit as it is assembled or you can disassemble the unit down to the condition it was in when you first took it out of the box Transport the keyboard horizontally Do not lean it up against a wall or stand it up on its side Do not subject the instrument t...

Страница 14: ... Controls and Terminals Front Panel PHONES 9 8 7 0 6 q q USB TO HOST PEDAL Voice Category List page 126 Style Category List page 134 Song Category List page 35 Music Database List page 135 w e r t y u 0 i o 4 5 6 7 8 9 1 3 2 ...

Страница 15: ... 26 33 67 9 MUSIC DATABASE button page 57 0 CONTRAST knob page 69 1 EXIT button page 68 2 SONG button page 33 3 EASY SONG ARRANGER button page 58 4 STYLE button page 26 5 VOICE button page 17 6 Dial pages 67 92 7 CATEGORY and buttons pages 67 92 8 Number buttons 0 9 and buttons pages 67 92 9 SPLIT ON OFF button page 19 0 DUAL ON OFF button page 18 1 HARMONY ON OFF button page 70 2 DSP ON OFF butto...

Страница 16: ...Y and buttons a number of times until the Language item appears The currently selected display language will appear below the Lan guage item When highlighted you can use the and buttons to select the lan guage as required 3 Select a display language The button selects English and the button selects Japanese The language selection will be stored in the internal flash memory so that it is retained e...

Страница 17: ...he main voice selection display will appear The currently selected voice number and name will be highlighted 2 Select the voice you want to play While watching the highlighted voice name rotate the dial The avail able voices will be selected and displayed in sequence The voice selected here becomes the main voice For this example select the 106 Flute voice 3 Play the keyboard Try selecting and pla...

Страница 18: ...tly selected dual voice will sound in addition to the main voice when you play the keyboard 2 Press and hold the DUAL ON OFF button for longer than a second The dual voice selection display will appear 3 Select the desired dual voice Watch the displayed dual voice and rotate the dial until the voice you want to use is selected The voice selected here becomes the dual voice For this example try sel...

Страница 19: ...1 Press the SPLIT ON OFF button The SPLIT ON OFF button turns the split voice on or off When turned on the split voice SPLIT will appear in the MAIN display The currently selected split voice will sound to the left of the keyboard split point 2 Press and hold the SPLIT ON OFF button for longer than a second The split voice selection display will appear Play Different Voices with the Left and Right...

Страница 20: ... Guitar voice 4 Play the keyboard Try selecting and playing a range of split voices Press the EXIT button to return to the MAIN display When you just want to play piano all you have to do is press one convenient button Press the PIANO RESET button The 001 Natural Grand Piano voice will be selected Play the Grand Piano Voice When you press the PIANO RESET button all settings other than touch sensit...

Страница 21: ...his makes it possible to sustain a chord for example while other notes are played staccato Soft Left Pedal The soft pedal reduces the volume and slightly changes the timbre of notes played while the pedal is pressed The soft pedal will not affect notes that are already playing when it is pressed Using the Pedals If the damper pedal doesn t work make sure that the pedal cord is properly plugged int...

Страница 22: ...tton 2 Use the dial to select 143 SFX Kit 2 3 Try out each key and enjoy the sound effects As you try out the various keys you ll hear the sound of a submarine a telephone bell a creaking door and many other useful effects 142 SFX Kit 1 includes lightning running water dogs barking and others Some keys do not have assigned sound effects and will therefore pro duce no sound For details on the instr...

Страница 23: ...ost comfortable for you Turn the metronome on and start it by pressing the MET RONOME ON OFF button To stop the metronome press the METRONOME ON OFF button again 1 Press the TEMPO TAP button to call up the tempo set ting 2 Use the dial to select a tempo from 5 to 280 Start the Metronome Adjusting the Metronome Tempo 4 4 Current setting Tempo ...

Страница 24: ...GORY and buttons as many times as necessary to select the beat length function Time Sig nature Denominator 4 Use the dial to select the beat length Select the required length for each beat 2 4 8 or 16 half note quarter note eighth note or 16th note Select 8 for this example Setting the Number of Beats per Measure and the Length of Each Beat Hold for longer than a second Denominator The length of o...

Страница 25: ...2 Use the CATEGORY and buttons to select the Bell item 3 You can then use the and buttons to turn the bell sound on or off 1 Press the FUNCTION button 2 Use the CATEGORY and buttons to select the Met ronome Volume item 3 Use the dial to set the metronome volume as required Setting the Click bell sound Adjusting the Metronome Volume f r f r Metronome volume ...

Страница 26: ...nt to use A list of all the available styles is provided on page 134 3 Press the START STOP button The style rhythm will start playing Press the START STOP button a second time when you want to stop playback Select a Style Rhythm When you play the style set the Sound Type to Style Doing this a more natural enhanced sound over the internal speak ers see page 77 However when using the headphones nor...

Страница 27: ...is button a second time will turn automatic accompaniment off 3 Turn sync start on Press the SYNC START button to turn the sync start function on Play Along with a Style When automatic accompaniment is on The area of the keyboard to the left of the split point 054 F 2 becomes the auto accompaniment region and is used only for specifying the accompaniment chords This icon appears when automatic acc...

Страница 28: ...ne to three notes at the same time to the left of the split point The accompaniment will change according to the left hand notes you play 5 Play a variety of left hand chords while playing a melody with your right hand 6 Press the START STOP button to stop style playback when you re done You can switch style sections to add variety to the accompaniment Refer to Pattern Variation Sections on page 7...

Страница 29: ...hese pages we ll introduce three easy to use chord progressions Be sure to try them out with the instrument s accompaniment styles The style will respond to the chord progression you play effectively creating a complete song Playing the Chord Progressions Play the scores with the left hand Before playing the scores follow steps 1 through 3 of Play Along with a Style on page 27 The scores provided ...

Страница 30: ... chords Bossa nova with jazz style chords This progression includes jazzy two five II V changes Try playing it through several times When you re ready to stop playing press the INTRO ENDING rit button Recommended Style 148 Piano Boogie Recommended Style 096 Bossa Nova F G F C C C Press the INTRO ENDING rit button Press the INTRO ENDING rit button G7 E7 Dm CM7 Am A7 FM7 Bm7 5 Press the INTRO ENDING...

Страница 31: ... of the keyboard Playing Auto accompaniment Chords C Db Eb F G Bb Db Eb F D E F G A B C D E F Split point default 054 F 2 Root notes and the corresponding keys Accompaniment range To play a major chord Press the root note of the chord C Cm C7 Cm7 To play a minor chord Press the root note together with the nearest black key to the left of it To play a seventh chord Press the root note together with...

Страница 32: ...ctions provided the performance assistant technology feature lessons and more The songs are organized by category In this section we ll learn how to play a demo song and select other songs and briefly describe the demo song and 29 songs provided 1 Press the DEMO button The demo song will start playing To stop demo play back at any time press the DEMO button or START STOP button Play the Demo song ...

Страница 33: ...ong You can stop playback at any time by pressing the START STOP but ton again Select and Listen to a Song 001 030 Built in Songs See page 35 031 035 User Songs Songs you record yourself 036 Songs transferred from a computer pages 107 109 or Songs in a USB flash memory connected to the instrument page 95 The currently selected song number and name You can also play songs you have recorded yourself...

Страница 34: ...tons or the 0 to 9 number buttons to set to tempo to anywhere from 5 and 280 quarter note beats per minute You can return to the original tempo by simultaneously pressing the and buttons Press the EXIT button to return to the MAIN display Song Fast Forward Fast Reverse and Pause Change the Song Tempo PAUSE Press the pause button to pause playback REW Press the fast reverse button to rapidly return...

Страница 35: ... Cool Galaxy Electric Piano Demo 8 ModernHarp Sweet Soprano Demo Function Demo 9 Hallelujah Chorus Use these songs to experience some of the instrument s advanced features song number 9 for the easy song arranger and songs 10 and 11 for the performance assistant technology feature The lesson function cannot be used with songs 10 and 11 10 Ave Maria 11 Nocturne op 9 2 Piano Solo 12 For Elise These ...

Страница 36: ... files from storage to playback Types of Songs Record page 60 Connect page 103 Transfer page 107 Your own performance Song Song Computer USB flash memory Song Song Song Save Play Song Storage locations External Songs loaded Song 036 USB 036 User Songs 031 035 Preset Songs 001 030 The 30 songs built into the instrument Load User songs cannot produce score display as they are If you convert a user s...

Страница 37: ...gin playing The triangular will move across the top of the score to indicate the current location 4 Press the EXIT button to return to the MAIN display Displaying the Song Score The score is created from the recorded song data and it may not be exactly the same as orig inal score Both chords and lyrics will be shown in single staff score dis play of a song that includes chord and lyric data When t...

Страница 38: ... highlighted to show the current location in the song Preset Songs That Can be Used For Lyrics Display Display the Lyrics Number Name 016 Mona Lisa Jay Livingston and Ray Evans 020 Against All Odds Collins 0007403 030 Can t Help Falling In Love George David Weiss Hugo Peretti and Luigi Creatore If the lyrics display shows gar bled characters try changing the display language page 16 NOTE Songs dow...

Страница 39: ...om allowing you to play anything with both your left and right hands Chord Free If you can play simple right hand melodies but have trouble with left hand chords this is the type for you The Chord type applies to only the left hand section of the keyboard allowing you to easily play chords to support the melody you are playing with your right hand Melody This type lets you play the melody of the s...

Страница 40: ...he SONG button and the Song Select display appears Select a song by using the dial For this example try selecting the 010 Ave Maria When the Chord type is selected features only available for this song can be seen in the display CHORD Type Play with Both Hands What is a Song You know the normal meaning of this word but in this instrument the term Song refers to the data that makes up a complete so...

Страница 41: ...the same keys over and over C E G C E G C E You ll notice that at measure five the notes will come out according to the score on the right Keep playing and performance assistant technology Chord type will continue to correct the notes that you play This is the performance assistant technology Chord type You can stop song playback at any time by pressing the START STOP button 6 Press the P A T ON O...

Страница 42: ...A T ON OFF button for longer than a second so that the performance assistant technology type appears Select the Chord Free type by using the dial 3 Select a song Press the SONG button and the Song Select display appears Select a song by using the dial For this example try selecting the 011 Noc turne CHORD FREE Type Applying the Chord Type to the Left Hand Only The currently selected type Hold for ...

Страница 43: ...laying the same notes with your left hand the actual notes produced will change to match the music This is the performance assistant technology Chord Free type Press the SCORE button if you want to see the score for the right hand part in the display You can stop song playback at any time by pressing the START STOP button 6 Press the P A T ON OFF button to turn the performance assistant technology...

Страница 44: ...ology feature is on 2 Select the MELODY type Press and hold the P A T ON OFF button for longer than a second so that the performance assistant technology type appears Select the Mel ody type by using the dial 3 Select a song Press the SONG button and the Song Select display appears Select a song by using the dial MELODY Type Play with One Finger The currently selected type Select Melody Hold for l...

Страница 45: ... music You can play any key If you want to play the melody with the melody score press the SCORE button to call up the melody score in the display How does it sound You ve played the melody using only one finger thanks to the performance assistant technology Melody type You can stop song playback at any time by pressing the START STOP button 6 Press the P A T ON OFF button to turn the performance ...

Страница 46: ... Press and hold the P A T ON OFF button for longer than a second so that the performance assistant technology type appears Select the Chord Melody type by using the dial 3 Select a song Press the SONG button and the Song Select display appears Select a song by using the dial CHORD MELODY Chord Type with the Left Hand Melody with the Right The currently selected type Select Chord Melody Hold for lo...

Страница 47: ... play accompaniment like chords and phrases with your left hand No matter what you play you ll produce the song melody with your right hand and beautiful chords and phrases with your left hand This is the performance assistant technology Chord Melody type If you want to play the melody with the melody score press the SCORE button to call up the melody score in the display You can stop song playbac...

Страница 48: ...ext try the three playing methods illustrated below Different ways of playing produce different results Once you get a feel for it try playing chords with your left hand and a melody with your right or any other combination The chord information included in the song is displayed in the lower area of the MAIN display You will get even better results if you match your left hand rhythm to rhythm of t...

Страница 49: ...y type is selected the performance assistant technology will only work with songs that include melody data In order to find out if a song includes the required data first select the song and then press the SCORE button If chords appear on the display when you press the SCORE button you can use the Chord type or any combination type that includes the Chord type If melody appear on the display when ...

Страница 50: ...and both hands Select lesson 1 2 or 3 Lesson start Song numbers 10 and 11 are function demos for perfor mance assistant The lesson function cannot be used with them NOTE Yamaha Education Suite You can select song you like and use it for a left hand right hand or both hands lesson You can also use songs only SMF format 0 1 transferred to the instrument from a computer page 107 During the lesson you...

Страница 51: ...our lesson As listed on page 35 there are a variety of song types 2 Press EXIT button to return to the MAIN display 3 Select the part you want to practice Press the R button for a right hand lesson L button for a left hand lesson or press both the R and L buttons simultaneously for a both hands lesson The currently selected part is shown in the upper right cor ner of the display Lesson 1 Waiting S...

Страница 52: ...ly when you select Lesson 1 Play the notes shown in the on screen score The next note to be played is indicated by a dot on the appropriate key of the graphic on screen keyboard When you play the correct note the marker will move to the next key to be played Playback will pause and wait for you to play the correct note The triangular marker above the score indicates play back progress Lesson 1 Les...

Страница 53: ...at include very high or low notes those notes may fall outside the displayed range and may not be shown on the display In such cases an over indicator appear to the left or right of the graphic keyboard Use the or button to shift the keyboard left or right so you can see the notes the marker will appear on the appropriate key in the display Notes that actually fall outside the keyboard s range can...

Страница 54: ... begin automatically when Lesson 2 is selected The triangular marker will appear in the score display and will move to indicate the current note in the song Try to play the notes at the correct timing As you learn to play the right notes at the right timing the tempo will increase until eventually you ll be playing at the song s original tempo 3 Stop the Lesson mode You can stop the Lesson mode at...

Страница 55: ... the lesson modes are selected in sequence Lesson 1 Lesson 2 Lesson 3 Off Les son 1 Song playback will begin automatically when Lesson 3 is selected Play along while listening to the song The score marker and keyboard marker in the display will indicate the notes to play 3 Stop the Lesson mode You can stop the Lesson mode at any time by pressing the START STOP button Lesson 3 Minus One In this cas...

Страница 56: ...ck will continue up to the point at which you pressed the REPEAT LEARN button and then jump back four mea sures and begin again after a count in This process will repeat so all you have to do is press the REPEAT LEARN button when you make a mistake in order to repeat practice of that section until you get it right Practice Makes Perfect Repeat and Learn You can change the number of measures the Re...

Страница 57: ...ase Select one that matches the image of the song you intend to play For this example select the 158 Patrol 3 Play the chords with your left hand and melody with your right The jazz style will start playing when you play a left hand chord to the left of the split point page 27 Refer to pages 29 31 for information about playing chords If you press the EXIT button to return to the MAIN display at th...

Страница 58: ...utton and use the dial to select 009 Hallelujah Chorus Press the START STOP button begin playback of the song An explanation of the Easy Song Arranger feature will appear on the display As the song progresses the styles will change changing the overall image of the song Keep in mind that you can enjoy using Easy Song Arranger with other songs as well any songs that include chord data 1 Press the E...

Страница 59: ...es the song will remain the same while only the melody voice changes When playing song numbers 010 011 and 020 to 030 while using the Easy Song Arranger melody tracks will be automati cally muted and no melody will sound In order to hear the mel ody tracks you will need to press the SONG MEMORY buttons 3 to 5 NOTE Song start The currently selected style number and name are dis played here Because ...

Страница 60: ...SONG MEMORY 1 5 and A buttons to spec ify the track s you want to record on SONG MEMORY Track 1 5 Record the melody parts SONG MEMORY Track A Records the style pattern and chord parts Track Mute This instrument allows you to choose whether recorded tracks will play back while you are recording or playing back other tracks page 89 Up to approximately 30 000 notes can be recorded for the five user s...

Страница 61: ...it voices cannot be recorded The selected track will be highlighted in the display Recording Procedure To cancel recording to a selected track press that track button a sec ond time Style accompaniment cannot be turned on or off while recording is in progress Rotate the dial to select a song number between 031 and 035 If you record to track that con tains previously recorded data the previous data...

Страница 62: ...n response to the confirmation message the song will not be saved as a MIDI file but will remain in the instru ment s memory until the power is turned off so you have the option of converting the song to a MIDI file and saving it later To do this press and hold the REC button until the save confirmation message appears then press the YES button If the memory becomes full dur ing recording a warnin...

Страница 63: ...pressing the button To Record Other Tracks Repeat steps 2 through 5 to record any of the remaining tracks By selecting an unrecorded track SONG MEMORY buttons 1 5 A you can record the new track while listening to previously recorded tracks the border around the track number will appear in the display You can also mute previously recorded tracks the border around the track number disappears in the ...

Страница 64: ... user song 031 035 you want to clear 2 Press and hold the SONG MEMORY track button 1 5 A corresponding to the track you want to clear for longer than a second A confirmation message will appear on the display You can cancel the clear operation by pressing the button 3 Press the button to clear the track The clear in progress message will appear briefly on the display while the track is being clear...

Страница 65: ...n the keyboard The backed up data will be erased and the default values restored Flash Clear To clear User Songs as well as Song Style and Music Database files that have been transferred to the internal flash memory from a computer turn the power on by pressing the power switch while simultaneously holding the highest white key on the keyboard and the three highest black keys Backup The Backup Par...

Страница 66: ...ct an item or value 1 Select a basic function 3 Start a function Display pages 68 69 Rotate counter clockwise to lower the volume Rotate clockwise to increase the vol ume Volume Adjustment Adjusts the volume of the sound heard via the instrument s speakers or a pair of headphones plugged into the PHONES jack Select a song you want to listen to or a song you want to use for a lesson Select an auto ...

Страница 67: ...ted see below Decrease Increase Press briefly to decre ment Press briefly to incre ment Example Song number 003 can be entered in three ways 0 0 3 0 3 003 will appear on the dis play after a brief delay 3 003 will appear on the dis play after a brief delay Press number buttons 0 0 3 CATEGORY and buttons When selecting a song style or voice you can use these buttons to jump to the first item in the...

Страница 68: ... Press the CATEGORY button s as many times as necessary until the required function appears You can then use the dial the and buttons or the number 0 9 buttons to adjust the value of the function as required The Displays To Return To the MAIN Display Most basic operations are carried out from the instrument s MAIN display You can return to the MAIN display from any other display by pressing the EX...

Страница 69: ...logy is on Harmony Appears when Harmony is on When this icon is showing har mony notes will be added to the main voice File Control When this icon is showing you can control file operations Chord Display Style Auto accompaniment Status page 27 Appears when the ACMP ON OFF button is pressed to turn accompaniment on after selecting a style When showing the key board range to the left of the split po...

Страница 70: ...s on the har mony icon will appear in the display When you press the HARMONY ON OFF button to turn this feature on the appropriate harmony type for the currently selected main voice is automatically selected NOTE Hold for longer than a second The currently selected harmony type The harmony notes can be added only to the Main Voice not to Dual or Split Voices The keys left of the Split Point of the...

Страница 71: ...ut the available reverb types 1 Press the FUNCTION button to call up the FUNCTION display 2 Use the CATEGORY and but tons to select the Reverb Type item 3 Use the dial to select a reverb type You can check how the selected reverb type sounds by playing on the keyboard Refer to the Effect Type List on page 138 for information about the available reverb types Adjusting the Reverb Level You can indiv...

Страница 72: ...ferent chorus type use the procedure described below 1 Press the FUNCTION button to call up the FUNCTION display 2 Use the CATEGORY and but tons to select the Chorus Type item 3 Use the dial to select a chorus type You can check how the selected chorus type sounds by playing on the keyboard Adjusting the Chorus Level You can individually adjust the amount of chorus that is applied to the main dual...

Страница 73: ...e DSP types Adjusting the DSP Level You can individually adjust the amount of DSP that is applied to the main and dual voices See page 93 Adding DSP When DSP is turned on the optimum DSP type for the current Voice is automatically selected The volume of the currently playing Voice changes when turning DSP on or off This is not a malfunction The amount of change dif fers depending on the selected V...

Страница 74: ...ration The sustain function does not affect split voice 1 Press the FUNCTION button to call up the FUNCTION display 2 Use the CATEGORY and but tons to select the Sustain item The current setting is displayed 3 You can then use the and buttons to turn sustain on or off Adding Sustain f r The sustain of some voices may not be markedly affected when the sustain function is turned on NOTE ...

Страница 75: ...ently selected function will appear in the display 2 Use the CATEGORY and but tons to select the Touch Sensitivity item The currently selected touch sensitivity will be displayed 3 Use the dial to select a touch sensitivity setting between 1 and 3 Higher values produce greater easier volume varia tion in response to keyboard dynamics i e greater sensitivity A setting of 4 results in a fixed touch ...

Страница 76: ...e 17 2 Select and play back any song steps 1 to 3 on page 33 3 Play the keyboard and remember the sound of the voice If you have stopped playback at some point during this procedure press the START STOP button to start playback again 4 Use the dial to change songs then play the keyboard and listen to the voice You should hear a different keyboard voice than you played in step 3 Watch the display w...

Страница 77: ...rrently selected sound type will appear 2 Use the dial to select the desired Sound Type Select Piano when you want to play only a piano sound or select Style when you want to play a style This function can also be set by using the FUNCTION button see page 93 Select a Sound Type Hold for longer than a second The currently selected sound type When using headphones the normal sound is applied NOTE ...

Страница 78: ...required Small Pitch Changes Tuning The overall tuning of the instrument can by shifted up or down by a maximum of 100 cents in 1 cent increments 100 cents 1 semitone 1 Press the FUNCTION button 2 Use the CATEGORY and but tons to select the Tuning item 3 Use the dial to set the tuning value between 100 and 100 as required Pitch Controls f r Transpose item Can be set between 12 and 12 The pitch of ...

Страница 79: ... the main section The length of the intro in measures differs depending on the selected Style MAIN section This is used for playing the main part of the Song It plays a main accompaniment pattern and repeats indefinitely until another section s button is pressed There are two variations on the basic pattern A and B and the Style playback sound changes harmonically based on the chords you play with...

Страница 80: ...arts For this example play a C major chord as shown below For information on how to enter chords see Playing Auto accompaniment Chords on page 31 Synchro Start When the synchro start standby mode is engaged style playback will begin as soon as you play a chord in the accompaniment range of the keyboard You can disengage the synchro start standby mode by pressing the SYNC START button again Appears...

Страница 81: ...omatically You can have the ending gradually slow down ritardando by pressing the INTRO ENDING rit button again while the ending is playing back Synchro Stop When this function is selected the accompaniment style will only play while you are playing chords in the accompaniment range of the keyboard Style playback will stop when you release the keys To turn the function on press the SYNC STOP butto...

Страница 82: ...t to any key from 021 A 1 through 108 C7 Setting the Split Point 021 A 1 024 C0 036 C1 048 C2 060 C3 072 C4 084 C5 096 C6 108 C7 Split point 054 F 2 Main voice Split voice f r When you change the split point the auto accompaniment split point also changes The split point cannot be changed during a song lesson The split voice sounds when the split point key is played NOTE You can also access the Sp...

Страница 83: ...of the chord fingerings recognized by the instrument can be used page 31 Press the ACMP ON OFF button to turn auto accompaniment on after pressing the STYLE button Press the STYLE button to engage the style function 1 Press the FUNCTION button 2 Use the CATEGORY and but tons to select the Style Volume item 3 Use the dial to set the style volume between 000 and 127 Play a Style with Chords but No R...

Страница 84: ...he order of the notes to create different inversions Successive chords in a chord progression can be smoothly connected for example by choosing the appropriate inversions or chord voicings Reading Chord Names Chord names tell you just about everything you need to know about a chord other than the inversion voicing The chord name tells you what the root of the chord is whether it is a major minor o...

Страница 85: ...ninth 7 b9 1 b2 3 5 b7 C7b9 Seventh add flatted thirteenth 7 b13 1 3 5 b6 b7 C7b13 Seventh ninth 7 9 1 2 3 5 b7 C79 Seventh add sharp eleventh 7 11 1 2 3 4 5 b7 or 1 2 3 4 5 b7 C7 11 Seventh add thirteenth 7 13 1 3 5 6 b7 C713 Seventh sharp ninth 7 9 1 2 3 5 b7 C7 9 Seventh flatted fifth 7b5 1 3 b5 b7 C7b5 Seventh augmented 7aug 1 3 5 b7 C7aug Seventh suspended fourth 7sus4 1 4 5 b7 C7sus4 Suspend...

Страница 86: ...d below however chord detection for style accompaniment occurs over the entire range of the keyboard allowing for even more dynamic style performance In this mode only chords played in the normal way page 31 can be detected 1 Press and hold the ACMP ON OFF but ton for longer than a second to select the function Chord Fingering 2 Use the dial to select 2 FullKeyboard Playing Styles Using the Entire...

Страница 87: ...oth as notation and in the keyboard diagram To call up possible inversions of the chord press the buttons 4 Try playing a chord in the auto accom paniment section of the keyboard checking the indications in the display When you ve played the chord properly a bell sound signals your success and the chord name in the display flash Press the EXIT button to return to the MAIN display Looking Up Chords...

Страница 88: ...me at the end of the section you want to repeat the B point 3 The specified A B section of the song will now play repeatedly You can stop repeat playback at any time by pressing the A B REPEAT button Song Volume f r Can be set between 000 and 127 Song volume item Song volume can be adjusted while a song is selected NOTE A B Repeat A B Repeat start and end points cannot be specified within the same...

Страница 89: ...aneously so that LR appears in the upper right corner of the MAIN display Select the song and play it 1 Press the VOICE button for longer than a second The VOICE SELECT MELODY R or MEL ODY L display will appear so you can select the Melody R or Melody L voice Pressing the VOICE button alternates between VOICE SELECT MELODY R and MELODY L 2 Use the dial to select the voice As you select different m...

Страница 90: ...nt panel settings to the specified registration memory Press the EXIT button to return to the MAIN display in order to check the bank and registra tion memory numbers 8 Banks Memory 1 Up to 16 presets eight banks of two each can be memorized Memory 2 Saving to the Registration Memory Bank number Data cannot be saved to the registration memory during song play back NOTE Bank number You can also sav...

Страница 91: ...Memory Bank number Settings That Can be Saved to the Registra tion Memory Style settings Style number Auto Accompaniment ON OFF Split Point Style settings Main A B Style Volume Tempo Chord Fingering Voice settings Main Voice setting Voice number Volume Octave Pan Reverb Level Chorus Level DSP Level Dual Voice settings Dual ON OFF Voice number Volume Octave Pan Reverb Level Chorus Level DSP Level S...

Страница 92: ... 4 Use the dial the and buttons or the 0 9 number buttons to set the selected function as required The and buttons are used to make ON OFF type settings ON OFF In some cases the button will initiate execu tion of the selected function and the will cancel the selection Some Function settings are stored in memory as soon as they are changed See The Backup Parameters on page 65 for information on the...

Страница 93: ...termines how much of the Main voice s signal is sent to the DSP effect DUAL VOICE Dual Volume 000 127 Determines the volume of the Dual voice Dual Octave 2 2 Determines the octave range for the Dual voice Dual Pan 000 left 64 center 127 right Determines the pan position of the Dual voice in the stereo image The value 0 results in the sound being panned full left the value 127 results in the sound ...

Страница 94: ... Determines whether a bell accent will be sounded ON or not OFF Metronome Volume 000 127 Determines the volume of the Metronome SCORE Quantize 1 1 4 note 2 1 4 note triplet 3 1 8 note 4 1 8 note triplet 5 1 16 note 6 1 16 note triplet 7 1 32 note 8 1 32 note triplet Depending on the song data you can make the score more readable by adjusting the timing of the notes This determines the minimum timi...

Страница 95: ...ientation 2 Check that the file control icon is shown in the MAIN display You can go to the FILE CONTROL display from which you can access file operations by pressing the MENU button from this display Do not press this button now but only when instructed to in the sections below Connecting a USB Flash Memory A message information or confirmation dialog sometimes appears on the display to facilitat...

Страница 96: ... prompting you to format the device media If so execute the Format operation page 97 To protect your data write protect To prevent important data from being inadvertently erased apply the write protect provided with each storage device or media If you are saving data to the USB storage device make sure to disable write protect Connecting removing USB storage device Before removing the media from t...

Страница 97: ...s the EXECUTE button again or the button and the format operation will begin 6 A message will appear on the display to inform you that the operation has fin ished Press the EXIT button to return to the MAIN display Formatting USB Flash Memory If you format a USB flash memory that already contains data all of the data will be erased Be careful not to erase important data when using the format funct...

Страница 98: ... has fin ished Press the EXIT button to return to the MAIN display Saving Registration Memory data to USB Flash Memory To Overwrite an Existing File If you want to overwrite a file that already exists on the USB flash memory use the dial or the and buttons to select the file then skip ahead to step 6 f r Up to 100 user files can be saved to a single USB flash memory If the USB flash memory has bee...

Страница 99: ...he dis play prompts you for confirmation You can cancel the save operation at this point by pressing the button 9 Press the EXECUTE button again or the button and the save operation will begin The user song will be stored to the USER FILE folder in the USB flash memory 10 A message will appear on the display to inform you that the operation has finished Press the EXIT button to return to the MAIN ...

Страница 100: ...der in the USB flash memory Files located outside of that folder will not be recognized 5 Press the EXECUTE button The dis play prompts you for confirmation You can cancel the load operation at this point by pressing the button 6 Press the EXECUTE button again or the button and the load operation will begin 7 A message will appear on the display to inform you that the operation has fin ished Press...

Страница 101: ... User Files folder in the USB flash memory Files located outside of that folder will not be recognized 5 Press the EXECUTE button The dis play prompts you for confirmation You can cancel the delete operation at this point by pressing the button 6 Press the EXECUTE button again or the button and the delete operation will begin 7 A message will appear on the display to inform you that the operation ...

Страница 102: ...isplay 1 Make sure that the USB flash memory containing the file you want to play has been properly connected to the instru ment s USB TO DEVICE terminal and that the icon is showing in the MAIN display 2 Press the SONG STYLE or MUSIC DATABASE button Files of the corre sponding type will be displayed 3 Use the dial to select the file you want to play 4 Play the selected file in the same way the in...

Страница 103: ...tion to USB stor age devices Refer to Precautions when using the USB TO DEVICE terminal on page 96 w USB TO HOST terminal This terminal allows direct connection to a per sonal computer Refer to Connecting a Per sonal Computer on page 104 for more information Connectors USB TO HOST w q ...

Страница 104: ... USB TO HOST terminal make sure to observe the follow ing points Failing to do so risks freezing the com puter and corrupting or losing the data If the computer or the instrument freezes restart the application software or the computer OS or turn the power to the instrument off then on again Connecting a Personal Computer USB TO HOST USB cable Computer USB TO HOST terminal Use an AB type USB cable...

Страница 105: ...e instrument are sounded by its internal tone generator system the internal tone generator is active when local control is on and inactive when local control is off External Clock ON OFF These settings determine whether the instrument is synchronized to its own internal clock OFF or to a clock signal from an external device ON Keyboard Out ON OFF These settings determine whether keyboard performan...

Страница 106: ...ter via the USB connection controlling playback stop and transport functions from the panel Remote control keys To use the remote control functions simulta neously hold down the lowest two keys on the key board A 1 and A 1 and press the appropriate key shown below PC1 PC2 OFF Local OFF OFF ON External Clock ON OFF OFF Song Out OFF OFF OFF Style Out OFF OFF OFF Keyboard Out OFF ON ON Hold for longe...

Страница 107: ...sicsoft Downloader You Can Transfer files from the computer to the instru ment s flash memory refer to the procedure described on page 108 The procedure for transferring songs included on the Accessory CD ROM from your com puter to the instrument is given as an example Backup file can be transferred from the instru ment to a computer and back refer to the procedure described on page 109 Initial Se...

Страница 108: ...the instrument in the same way as a song file 6 A copy of the selected MIDI song file will appear in the List of files stored temporarily at the top of the window The memory medium will also be displayed at the bottom of the window to specify the desti nation for the transfer Click Instrument and then Flash memory 7 After selecting the file in the List of files stored temporarily click the downwar...

Страница 109: ...ress the SONG button and select the song 036 residing in flash memory for which you want to set the guide track 2 Press the FUNCTION button 3 Use the CATEGORY and buttons to select the R Part or L Part item 4 Use the dial to select the channel you want to play back as the specified right or left hand part We recommend that you select channel 1 for the right hand part and channel 2 for the left han...

Страница 110: ...nt at an appropriate key page 82 Is the ACMP indicator showing in the display If it is not showing press the ACMP ON OFF button so that it does show No rhythm accompaniment plays when the START STOP button is pressed after selecting style number 131 or a style between 143 160 Pianist This is not a malfunction Style number 131 and style numbers 143 160 Pianist have no rhythm parts so no rhythm will...

Страница 111: ...ferently according to their type Types 01 10 13 function when style playback is on chords are played in the accompaniment range of the keyboard and a melody is played in the right hand range Types 15 26 will function whether style playback is on or off For types 23 26 you need to play two notes at the same time The OverCurrent message is shown in the upper area of the MAIN display and the USB devi...

Страница 112: ... Displayed when the transmission of Initial Send has been completed Error Displayed when writing has failed Exit Displayed when the record standby mode is exited because an inappropri ate style has been selected during style record standby File information area is not large enough Indicates that saving data in the media cannot be executed since the total number of files have become too many File i...

Страница 113: ...ng accessed Style data is too large to load Indicates that style data cannot be loaded since the style data is too large Sure YES NO Reconfirms whether each operation is executed or not The limit of the media has been reached Indicates that saving data cannot be executed since the folder directory structure has become too complicated The media is not formatted Indicates the inserted media has not ...

Страница 114: ...ations Do not use any other screws Use of incorrect screws can cause damage or malfunction of the product Be sure to tighten up all screws upon completing assembly of each unit To disassemble reverse the assembly sequence given below CAUTION Have a Phillips head screwdriver ready A B C D E 6 x 20 mm long screws x 4 Remove all parts from the package and make sure you have all of the items Bundled p...

Страница 115: ...rews 6 x 20mm 3 Attach B 3 1 Place the lower side of B on each foot of D and E then attach the upper side to D and E 3 2 Attach the top of B to D and E by finger tight ening the thin screws 4 x 12mm 3 3 While pushing the lower outside part of D and E towards each other secure the bottom of B at each end using two tapping screws 4 x 20mm 3 4 Insert the other two tapping screws 4 x 20mm into the oth...

Страница 116: ...Voltage Selector Before connecting the AC power cord check the setting of the voltage selector which is provided in some areas To set the selector for 110V 127V 220V or 240V main voltages use a minus screw driver to rotate the selector dial so that the correct voltage for your region appears next to the pointer on the panel The voltage selector is set at 240V when the unit is initially shipped Aft...

Страница 117: ...ors and other movable fixtures Move the instrument to an appropriate location Does this instrument make a rattling noise when you shake it Tighten all screws Does the pedal box rattle or give way when you step on the pedals Turn the adjuster so that it is set firmly against the floor Are the pedal and power cords inserted securely into the sockets Check the connection If the main unit creaks or is...

Страница 118: ...31 86 Chord root 87 Chord type Chord Dictionary 87 Chord type performance assistant technology 39 40 Chord Free type performance assistant technology 39 42 Chord Melody type performance assistant technology 39 46 Chorus 72 Chorus Type 139 Computer 104 105 107 D Default Setting 92 Delete Song Track 64 Delete USB flash memory 101 Delete User Data 102 Delete User Song 63 Demo 32 Demo Cancel 94 Displa...

Страница 119: ...120 Single Staff Score 37 SMF Standard MIDI File 107 Song 33 Song Clear 63 Song List 35 Song Memory 60 61 Song Out 94 105 Song Volume 88 Sound Type 77 93 Specifications 144 Split Chorus Level 93 Split Octave 93 Split Pan 93 Split Point 19 82 Split Reverb Level 93 Split Voice 19 Split Volume 93 Standard Chords 31 Style 26 29 79 Style File 100 Style List 134 Style Out 94 105 Style Volume 83 Sustain ...

Страница 120: ...ploi Manual de instrucciones Scores Noten Partitions Partituras This demo is an example of how the Easy Song Arranger can be used to change styles throughout a piece Hallelujah Chorus Song No 9 q q q q 123 Function Demo for Easy Song Arranger Scores ...

Страница 121: ...Scores Noten Partitions Partituras Owner s Manual Bedienungsanleitung Mode d emploi Manual de instrucciones 121 ...

Страница 122: ...will be corrected by the performance assistant technol ogy feature If you play the Play These Notes part using the performance assistant technology feature the part will be corrected and played so that it matches the backing part Ave Maria Song No 10 q q q q 61 Function Demo for performance assistant technology Repeatedly Play the Same Key P A T Your Turn Type CHORD ...

Страница 123: ...Scores Noten Partitions Partituras Owner s Manual Bedienungsanleitung Mode d emploi Manual de instrucciones 123 ...

Страница 124: ...at the pitch will be corrected by the performance assistant technol ogy feature If you play the Play These Notes part using the performance assistant technology feature the part will be corrected and played so that it matches the backing part Nocturne op 9 2 Song No 11 q q q q 108 Function Demo for performance assistant technology P A T Type CHORD FREE ...

Страница 125: ...Scores Noten Partitions Partituras Owner s Manual Bedienungsanleitung Mode d emploi Manual de instrucciones 125 ...

Страница 126: ...nes Split Voice Voz de división y Song Canción Si se excede la polifonía máxima las notas tocadas con anterioridad se cortan y se da prioridad a las notas más recientes prioridad de la última nota The Voice List includes MIDI program change numbers for each voice Use these program change numbers when playing the instrument via MIDI from an external device Program change numbers are often specified...

Страница 127: ...2 030 Overdriven Guitar 050 000 112 031 Distortion Guitar BASS 051 000 112 034 Finger Bass 052 000 112 033 Acoustic Bass 053 000 112 035 Pick Bass 054 000 112 036 Fretless Bass 055 000 112 037 Slap Bass 056 000 112 039 Synth Bass 057 000 113 039 Hi Q Bass 058 000 113 040 Dance Bass STRINGS 059 000 116 050 Live Orchestra 060 000 112 049 String Ensemble 061 000 112 050 Chamber Strings 062 000 113 05...

Страница 128: ... 001 003 Electric Grand Piano KSP 152 000 032 003 Detuned CP80 153 000 000 004 Honky tonk Piano 154 000 001 004 Honky tonk Piano KSP 155 000 000 005 Electric Piano 1 156 000 001 005 Electric Piano 1 KSP 157 000 032 005 Chorus Electric Piano 1 158 000 000 006 Electric Piano 2 159 000 001 006 Electric Piano 2 KSP 160 000 032 006 Chorus Electric Piano 2 161 000 041 006 DX Analog Electric Piano 162 00...

Страница 129: ...39 Synth Bass 1 263 000 040 039 Techno Synth Bass 264 000 000 040 Synth Bass 2 265 000 006 040 Mellow Synth Bass 266 000 012 040 Sequenced Bass 267 000 018 040 Click Synth Bass Voice No Bank Select MIDI Program Change 1 128 Voice Name MSB 0 127 LSB 0 127 268 000 019 040 Synth Bass 2 Dark 269 000 040 040 Modular Synth Bass 270 000 041 040 DX Bass XG STRINGS 271 000 000 041 Violin 272 000 008 041 Sl...

Страница 130: ...1 000 035 099 Round Glockenspiel 392 000 040 099 Glockenspiel Chimes 393 000 041 099 Clear Bells Voice No Bank Select MIDI Program Change 1 128 Voice Name MSB 0 127 LSB 0 127 394 000 042 099 Chorus Bells 395 000 065 099 Soft Crystal 396 000 070 099 Air Bells 397 000 071 099 Bell Harp 398 000 072 099 Gamelimba 399 000 000 100 Atmosphere 400 000 018 100 Warm Atmosphere 401 000 019 100 Hollow Release...

Страница 131: ... 036 Stream 472 064 000 037 Bubble 473 064 000 038 Feed 474 064 000 049 Dog 475 064 000 050 Horse 476 064 000 051 Bird Tweet 2 477 064 000 056 Maou 478 064 000 065 Phone Call 479 064 000 066 Door Squeak 480 064 000 067 Door Slam 481 064 000 068 Scratch Cut 482 064 000 069 Scratch Split 483 064 000 070 Wind Chime 484 064 000 071 Telephone Ring 2 485 064 000 081 Car Engine Ignition 486 064 000 082 C...

Страница 132: ... Ride Cymbal 1 64 E 3 52 E 2 Chinese Cymbal 65 F 3 53 F 2 Ride Cymbal Cup 66 F 3 54 F 2 Tambourine 67 G 3 55 G 2 Splash Cymbal 68 G 3 56 G 2 Cowbell Cowbell Analog 69 A 3 57 A 2 Crash Cymbal 2 70 A 3 58 A 2 Vibraslap 71 B 3 59 B 2 Ride Cymbal 2 72 C 4 60 C 3 Bongo H 73 C 4 61 C 3 Bongo L 74 D 4 62 D 3 Conga H Mute Conga Analog H 75 D 4 63 D 3 Conga H Open Conga Analog M 76 E 4 64 E 3 Conga L Conga...

Страница 133: ...2 Crash Cymbal 2 Hand Cymbal 2 Train 70 A 3 58 A 2 Vibraslap Jet Plane 71 B 3 59 B 2 Ride Cymbal 2 Hand Cymbal 2 Short Starship 72 C 4 60 C 3 Bongo H Burst 73 C 4 61 C 3 Bongo L Roller Coaster 74 D 4 62 D 3 Conga H Mute Conga Analog H Submarine 75 D 4 63 D 3 Conga H Open Conga Analog M 76 E 4 64 E 3 Conga L Conga Analog L 77 F 4 65 F 3 Timbale H 78 F 4 66 F 3 Timbale L 79 G 4 67 G 3 Agogo H 80 G 4...

Страница 134: ...JazzBallad 72 Dixieland 73 Ragtime 74 AfroCuban 75 Charleston R B 76 Soul 77 DetroitPop1 78 60 sRock Roll 79 6 8Soul 80 CrocoTwist 81 Rock Roll 82 DetroitPop2 83 BoogieWoogie 84 ComboBoogie 85 6 8Blues COUNTRY 86 70 sCountry 87 Country8Beat 88 CountryPop 89 CountrySwing 90 CountryBallad 91 Country2 4 92 CowboyBoogie 93 CountryShuffle 94 Bluegrass LATIN 95 BrazilianSamba 96 BossaNova 97 PopBossa 98...

Страница 135: ... TurnThre 142 Sherry DANCE DISCO 143 Babylon 144 Goodbye 145 Catch22 146 DISCO 147 Survival 148 TheNavy 149 DontHide 150 Celebrat 151 LondonRU 152 10 2 Sun 153 ShakeYou 154 Believe 155 BoySumer 156 I mSexy 157 StuffHot SWING JAZZ 158 Patrol 159 Charles 160 GiveLove 161 Rhythm 162 LOVE 163 LeroyBad 164 Caraban 165 Misbehav 166 Safari 167 Smiling 168 SoWhatIs 169 TimeGone 170 TasteHny 171 Sandman 17...

Страница 136: ...avier 1 1 J S Bach 027Violl mid La Viollette L Streabbog 028Angel mid Angels Serenade Traditional 029Saraf mid Krasnyj Sarafan Traditional 030Ameri mid America the Beautiful S A Ward 031Brown mid Little Brown Jug Traditional 032Lomon mid Loch Lomond Traditional 033Bonni mid My Bonnie Traditional 034Londo mid Londonderry Air Traditional 035Banjo mid Ring de Banjo S C Foster 036Vogle mid Wenn ich ei...

Страница 137: ...r als auch bei ausgeschalteter automatischer Bass Akkord Begleitung erzeugt die Effektgeschwindigkeit hängt jedoch stets von der aktuellen Tempoeinstellung ab Seite 34 Dank der spezifischen Notenwerte der einzelnen Harmony Typen können Sie den Effekt präzise mit dem Rhythmus synchronisieren Es gibt auch Triolen Einstellungen 1 6 Viertelnotentrio len 1 12 Achtelnotentriolen 1 24 Sechzehntelnotentri...

Страница 138: ...18 14 ROOM4 2 19 15 ROOM5 2 0 16 ROOM6 2 1 17 ROOM7 2 2 18 ROOM S 2 5 19 ROOM M 2 6 20 ROOM L 2 7 21 ACOSTIC ROOM 2 20 22 DRUMS ROOM 2 21 23 PERC ROOM 2 22 24 STAGE1 Reverb suitable for a solo instrument 3 16 25 STAGE2 3 17 26 STAGE3 3 0 27 STAGE4 3 1 28 PLATE1 Reverb simulating a plate reverb unit 4 16 29 PLATE2 4 17 30 PLATE3 4 0 31 GM PLATE 4 7 32 TUNNEL Simulates a cylindrical space expanding ...

Страница 139: ...f Celeste 68 16 19 SYMPHONIC2 68 0 20 FLANGER1 Creates a sound reminiscent of a jet airplane 67 8 21 FLANGER2 67 16 22 FLANGER3 67 17 23 FLANGER4 67 1 24 FLANGER5 67 0 25 GM FLANGER 67 7 26 ROTARY SP1 Simulates a rotary speaker 69 16 27 ROTARY SP2 71 17 28 ROTARY SP3 71 18 29 ROTARY SP4 70 17 30 ROTARY SP5 66 18 31 ROTARY SP6 69 0 32 ROTARY SP7 71 22 33 2WAY ROT SP 86 0 34 AUTO PAN1 Several pannin...

Страница 140: ... chorusing 66 17 37 CHORUS2 66 8 38 CHORUS3 66 16 39 CHORUS4 66 1 40 CHORUS5 65 2 41 CHORUS6 65 0 42 CHORUS7 65 1 43 CHORUS8 65 8 44 CHORUS FAST 65 16 45 CHORUS LITE 65 17 46 GM CHORUS1 65 3 47 GM CHORUS2 65 4 48 GM CHORUS3 65 5 49 GM CHORUS4 65 6 50 FB CHORUS 65 7 51 CELESTE1 A 3 phase LFO adds modulation and spaciousness to the sound 66 0 52 CELESTE2 66 2 53 SYMPHONIC1 Adds more stages to the mo...

Страница 141: ...ortion 73 0 100 OVERDRIVE1 Adds mild distortion to the sound 74 0 101 OVERDRIVE2 74 9 102 ST DIST Stereo distortion 73 8 103 ST OD Stereo Overdrive 74 8 104 ST DIST HARD Hard edge stereo distortion 75 18 105 ST DIST SOFT Soft warm soft distortion 75 19 106 AMP SIM1 A simulation of a guitar amp 75 0 107 AMP SIM2 75 1 108 ST AMP1 Stereo amp simulator 75 20 109 ST AMP2 75 21 110 ST AMP3 75 8 111 ST A...

Страница 142: ... 1 161 DUAL ROT BRT Rotary speaker simulation with speed switching 99 16 162 D ROT BRT F 99 30 163 DUAL ROT WRM 99 17 164 D ROT WRM F 99 31 165 DUAL ROT SP1 99 0 166 DUAL ROT SP2 99 1 167 ROTARY SP1 Simulates a rotary speaker 69 16 168 ROTARY SP2 71 17 169 ROT SP2 FAST 71 23 170 ROTARY SP3 71 18 171 ROT SP3 FAST 71 24 172 ROTARY SP4 70 17 173 ROT SP4 FAST 70 20 174 ROTARY SP5 66 18 175 ROT SP5 FAS...

Страница 143: ... DLY1 Wah Distortion and Delay are connected in series 97 16 219 WH DST DLY2 97 0 220 WH DST TDLY WAH Distortion and Tempo Delay are connected in series 102 0 221 WH OD DLY1 Wah Overdrive and Delay are connected in series 97 17 222 WH OD DLY2 97 1 223 WH OD TDLY1 WAH Overdrive and Tempo Delay are connected in series 102 1 224 WH OD TDLY2 102 16 225 CLVI TC WAH1 Clavinet Touch Wah 82 18 226 CLVI TC...

Страница 144: ...las espe cificaciones equipos u opciones pueden no ser las mismas en todos los mercados solicite información a su distribuidor Yamaha Dimensions W x D x H 1 369mm x 502mm x 852mm 53 7 8 x 19 3 4 x 33 9 16 With music rest W x D x H 1 369mm x 502mm x 1 006mm 53 7 8 x 19 3 4 x 39 5 8 Weight 49kg 108 lbs Keyboard Type GHS Graded Hammer Standard keyboard with matte black keytops Number of keys 88 Touch...

Страница 145: ...Owner s Manual Bedienungsanleitung Mode d emploi Manual de instrucciones 145 ...

Страница 146: ...146 Owner s Manual Bedienungsanleitung Mode d emploi Manual de instrucciones ...

Страница 147: ...and ask for the correct method of disposal Verbraucherinformation zur Sammlung und Entsorgung alter Elektrogeräte Befindet sich dieses Symbol auf den Produkten der Verpackung und oder beiliegenden Unterlagen so sollten benutzte elektrische Geräte nicht mit dem normalen Haushaltsabfall entsorgt werden In Übereinstimmung mit Ihren nationalen Bestimmungen und den Richtlinien 2002 96 EC bringen Sie al...

Страница 148: ...n dehors de l Union Européenne Ce symbole est seulement valables dans l Union Européenne Si vous souhaitez vous débarrasser de déchets d équipements électriques et électroniques veuillez contacter les autorités locales ou votre fournisseur et demander la méthode de traitement appropriée Información para Usuarios sobre Recolección y Disposición de EquipamientoViejo Este símbolo en los productos emb...

Страница 149: ... A grounding type plug has two blades and a third grounding prong The wide blade or the third prong are provided for your safety If the provided plug does not fit into your outlet consult an electrician for replacement of the obsolete outlet 10 Protect the power cord from being walked on or pinched particularly at plugs convenience receptacles and the point where they exit from the apparatus 11 On...

Страница 150: ... YS Copenhagen Liaison Office Generatorvej 6A DK 2730 Herlev Denmark Tel 44 92 49 00 FINLAND F Musiikki Oy Kluuvikatu 6 P O Box 260 SF 00101 Helsinki Finland Tel 09 618511 NORWAY Norsk filial av Yamaha Scandinavia AB Grini Næringspark 1 N 1345 Østerås Norway Tel 67 16 77 70 ICELAND Skifan HF Skeifan 17 P O Box 8120 IS 128 Reykjavik Iceland Tel 525 5000 RUSSIA Yamaha Music Russia Office 4015 entran...

Страница 151: ......

Страница 152: ...cal Instrument Division Yamaha Corporation 2009 Yamaha Corporation WR86780 XXXPOXXX X 01A0 Printed in Indonesia Yamaha Home Keyboards Home Page http music yamaha com homekeyboard Yamaha Manual Library http www yamaha co jp manual ...

Отзывы: