Yamaha AG08 Скачать руководство пользователя страница 20

g

FX SEND knobs

Use these knobs to control the send level for FX1 of channel 1.

Push these knobs to toggle the effect type for FX1 of channel 1.

h

[AMP SIM] button

Toggles the amp simulator function for channel 2 on/off. The amp simulator recreates the sound of playing an
electric guitar through an amplifier. This simulates the characteristic “distorted” amp sound that’s heard when you
directly connect an electric guitar.

i

[CH1 PRESET] [1]–[4] buttons

Use these buttons to register effect combinations for channel 1 as a preset, and recall them later. The button lights
up for the preset you recall. You can store four presets. With AG08 Controller, you can select from six different colors
for the button LEDs. Use AG08 Controller to change the LED colors. See “Using the presets” (p.62) for how to register
the presets.

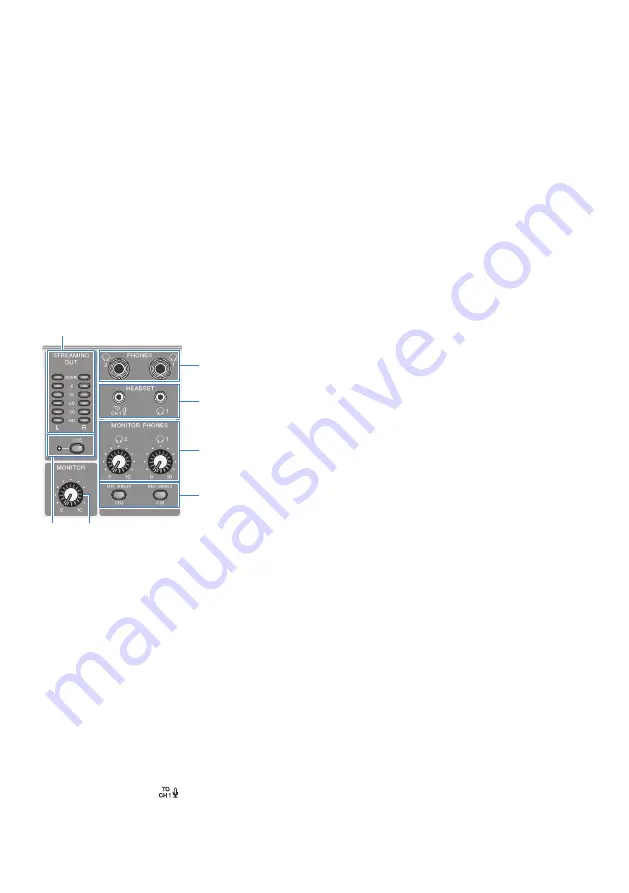
Top panel output section

d

a

b

e

f

g

c

a

[STREAMING OUT] LED level meters

These meters display the level of signal used for the streaming bus (STREAMING bus). Each horizontal meter lights up
when its signal level (shown in the middle, in units of dB) is exceeded. When the signal level exceeds 0 dB, the OVER
LED lights up red.

b

[CUE] switch

When this is turned on, the STREAMING OUT signal is output to both MONITOR PHONES 1 and 2, and the indicator to
the left of the switch lights up. Turn this on when you want to check the streaming signal in headphones.

c

[MONITOR] knob

Adjusts the volume of audio sent to the device connected to the [MONITOR OUT] connectors.

d

[PHONES 1 (

H

)/PHONES 2 (

H

)] jack (phone type)

Connect your headphones here. Compatible with stereo phone plugs. When using headphones or earphones with a
stereo mini-plug, you can also use the [HEADSET] headphones [

H

] output jack.

e

[HEADSET] mic [

] input jack

Connect a headset mic here. Normally, the plug is pink. The audio input from this jack is sent to channel 1.

20

Component names and functions > Front side

Содержание AG08

Страница 1: ...LIVE STREAMING MIXER EN User Guide YAMAHA A 5 DE...

Страница 2: ...computer and configuring the settings Mac 27 Connecting to an iPad iPhone 30 Connecting to Android devices 32 Using this product for livestreaming 17LIVE Twitch YouTube Live 34 Using this product with...

Страница 3: ...esets 62 Saving a preset 63 Using the dedicated app 64 Using AG08 Controller 64 Using this product for a podcast 69 Using WaveLab Cast 69 Using this product in music production 70 Using Cubase AI with...

Страница 4: ...Dimensions 80 Block diagram 81 Level diagram 82 4 Contents...

Страница 5: ...ons or warranties with regard to the use of the software and documentation and cannot be held responsible for the results of the use of this guide and the software Protection of copyright Do not use t...

Страница 6: ...ks used in this guide are as follows Steinberg Cubase Cubasis and WaveLab Cast are registered trademarks of Steinberg Media Technologies GmbH Windows is a registered trademark or trademark of Microsof...

Страница 7: ...safety related points you must be aware of when using this product Online manuals User Guide this guide Explains the name and function of each part how to connect to various devices and how to set th...

Страница 8: ...ivestream mix Also the three USB output channels on this product output individually to multiple applications on your computer For example you can use these in combination to create the optimum mixes...

Страница 9: ...n Stable operations using the dedicated AC adapter Use the included AC adapter to supply the necessary power for stable operations 9 Introduction Product features...

Страница 10: ...low Check whether all of these items have been properly packaged with the product AC adapter PA 150B 1 USB cable USB C to USB C 1 5 m 1 Safety Guide 1 Start Guide 1 WaveLab Cast Download Information 1...

Страница 11: ...uter power will be supplied from the computer to this unit When connecting an iPad iPhone connect the included AC adapter separately to the 12V DC jack NOTE A dedicated driver is required to use this...

Страница 12: ...n and unplugging the cable may cause a malfunction d ASSIGNABLE FOOT SW jack Connect a footswitch such as a Yamaha FC5 sold separately here You can set the INPUT MUTE TAP TEMPO VOICE EFFECT and OUTPUT...

Страница 13: ...Compatible with stereo mini plug cables f CH5 6 LINE IN jacks RCA pin type Connect an electronic musical instrument audio device or other line level equipment here Channels 5 6 use RCA pin type plugs...

Страница 14: ...Output for the MONITOR OUT jacks In the AG08 Controller app select the MONITOR OUT settings shown at the bottom right corner of the Detail screen 14 Component names and functions Rear panel...

Страница 15: ...NE IN OUT jack Press the menu button on the AG08 Controller and select Settings OUTPUT to make the settings For the signals for MIX MONITOR1 MONITOR2 AUX and STREAMING refer to the block diagram 15 Co...

Страница 16: ...Front side Effects section Input section Output section Fader section Sound pad section Top panel input section a b c d e f g h 16 Component names and functions Front side...

Страница 17: ...from malfunctioning and to prevent noise turn phantom power on off only when the channel 1 2 faders are at minimum setting d PAD switch These switches attenuate the input signal level Turn these swit...

Страница 18: ...d LEDs only briefly light up when a loud sound is input h STREAMING ON OFF switch These switches toggle the output to the livestream bus STREAMING bus of channels 3 4 5 6 and 7 8 Fader section a b a C...

Страница 19: ...zero only the center LED lights up d FORMANT knob Turn this knob to adjust the formant for the channel 1 voice Turn this towards LOW for a more masculine voice and turn this towards HIGH for a more f...

Страница 20: ...ection d a b e f g c a STREAMING OUT LED level meters These meters display the level of signal used for the streaming bus STREAMING bus Each horizontal meter lights up when its signal level shown in t...

Страница 21: ...udio that is output is the same as that of the headphones H output jack f MONITOR PHONES 1 H MONITOR PHONES 2 H knobs These knobs adjust the volume for the headphones connected to the headphones PHONE...

Страница 22: ...and select Settings MIX MINUS to make the settings Top panel sound pad section c a b d a z standby on switch Toggles between power standby and on To set this to standby while the power is on long pres...

Страница 23: ...REC buttons in combination with the SOUND PAD buttons to record with the sound pad See Recording to the sound pad p 58 for details d SOUND PAD 1 6 buttons These buttons play back record audio files s...

Страница 24: ...the mouse and keyboard 2 Make sure that the volume on this product and on the connected device is turned all the way down 3 Connect the included AC adapter to the 12V DC jack on the rear panel and sli...

Страница 25: ...put input setting on your computer to AG08 1 Open the Search box from the Taskbar The method of opening the Search box may differ depending on your computer s settings 2 Type Sound into the Search box...

Страница 26: ...computer NOTE This product can be powered by a computer that has a USB Type C port supplying at least 5 V 1 5 A of current via a USB C to USB C cable without the need to connect a AC adapter 1 Remove...

Страница 27: ...n the connected device is turned all the way down 3 Connect the included AC adapter to the 12V DC jack on the rear panel and slide the POWER SOURCE selector switch to 12V DC left side Rear panel AC ad...

Страница 28: ...r Sound Output 4 Similarly select Use This Device For Sound Input Once you ve finished steps 3 and 4 the mic and speaker icons at the bottom right of Yamaha AG08 Streaming CH3 4 in the list appear 5 T...

Страница 29: ...rent via a USB C to USB C cable without the need to connect a AC adapter 1 Remove all USB devices from your computer except for the mouse and keyboard 2 Make sure that the volume on this product and o...

Страница 30: ...s see the following Yamaha website https www yamaha com 2 ag08 1 Make sure that the volume on this product and on the connected device is turned all the way down 2 Connect the included AC adapter to t...

Страница 31: ...e USB C cable included with the iPad to connect directly to this product However the amount of time you can use the iPad will be limited by how much battery charge remains on the iPad This product is...

Страница 32: ...have a power supply on hand for powering your Android device 1 Make sure that the volume on this product and on the connected device is turned all the way down 2 Connect the included AC adapter to th...

Страница 33: ...ample for Android devices that use a USB C port to input output audio you ll need a USB C to 3 5 mm four conductor TRRS earphone jack conversion adapter cable Use a four conductor TRRS stereo mini cab...

Страница 34: ...stall the AG08 Controller app from the following website https www yamaha com 2 ag08 Headphones or earphones PHONES 1 stereo phone plug or 3 5 mm stereo mini plug PHONES 2 stereo phone plug USB C to U...

Страница 35: ...2 Connect your headphones or earphones to the output jack 35 Using this product for livestreaming 17LIVE Twitch YouTube Live Using this product with your computer...

Страница 36: ...headset microphone to the HEADSET mic input jack Now that you ve made these connections configure the settings for this unit 4 Turn the z standby on switch on 36 Using this product for livestreaming...

Страница 37: ...n the front panel as follows PAD switch off Phantom 48V switch on when using a condenser mic Channel 1 GAIN knob fader as appropriate see illustration MIX MINUS off 37 Using this product for livestrea...

Страница 38: ...llow the instructions from the Sound Check function in the AG08 Controller app to configure the connection with your computer and the levels on this product Press the menu button on the AG08 Controlle...

Страница 39: ...ction with your computer and the levels on this product If the output input settings for the computer are not finished a sound settings screen like the one below is shown 39 Using this product for liv...

Страница 40: ...no effect on the volume of the livestreaming audio 8 Start the livestream Use the faders to adjust the respective volumes Launch the livestreaming app and check the balance for the listeners NOTE See...

Страница 41: ...martphone via the computer such as when guests are participating via phone call use a 3 5 mm four conductor TRRS stereo mini cable to connect the LINE 7 8 IN OUT smartphone input output jack to the he...

Страница 42: ...ed on iPhones Headphones or earphones PHONES 1 stereo phone plug or 3 5 mm stereo mini plug PHONES 2 stereo phone plug Apple Lightning to USB 3 Camera Adapter and a commercially available USB A to USB...

Страница 43: ...2 Connect your headphones or earphones to the output jack 43 Using this product for livestreaming 17LIVE Twitch YouTube Live Using with an iPad iPhone...

Страница 44: ...nect a headset microphone to the HEADSET mic input jack Now that you ve made these connections configure the settings for this unit 4 Turn the z standby on switch on 44 Using this product for livestre...

Страница 45: ...itch on the front panel as follows PAD switch off Phantom 48V switch on when using a condenser mic Channel 1 GAIN knob fader as appropriate see illustration MIX MINUS off 45 Using this product for liv...

Страница 46: ...follow the instructions from the Sound Check function in the AG08 Controller app to configure the connection with your computer and the levels on this product Press the menu button on the AG08 Control...

Страница 47: ...usting the volume using the MONITOR PHONES H knob has no effect on the volume of the livestreaming audio 8 Start the livestream Use the faders to adjust the respective volumes Launch the livestreaming...

Страница 48: ...even when connected via USB cable You ll need to connect using a 3 5 mm 4 conductor TRRS stereo mini cable What you need This product Android device Headphones or earphones PHONES 1 stereo phone plug...

Страница 49: ...2 Connect your headphones or earphones to the output jack 49 Using this product for livestreaming 17LIVE Twitch YouTube Live Using this product with an Android device...

Страница 50: ...nnel 1 mic line input jack Connect a headset microphone to the HEADSET mic input jack 4 Turn the z standby on switch on 50 Using this product for livestreaming 17LIVE Twitch YouTube Live Using this pr...

Страница 51: ...PHONES H knob while speaking into the mic Adjusting the volume using the MONITOR PHONES H knob has no effect on the volume of the livestreaming audio 7 Start the livestream Use the faders to adjust t...

Страница 52: ...or otherwise taking a break during the livestream turn the m button on the LED lights up so that the sound from the mic is not broadcasted n Adding reverb to your voice To add reverb to the mic audio...

Страница 53: ...digital piano synthesizer or other digital instrument to the CH3 4 LINE jack and set the LINE USB selector switch to LINE n Connecting a music player Connect your music player to the CH5 6 LINE jacks...

Страница 54: ...8 is automatically attenuated when someone speaks into a mic connected to channel 1 or 2 without the need to operate the faders yourself Once the person stops speaking into the mic this function autom...

Страница 55: ...mpressor You can use this to minimize changes in volume and maximize the sound pressure levels by setting a compressor for the LOW MID and HIGH frequency bands Use the AG08 Controller app to configure...

Страница 56: ...ck the audio file that s assigned to the SOUND PAD button you pressed If the playback mode is set to ONE SHOT playback starts from the beginning when you press a pad continues once to the end and stop...

Страница 57: ...configure in the top left part of the screen Set the parameters in the bottom left part of the screen for the pad you selected including the name Rename the pad s LED color waveform display playback...

Страница 58: ...lect it you can check the contents of that sound pad while the button is pressed 3 To start recording press the REC button again Recording starts When you press the SHIFT and REC buttons at the same t...

Страница 59: ...and this unit and the SOUND PAD 1 6 buttons flash blue in a cyclical manner You cannot operate this product while synchronization is in progress Do not turn off the AG08 quit the AG08 Controller app...

Страница 60: ...n controls to adjust the length of the audio file and press the Send to AG button to send the data to the AG08 You can adjust the length and trim delete the silence at the beginning and end of the rec...

Страница 61: ...for channel 1 2 Use the FORMANT and PITCH knobs to adjust the voice formant and pitch to your liking You can use the AG08 Controller app to recall presets that you ve already created or to add effect...

Страница 62: ...The selected preset buttons lights up and the effect settings preset are recalled Pressing the button again makes it go dark and the unit returns to the state it was in before you selected the preset...

Страница 63: ...e effects 2 Press and hold a CH1 PRESET button to which you wish to save 1 4 for at least two seconds NOTE With AG08 Controller you can select from six different colors for the button LEDs Press the m...

Страница 64: ...oller is an intuitive application that s easy to operate Here s a brief summary of how the app works Detail mode SOUND SETTING screen Use this screen to configure the signal processing for each channe...

Страница 65: ...The screen shown below contains the detailed settings for the EQ 65 Using the dedicated app Using AG08 Controller...

Страница 66: ...Simple mode Use this mode to make easy settings for the channel 1 effects by selecting your use case vocal character mic type and so on 66 Using the dedicated app Using AG08 Controller...

Страница 67: ...PAD SETTINGS screen Use this screen to configure the sound pad related settings 67 Using the dedicated app Using AG08 Controller...

Страница 68: ...the button at the top left of the SOUND SETTING screen or Simple screen to show the menu This also shows the screens for making other detailed settings backing up the data and so on 68 Using the dedic...

Страница 69: ...up Refer to the following page to download the app and activate the license https www steinberg net getwavelabcast NOTE You will need a download access code to download this app This code is listed on...

Страница 70: ...ter Cubase AI setup Refer to the following page to download the app and activate the license https www steinberg net getcubaseai NOTE You will need a download access code to download this app This cod...

Страница 71: ...s with Cubasis this is a music production app that lets you record play back and edit audio from your iPad iPhone To use this app search for and download Cubasis LE from the App Store For more details...

Страница 72: ...er LED is flashing or lights only intermittently There might be a problem with the power supply The LED flashes when there is some kind of problem with the power supply Connect the included AC adapter...

Страница 73: ...selector switch set correctly Set the switch to HIGH If the volume from the sound source is too low you may not be able to hear the sound when this switch is set to LOW Is the MIX MINUS switch turned...

Страница 74: ...s appropriate for Internet livestreaming is already set for this button by factory default which keeps down unnecessary noise in the low end and helps smooth out differences in the input levels Reverb...

Страница 75: ...Controller app the CH1 PRESET data the SOUND PAD audio data and so on 1 Set the z standby on switch to standby for the time being 2 Set the z standby on switch to on while holding down the COMP EQ bu...

Страница 76: ...HONES and HEADSET PHONES cannot be used simultaneously AUX OUT 1 Input channel features PAD CH1 CH2 26 dB DSP CH1 COMP EQ VOICE CHANGER REVERB MUTE CH2 COMP EQ AMP SIM REVERB MUTE CH 3 4 5 6 7 8 DUCKE...

Страница 77: ...4 Not including the headset mic plug in power input and the AUX OUT circuit 77 Appendix General specifications...

Страница 78: ...6 mV 12 dBu 194 7 mV INPUT CH2 GUITAR 5 OFF 10 1 M 72 dBu 0 195 mV 56 dBu 1 228 mV 46 dBu 3 884 mV Phone jack 3 unbalanced 0 26 dBu 38 84 mV 10 dBu 245 1 mV 0 dBu 775 0 mV ON 10 46 dBu 3 884 mV 30 dBu...

Страница 79: ...dBu 1 228 V 14 dBu 3 884 V Phone jack 9 balanced PHONES 120 40 phone 1 5 mW 1 5 mW 6 mW 6 mW Phone jack 3 5 mm phone jack AUX OUT 150 1 5 k line 30 dBu 24 51 mV 20 dBu 77 50 mV 3 5 mm phone jack 10 C...

Страница 80: ...Dimensions 290 219 212 2 1 7 2 2 2 73 76 88 Units mm 80 Appendix Dimensions...

Страница 81: ...Block diagram See the following Yamaha website for the AG08 block diagram https www yamaha com 2 ag08 81 Appendix Block diagram...

Страница 82: ...Level diagram See the following Yamaha website for the AG08 level diagram https www yamaha com 2 ag08 82 Appendix Level diagram...

Страница 83: ...ttps www yamahaproaudio com Yamaha Downloads https download yamaha com 2023 Yamaha Corporation Published 01 2023 AM A0 Layout Folder YMH_PDF_Manual_A5_PA Stylesheet Name 01_YMH_PDF_Manual_A5_PA_En Mul...

Отзывы: