About the COMMANDS
212
Chapter 9 COMMAND
• A5000/A4000
● ● ● ● ● ● ● ● ● ● ● ● ● ● ● ● ● ● ● ● ● ● ● ● ● ● ● ● ● ● ● ● ● ● ● ● ● ● ● ● ● ● ● ● ● ● ● ● ● ● ● ● ● ● ●
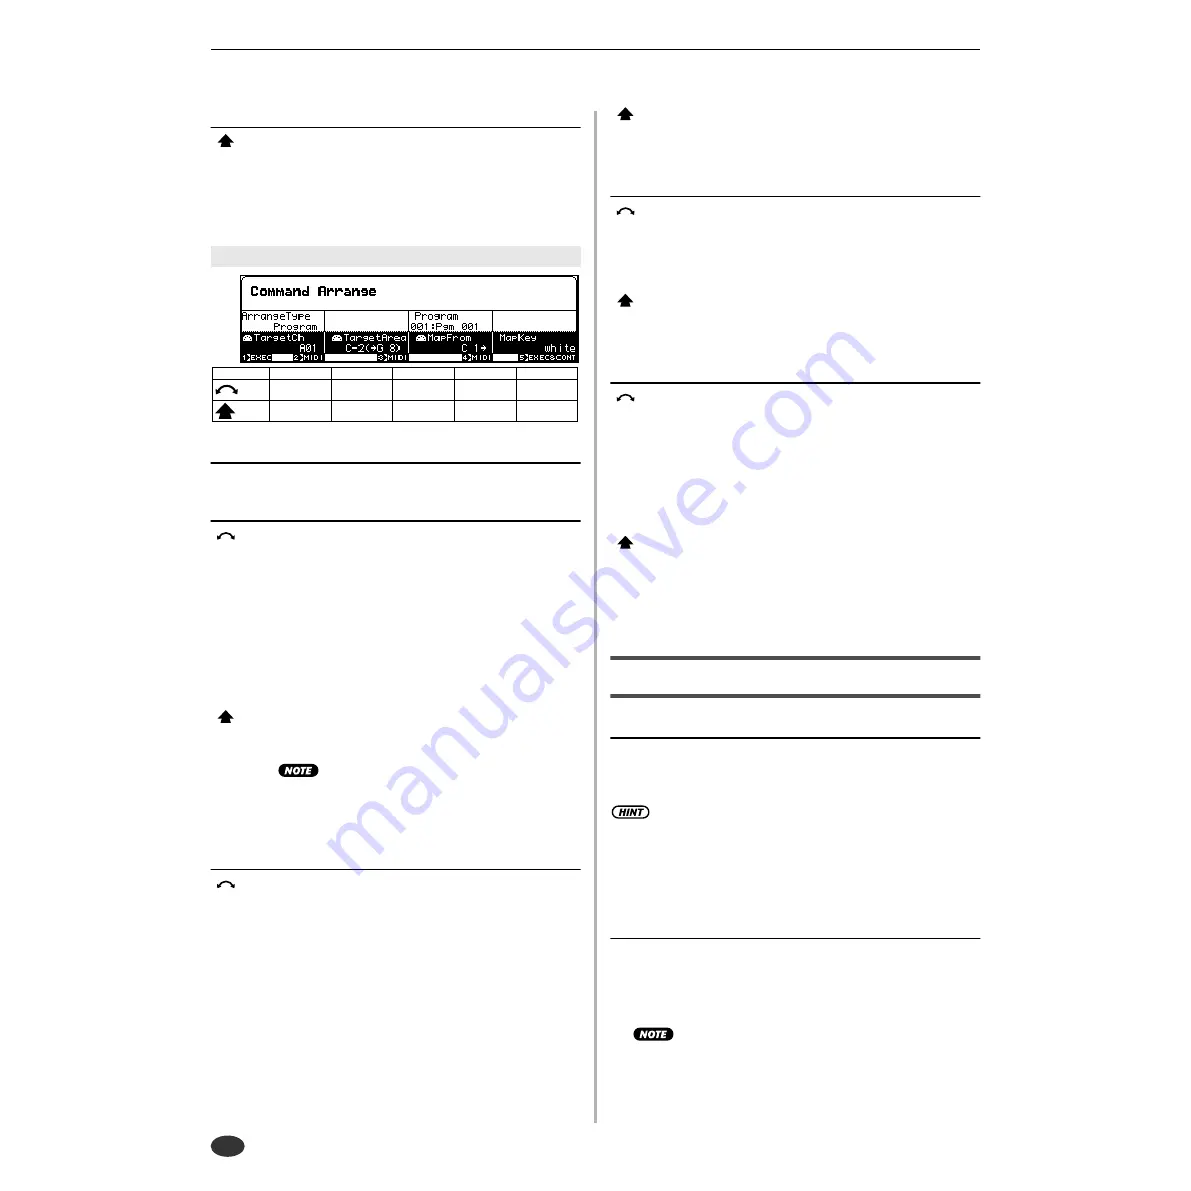
Knob 5
[
Press] EXEC&CONT
Press this knob to call the arrange confirmation display.
Press Knob 5 (YES) to actually execute the arrange oper-
ation.
Knob 1
Same function as Cursor
q
(page 211).
Knob 2
[
Turn] Target Channel
Specifies the MIDI channel which will be used to select
the samples to be arranged.
[Range] A01 — B16 (01 — 16 on the A4000), Bch, all
• A01 — B16 (01 — 16 on the A4000) ... Only sam-
ples set to the corresponding receive channel
will be arranged.
• Bch ... Only samples set to the basic receive chan-
nel (page 94) will be arranged.
• all ... All assigned samples will be arranged.
[
Press] MIDI
Allows setting the Target Channel parameter directly from
an external MIDI controller (page 82).
• When setting the MIDI channel via MIDI on the
A5000, receive the appropriate MIDI messages via
the MIDI IN-A connector to set channels A01 — A16,
and via the MIDI IN-B connector to set channels B01
— B16.
Knob 3
[
Turn] Target Area
Specifies the lowest note in the key area containing sam-
ples to be arranged.
[Range] C-2 — G8
• When the Arrange Type parameter is set to Pro-
gram, all samples in the range from the speci-
fied Target Area note up to G8 will be selected
for arrangement.
• When the Arrange type parameter is set to Sam-
pleBank, samples which are both in the SAM-
PLE parameter Key Range (page 127) and in
the range from the Target Area not to G8 will
be selected.
[
Press] MIDI
Allows setting the Target Area parameter directly from an
external MIDI controller (page 82).
Knob 4
[
Turn] Map From
Sets the base note for sample arrangement. The samples
selected for arrangement will be mapped from the speci-
fied Map From note upward, key by key.
[Range] C-2 — G8
[
Press] MIDI
Allows setting the Map From parameter directly from an
external MIDI controller (page 82).
Knob 5
[
Turn] Map Key
Determines whether samples will or will not be assigned
to black keys.
[Range] White, all
• White ... Samples will be assigned only to white
keys.
• all ... samples will be assigned to all keys (white
and black).
[
Press] EXEC&CONT
Press this knob to call the arrange confirmation display.
Press Knob 5 (YES) to actually execute the arrange oper-
ation.
FREEZE
[COMMAND/EXIT] Button
→
Knob 1 to highlight display line 2
→
Press Knob 2.
This command actually applies the current Easy Edit or Sam-
ple Bank settings directly to the samples. After execution the
Easy Edit or Sample Bank settings are initialized.
• If a sample which uses Easy Edit settings or sample bank settings
is copied to a different program or sample bank, the sound of the
sample will change. The Freeze function can be used to actually
apply the Easy Edit or sample bank settings to a sample so that it
can be moved to any other program or sample bank with no change
in sound. It is also possible to simultaneously change the loop
modes of all samples contained in a sample bank.
[Operation]
1.
Select the Freeze Type (page 213).
2.
Make other settings as required.
3.
Press Knob 1 (EXEC) or Knob 5 (EXEC&CONT), and the freeze
confirmation display will appear. Press Knob 5 (YES) to execute
the freeze operation.
• If Knob 1 (EXEC) is used to execute the command, the display
previous to the command menu will be recalled after execution
has finished. If Knob 5 (EXEC&CONT) is used to execute the
command, the freeze display will be retained so you can con-
tinue and perform further freeze operations.
Cursor
w
Knob 1
Knob 2
Knob 3
Knob 4
Knob 5
Turn
action
Cursor
Target
Channel
Target Area
Map From
Map Key
Press
action
EXEC
MIDI
MIDI
MIDI
EXEC&CONT
w
Cursor
Содержание A4000
Страница 1: ......
Страница 30: ...Sound Check 30 Chapter 1 Setting Up A5000 A4000 ...
Страница 116: ...PLAY CONTROL 116 Chapter 4 PLAY Mode A5000 A4000 ...
Страница 296: ......


