background image


3.

The method of special setting


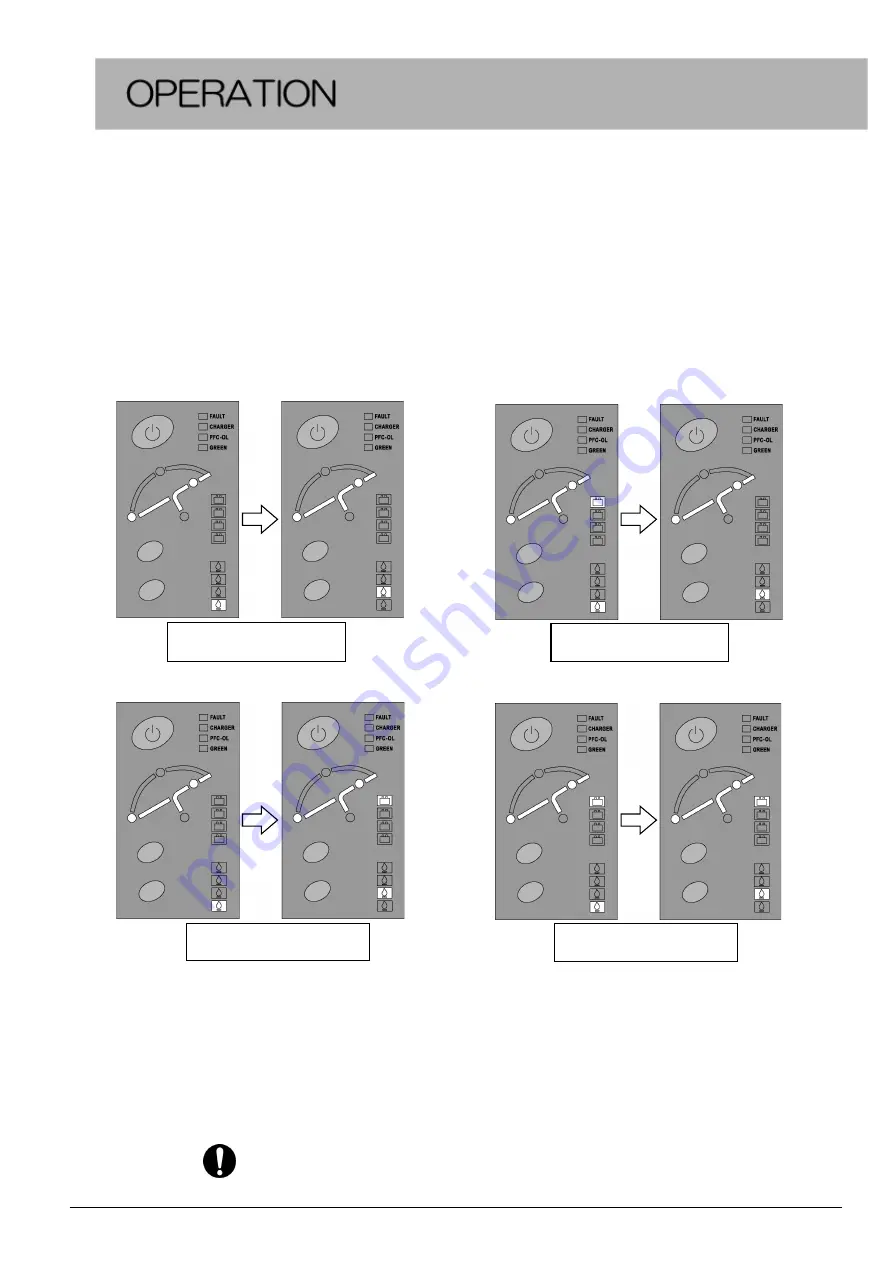
LED repeats lighting, lights-out by the operation of the FUNCTION key and the SET key.   
The setting, confirmation of the output voltage and green mode can be done with a   
combination of the LED lighting, lights-out by each model of the bottom figure.   
3Change each setting of an output voltage to the indication of 

  after you make it the LED 

indication of 

. Be careful because it can't be set up in the voltage when this process is mistaken.


3-1


Lighting Figure


ALS-1

.

5K


Be sure to carry out the following process after you finish a setup.


Push a FUNCTION key and a SET key in the bottom left of the front panel at the   
same time. Cancel the special setup mode surely, and drop a power supply for a while,   
and restart after you finish setting of output voltage. How to restart is to see the term   
of “Start-up”, “Shut-down” in nine-page. It is the completion of the setup with this. 


A setup is reflected by the restart of the device. 


12


Output 100V 

Output 110V 

Output 115V 

Output 120V 

Содержание miniUPS ALS Series

Страница 1: ...TG 000210TE3 YAMABISHI Corporation ...

Страница 2: ......

Страница 3: ...The three Signal Words below describe what will happen in the unlikely event of mistake being made during handling or operation If this device is improperly used people may be severely injured or killed If this device is improperly used people may suffer light to medium injures or material damage may occur Extra notes or precautions are added to operating procedures and explanations The contents w...

Страница 4: ...in this instruction manual Use in the condition and environment that this instruction manual mentions Prohibition from reconstructing dismounting and arranging Do not reconstruct dismount and arrange as burning or injuring you Prohibition from using in vehicle This item isn t for using in vehicle that a vibration is always added It may cause a fire and dangerous due to the vibration A guarantee is...

Страница 5: ...h temperature place Don t use it except for a plug to conform Please keep unobstructed air in the exhaust holes of UPS Power socket should be close to the UPS Don t put any liquid or object in the inside of the UPS We suggest regular maintenance to make it use this device for long time Battery exists the danger of high voltage and current Don t try to open or damage battery casing It might hurt hu...

Страница 6: ...WN 9 2 Special Setting 10 2 1 Setting of Output Voltage 2 2 Setting of Green Mode 3 Method of Special Setting 11 3 1 Status of LED lighting at Setting of Output Voltage 11 16 3 2 Status of LED lighting at Setting of Green Mode 17 4 FUNCTIONS 18 4 1 Self Diagnosis of Battery 18 4 2 Turn to Bypass 18 4 3 Interface connection 19 TROUBLE SHOOTING 20 21 SPECIFICATION 22 4 ...

Страница 7: ...ly and automatically under power normal condition During power failure it can provide immediate back up power from the batteries without any interruption When overload or UPS malfunction the system will automatically transfer to bypass mode and continue supplying output equipment with utility power when overload situation releases it will transfer back to inverter mode automatically while malfunct...

Страница 8: ... Function Key Set Key Charging Fault Alert Over Current Alert Green Mode Operating Bypass Operating Inverter Operating Input Discharge Operating Charging Status 100 75 50 25 Load Status 100 75 50 25 ON OFF Key Front Panel Front View ...

Страница 9: ... Back View 7 Interface Slot Fan Outlet Input Switch Input Cable Output Fuse ALS 1 5KH ALS 2KH ALS 3KH ALS 2K ALS 3K ALS 1 5K ...

Страница 10: ...ture 10 25 is recommended to keep a battery life long Near the machine like display and so on which a magnetic influence is often taken The place to have salt and corrosion gas The place to have a vibration shock The place where powdered dust is abundant About the installation place Keep the following strictly for the safety Secure the space of more than the front 10cm and more than the rear 20cm ...

Страница 11: ...10A 1 7m HOT Black or Brown COOL White or Blue Earth Green Terminal M4 Over 10A ALS 2K NEMA 5 20P Cable 3 31mm2 20A 1 7m NEMA 5 15R 15A 4peace Over 30A Terminal M4 ALS 2KH Cable 0 75 mm2 10A 1 7m HOT Black or Brown COOL White or Blue Earth Green Terminal M4 Over 15A ALS 3KH Cable 1 5 mm2 16A 1 7m HOT Black or Brown COOL White or Blue Earth Green Terminal M4 Over 20A 9 ...

Страница 12: ...g and bypass operation was done for about ten seconds inverter operation It usually drives is done Shut down Push the ON OFF key of the front panel about one second and change to the bypass operation Turn off the rear switch An alarm rings and a device stops in about ten seconds 10 ...

Страница 13: ...2K 2KH ALS 3K 3KH 30W or less 60W or less 90W or less Be careful enough of the setup because a backup by the battery isn t completed when AC line is failed during green mode operation The method of Special Setting Push a FUNCTION key and a SET key in the bottom left of the front panel for more than one second at the same time Every time a FUNCTION key is pushed LED are turned on in turn Every time...

Страница 14: ...ause it can t be set up in the voltage when this process is mistaken 3 1 Lighting Figure ALS 1 5K Be sure to carry out the following process after you finish a setup Push a FUNCTION key and a SET key in the bottom left of the front panel at the same time Cancel the special setup mode surely and drop a power supply for a while and restart after you finish setting of output voltage How to restart is...

Страница 15: ...he same time Cancel the special setup mode surely and drop a power supply for a while and restart after you finish setting of output voltage How to restart is to see the term of Start up Shut down in nine page It is the completion of the setup with this A setup is reflected by the restart of the device 13 Output 100V Output 110V Output 115V Output 120V ...

Страница 16: ...he same time Cancel the special setup mode surely and drop a power supply for a while and restart after you finish setting of output voltage How to restart is to see the term of Start up Shut down in nine page It is the completion of the setup with this A setup is reflected by the restart of the device 14 Output 100V Output 110V Output 115V Output 120V ...

Страница 17: ...the same time Cancel the special setup mode surely and drop a power supply for a while and restart after you finish setting of output voltage How to restart is to see the term of Start up Shut down in nine page It is the completion of the setup with this A setup is reflected by the restart of the device 15 Output 200V Output 220V Output 230V Output 240V ...

Страница 18: ...he same time Cancel the special setup mode surely and drop a power supply for a while and restart after you finish setting of output voltage How to restart is to see the term of Start up Shut down in nine page It is the completion of the setup with this A setup is reflected by the restart of the device 16 Output 200V Output 220V Output 230V Output 240V ...

Страница 19: ...he same time Cancel the special setup mode surely and drop a power supply for a while and restart after you finish setting of output voltage How to restart is to see the term of Start up Shut down in nine page It is the completion of the setup with this A setup is reflected by the restart of the device 17 Output 200V Output 220V Output 230V Output 240V ...

Страница 20: ...n Mode For ALS Series Be sure to carry out the following process after you finish a setup A FUNCTION key and a SET key in the bottom left of the front panel are pushed at the same time It is not necessary to restart 18 Green Mode ON Green Mode OFF ...

Страница 21: ...tery an alarm rings and it is returned to the inverter operating soon 4 2 Turn to Bypass Push an ON off key at the inverter operating it is returned to bypass operating Push an ON off key at the bypass operating it is returned to inverter operating It isn t returned to the inverter operating at the over electric current time and so on Keep the interval of twenty seconds and more when you return it...

Страница 22: ... need UPSilon2000 and cable of the attachment OS compatibilities Widows7 8 10 The product doesn t react the UPS service from Windows Please set RS232C as below Baud Rates 2400bps Data Length 8bits Stop Bit 1bit Parity None Arrangement of DB9connecter and RS232Cpin Pin No Function Ⅰ O 9 RS232RX Input 6 RS232TX Output 7 GROUND 20 ...

Страница 23: ...n mode function UPS still in POWER OFF status Press power on off key Buzzer sound once and the UPS Become normal Keys on front panel don t work UPS is proceeding controlling process Wait for a while to operate the UPS Key damaged Call for service Press FUNCTION key in AC mode but the UPS goes back to AC mode within less than 10 seconds Internal battery deteriorated Call service to replace batterie...

Страница 24: ...e Check AC or battery wires UPS PCB abnormal Call for service Five short beep continuously Internal over temperature Check the ventilation Fan fail Call service to replace the fan Four short beep continuously PFC over load protect in action due to low AC input Check input AC power or release LINE LED did not lit on after connect AC input and BOOST INV LED lit on with three short beep continuously ...

Страница 25: ... Accuracy Within 0 3 Transfer Time ZERO for Line Fails or Reverse 4mSec Transfer to Bypass or Reverse Green Mode 30W or less 60W or less 90W or less Power factor 0 7 Backup Time 6min Recharge Time 90 8hours Battery Sealed Lead Acid battery Input Phase Single Phase 2 Wire Voltage V 85 135 170 265 85 135 170 265 170 265 Frequency 50 60Hz Power factor 98 TYP Efficiency 85 TYP 90 TYP Interface RS 232C...

Страница 26: ...mabishi co jp eng TOKYO office 143 0016 Omori building 2 4 18 Omorikita Ota ku Tokyo Tel 813 3767 8861 Fax 813 3767 7080 NAGOYA Sales Pit 461 0025 1 17 43 Tokugawa Higashi ku NagoyaCity Aichi Tel 8152 325 7511 Fax 8152 325 7510 OSAKA ZEO 532 0011 5 12 8 Nishinakajima Yodogawa ku OsakaCity Osaka Tel 816 6307 2751 Fax 816 6307 2752 ...

Отзывы: