37
YA3805-201006
EN
WARNING
Electric malfunction risk! Connecting
the cables without switching of the main power,
could cause a damage to the product and electric
shock risks. Switch of the main power from the
power cable, before connecting it to the computer.
WARNING
Installation should be done by a
certifi ed installer according to local regulations on
electrical safety.
NOTICE
Make sure to connect the poles
correctly.
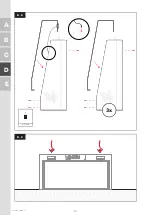
D.14
Place the side plates in place and fasten.
D.15
Close the top gap with transparent sealant to
make the Sona watertight.
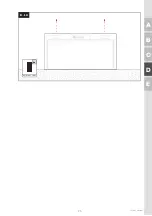
D.16
Switch on the main power.
NOTICE
For settings, service and statistics, visit
the My Yalp section in the Yalp Store.
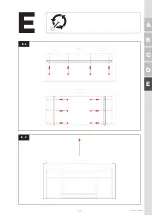
D.17
Roll out the Sona fl oor and place according to
the image.
NOTICE
Make sure the “2” is located on the
button-side of the arch.
D.18
Cut the fl oor to size.
D.19
Add the infi ll sand (Type: #30 Silica sand)
onto the Sona fl oor evenly: 25kg/m
2
(55lbs/10ft
2
).
Work the sand into the fl oor using a (rotary) broom.
D.20
Let’s play the Sona!
SERVICE
SUPPORT
For questions, comments or help you can always
contact the Yalp head-offi ce in the Netherlands:
Yalp Sports- & Play Equipment
Nieuwenkampsmaten 12
7472 DE Goor
The Netherlands
+31 (0) 547 289 410
[email protected]
For contact details of Yalp distributors or o
ffi
ces, please go to Yalp.com or check the distributors overview at
store.yalp.com.
POWER CYCLE
• Turn off the power or unplug the device
• Wait 30 seconds
• Turn on the power or plug in the product
• Wait until the product has completed the start-
up process and the product has come online
CLEANING & MAINTENANCE
WARNING
Follow the instructions in this section
closely when servicing the product. Failure to
follow these instructions may cause serious injury
or damage.
WARNING
Always be sure that the product is
powered off and unplugged before attempting to
perform inspection or maintenance.
WARNING
When servicing the product,
use identical replacement parts only. Use of
unauthorized parts may cause serious injury or
damage.
Use a mild soap and a non-scratching cloth to clean the product every 3 months
Apply car wax (turtle wax) twice a year on the polyester caps, to keep them nice and shiny
The product should be inspected for damaged or missing parts on a regular basis
When parts are damaged or missing, the product should be disconnected and the parts should be corrected,
repaired or replaced to prevent injuries
Tighten the bolts every 6 months to prevent loose bolts
Содержание Sona YA3500
Страница 1: ...EN NL Installation instructions Installatievoorschrift YA3805 Yalp Toro ...
Страница 5: ...5 YA3805 201006 A B C D E A 811 mm 31 9 1650 mm 65 0 300 mm 11 8 13 62 m 536 A 2 ...
Страница 8: ...8 YA3805 201006 1 5 m 5 ft 2 m 78 7 X 200 mm 7 9 A 4 A 5 A C E B D A ...
Страница 9: ...9 YA3805 201006 A B C D E A A 6 ...
Страница 11: ...11 YA3805 201006 A B C D E A A 8 A 9 Data 15 m 3x ...
Страница 12: ...12 YA3805 201006 150 mm 6 A 10 C E B D A ...
Страница 15: ...15 YA3805 201006 A B C D E B 6530 mm 257 1 6530 mm 257 1 13060 mm 514 2 13060 mm 514 2 B 4 B 5 ...
Страница 16: ...16 YA3805 201006 A C E B D C C 140 mm 5 5 386 5 mm 15 2 200 mm 7 9 35 mm 1 4 C 1 C 2 Drill bit ...
Страница 18: ...18 YA3805 201006 A C E B D D D 3x D 1 ...
Страница 19: ...19 YA3805 201006 A B C D E D 100 204 8x D 2 ...
Страница 20: ...20 YA3805 201006 A C E B D D D 3 ...
Страница 21: ...21 YA3805 201006 A B C D E D D 4 D 3 D 2 D 4 3x D 5 17 mm Cordless drill Cap Bit M10 M10x35 6x 100 282 6x ...
Страница 22: ...22 YA3805 201006 A C E B D D WARNING D 6 NOTICE PE N L ...
Страница 23: ...23 YA3805 201006 A B C D E D A A C B B C CLIC K CLICK D 7 ...
Страница 24: ...24 YA3805 201006 A C E B D D 3x D 8 D 9 BIT TX40 ...
Страница 25: ...25 YA3805 201006 A B C D E D D 10 0850 2006 2003 8x ...
Страница 26: ...26 YA3805 201006 A C E B D D 11 ...
Страница 27: ...27 YA3805 201006 A B C D E E E 1 E 2 E ...
Страница 28: ...28 YA3805 201006 A C E B D E E 3 E 4 ...
Страница 29: ...29 YA3805 201006 A B C D E E E 4 E 1 E 5 ...
Страница 46: ...YA3805 201006 Made in the Netherlands ...


