background image

3

An ASSA ABLOY Group brand

P/N AYRT-220-INST-FUL Rev A

    Factory Default Settings

To reset the lock to factory default, see the following:

The following procedure returns the lock to its factory defaults 
by deleting all user codes 

(including the Master PIN code*) 

and 

returning all programming features to their original default settings 
(see below).  
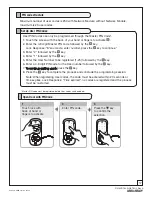
1. Remove the batteries and then remove the inside escutcheon       
    to access the reset button.
2. The reset button (see image at right) is located above the  


    PCB cable connector. 
3. Hold down the reset button for a minimum of 3 seconds and      
    then reinstall the batteries; once the batteries are properly          
    installed, release the reset button. 
All features (including adjustable settings** (see below) should     
now be returned to factory default.
Upon reset, Master Code Registration is the only option available 
and 

must be performed

 prior to any other programming of the lock.

See 

"Operation" 

later in this manual for programming instructions.

    Reset Lock to Factory Default

Reset Button

Inside Escutcheon

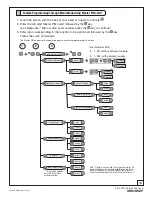
Settings

Factory Default

Master Code

Registration 

required

Auto Re-lock

Enabled

One Touch Re-Lock

Enabled

Audio

Enabled

Auto Re-lock Time

**30 Seconds

Wrong Code Entry Limit

**5 Times

Shutdown Time

**60 Seconds

**Adjustable only when using Network Module

Содержание YRDZB

Страница 1: ...Fax 770 831 8598 Certification Exhibit FCC ID U4A YRHCPZB0 IC 6982A YRHCPZB0 FCC Rule Part 15 247 IC Radio Standards Specification RSS 210 ACS Project Number 12 0001 Manufacturer Assa Abloy Inc Models YRDZB YRD210 ZB YRD220 ZB YRT210 ZB YRT220 ZB Manual YRT220 ZB ...

Страница 2: ... Click Product Information Documentation and then Installation Instructions Este documento está disponible en español en nuestra página de internet Vaya a www yalerealliving com Presione Información del Producto y Documentación y luego Instrucciones de Instalación Ce document est disponible sur notre site Web dans le français imprimé Allez à www yalerealliving com Cliquez sur le Information sur le...

Страница 3: ...ference will not occur in a particular installation If this equipment does cause harmful Interference to radio or television reception which can be determined by turning the equipment off and on the user is encouraged to try to correct the interference by one or more of the following measures Reorient or relocate the receiving antenna Increase the separation between the equipment and receiver Conn...

Страница 4: ... button for a minimum of 3 seconds and then reinstall the batteries once the batteries are properly installed release the reset button All features including adjustable settings see below should now be returned to factory default Upon reset Master Code Registration is the only option available and must be performed prior to any other programming of the lock See Operation later in this manual for p...

Страница 5: ...rférence reçue y compris l interférence qui peut causer l opération peu désirée For the U4A YRHCPZB0 and 6982A YRHCPZB0 the following statement applies This equipment complies with FCC IC radiation exposure limits set forth for an uncontrolled environment This equipment should be installed and operated with minimum distance 20cm between the radiator and your body This transmitter must not be co lo...

Страница 6: ...nal Outside Escutcheon Latch Keys 4 Inside Escutcheon Mounting Screws Pack 1 2 Inside Mounting Plate Screws Pack 1 2 Latch 2 Strike Plate Mounting Screws Pack 2 Cylinder Installation Instructions Template Latch Bolt Strike Plate Included in the box Inside Mounting Plate with gasket Inside Escutcheon Outside Escutcheon 2 Screw Packs see below Keys Cylinder Battery Cover Allen Wrench 4 AA Alkaline B...

Страница 7: ...oor 1 Attach with two 2 M4 x 25 4mm screws supplied C Install strike on the door frame using two 2 M4 x 25mm screws supplied making sure to allow for the latch to be centered in the strike NOTE The latch bolt and strike can be installed in only one of two ways with the bevel slope of latch facing out or facing in while standing outside of the door If the door opens in the bevel will face the outsi...

Страница 8: ... through 2 1 8 diameter hole and under the latch Fig 3A B then insert posts and tailpiece into the latch Square Drive Tube is marked WHITE to indicate top NOTE The tops of both the square drive tube and the hub in the shank are marked to indicate their orientation for proper installation Figures A B Shank NOTE Cable goes under latch Fig 1A 1B Outside of Door Figure 1B Inside of Door Top of Drive T...

Страница 9: ...ting 2 M4 x 25mm pan head machine screws through the mounting plate and into the slightly extended through posts of the outside escutcheon Fig 4B Ensure that outside escutcheon is vertically aligned Tighten securely with a 2 Phillips screwdriver Do not over tighten 4 Holding the outside escutcheon flush to the door position the inside mounting plate by routing the cable connector through the mount...

Страница 10: ...in firmly using thumbs until completely seated properly seated position indicated by arrows on PCB as in Fig 7B 8 Install and secure inside escutcheon to inside mounting plate using 4 M4 x 8mm 8 32 x 5 16 pan head machine screws through the inside escutcheon into the mounting plate Fig 8 NOTE Make sure cable does not obstruct path of the mounting screws Inside Escutcheon Reset Button Figure 7B Fig...

Страница 11: ... LHR Lever Right handed lever position Left handed lever position Before proceeding with the next step ensure correct lever handing for proper installation Correct curved position Correct curved position Incorrect Incorrect Determine Lever Position Both outside and inside lever handles should always point toward the door hinges ...

Страница 12: ...position top is marked RED 2 Remove clip from shank 3 Install hex set screw Install the Exterior Lever Right Hand shown 1 Install cylinder in exterior lever If necessary remove key from cylinder A Drop cylinder in exterior lever handle as shown 90 B Insert key in cylinder A Place set screw in hole on side of shank toward edge of door opposite lever handle turn CW to allow placement of lever handle...

Страница 13: ...llen wrench and rotating set screw CCW Fig 1F Do not overtighten G Turn key 90 CCW pull to remove key and test operation of lever handle ensuring that the latch moves smoothly G 90 F Figure 1F CCW E Push lever handle with key cylinder over shank until hole on handle aligns with set screw in shank Figure 1E ...

Страница 14: ...both the outside and inside lever handles Also try using both the thumbturn and key The movement of the latch should be smooth and unobstructed If operation is not smooth review the previous steps to ensure proper installation while maintaining proper alignment of escutcheons 1 Rotate thumbturn counter clockwise to horizontal position Fig 9A 2 Insert set screw on side of shank toward edge of door ...

Страница 15: ...enu and Icons Touch the screen with palm of hand or fingers to begin and end actions Repeat operation using settings indicated Enter Value 1 10 times or seconds Click the indicated number Enter Master PIN code 4 8 digits in length Advanced Mode only Press the Star key on the touchscreen to Enter or Accept entry Enter User PIN Can be 4 8 digits in length Press the Pound key on the touchscreen to en...

Страница 16: ...k is disabled Shutdown Time The unit will shutdown for a default of sixty 60 seconds and not allow operation after the wrong code entry limit has been met When the unit is in Shutdown the Status Indicator flashes RED and BLUE the keypad flashes as well Audio Mode Choosing Disable 3 in Audio mode shuts off the code confirmation tone playback for use in quiet areas Audio mode is enabled or disabled ...

Страница 17: ...ock with fingers spread to activate 1 Touch the screen with the back of your hand or fingers to activate 2 Press the key Lock Response Register Master Code press the key to continue 3 Press the key Lock Response Enter a 4 to 8 digit pin code followed by the pound key 4 Enter new 4 8 digit Master PIN code followed by the key Lock visually confirms pin code selection announces Handing lock the motor...

Страница 18: ...e User number followed by the key 7 To continue adding users press the key 8 Press the key to complete the process and conclude the programming session Set Up User PIN Codes Note When registering User codes the code must be entered within 20 seconds or time expires Lock Response Time expired no codes are registered and the process must be re started 3 Press the key to confirm the selection Enter P...

Страница 19: ...n LED One Touch Locking Setting Enable Disable Feature Programming Through Menu Mode Using Master PIN code 1 Touch the screen with the back of your hand or fingers to activate 2 Enter the 4 8 digit Master PIN code followed by the key Lock Response Menu mode enter number press the key to continue 3 Enter digit corresponding to the function to be performed followed by the key Follow the voice comman...

Страница 20: ...alignment of latch and or strike which may be preventing latch from properly entering the strike With the door open extend and retract the latch if it is smooth check the strike alignment Latch does not extend or retract smoothly a Latch and strike are misaligned see above b Check the backset of door relative to adjustments already made to latch c Verify proper door preparation and re bore holes t...

Страница 21: ...r If low battery indicator is lit replace batteries PIN codes will not register PIN codes must consist of 4 to 8 digits to register The same PIN code cannot be used for multiple users Registration management of PIN codes is set by the authority of Master Code The Master PIN code must be registered prior to adding any users Contact the Master user User codes must be entered within 20 seconds while ...

Страница 22: ...NT The batteries must be removed prior to removing and or inserting the network module Remove batteries Remove and or insert network module Reinstall batteries Installing the Network Module Use Feature Programming step 7 page 16 for enrollment of the Network Module ...

Страница 23: ...r Reverse Levers 1 Remove the outside lever handle A Insert key in cylinder outside lever handle rotate key 90 clockwise B Insert allen wrench included in set screw on side of lever toward edge of door turn clockwise to loosen C Pull to remove lever handle key cylinder B CCW F C 90 A 90 ...

Страница 24: ...andle A A Remove and switch handles inside to outside outside to inside B Remove cylinder from outside lever handle C Insert cylinder in new outside lever Fig 3A D Push handle in allowing holes for set screw to align E Insert set screw and tighten by turning set screw counter clockwise 3 Change the lever handing Incorrect NOTE Swoop of lever handle must be oriented in upward direction as shown in ...

Страница 25: ...dle B Remove cylinder How to Replace or Install Cylinder 2 Install new cylinder A Insert cylinder in new outside lever B Push handle in allowing holes for set screw to align C Insert set screw and tighten by turning set screw counter clockwise D Verify that new cylinder fits and rotates freely E Test operation of the new cylinder key ...

Страница 26: ...twork Module Up to 25 Users Location Door Number User User Name User PIN Code User Type User Name User PIN Code Master User 13 User 01 User 14 User 02 User 15 User 03 User 16 User 04 User 17 User 05 User 18 User 06 User 19 User 07 User 20 User 08 User 21 User 09 User 22 User 10 User 23 User 11 User 24 User 12 User 25 ...

Страница 27: ...er ___ User ___ User ___ User ___ User ___ User ___ User ___ User ___ User ___ User ___ User ___ User ___ User ___ User ___ User ___ User ___ User ___ User ___ User ___ User ___ User ___ User ___ User ___ User ___ User ___ User ___ User ___ User ___ User ___ User ___ User ___ User ___ User ___ User ___ User ___ User ___ User ___ User ___ User ___ User ___ User ___ User ___ User ___ User ___ User _...

Страница 28: ...rademark of Yale Security Inc an ASSA ABLOY Group company All rights reserved Yale Real Living is a trademark of Copyright 2012 Yale Security Inc an ASSA ABLOY Group company All rights reserved Reproduction in whole or in part without express written permission of Yale Security Inc an ASSA ABLOY Group company is prohibited YALE with its unique global reach and range of products is the world s favo...

Отзывы: