Yale Conexis Smart Lock L2 Скачать руководство пользователя страница 16

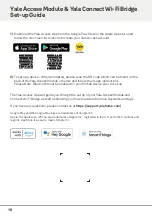
1) Download the Yale Access App from the Google Play Store or the Apple App store and  

  follow the on-screen instructions to create your Yale Access account.

2) To set up a device - When prompted, please scan the QR code which can be found on the  

  back of the Yale Access Module or below and follow the in-app instructions.

  Please Note: Bluetooth must be enabled on your mobile device prior to set-up.

The Yale Access App will guide you through the set up of your Yale Access Module and 

Connect Wi-Fi Bridge, as well as showing you how to add and remove Keycards and tags. 

If you have any questions, please contact us at https://support.yalehome.com/

Google Play and the Google Play logo are trademarks of Google LCC
Apple, the Apple logo, iPhone, are trademarks of Apple Inc., registered in the U.S. and other countries and 
regions. App Store is a service mark of Apple Inc.

Yale Access Module & Yale Connect Wi-Fi Bridge 

Set-up Guide

16

Содержание Conexis Smart Lock L2

Страница 1: ...Conexis Smart Lock L2 User Manual KM 735817...

Страница 2: ...s yalehome co uk declarations of conformity Conexis Smart Lock L2 Product Overview 4 Inside The Box 4 Removing existing handle cylinder 6 Measuring Your Door 7 Installing The Actuator 8 Installing Han...

Страница 3: ...LED Backup 9V contacts INSIDE OUTSIDE Radio Cover Battery Cover ools Required ever Handle nside LED Thumbturn Key Card Tag Reader Lever Handle Bluetooth Wakeup Button and LED Backup 9V contacts Tools...

Страница 4: ...home 145mm 160mm 170mm 55mm 70mm 80mm Fixing Pack B Fixing Pack A Fixing Pack C Fixing Pack D 1x Key Tag 1x Yale Access Module Trusted every day 1x Key Card 1x Yale Connect Wi Fi Bridge 1x DoorSenseTM...

Страница 5: ...5 Fixing Pack A The smart way to protect your home 170mm 80mm Fixing Pack D 4x AA Alkaline 4 x AA Alkaline Batteries Fixing Pack B Fixing Pack C Fixing Pack D...

Страница 6: ...6 RemovingExistingHandleAndCylinder Do not close door until installation is complete Make note of your current fixing screw positions...

Страница 7: ...the thickness of the door to select the correct fixing pack 44 50mm 58 65mm 70mm Door thickness Door thickness Door thickness Measure the distance between the centre of the lock and the inside of the...

Страница 8: ...tailbar left and right do not turn past angle shown on diagram Does it move freely Yes if it moves freely please proceed No remove the actuator from door and realign until it moves freely Tip You may...

Страница 9: ...1 x2 9 InstallingExternalHandle 1 3 5 4 6 7 1 x2 1 x2 6 7 Refer to current fixing screw positions You may need to screw in an additional lug from fixing pack A...

Страница 10: ...8 InstallingInternalFixingPlate Ensure correct fixing pack is used for width of door Do not fully tighten as the handle needs to be aligned in the next step 08 1 2 3 4 5 Fixing pack B C or D screws Re...

Страница 11: ...sure that alignment tool is flat against the door as screws are tightened This ensures the motor is aligned correctly AligningHandle 09 INSIDE OUTSIDE 1 2 3 4 5 6 Ensure exterior handle and fixing pla...

Страница 12: ...12 InstallingInternalHandle i 1 2 Turn until arrows are facing each other Do not turn thumbturn until installation is complete...

Страница 13: ...13 InstallingInternalHandle 1 3 4 Tuck excess cable into slot Take care when removing cable if adjustments are needed Do not trap cable Remove 2...

Страница 14: ...14 InstallingInternalHandle 1 2 4 5 6 9 2 3 Check seal Then tighten screws 8 7 Inserting Module...

Страница 15: ...d unlocking If these steps are not completed the door will not lock If the lock sounds like it is struggling to lock check actuator installation shown on page 8 If after completing this step you get 8...

Страница 16: ...your mobile device prior to set up The Yale Access App will guide you through the set up of your Yale Access Module and Connect Wi Fi Bridge as well as showing you how to add and remove Keycards and t...

Страница 17: ...17 LockingtheConexis SmartLockL2 Check that the handle is locked 2 1 Please make sure your door remains open Beep Beep Beep...

Страница 18: ...18 UnlockingwithKeyCardorKeyTag 3 Beep Beep Beep The smart way to protect your home Trusted every day 1 2 This process should be done after module is added...

Страница 19: ...moothly Test to make sure the lever handle cannot be pushed down Push the thumbturn in on the inside handle and turn 180 degrees to unlock the door Push the lever handle down and make sure it returns...

Страница 20: ...cator Low Battery No Battery 1 2 Replace with Alkaline Batteries 1 2 Beep beep beep beep beep beep beep beep beep When the battery is low you will receive a notification in the Yale Access app and via...

Страница 21: ...ctor 6 Press and hold R button Insert batteries while pressing R button Hold until continuous beeping 7 8 Remove batteries and install following installation instructions 19 Beep beep beep Locking Che...

Страница 22: ...Issue No 3A Part of ASSA ABLOY Customer Services Visit yalehome co uk help support Yale UK School Street Willenhall WV13 3PW The 2 year guarantee for this product is active from the date of Purchase...

Отзывы: