background image

16

Playing Back a Disc

GENERAL FEATURES

All playback operation can be realized by the navigation.
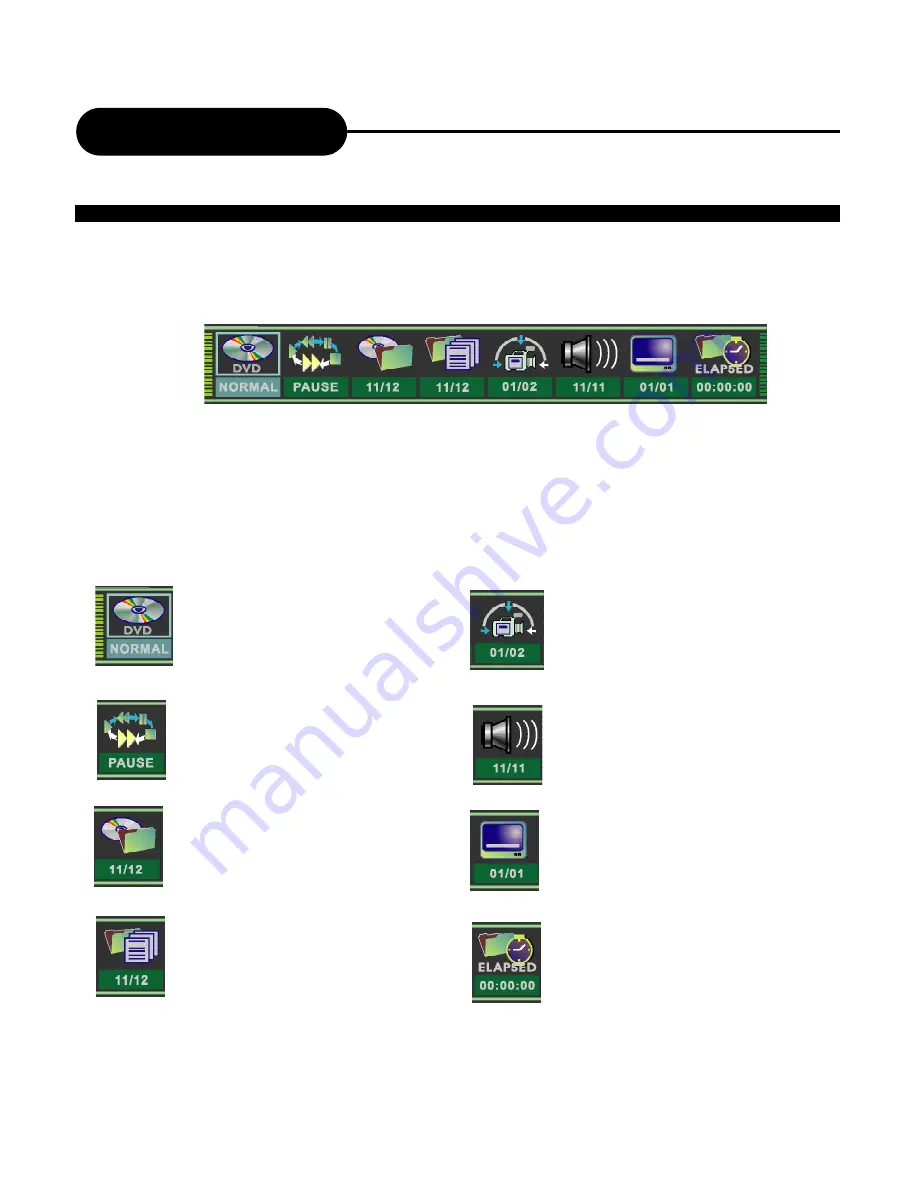
During playback, press NAVIGATION to access the control bar:

Control bar is a collection of icons. Those icons are presentations of commands or information that needed to finish
a function. The details of every functions see below:

Press RIGHT/LEFT to highlight one icon and press SELECT to enter it, press UP/DOWN to select a item,
press SELECT.
Press NAVIGATION again to cancel the control bar.

Playback mode    Set your preferable
playback mode such as PROGRAM,
RANDOM and various repeat mode. 

Playback control

Control playback by

various setting such as FAST
FORWARD, FAST REVERSE, PAUSE,
STOP, etc.

Title   Select to choose an available title
by inputting numbers.

Chapter 

Select to choose an available

chapter by inputting numbers.

Angle    Select your desired camera
angle, if available.

Audio Select your desired audio
setting, if available.

Subtitle    Select to choose an available
subtitle by inputting numbers.

Timer 

Goto the point you want to start

from by inputting the time.

Содержание DVD Record Master XL

Страница 1: ...Handbuch Manual Manuel Y akumo DVD Record MasterXL DVD RW Recorder Player F GB D E ...

Страница 2: ... of controls or adjustments or performance of procedures other than those specified herein may result in hazardous radiation exposure DO NOTSTAREINTO BEAM To ensure proper use of this product please read this owner s manual carefully and retain for future reference Should the unit require maintenance contact an authorized service location or contact us Only qualified service personnel should remov...

Страница 3: ...This is a safety feature See Instruction Manual for replacement or resetting of protective device If replacement of the plug is required be sure the service technician has used a replacement plug specified by the manufacturer that has the same overload protection as the original plug 15 Outdoor Antenna Grounding If an outside antenna or cable system is connected to the product be sure the antenna ...

Страница 4: ...nt 4 If placed in a cabinet please allow at least 2 5 cm 1 inch of free space around the player for proper ventilation TO OBTAIN A CLEAR PICTURE This player is a high tech precision device If the optical pick up lens and disc drive parts are dirty or worn down the picture quality will become poor To obtain a clear picture we recommend regular inspection and maintenance i e cleaning or parts replac...

Страница 5: ...laying Repeatedly 20 Playing in Random Order 21 Selecting Camera Angles Languages Audio Settings 22 Playing in a Favorite Order 23 Selecting Subtitles 24 KODAKPictureCD JPEG MP3Playback 25 Using the On screen Display 27 Setting the Parental Lock 28 Customizing DVD Function Settings 29 Recording Options 30 Channel Search 30 Normal Recording 31 One Touch Record 32 Time Record 33 Editing 34 Editing a...

Страница 6: ...T 3 COMPOSITE VIDEO OUTPUT 4 AUDIO INPUT REAR LEFT RIGHT 5 COMPOSITE VIDEO INPUT REAR 6 DIGITALAUDIO OPTICAL OUTPUT Identification of Controls FRONT PANEL REAR PANEL 2 3 1 4 5 6 7 8 9 10 1 STANDBY 2 PREVIOUS 3 NEXT 4 RECORD OTR 5 STOP 6 PLAY PAUSE 7 AUDIO INPUT FRONT LEFT 8 AUDIO INPUT FRONT RIGHT 9 COMPOSITE VIDEO INPUT FRONT 10 S VIDEO INPUT FRONT 11 OPEN CLOSE 1 6 7 8 2 3 4 9 5 11 10 11 12 13 ...

Страница 7: ...ORWARD 20 SLOW 21 SETUP 22 OPEN CLOSE 23 NUMBERS 24 TITLE 25 GOTO 26 RETURN 27 PLAY 28 STOP 29 CHANNEL 30 VOLUME 31 MENU 32 SUBTITLE 33 PAUSE STEP 34 DISPLAY 35 NAVIGATION 1 STANDBY 2 MUTE 3 I P INTERLACE PROGRESSIVE 4 RANDOM 5 REPEAT 6 ADD CLEAR 7 DIRECTION UP DOWN LEFT RIGHT 8 SELECT 9 EDIT 10 INPUT 11 REC OTR RECORD ONE TOUCH RECORD 12 DISC OPERATION 13 TIMER 14 PREVIOUS 15 NEXT 16 ANGLE 17 AUD...

Страница 8: ...an amplifier and speaker system right and left front speakers a center speaker and one or two rear speakers CONNECTION FOR AUDIO OUTPUT Enjoying Digital Stereo Sound BETTER Enjoy the dynamic sound of Digital Stereo by connecting an amplifier equipped with a digital audio input and speaker system ...

Страница 9: ...ive Scan or Component Video Input During stop status press I P button on remote control unit to switch between Progressive Scan or Interlace Scan or switch these two modes in General Setup from the Setup Menu CONNECTION FOR VIDEO OUTPUT GOOD BETTER Connect your recorder with the S Video cable if the TV has an S Video input Do not connect the yellow video cable if using the S Video cable Connection...

Страница 10: ...the connected TV Turn off the power and unplug both units before setting up any connections RF out is signal pass thru ONLY Use A V S Video or Component outputs for playback For TV without A V inputs an RF Modulator will be required Signal Input YOUR RECORDER Connection ...

Страница 11: ...WITH SIGNAL FROM AV SYSTEMS SUCH AS VCR DVD PLAYER ETC NOTE Refer to the manual of the connected system Turn off the power and unplug both units before setting up any connections or Connect your recorder with the S Video cable if the Signal Source has an S Video input Do not connect the yellow video cable if using the S Video cable YOUR RECORDER Connection ...

Страница 12: ...er to the manual of the connected system Turn off the power and unplug both units before setting up any connections or Connect your recorder with the S Video cable if the Signal Source has an S Video input Do not connect the yellow video cable if using the S Video cable RECORDER FRONT RECORDER REAR Connection ...

Страница 13: ...r intellectual property rights owned by Macrovision Corporation and other rights owners Use of this copyright protection technology must be authorized by Macrovision Corporation and is intended for home and other limited viewing uses only unless otherwise authorized by Macrovision Corporation Reverse engineering or disassembly is prohibited Manufactured under license from Dolby Laboratories Dolby ...

Страница 14: ... a DVD disc 3 Press direction keys or the number buttons to select the title 4 Press the SELECT or PLAY button The DVD video player will start playback from the title selected 5 To remove the disc press the OPEN CLOSE button Title 1 Title 3 Title 2 Title 4 PLAY OPEN CLOSE SELECT ...

Страница 15: ... or DVD R disc The index pictures will appear on the screen as above 14 Playing Back a Disc PLAYING A DVD RW OR DVD R DISC PREV NEXT 1 TITLE 01 01 00 12 14PM SP 00 00 20 2 TITLE 01 01 00 12 14PM HQ 00 00 20 3 TITLE 01 01 00 12 14PM SLP 00 00 20 4 TITLE 01 01 00 12 14PM HQ 00 00 20 5 TITLE 01 01 00 12 14PM SP 00 00 20 6 TITLE 01 01 00 12 14PM EP 00 00 20 1 TITLE 01 01 00 12 14PM SP 00 00 20 1 2 3 4...

Страница 16: ...ndex Picture Screen can only be updated When NEXT is highlighted press SELECT the next index pictures will display on the screen When it reaches the last one if press NEXT again the Index Picture Screen can only be updated 6 Stop playback Press the STOP button once to stop the player press the PLAY button to resume playing To playback from the start press the STOP button twice then press the PLAY ...

Страница 17: ...ess SELECT Press NAVIGATION again to cancel the control bar Playback mode Set your preferable playback mode such as PROGRAM RANDOM and various repeat mode Playback control Control playback by various setting such as FAST FORWARD FAST REVERSE PAUSE STOP etc Title Select to choose an available title by inputting numbers Chapter Select to choose an available chapter by inputting numbers Angle Select ...

Страница 18: ...ck Press PAUSE STEP during normal playback to pause playback and press PLAY to resume normal playback 4 Frame advance Press PAUSE STEP during normal playback One frame is advanced each time you press PAUSE STEP Press PLAY to resume normal playback 5 Slow Press the SLOW button during playback The playback speed becomes 1 2 1 4 1 8 of the normal speed or normal play each time you press the SLOW butt...

Страница 19: ...k 5 DVD VIDEO DISCS ARE NORMALLY DIVIDED INTO TITLES AND SUB DIVIDED INTO CHAPTERS SIMILARLY CD S AUDIO HDCD and MP3 ARE DIVIDED INTO TRACKS YOU CAN CONVENIENTLY LOCATE ANY SPECIFIC TITLE CHAPTER OR TRACK WITH THIS DVD PLAYER TITLE 1 DVD Video Disc TITLE 2 Audio CD LOCATING A TITLE USING THE TITLE MENU You can locate a specific title using the title menu function if a DVD video disc contains a tit...

Страница 20: ...hlight the icon and input the number of a vailable chapter then press SELECT 4 If you want to start playback from some point press GOTO to highlight the icon and input the time then press SELECT Note The function is invalid on MP3 disc For CD disc GOTO is used for track time selection For DVD RW R it cannot function by time searching e g To select title 2 If a DVD video disc contains title numbers...

Страница 21: ...ect A B and press SELECT at the beginning of the segment in which you want to repeat playback point A 2 Press SELECT again at the end of the segment point B The player will automatically return to point A and start to repeat playback of the selected segment A B 3 Highlight by pressing RIGHT LEFT press SELECT Use UP DOWN to select NORMAL and press SELECT to resume normal playback Note There are two...

Страница 22: ... resume normal playback Note The player will go to another chapter or track and start playback if you press the SKIP button during random playback When MP3 CD disc is played back the display icon is different from each other Playing in Random Order THIS RECORDER ALLOWS YOU TO PLAYBACK TITLES CHAPTERS WITHIN A TITLE OR TRACKS IN RANDOM ORDER RANDOM ...

Страница 23: ...hange the camera angle When you resume to normal playback the camera angle changes to the new settings The angle icon indicator will illuminate while playing back a title that contains at least one scene recorded from multiple angles HOW TO SELECT A LANGUAGE PLAYBACK AUDIO SETTING This player allows you to select a preferred language and sound recording system from those included on the DVD video ...

Страница 24: ...ailable on the disc The right volume allows you to edit titles in your favorite order 2 In the left volume use UP DOWN to select one title and press ADD CLEAR to add it to the right volume You can also select one chapter by pressing SELECT after highlighting the title 3 To clear one title you have added in the right volume highlight the one and then press ADD CLEAR to clear it Use RIGHT LEFT to mo...

Страница 25: ... the subtitles as they will appear on screen automatically As you press the SUB T button the subtitles may not appear immediately during some scenes If the subtitles continue to show on your TV even after the DVD has been turned off please check the closed caption settings on your TV THIS RECORDER ALLOWS YOU TO DISPLAY THE SUBTITLES FROM THOSE INCLUDED ON THE DISC ON TO YOUR TV SCREEN Good afterno...

Страница 26: ...lect one command a NORMAL Play current list one by one b S RPT Repeatedly play current item c D RPT Repeatedly play all the items in current directory d PROG Play the favorite tracks list repeatedly Note You should program in each track first highlight your desired one in the left volume press ADD CLEAR to add it to the right volume FAVORITE PROGRAM if you want to remove one in your favorite list ...

Страница 27: ...ss it it cycles among LEFT RIGHT and STEREO You can also switch the channel by the menu Highlight by press LEFT or RIGHT press SELECT then use UP or DOWN to select it 4 Highlight press SELECT use UP or DOWN to select one command a NORMAL Play current list one by one b S RPT Repeatedly play current item c D RPT Repeatedly play all the items in current directory d PROG Play the favorite tracks list ...

Страница 28: ...t title Current chapter Time elapsed Time remain Press DISPLAY button during DVD playback Using the On Screen Display THIS PLAYER ALLOWS YOU TO VIEW STATUS AND DISC INFORMATION ON YOUR TV SCREEN DISPLAY CURRENTTITLE TOTALTITLE CURRENTCHAPTER TOTALCHAPTER TITLE ELAPSED TITLE REMAIN CHAPTER ELAPSED CHAPTER REMAIN ...

Страница 29: ...wed by a parental lock level and the way a DVD can be controlled may vary from disc to disc For example if the disc allows it you could edit out violent scenes unsuitable for children and replace them with more suitable scenes or lock out playback of the disc all together 6 Press SELECT the sub menu of Set Rating Level appears use UP DOWN to select one rating press SELECT to confirm it 7 Highlight...

Страница 30: ...enu Factory defaults Record Setup Auto chapter marker Default source Default quality General Setup Screen saver Progressive Interlace Video output Video output format Restore factory settings Main Page GNRL PLAY REC LANG TUNER CLOCK Interlace Progressive On Off Playback Setup TV aspect ratio Rating level Digital audio output Closed captions OK 16 9 Pan Scan Letter box F A V F SV R A V R SV SCART T...

Страница 31: ...ing auto searching press STOP to cancel searching 5 To browse the found channels first press RIGHT LEFT to CH then press UP DOWN and you can also input numbers and press SELECT 6 If you want to skip one channel use UP DOWN to highlight the skip space of the corresponding channel and press SELECT 7 Press SETUP again to exit 1 If the picture of the channel scaned is poor you can use the direction bu...

Страница 32: ...u can select it by pressing CHANNEL or input the assigned number of the channel to select your desired one directly 5 Press SELECT to confirm your selection 6 Press RIGHT LEFT to highlight the icon and press SELECT and UP DOWN to select the record quality HQ Perfect quality nearly 64 minutes in a blank disc SP Standard Play quality nearly 130 minutes in a blank disc EP Extend Play nearly 250 minut...

Страница 33: ...ded you can press PLAY to switch to normal playback mode 1 During stop status press SETUP to access the Setup Menu 2 Use RIGHT LEFT to highlight the CLOCK icon as the right figure 3 Use UP DOWN to highlight the Date Time and AM PM respectively 4 With Date mm dd yy highlighted press SELECT and input the local date by numbers press SELECT again 5 With Time hh mm ss highlighted press SELECT and input...

Страница 34: ... 5 In five minutes before it is ready to record the scheduled it appears a Record Prompt dialog affirm press OK abolish press CANCEL and if without operation for a moment it will record the scheduled automatically Note In standby mode your recorder can wake up in 2 minutes before recording During recording you can press STOP to suspend the recording A DVD RW DVD R can record for upto 366 minutes u...

Страница 35: ...vious next page of titles 3 Press EDIT the title edit bar appears on the screen while playing back Press RIGHT LEFT to highlight one icon and enter it press UP DOWN to select a sub item 4 Press EDIT to quit the menu EDITING A TITLE OF DVD RW View current title total title View current chapter total chapter Current operation status Chapter editing Select to add one chapter marker or delete the curr...

Страница 36: ...e current title will be deleted Note From the second icon in the control bar the above operation can be viewed If only one chapter is available in the current title there is only to select From the control bar select the fifth icon press SELECT When the icon displays C hide it shows the current chapter is visible and you can select it to hide it by pressing SELECT When the icon displays C unhide i...

Страница 37: ...ON displayed You can also rename the current title by selecting press SELECT with T NAME displayed On the screen there appears a keyboard Press the direction keys UP DOWN RIGHT LEFT to highlight the one which you want to input and press SELECT to confirm it The control bars of the last line in the keyboard is for edit command Select OK to save the name Note The maximum length of the title name is ...

Страница 38: ...e disc editing bar 4 With each icon highlighted by pressing RIGHT LEFT the corresponding description of each operation will display on the screen such as Disc Finalization Delete title Erase disc Disc protection etc 5 Press SELECT to run the operation EDITING A DISC OF A DVD RW ...

Страница 39: ...EL DVD RW only When this icon is selected it will delete the last title ERASE DVD RW only Press SELECT to begin erasing the disc LOCK DVD RW only When the icon display LOCK it shows you can lock your current disc If you have locked your disc you can t make any changes any more except play it back but you can unlock it by UNLOCK COMPATIBLE When the icon display COMP it shows you can make your curre...

Страница 40: ...xternal dimensions 430 x 65 x 302 mm W H D Signal system PAL NTSC Laser Semiconductor laser wavelength 650 nm PERSONAL VIDEO RECORDER Audio cable red and white 1 pair Remote control 1 Batteries AAA 2 Video cable yellow 1 Owner s Manual 1 Scart cable 1 SUPPLIED ACCESSORIES Design and specifications are subject to change without notice ...

Страница 41: ...s manufactured between 1997 1998 Scratched disc Connect the DVD player directly through the TV and not through any other source What you re viewing is the effect of the copy protection circuitry required on all DVD players Place the disc with the graphics side up Place the disc on the disc tray correctly inside the guide Make sure the disc is free from scratches fingerprints Press the SETUP button...

Страница 42: ... type ID 002 T00 T01 R00 R01 D01 001 001 001 R01 AZ0 001 R01 R01 R00 R00 Product Rev No 0 0 0 2 2 0 0 0 0 0 0 0 0 1 1 0 1 Notes Sample Only Ready Now Ready Now Ready Now Notes 2 types Ricoh ID Support Media DVD RW Recommend Max Write Speed 2 4x Maker MITSUBISHI RICOH TDK Total Recommend Media speed 2 4x 2 4x 2 4x 3 Manufacture ID MCC RICOHJPN TDK Media type ID A01 W01 t01 Total 1 1 1 Notes Not Rec...

Страница 43: ...www yakumo com ...

Отзывы: