background image

12

Sending MESSAGE (Massages) or Images (PICT) 

Replying to the sender of the checked message or image data

Reply to the sender of the checked message or image data.

1

  Press and hold 

 for over one second.

  Displays the “DG-ID SETUP” screen.

2

 Press 

, (

 appears on the left side)

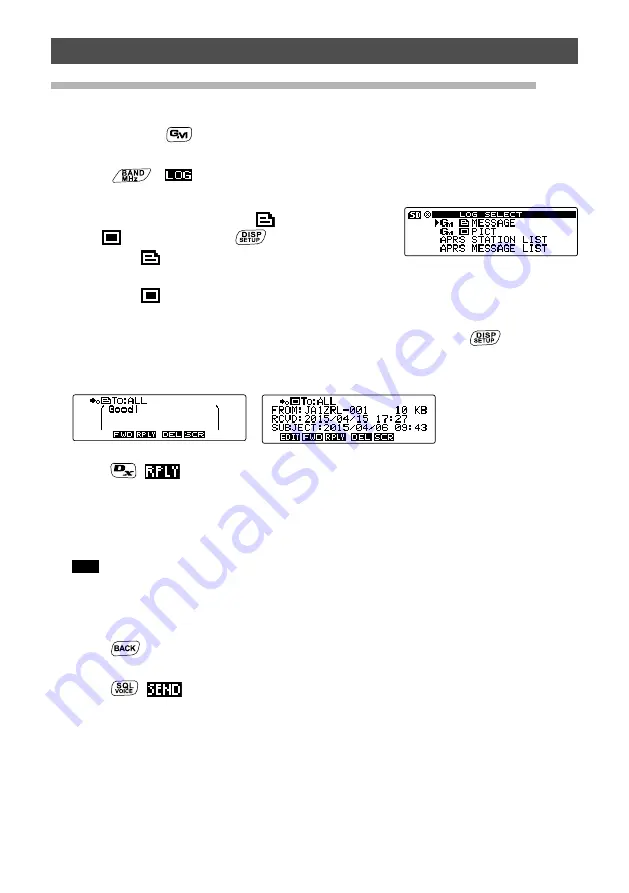
  Displays the “LOG SELECT” screen.

3

  Rotate the DIAL to select 

[GM 

 MESSAGE]


or


[GM 

 PICT]

,

 then press 

.

 When 

[GM 

 MESSAGE]


is selected, the “GM 

MESSAGE” screen appears.

 When 

[GM 

 PICT]


is selected, the “GM PICT” 

screen appears.

4

  Rotate the DIAL to select the data you want to reply to, then press 

.

  Displays the selected data.
                 

[MESSAGE]


[PICT] 


5

 Press   (

 appears on the upper side).

  Displays the message entry screen.

6

  Enter the reply message.

  See “Creating and sending a new message” on page 9 to enter the reply 

message.

 Tips 

  •  When replying, the call sign of the MESSAGE/PICT data sender is automatically specified 

for “to:”.


•  In other words, even if you specify the data sender's call sign (name) for “to:” to reply, other 

stations operating GM on the same frequency can still view the message or image as long 
as they are within the communication range.

7

 Press 

.

  Displays the entire message.

8

 Press 

 (

 appears on the upper side).

  Sends the message. When message or image transmission completes, “Completed” 

appears and then the screen returns to either the message list screen or image list 
screen.

Содержание FTM-100DE

Страница 1: ...tion For information on basic operation of the transceiver please refer to the enclosed FTM 100DR DE operating manual Company names and products in this manual are trademarks or registered trademarks...

Страница 2: ...haracter 5 Completing input 5 Checking Received Messages or Images 6 Downloading messages or images 6 Viewing the message or image list 6 Deleting messages or images 8 Deleting data from the content d...

Страница 3: ...he GM members within your communication range the GM function also displays the relative positions of all the members on the transceiver screen Tips The GM function does not work while in the analog m...

Страница 4: ...DN mode within the communication range Tips Displays for stations within your communication range Displays for stations outside your communication range Deleting stations from the list Delete the sta...

Страница 5: ...changes the character type in the following order Uppercase letters symbols lowercase letters numbers Deleting all input characters Press CLR appears on the upper side Moving the cursor to the left P...

Страница 6: ...ceiving a message When receiving an image Tips While receiving an image sender s call sign and appear to indicate the reception progress of the data If the message cannot be downloaded successfully du...

Страница 7: ...OG list indicate the following NEW Creating and sending a new message Message received unread Message received read Message sent Message failed to send Image received unread Image received read Image...

Страница 8: ...tarts the deletion process After completing deletion the display returns to the data list screen Rows move up by one Tip To cancel deletion select Cancel then press Deleting data from the list 1 From...

Страница 9: ...al mode on the same frequency There are the following three ways for sending messages or images 1 Creating and sending a new message 2 Replying to the sender of the downloaded message or image data 3...

Страница 10: ...age list screen The tag of the transmitted message is added to the top of the list Using routine messages The following 19 routine messages are stored on the transceiver at the time of factory shipmen...

Страница 11: ...can be selected and used in the same way as the 19 prepared routine messages 1 Follow steps 1 to 6 in Creating and sending a new message on page 9 to input a text message Tip Alphanumeric characters i...

Страница 12: ...lected data MESSAGE PICT 5 Press appears on the upper side Displays the message entry screen 6 Enter the reply message See Creating and sending a new message on page 9 to enter the reply message Tips...

Страница 13: ...ct GM MESSAGE or GM PICT then press When GM MESSAGE is selected the GM MESSAGE screen appears When GM PICT is selected the GM PICT screen appears 4 Rotate the DIAL to select the data you want to forwa...

Страница 14: ...h another transceiver if the DP ID of the stations are registered in each other s transceivers they can communicate even if the DG ID numbers are different For details refer to the FTM 100DR DE operat...

Страница 15: ......

Отзывы: