background image

6.


When the program opens, confirm that the file AH036_V0111.SFL is highlighted; if not, click on 
it to highlight it. 

7.


Click "Configure" if necessary, to change the COM Port. 

8.


Click 

WRITE. 

The onscreen progress bar will indicate programming activity. 

9.


When programming has completed, an [OK?] box will appear. Click [OK?]. 

10.


Disconnect the AC power cable (or turn OFF the rear MAIN power switch for FT

DX

5000 and 

wait a minute, until the capacitors discharge) and then remove the DB9 serial programming cable. 
Thru the access hole on the back of the radio, move the 

PGM-SW

 to the 

NORMAL

 position.  

See Fig. 6. 

11.


Reconnect the AC power cable (or turn ON the rear MAIN power switch for FT

DX

5000). 

12.


Press and hold in the [FAST] and [LOCK] keys while turning the radio back on. This resets the 
radio and locks in the new software.  

13.


Turn the radio off. The main CPU updating process is now complete.


14.


Confirm the new update software by holding the three buttons [GEN]

[50]

[ENT] and turn the 

radio on. The new software version will be displayed See Fig. 2.  


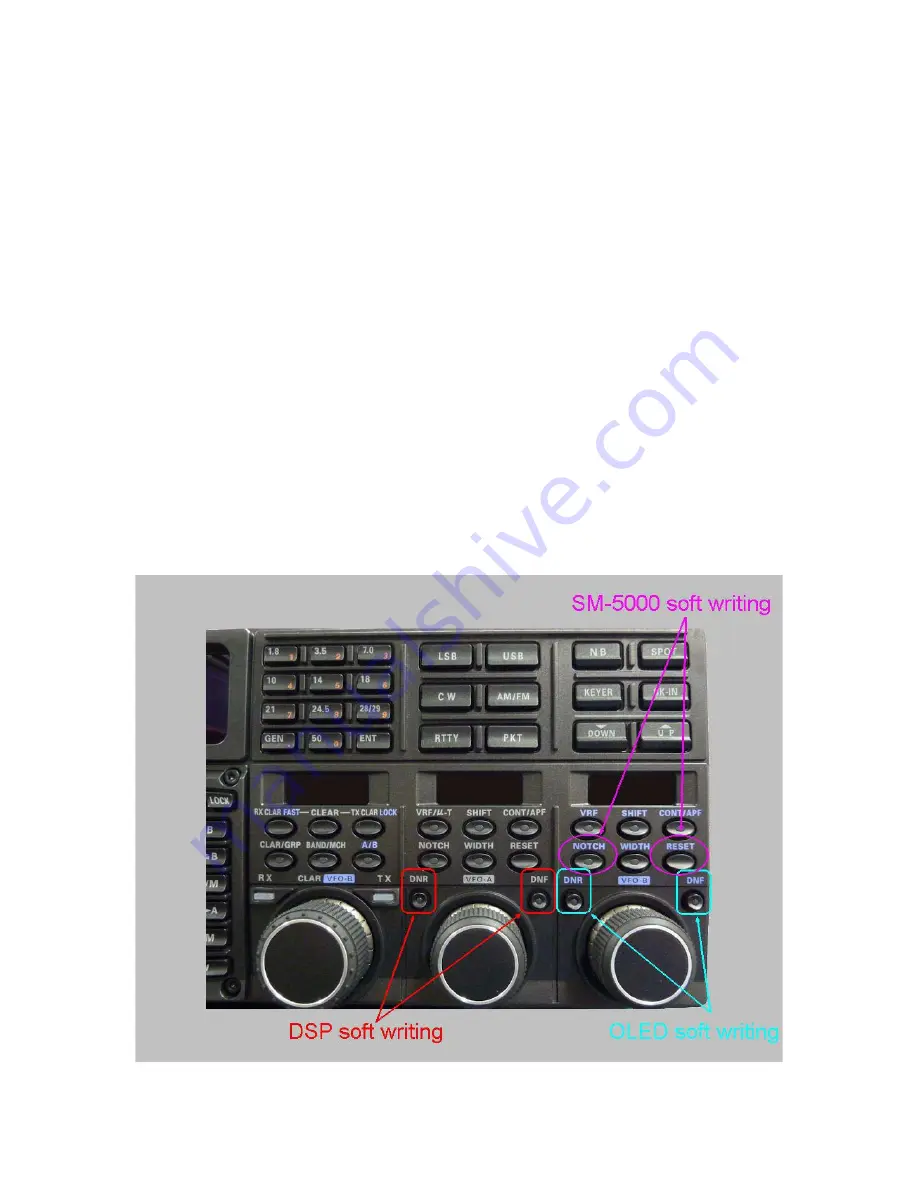
EDSP, OLED and SM-5000 Software Update 


See below, how to access the programming mode for each different EDSP, OLED and SM-5000 
software. It is very important to install the correct software. The incorrect installation may make the 
radio inoperable and the version number will not be displayed.  
 

Fig. 7


Содержание FTDX5000 - SOFTWARE UPDATE AND VERSION...

Страница 1: ...17 10 OEL OLED Software Version 0110 3 23 10 SM 5000 Software Version 0107 3 23 10 DMU 2000 Software Version Option Please refer to the DMU 2000 update information on our website EDSP 5000 Programmin...

Страница 2: ...lding the three buttons GEN 50 ENT turn the radio on The software version will be displayed See Fig 1 and 2 Fig 1 Fig 2 MAIN Software Version The version number will be shown on the VFD CLAR Clarifier...

Страница 3: ...lay Left side See Fig 2 and 4 example OEL software version V0110 DMU 2000 Software Version The version number will be shown on the VFO A SELECT DIAL display Center See Fig 2 and 4 example DMU software...

Страница 4: ...ication Error you may need to try another USB adapter cable or another computer 1 Turn the FTDX5000 rear panel Main Power switch OFF or disconnect the power cable 2 Make sure the USB to DB9 adapter ca...

Страница 5: ...the programming will not start Fig 6 3 Connect the serial straight through programming cable DB9F to DB9F to the serial port COM1 in the back of your computer Plug the DB9F connector to the CAT connec...

Страница 6: ...the NORMAL position See Fig 6 11 Reconnect the AC power cable or turn ON the rear MAIN power switch for FTDX5000 12 Press and hold in the FAST and LOCK keys while turning the radio back on This reset...

Страница 7: ...9 pin CAT connector on the rear of the transceiver If you use a USB to serial adapter you might need to change the COM Port setting 3 Reconnect the AC power cable or turn ON the rear panel MAIN power...

Страница 8: ...rear panel MAIN power switch 2 Connect a serial RS 232C DB9F to DB9F straight cable to the COM1 connector of your computer and the 9 pin CAT connector on the rear of the transceiver If you use a USB t...

Страница 9: ...new software version will be displayed See Fig 2 SM 5000 Software Version 1 Turn the FTDX5000 OFF and disconnect the power cable or turn OFF the rear panel MAIN power switch 2 Locate the program swit...

Страница 10: ...le Thru the access hole on the back of the SM 5000 move the PGM SW to the NORMAL position See Fig 10 12 Reconnect the AC power cable or turn ON the rear panel MAIN power switch for FTDX5000 13 Turn th...

Отзывы: