


OUTLET
AC CORD INLET
AC CORD
Set a film on
FILM HOLDER
Open the
SAFETY COVER
8
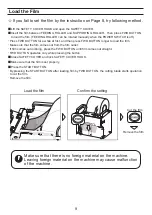
Load the Film
■
The SOCKET-OUTLET shall be installed near the equipment and shall be
easily accessible.
■
Set the machine only in the upright position.
■
Plug in AC CORD to the AC CORD INLET.
■
Make sure the POWER SWITCH is off then plug into an appropriate
grounded AC outlet.
■
Turn the POWER SWITCH on.
・
When the POWER SWITCH is turned on, a letter, A, b, C, d, E, F and 3 or
4 digits will be displayed on CONTROL PANEL.
(Previous use cutting length will be displayed)
・
When the POWER SWITCH is turned on, mode setting is set to previous use.
■
Set a film on FILM HOLDER.
・
Set film at center of FILM HOLDER, following to the drawing in right.
(As regards FD-200
Ⅲ
and FD-300, set film roll into BOBBIN and place at the
BOBBIN SHAFT SOCKET. Refer to P-13.)
■
Pull up SAFETY COVER HOOK and open the SAFETY COVER.
■
Peel the film and put it on FILM GUIDE.
・
To set the film properly, keep it a little loose as the drawing shows below.
■
Close SAFETY COVER gently, and lock SAFETY COVER HOOK.
■
Press the FWD BUTTON to feed out the film.
・
Press the FWD BUTTON until the film comes out from the FILM OUTLET.
・
If film comes out inclining, press the FWD BUTTON until film comes out
straight.
・
FWD BUTTON Operates only while pressing the button.
■
Make sure that the film is set properly.
■
Press the START BUTTON.
・
By pressing the START BUTTON after loading film by FWD BUTTON, the
cutting blade starts operation to cut the film.
・
Remove first piece of film.
■
When you pull out film, please follow the instruction below.
・
Lift the SAFETY COVER HOOK and open the SAFETY COVER.
・
Press REV BUTTON, and draw out the film from FEEDING ROLLER.
・
After front edge of the film comes out between FEEDING ROLLER and
SUPPORTING ROLLER, stop pressing REV BUTTON.
Load the film
Keep the film a little loose
Confirm the setting
Cut the film
Remove the film


