DMU-2000 D
ATA
M
ANAGEMENT
U
NIT
Page 2
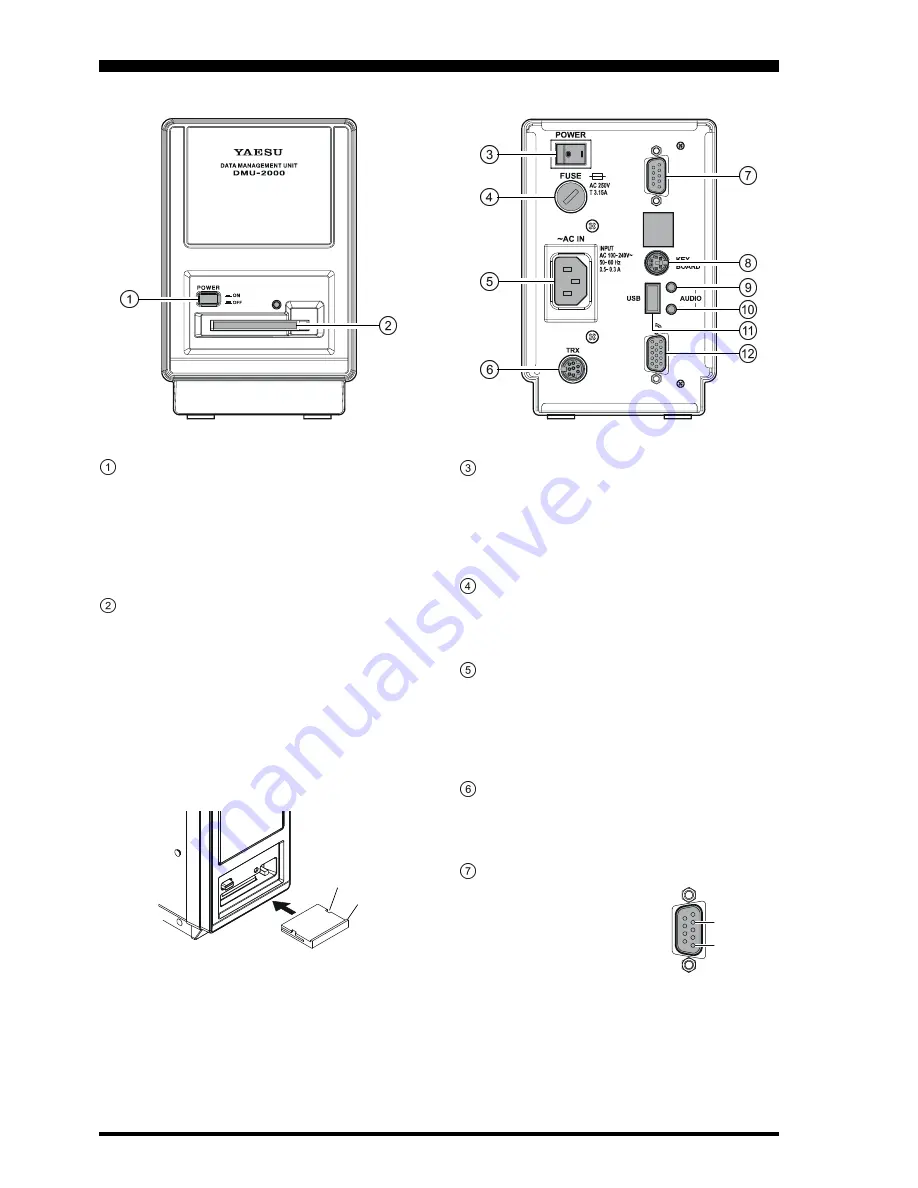
POWER
Switch
Press this switch to turn the Data Management Unit
on, after first setting the rear panel
POWER
switch
to the “
I
” position. Press this switch again to turn the
Data Management Unit off. If the rear panel’s
POWER
switch is set to the “
O
” position, the front
panel
POWER
switch will not function.
CF Card Slot
This slot accepts the supplied Compact Flash (CF)
Card, which allows storage, transfer, and recall of
transceiver configuration data and operator prefer-
ences, along with Log Book data, etc. When the CF
Card is successfully inserted, the red LED by the slot
will light up.
When you insert the CF card into the this slot, please
insure that the white side (ridge side) of the CF card
is up. If the CF card is inserted incorrectly, the
DMU-
2000
may be damaged.
Main
POWER
Switch
This is main power On (
I
)/Off (
O
) switch of the Data
Management Unit. Always turn this switch on before
turning on the front panel’s [
POWER
] button.
If this switch is not turned On, the front panel
[
POWER
] switch will not function.
FUSE
This holder requires a T 3.15-A fuse. Always use the
T 3.15 Amp fuse, whether operating on 100 - 120 VAC
or 200 - 240 VAC.
~AC IN
Jack
Connect the supplied 3-wire AC line cord to this
socket after ensuring that your AC mains voltage
matches that on the label. See the Installation section
for instructions on how to change the internal switch-
ing power supply AC mains voltage, if necessary.
TRX
Jack
Connect this 8-pin MINI-DIN jack to the
DMU
jack
on the
FT-2000
transceiver, using the supplied con-
trol cable.
COM
Jack
Connect a after-market GPS re-
ceiver capable of supplying
NMEA data to this jack. The data
line connects to Pin 2, and the
ground shield connects to Pin 5.
When you connect the GPS receiver to this jack, the
“Rotator” page on the after-market monitor will au-
tomatically include a Great Circle map centered on
your location. The
DMU-2000
can support the RMC
Data Sentences from the GPS receiver.
Pin 2
GPS DATA IN
Pin 5
GND
S
WITCHES
AND
C
ONNECTORS
To remove the card out from slot, press the small push-
button at the right hand side of the slot.
Advice
: If you get the “
CF CARD IS NOT READY
”
error message on the after-market monitor, check the
position of the CF Card in the slot for proper align-
ment.
Ridge
Notch


