background image

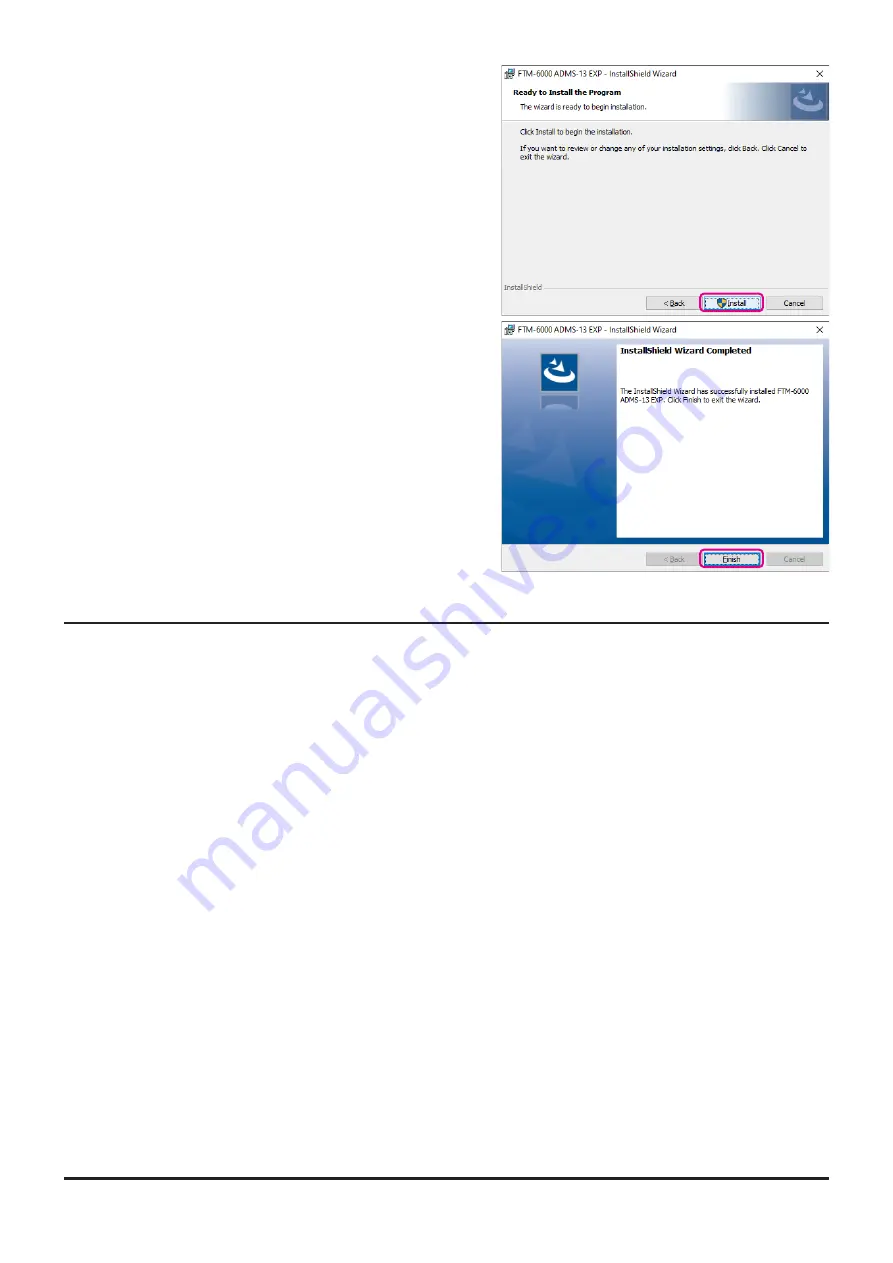
5.  Click the [Install] button.

•   When the [User Account Control] dialog box opens, 

click the [Yes] button.

6. 

When the installation is finished, the dialog box shown 

right will open. Click the [Finish] button, to complete 

the installation of the software.

Unistalling the ADMS-13

The procedure to uninstall the ADMS-13 on a Windows 10

®

 (64 bit) computer is shown below for the pur-

pose of explanation.

1.  Disconnect the USB Cable from the computer.
2.  Click the [

Start

] button and then click “

Settings

”.

3.  Click “

Apps

”.

4.  Select “

FTM-6000 ADMS-13 EXP

” and then click “Uninstall”.

•   When the “

User Account Control

” dialog box opens, click the left mouse button on [

Yes

].

•   The uninstall of the software will start. The unistall procedure ends with this.

6

Содержание ADMS-13

Страница 1: ...venient editing of the FTM 6000R E memory channel frequencies channel information and alpha tags using a personal computer Also the transceiver parameters and the setup menu items may be edited and configured easily from the computer keyboard YAESU MUSEN CO LTD ...

Страница 2: ...5 Find Next 15 Goto Channel 16 Insert Channel 16 Delete Channel 16 Clear Channel 16 Move Up 16 Move Down 16 Add Frequency Range 17 Sort 17 Communications Data communication with the FTM 6000R E 18 Settings 18 Set Mode 18 Tool Bar 19 Status Bar 19 Window 19 Setting the Template Items 20 Memory 20 Memories 20 PMS 20 About the setting items of each memory channels 20 Receive Frequency Transmit Freque...

Страница 3: ... Operating Mode 24 TAG 24 Name 24 Tone Mode 24 CTCSS Frequency 24 DCS Code 25 User CTCSS 25 Tx Power 25 Step 25 Narrow 25 Clock Shift 25 Comment 25 Troubleshooting 26 2 ...

Страница 4: ...rtant information Symbols Description This icon indicates cautions and alerts the user should be aware of This icon indicates helpful notes tips and information Important Notes Before downloading this software please read the Important Notes carefully Copyrights and all other intellectual property rights for the software as well as the soft ware manual are the property of YAESU MUSEN CO LTD The re...

Страница 5: ...ter the optional SCU 20 PC connection cable for USB The SCU 20 is included in the optional SCU 40 WIRES X Connection Cable Kit When using a COM port connection the optional CT 163 cables When using the SCU 20 cable be sure to install the designated driver before connecting the cable to the computer Necessary PC peripheral interfaces USB port USB 1 1 USB 2 0 or RS 232C interface COM port The flow o...

Страница 6: ...e same folder and extract the downloaded zip file Start up the computer as an Administrator user ADMS 13 Programming Software Installation 1 Start up the computer as an Administrator user 2 Double click the setup exe in the same folder that you have unzip the files When the NET Framework install dialog box opens follow the on screen instructions to install 3 The dialog box which is shown right wil...

Страница 7: ...e ADMS 13 The procedure to uninstall the ADMS 13 on a Windows 10 64 bit computer is shown below for the pur pose of explanation 1 Disconnect the USB Cable from the computer 2 Click the Start button and then click Settings 3 Click Apps 4 Select FTM 6000 ADMS 13 EXP and then click Uninstall When the User Account Control dialog box opens click the left mouse button on Yes The uninstall of the softwar...

Страница 8: ...ore using the SCU 20 PC connection cable installation of the driver software for the SCU 20 is required Download the driver software for the SCU 20 in advance Download the designated driver software from the Yaesu website http www yaesu com Read the installation manual thoroughly and install the driver Connect the FTM 6000R E and the PC 1 Refer to the figure and connect the SCU 20 PC connection ca...

Страница 9: ...computer Click Exit in the File menu to close the ADMS 13 First use the Get Data from FTM 6000 command Page 9 to upload the setting data of the FTM 6000 to theADMS 13 programmer Display examples First Screen This is the first screen to be displayed when starting the ADMS 13 software 8 ...

Страница 10: ...000R E and send data to FTM 6000R E For more details see Names and Functions of Menu Bar TAB Menu Bar Click the left mouse button on each TAB in the title bar Memories PMS VFO HOME to display the frequency list of the desired memory channels VFO and other preset transceiver settings For more details see Setting the Template Items 9 ...

Страница 11: ...asic setting items which are not related to memory channels can be configured from Set Mode Click the left mouse button on Settings in the Settings menu to open the item Set Mode window For more details see Set Mode 10 ...

Страница 12: ...6000 This command transfers the settings data of the FTM 6000R E to the ADMS 13 programmer To communicate with the FTM 6000R E and create a new data file 1 Connect the PC connection cable SCU 20 between the FTM 6000R E and the computer 2 Click the icon or the Get Data from FTM 6000 parameter in the Communications menu The Get Data From FTM 6000 window will open 3 Follow the on screen instructions ...

Страница 13: ...n the desired file before performing the send data operation above 1 Connect the PC connection cable SCU 20 between the FTM 6000R E and the computer 2 Follow the on screen instructions to transmit data to the FTM 6000R E 3 After the data transmission completes Completed will appear on the computer display and click the Close button 4 The FTM 6000R E will automatically re start in accordance with t...

Страница 14: ...ter in the File menu Specify the file name and destination folder for the selected configuration file and then click the Save button to save the file Import ADMS 13 data files may be created using a spreadsheet such as Microsoft Excel To create a data file for the import of data save the spreadsheet in the CSV comma separated file format A spreadsheet may be easily created by exporting the templat...

Страница 15: ...n the File menu the Print window will open to enable printing Set the start line and the end line of the data you want to print and then click the Printing button to start printing To change the specific printer settings go to the Printer properties by clicking the the Printer setup button Exit To exit the ADMS 13 programmer click the Exit parameter in the File menu to close the ADMS 13 software I...

Страница 16: ...elected area to the clipboard click the Copy parameter in the Edit menu Paste To paste the clipboard data to the selected area click the Paste parameter in the Edit menu Find To find a specified text click the Find parameter in the Edit menu The Find window will open Select the column from the drop down list Enter the text to search for and then click the Find button The candidate character string...

Страница 17: ...tinue will appear If you agree click the OK button Delete Channel To delete the specified range of channel data click the Delete Channel parameter in the Edit menu The channels that were displayed after the deleted channels will shift up accordingly Clear Channel To clear the current channel data click the Clear Channel parameter in the Edit menu The channels that were displayed after the deleted ...

Страница 18: ...cy step Click the Add button to create the additional specified memory channels The 8 33 kHz step is available only when receiving on the Air band 108 136 995 MHz Sort Click the Sort parameter in the Edit menu the Sort window will open Sort by Select the first parameter for sorting items such as the order of frequencies Then sort by Select the second parameter for sorting Sort Mode Set to sort in ...

Страница 19: ...the various functions of the FTM 6000R E according to your preferences The ADMS 13 software displays the set mode menu in an easy to understand manner where you can change and save the setting values Click the Settings parameter in the Settings menu to open the SetMode window To change the setting of each item in the window click the icon to show the dropdown settings list and then click the desir...

Страница 20: ...he depressed toolbar button and keyboard latch state A check mark appears next to the Status Bar parameter when the Status Bar is displayed Window This menu sets the operating window parameters of the ADMS 13 programmer Click the Tile up and down parameter in the Window menu to display multiple template files by dividing the window into two lists upper and lower parts Click the Tile up and down pa...

Страница 21: ...ency entry is complete use the key to move the cursor to the right and subsequently configure the additional detail settings for the channel To enter the transmit frequency for the next channel press the ENTER or key The receive and transmit frequencies can be set separately Offset Frequency When a transmit frequency is not entered transmission will be performed at a frequency obtained by adding s...

Страница 22: ...ls such as idle line signals used by private railways and control signals of MCA radio system Tx Power This item selects the TX Power Step Sets the channel step for receiving channels Narrow By ticking the checkbox of this item switches to the Narrow FM mode Clock Shift When an internal spurious signal occurs due to the microcomputer clock turn this setting on tick the checkbox This may improve th...

Страница 23: ...equencies Offset Frequency When a transmit frequency is not entered transmission will be performed at a frequency obtained by adding subtracting the offset frequency to from the receive frequency Offset Direction Set the frequency shift direction OFF The transmit frequency is not shifted RPT The transmit frequency is shifted to the minus offset RPT The transmit frequency is shifted to the plus off...

Страница 24: ...eckbox the step setting become selectable Step Sets the channel step for receiving channels Narrow By ticking the checkbox of this item switches to the Narrow FM mode Clock Shift When an internal spurious signal occurs due to the microcomputer clock turn this setting on tick the checkbox This may improve the situation Usually this item is set to OFF un tick the checkbox Comment Comments may be add...

Страница 25: ...e receive frequency Offset Direction Set the frequency shift direction OFF The transmit frequency is not shifted RPT The transmit frequency is shifted to the minus offset RPT The transmit frequency is shifted to the plus offset The transmit frequency is not shifted Operating Mode Select the operating mode for receive channel FM The selected frequency band is set to FM mode AM The selected frequenc...

Страница 26: ...uency Narrow By ticking the checkbox of this item switches to the Narrow FM mode The degree of modulation becomes half the normal level Clock Shift When an internal spurious signal occurs due to the microcomputer clock turn this setting on tick the checkbox This may improve the situation Usually this item is set to OFF un tick the checkbox Comment Comments may be added to the edited HOME channels ...

Страница 27: ...in a different order from the clicked the Send Data to FTM 6000 in the Communications menu and displayed procedure Follow the on screen instructions The data transmission has stopped before completion Disconnecting the connection cable or poor contact of the connection cable Confirm the cable connection and try again The data import export is not successful Adjust the number of the rows of CSV fil...

Страница 28: ...produced without the permission of YAESU MUSEN CO LTD YAESU MUSEN CO LTD Tennozu Parkside Building 2 5 8 Higashi Shinagawa Shinagawa ku Tokyo 140 0002 Japan YAESU USA 6125 Phyllis Drive Cypress CA 90630 U S A YAESU UK Unit 12 Sun Valley Business Park Winnall Close Winchester Hampshire SO23 0LB U K ...

Отзывы: