10
11
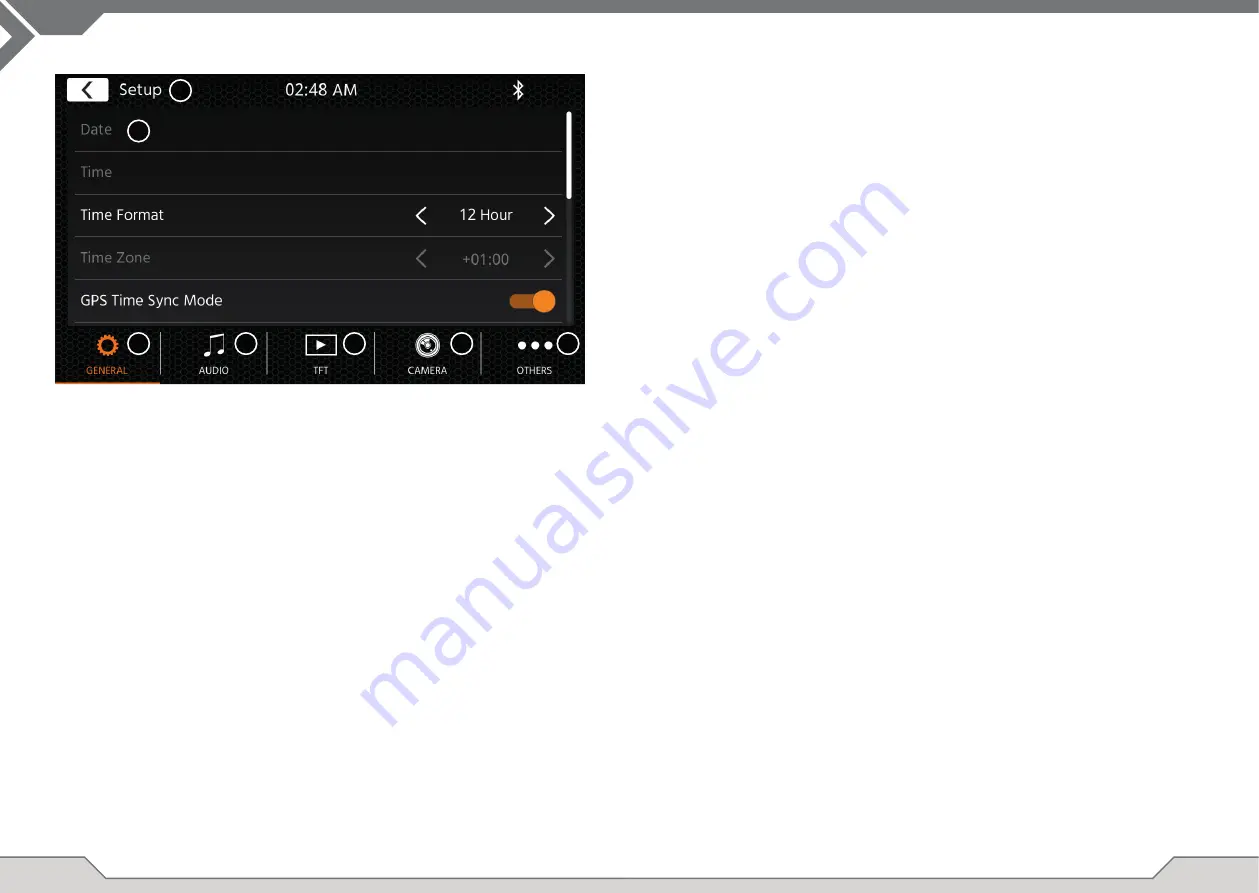
Operation Buttons:
1. Return
Press to return to the home screen.
2. List area
The shown list area is depending on the currently selected category.
To see other settings you can scroll/swipe the list up and down or select
different category from the lower area.
3. General
Contains general settings like language, date&time, FAV key assignment.
3(a) System Language: Press arrow keys to select language.
3(b) Time sync mode (DAB+): Press switch to ON/OFF setting.
3(c) FAV short press: Press arrow keys to assign a different function.
3(d) FAV long press: Press arrow keys to assign a different function.
3(e) Beep: Press switch to ON/OFF setting (Enable/Disable key press beeps).
3(f) Microphone: Press arrow key to change selected microphone.
3(g) Wallpaper: Press to select different background.
3(h) Date: Press manually set a date (only possible if the sync modus is set to OFF).
3(i) Time: Press to manually set time (only possible if the sync modus is set to OFF).
3(j)Time Zone: Press to manually set time zone.
3(k)Time Format: Press arrow keys to change 12/24h format.
3(l) Apple connectivity: press to change mode
4. Audio
Contains setting for audio and sound adjustments.
4(a) Balance: Press arrow keys to shift the center to left or right position.
4(b) Fader: Press arrow keys to shift the center to front or rear position.
4(c) Equalizer: Press to open EQ. You can select different EQ-Presets or manually
change the frequency bands to your liking.
DEVICE SETTINGS
Balance and Fader can also be optically adjusted or LPF, Subwoofer
level and Loudness can be adjusted.
4(d) Loudness: Press to ON/OFF loudness.
4(e) Subwoofer Power: Press to ON/OFF subwoofer power.
4(f) Subwoofer Gain: Press arrow key to change subwoofer gain if Subwoofer
Power is set to ON.
4(g) Navi Mixer: Press switch to activate or deactivate mixing of navigation
voice and background audio.
4(h) Startup volume: Press more key. Here you can change individually all
available sources in regard of startup volume.
You can choose to apply the last used volume, or set a fi x volume on startup.
5. TFT
Here you can adjust settings in regard of the screen for example brightness
mode or brightness values.
5(a) TFT brightness day: Press arrow keys to set value for day mode.
5(b) TFT brightness night: Press arrow keys to set value for night mode.
5(c) Dim mode: Press arrow keys to set value.
Auto: the brightness is adjusted automatically with switching on the front
headlights of the vehicle (Night).
Day: the brightness is permanently at day value.
Night: the brightness is permanently at night value.
5(d) Touchscreen Auto Standby: On set idle time, the screen will be powered
off when not operated (audio will continue in background).
6. Camera
Enables you to adjust settings on the connected rear view camera.
6(a) Reverse Camera: Press arrow keys to adjust value.
Cam1: Will use the Video Cam1 input
Cam2: Will use the Video Cam2 input
Cam1+Cam2: Will use the Video Cam1 on reverse gear, and will switch
automatically after a delay to Cam2 when reverse gear is released.
6(b) Reverse Camera Mute: Press to change value (Mute, Reduce, Off)
6(c) R-Cam switch off delay: Press arrow keys to change the delay time until
the cam view auto closes after leaving reverse gear.
6(d) Camera picture: Press arrow keys to adjust value (normal or hor. mirrored).
6(e) Camera 1 Grid Lines: Press to turn camera 1 grid lines off and on. At the
camera source, you can adjust the position of the lines if the function is set ON.
6(f) Camera 2 Grid Lines: Press to turn camera 2 grid lines off and on. At the
camera source, you can adjust the position of the lines if the function is set ON
7. Miscellaneous Here you can fi nd information on the software device version and load factory.
7(a) Software version: Press more key to show the device system software version.
7(b) Install Software: Press more key to start software installation from USB-1 port.
If the fi les are not found, the buttons to proceed will not enable.
7(c) Factory default: Press more key and confi rm to perform a factory reset.
7(d) SWC assignment: Press to open the SWC assignment screen for Analogue-
Key mode (not for IR-Stalkinterface mode)
7(e) Open Source License: press to see the license text.
1
2
3
4
5
6
7


