background image

Ver. 1.6  June

 2015

da Vinci  

Jr.1.0

P 12

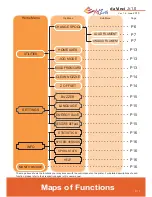
The map above shows the functions your may access with the control panel on the printer. For detailed descriptions of each 

function, please refer to their respective pages in this user manual.

Home Menu

Top Menu

Page

P6

P7

P7

P13

P13

P13

P14

P14

P15

P15

P15

P15

P16

P16

P16

P16

P16

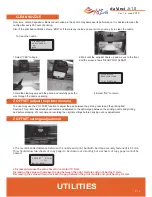
UTILITIES

LOAD FILAMENT

UNLOAD FILAMENT

CHANGE SPOOL

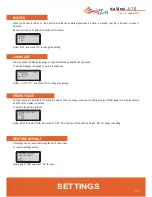
BUZZER

SETTINGS

HOME AXES

STATISTICS

INFO

MONITOR MODE

JOG MODE

BUILD FROM CARD

LANGUAGE

SYSTEM VERSION

CLEAN NOZZLE

ENERGY SAVE

SPOOL STATS

Z OFFSET

RESTORE DEFAULT

HELP

Sub Menu 

Maps of Functions

Содержание da Vinci Jr.1.0

Страница 1: ...Ver 1 6 June 2015 da Vinci Jr 1 0 P 1 da Vinci Jr 1 0 User Manual da Vinci Jr 1 0 da Vinci Junior 1 0 3D Printer ...

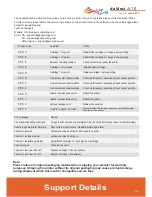
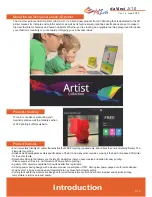
Страница 2: ...d materials may damage the machine Registering your printer via XYZware before your first print is strongly recommended When registered with XYZprinitng you will receive the latest technical support and updates To register simply click Register Now to begin You may use XYZware to initiate manual updates to the printer firmware and software When using the printer for the first time we recommend con...

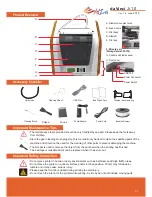
Страница 3: ...and include moving parts Cleaning Brush Product Overview Accessory Checklist Important Maintenance Tips Important Safety Instruction Scraper USB Wire Power Cord Bundled filament Bed Tape X 3pcs Filament spool axle ring Power Adapter Guide tube Cleaning Wire x 5 SD Card The maintenance tools provided should be only handled by an adult Please keep the tools away from children The scraper is used to ...

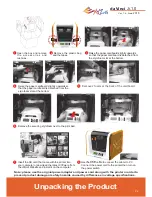
Страница 4: ...uct Note please use the original power adapter and power cord along with the printer in order to prevent product damage or safety hazards caused by differences in voltage specifications Open the box and remove t h e a c c e s s o r i e s a n d cushions Remove 2 foams at the back of the cardboard Remove the plastic bag and the tapes Raise the paper cardboard slightly upwards so that the paper cardb...

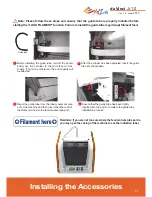
Страница 5: ...Installing the Accessories Ensure that the guide tube has been tightly inserted into the port to complete the guide tube installation process Direct the guide tube from the tube movement area out of the machine and then insert the other end of the filament tube into the feed module tube port Guide tude 3 4 Before installing the guide tube turn off the printer and move the extruder to the far left ...

Страница 6: ...ed in the correct manner Open the release arm and push the filament all the way to the bottom so that the front end of the filament is completely inserted into the feed module Take out and separate the filament spool axle ring into its two components Install the sensor chip Please pay special attention to the position of the installation holes on the chip Insert the filament spool axle ring compon...

Страница 7: ... main menu LOAD FILAMENT EXTRUDER HEATING TEMPERATURE 210 C PLEASE WAIT LOAD FILAMENT EXTRUDER HEATING TEMPERATURE 210 C PLEASE WAIT LOADING PLEASE WAIT UNLOADING PLEASE WAIT OK TO RETURN UTILITIES CHANGE SPOOL HOME AXES JOG MODE UTILITIES CHANGE SPOOL HOME AXES JOG MODE CHANGE SPOOL LOAD FILAMENT UNLOAD FILAMENT CHANGE SPOOL LOAD FILAMENT UNLOAD FILAMENT CHECK FILAMENT OUT FROM NOZZLE TO RETRY OK...

Страница 8: ...level low 5m left Replace cartridge 1 immediately Note Please retain all original packaging material when shipping your product for warranty purposes Shipping the printer without its original packaging may cause product damage during shipment which will result in chargeable service fees Symptom Cartridge 1 chip error Cartridge 1 chip error Extruder 1 heating problem Cartridge 1 not installed Cartr...

Страница 9: ...pecifications PLA filaments are made using polymerized lactic acid which is extracted from corn sugarcane or other sugar containing crops and is regarded as the most environmentally friendly 3D printing material Unwanted PLA printed objects can be simply discarded in the soil where it will naturally decompose PLA materials printed at low temperatures are not only suitable for family settings its b...

Страница 10: ...ly friendly 3D printer that satisfies the WEEE recycling requirements and utilizes the environmentally friendly PLA filaments for printing Satisfies electrical appliance safety specifications of the EU and many other countries making it the best home based 3D printer for the entire family Detachable SD card that allows you to store 3D model files that you have created and edited for easy printing ...

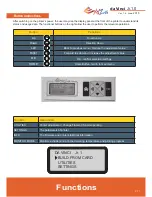
Страница 11: ...unctions Function Description UTILITIES Printer adjustment Change filament Sample printing SETTINGS The parameters of printer INFO The firmware and printer statistical information MONITOR MODE Monitors extruder and print bed working temperature and printing progress Button Functions Up Direction Up Down Direction Down Left Back to previous menu Reduce the adjustment value Right Forward to submenu ...

Страница 12: ...to their respective pages in this user manual Home Menu Top Menu Page P6 P7 P7 P13 P13 P13 P14 P14 P15 P15 P15 P15 P16 P16 P16 P16 P16 UTILITIES LOAD FILAMENT UNLOAD FILAMENT CHANGE SPOOL BUZZER SETTINGS HOME AXES STATISTICS INFO MONITOR MODE JOG MODE BUILD FROM CARD LANGUAGE SYSTEM VERSION CLEAN NOZZLE ENERGY SAVE SPOOL STATS Z OFFSET RESTORE DEFAULT HELP Sub Menu Maps of Functions ...

Страница 13: ... Z AXIS Y AXIS to move print bed backwards and forwards 2 Select desired increment of travel with and buttons and press or hold or button for desired direction to move the extruder To home axes To move the extruder To print a sample Select YES to proceed jog mode x axis y axis z axis build FROM CARD demo DEMO start building no yes x axis ok exit 001mM 010mm 020mm 2 Put the bed tape on the print be...

Страница 14: ...y residue on your prints you may try to clean the nozzle To clean the nozzle 3 Hold the cleaning wire with the pliers and carefully pass the wire through the nozzle openning 1 Select YES to begin 4 Select OK to return 2 Wait until the extruder heats up and moves to the front and the screen shows READY FOR CLEAN CLEAN NOZZLE ARE YOU SURE NO YES CLEAN NOZZLE READY FOR CLEAN OK TO RETURN 1 The recomm...

Страница 15: ...play by default To select a longer time interval All settings can be reset to factory default with a few clicks To reset all settings at once You may switch the display language on the printer between English and Japanese The default lanague is English To switch to Japanese Select OFF and press OK to change the setting Select 06M for auto off after 6 minutes or OFF for never turn off the LED and p...

Страница 16: ...he latest information product documents tutorial video and more MONITOR MODE shows the temperature of the extruder See below for the working temperature for the parts in different modes SPOOL STATISTICS provides the information on cartridge level see REMAINING and the capacity color and material of the filament Press to read the second page statistics lifetime 00006h last time 00h34m ok to return ...

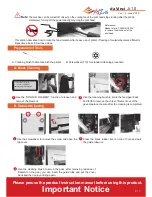
Страница 17: ... remove the chips of filament out of the gear Replace the wire after the cleaning is completed 2 Press the black rubber fixer on top of hole and pull the guide tube out 2 Use the cleaning brush to scrub the gear after removing residues of filament on the gear you can insert the guide tube and put the cover back and then enjoy printing again 3 Use the screwdriver to remove the screw and open the to...

Страница 18: ...ommunications Commission FCC Statement You are cautioned that changes or modifications not expressly approved by the part responsible for compliance could void the user s authority to operate the equipment This equipment has been tested and found to comply with the limits for a Class B digital device pursuant to part 15 of the FCC rules These limits are designed to provide reasonable protection ag...

Страница 19: ...into the printer can lead to printer damage or safety risks Do not use flammable chemicals or alcohol wipes to clean this device Do not disassemble or replace the printer cover with none XYZprinter covers Do not touch heated surfaces during or after operation Heated surfaces can cause severe burns Insert and secure the power cord firmly for proper usage and to avoid potential electricity and fire ...

Отзывы: