background image


March 2016

P 9

da Vinci  

HD23F1JS016

Install Scan Bed and Devices Calibration 

When you find inaccurate scan results, please follow the steps for scanning devices calibration:

Original model

Scanning result
before calibration

Scanning result
after calibration

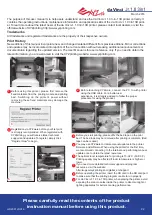
Push the print bed to proper position then install the Scan Bed. 

Note: Please always press the button of Scan Bed before attach or remove it.

In XYZscan,select 

“Setting”> “Calibrate Now” 

Wait until XYZscan shows the instructions of calibrating plate placement, place the plate at the 

center of the turntable (with chessboard pattern facing the left and insert the tab at the bottom 

of the calibrating plate into the hole at the center of the turntable), then the click “Calibrate now” 

button.

Wait until XYZscan and the printer finish 

calibration (for approx. 7 minutes)

When XYZscan prompts of calibration completed, 

remove the calibrating plate, and click “OK” to finish. 

You may begin to scan.

SCANNING

Содержание da Vinci Jr. 1.0

Страница 1: ...March 2016 P 1 da Vinci HD23F1JS016 da Vinci Jr 1 0 3in1 Quick Guide da Vinci Jr 1 0 3 in 1 3D Printer...

Страница 2: ...ur first print is strongly recommended When registered with XYZprinting you will receive latest technical supports and updates To register simply click Register Now to begin You may use XYZware to ini...

Страница 3: ...ve the object from the print bed when printing has finished The bed tape is reusable and it can be replaced when it has worn out Store the gear cleaning brush properly This tool shall only be used to...

Страница 4: ...axis Unpacking the Product 7 9 8 6 10 9 Note please use the original power adapter and power cord along with the printer in order to prevent product damage or safety hazards caused by differences in...

Страница 5: ...ament guide tube Ensure that the guide tube has been tightly inserted into the feeding hole 2 1 Remove the extruder Press the white button at the back of the extruder to release it Install the filamen...

Страница 6: ...filament into the guide hole please cut the tip of the filament off at a 45 Open the release arm and push the filament all the way to the bottom so that the front end of the filament is completely in...

Страница 7: ...nu LOAD FILAMENT EXTRUDER HEATING TEMPERATURE 210 C PLEASE WAIT LOAD FILAMENT EXTRUDER HEATING TEMPERATURE 210 C PLEASE WAIT LOADING PLEASE WAIT UNLOADING PLEASE WAIT OK TO RETURN UTILITIES CHANGE SPO...

Страница 8: ...AXIS Y AXIS to move print bed backwards and forwards 2 Select desired increment of travel with and buttons and press or hold or button for desired direction to move the extruder To home axes To move...

Страница 9: ...efore attach or remove it In XYZscan select Setting Calibrate Now Wait until XYZscan shows the instructions of calibrating plate placement place the plate at the center of the turntable with chessboar...

Страница 10: ...service for the issue and provide the details of leveling information 4 1A If SUCCESS is shown for the detection result and AUTO LEVEL OFF is shown on the third row on the screen it indicates good pla...

Страница 11: ...to scrub the feed gear back and forth to remove the chips of filament out of the gear Replace the wire after the cleaning is completed 2 Press the black rubber fixer on top of hole and pull the guide...

Страница 12: ...the set value of the connected Wireless Access Point For details of setting method please refer to the Production Operation Manual or the information provided by the original factory 3 The Channel Wi...

Страница 13: ...ter The monitoring function of printer can be used to confirm the on line status and the IP information of the connected printer XYZware secures the IP address of the printer and the connection is suc...

Страница 14: ...ic acid which is extracted from corn sugarcane or other sugar containing crops and is regarded as the most environmentally friendly 3D printing material Unwanted PLA printed objects can be simply disc...

Отзывы: