background image

da Vinci 1.0 User Manual 

P 6

Chapter 2 Overview

This chapter describes the unpacking and set up of the printer. Before proceeding to this chapter, 
please make sure read the Chapter 1. Important Safety Instruction is acknowledged carefully.

Attention

 Retain the box and packing material. If the need arises,it will be used to transport the unit.

 This device without packing material or box is wighted around 23Kg (50lb). Handle the printer carefully to 

   prevent personal injury and damage of the printer.

A

B

Packing support x2

Tapex2

Cable tie x1

GL

UE

 ST

ICK

P

R

IN

TI

N

G

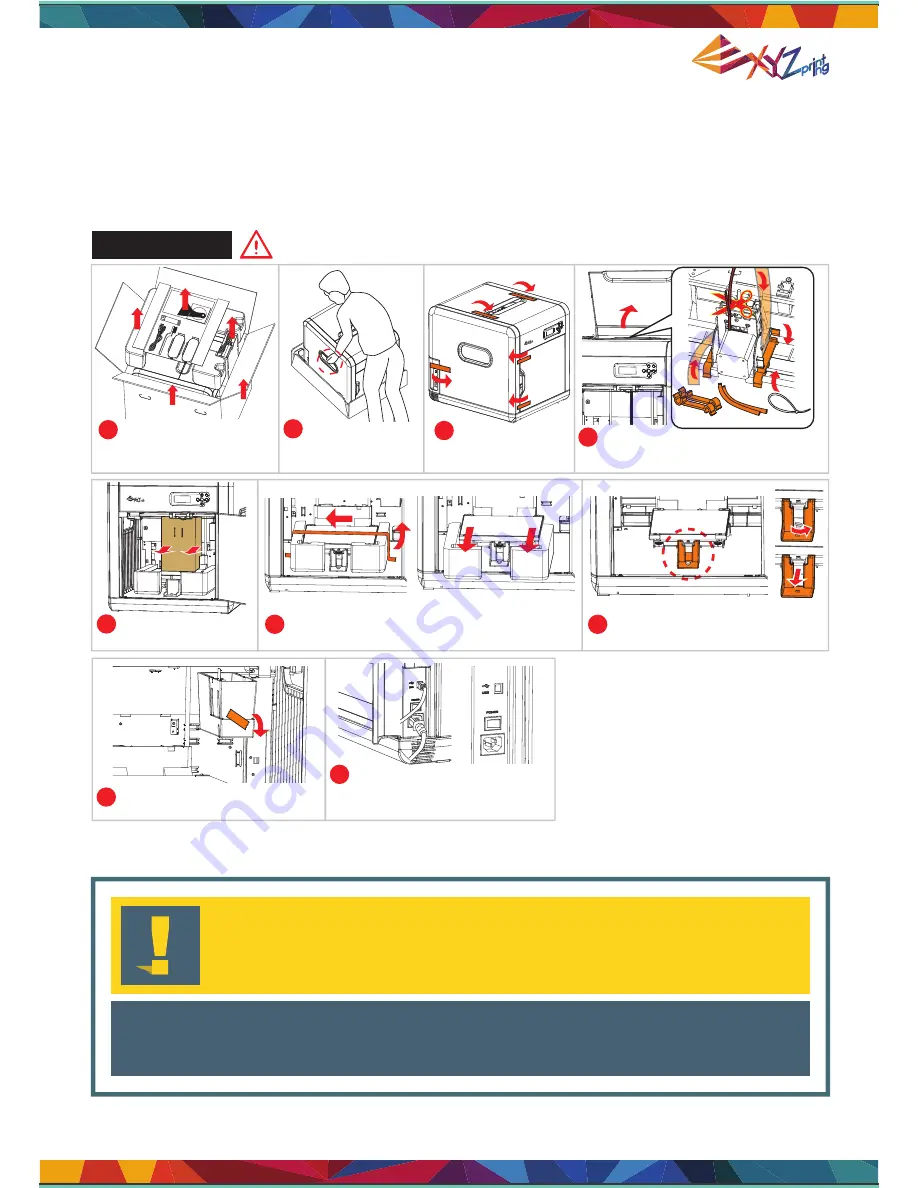
Open the box

2

3

6

5

7

8

9

1

4

A

B

Open the top cover, then remove
packaging supports and tapes from 
inside.

Remove the print bed shipping tapes and 
foam cushioning pieces.

Remove the bottom screw and the 
plastic piece under print bed.

Remove the drip tray packaging 
tapes.

Open the box and 
remove the accessories 
and the cushion.

Take out the printer 
by holding the side 
handles.

Remove plastic 
bag and tapes.

Remove the cardboard.

Use the USB cable to connect the 

printer to PC. Connect the power 

cord to the printer then turn on the 

power switch.

Note: Cable tie illustrated in step 4 in this section is used to fix the extruder during transportation. 
It should be removed before powering on the printer, or the printer may not funtion normally.

Содержание da Vinci 1.0

Страница 1: ...da Vinci 1 0 User Manual P 1 da Vinci 1 0 User Manual...

Страница 2: ...new da Vinci 1 0 3D Printer The instructions are for your safety and to properly maintain your printer Visit our website http www xyzprinting com or contact your sales representative to get the latest...

Страница 3: ...pter 5 Load the Filament 10 Chapter 6 Printer Functions 12 6 1 UTILITIES 13 6 1 1 LOAD FILAMENT 14 UNLOAD FILAMENT 15 6 1 2 HOME AXES 16 6 1 3 JOG MODE 17 6 1 4 BUILD SAMPLE 18 6 2 SETTINGS 19 6 3 INF...

Страница 4: ...Do not use flammable chemicals or alcohol wipes to clean this device Do not disassemble or replace the printer cover with none XYZprinter covers Do not touch heated surfaces during or after operation...

Страница 5: ...da Vinci 1 0 User Manual P 5...

Страница 6: ...CK PRINT ING Open the box 2 3 6 5 7 8 9 1 4 A B Open the top cover then remove packaging supports and tapes from inside Remove the print bed shipping tapes and foam cushioning pieces Remove the bottom...

Страница 7: ...flat surface to lay the 3D model Cartridge Slot space for placing the filament cartridge USB Port used for connecting the USB cable Power switch this switch turns on off the power of the printer Power...

Страница 8: ...da Vinci 1 0 User Manual P 8 Chapter 3 Install and Set Up Parts name and functions Front View Top View Rear View Left View Right View Bottom View...

Страница 9: ...ation of printer will be shown on the panel it is ready to print Display Panel Warning Make sure to set the power switch to the off position before inserting the power cord Make sure the power cord is...

Страница 10: ...da Vinci 1 0 User Manual P 10 Chapter 5 Load the Filament...

Страница 11: ...ease unload the filament before printer shipping Please use the regular carton and protection material Do not put the printer in the carton while extruder or heated bed still warm and make sure both a...

Страница 12: ...pervious menu Forward to submenu OK confirm selection settings Home Button return to main menu Function Description UTILITIES SETTINGS INFO MONITOR MODE Printer adjustment Change filament Sample prin...

Страница 13: ...S Function Description CHANGE CARTRIDGE HOME AXES JOG MODE BUILD SAMPLE Loads unloads filament Moves the extruders and print bed to default home location Manually adjusts the movement of X Y Z Axis fo...

Страница 14: ...ng temperature 3 Push the filament through the filament guide tube to the hole of the extruder and press OK button 4 Please follow instructions on the panel and press OK to finish this process it is n...

Страница 15: ...P 15 6 1 2 UNLOAD FILAMENT 1 Choose CHANGE FILAMENT UNLOAD FILAMENT 2 Please wait for extruder to reach working temperature 3 Pull the filament through the filament guide tube to the hole of the extr...

Страница 16: ...HOME AXES function and press Yes extruder and heated bed will move to proper positions 2 Wait for extruder and heated bed moving process finish 3 Refer the information from display panel process comp...

Страница 17: ...P 17 6 1 4 JOG MODE 1 Choose the proper axis and press OK to next steps Options X AXIS Y AXIS Z AXIS 2 Select adjustment degree Use Upper Down button to switch adjustment degree Use Left Right Button...

Страница 18: ...UILD SAMPLE 1 Choose printing sample 2 Press OK printer will be start to print 3 Printing status will be refresh on the LCD panel BUILDING the percetenge of printing finish TIME PASS elapsed build tim...

Страница 19: ...ep the extruders and print bed at working temterature when printer is powered on Set the language displayed on the panel Available options English Japanese Apply default settings Default On Off Englis...

Страница 20: ...inting time of last task in this printer 6 3 2 SYSTEM VERSION Printer version information will be shown on the display panel 6 3 3 FILAMENT STATS Some information related to filament which in the prin...

Страница 21: ...ci 1 0 User Manual P 21 6 4 MONITOR MODE You can get the temperatures of information via Monitor Mode function EXTRUDER Proper working temperatures is 210 410 PLATFORM Proper working temperatures is 9...

Страница 22: ...alue decreases CALIBRATE fail 270 135 105 OK TO RETURN 1 3 2 1 A B C 2 3 If the value shown is always ERR ERR ERR follow the steps below to clean Reminder CALIBRATE fail ERR ERR ERR OK TO RETURN A Cle...

Страница 23: ...Q1 Are there any suitable applications or software for this printer A1 The packaged CD contains the XYZWare software After installation it will use an available internet connection and look for the la...

Страница 24: ...da Vinci 1 0 User Manual P 24...

Страница 25: ...da Vinci 1 0 User Manual P 25...

Страница 26: ...da Vinci 1 0 User Manual P 26...

Страница 27: ...ssued Make sure to present the card if you require any repairs service or maintenance to the product during the warranty period 4 XYZprinting may levy charges under any of the following circumstances...

Отзывы: