da Vinci 1.0 User Manual
P 22
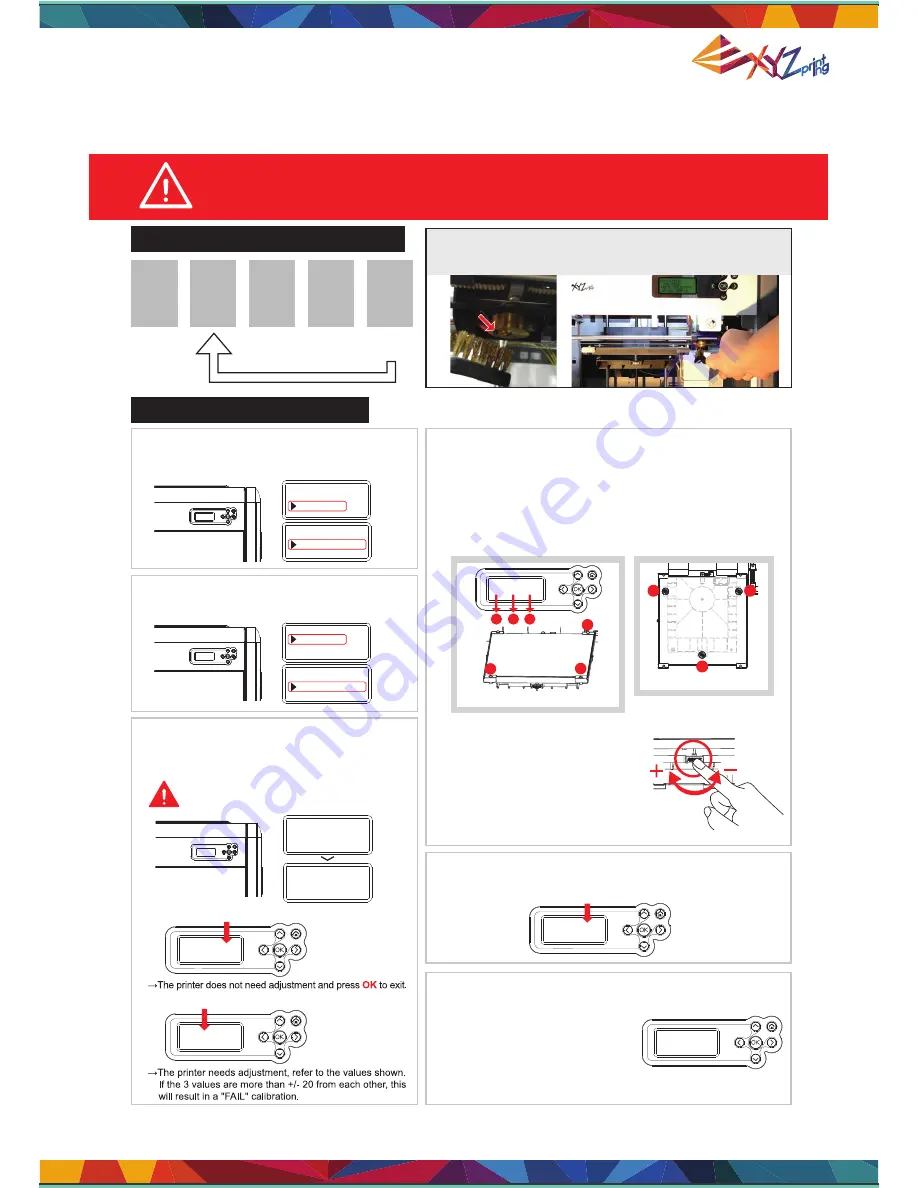
6-5 Print Bed Adjustment
Print bed adjustment flow chart
Print bed adjustment steps
Perform again!
1.
UTILITIES
SETTINGS
INFO
DA VINCI 1
.
0
DA VINCI 1
.
0
SYSTEM VERSION
INFO
CARTRIDGE STATS
STATISTICS
UTILITIES
SETTINGS
INFO
CALIBRATE
BUILD SAMPLE
uTILITIES
jOG MODE
I
. If
SUCCESS
is shown.
I.
Adjust the screw at Point A to reduce the difference between the
1st and the 2nd measurements.
II.
Adjust the screw at Point B based on your evaluation of the
results obtained from the previous steps.
III.
Finally, adjust the screw at Point C to reduce the difference
between all measurements.
II
. If
FAIL
is shown.
CALIBRATE
IN PROGRESS
PLEASE WAIT
CALIBRATE
SUCCESS 230
+
230
,+
235
,+
235
[
OK
]
TO SAVE
EXTRUDER HEATING
TEMPERATURE999
°
C
PLEASE WAIT
CALIBRATE
SUCCESS
230
+
230
,+
235
,+
235
[
OK
]
TO SAVE
CALIBRATE
fail
+
270
,+
135
,+
105
[
OK
]
TO RETURN
Step-by-step adjustment
(Location of the measurement points)
(Adjust the location of the screws)
View the printer from the front when making adjustment
Each full turn leads to a change of 50 to the values
shown.
Use small dial turns to approximate the desired value.
Rotate the screw to the left to
raise the bed (value increases)
Rotate the screw to the right to
lower the bed (value decreases)
CALIBRATE
fail
+
270
,+
135
,+
105
[
OK
]
TO RETURN
1
3
2
1
A
B
C
2
3
If the value shown is always
ERR,ERR,ERR
,
follow the steps below to clean.
¡
Reminder
CALIBRATE
fail
ERR,ERR,ERR
[
OK
]
TO RETURN
A. Clean the surface of the print head
using the copper brush.
(Clean the contact point between the print
head and print bed)
B. Wipe and clean the measurement
points as shown in step 4.
C. Perform the calibration process again.
This print bed has been factory calibrated before shipping. Recalibration is
necessary if there are print issues when starting to print or the nozzle gets too
close to the print bed. When in doubt, it is recommended to contact service
center for more information.
Step
1
2
3
4
5
Step
Step
Step
Step
Click “INFO>SYSTEM VERSION” using the
function keys to make sure your firmware is the
latest.
4. Refer to the values for adjustment:
5. After the adjustment is finished, perform step 2. Wait until
SUCCESS
is shown and press
OK
to complete calibration.
2. Click “UTILITIES>CALIBRATE” using the
function keys and select “Yes” to perform
calibration.
3. The printer starts automatic measurement.
Wait for 2~3 minutes and verify the data
shown.
Note: During the measurement process, the
print bed and print module will be heated.
Care should be taken during operation!
To clean the molted filament from nozzle thoroughly, it is
recommended to activate “CLEAN NOZZLE” function
to keep heating the extruder for better cleaning.
Содержание da Vinci 1.0
Страница 1: ...da Vinci 1 0 User Manual P 1 da Vinci 1 0 User Manual...
Страница 5: ...da Vinci 1 0 User Manual P 5...
Страница 10: ...da Vinci 1 0 User Manual P 10 Chapter 5 Load the Filament...
Страница 24: ...da Vinci 1 0 User Manual P 24...
Страница 25: ...da Vinci 1 0 User Manual P 25...
Страница 26: ...da Vinci 1 0 User Manual P 26...


