background image


15

Loading Film (Continued) 

Step 3: 


Make certain the lower film is tight. If necessary, rotate the 
supply roll backwards to tighten. 


Grasp the film from the upper supply roll, and adhere it to  
the exposed adhesive on the lower supply roll. For best 
results, adhere the top film 1 inch below the round steel 
idler bar. By carefully aligning the edges, keeping the film 
tight and avoiding wrinkles, film waste will be minimized. 


Step 4: 


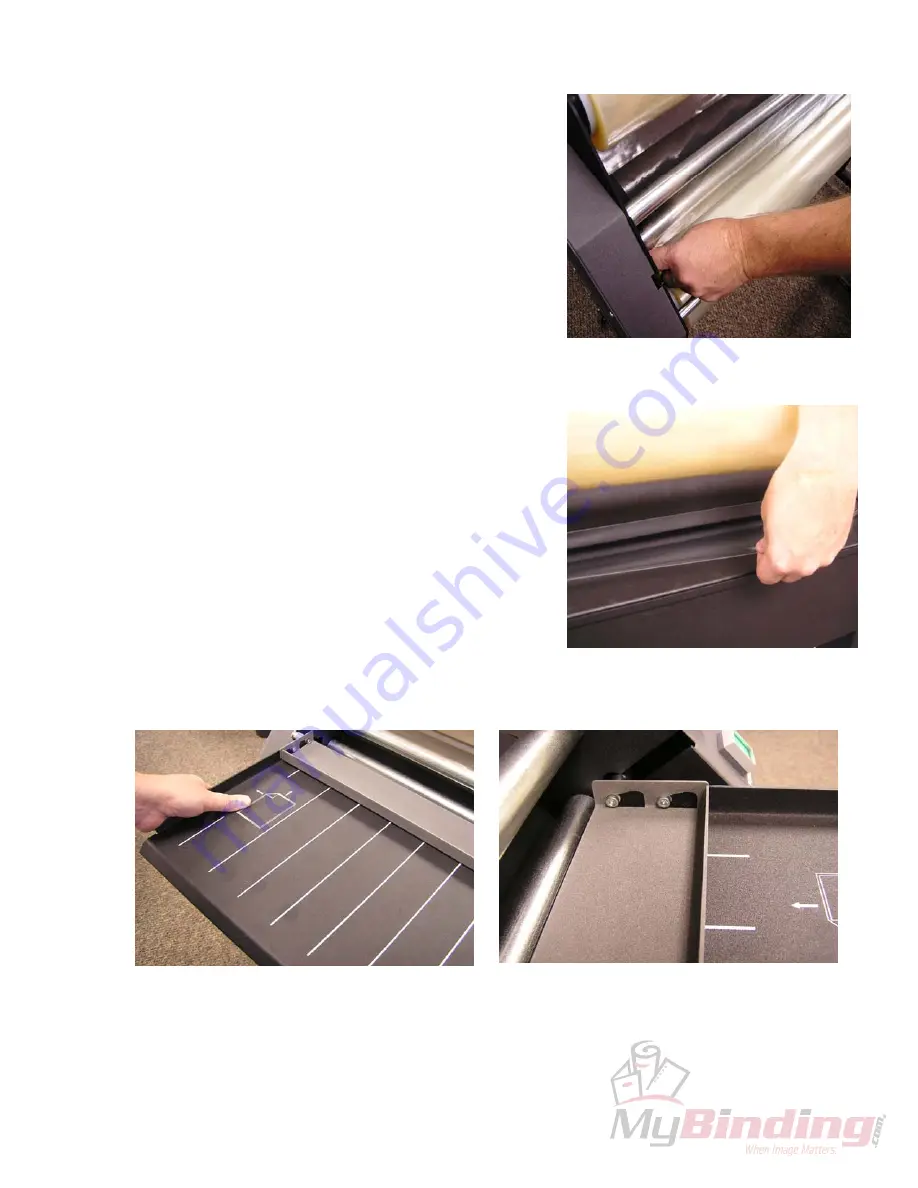
Use the foot pedal to run the film through the machine. 


Ensure that the film is exiting under the cutter bar 
assembly. 


Run material through the machine until all wrinkles go 
away. 


Material amount will vary depending on loading accuracy. 


Expect to run approximately 3 to 4 feet through the system. 


Trim off excess film by using the hand held cutter and 
sliding it in either direction. 


Step 5: 


Install feed tray completely by aligning the support posts in 
the grooves located in the sides of the machine. 


First, insert right side of tray 

Second, insert the left side of tray 

You are now ready to feed your documents! 


Guide film out the back of the machine 


Tacking laminate from top roll to exposed 

adhesive on bottom roll 


Содержание XM4400

Страница 1: ...Instruction Manual Provided By http www MyBinding com http www MyBindingBlog com Xyron XM4400 Laminating System...

Страница 2: ...1 XM4400 Adhesive Application Laminating System User s Guide P N 3355 Revision C 02 09 10...

Страница 3: ...ith Film 12 Machine Rollers Bars and Supply Roll Locations 13 Web Path Diagram for Loading Laminate 13 Loading laminate film 14 Troubleshooting tip for loading laminate 16 Caring for your rollers 16 L...

Страница 4: ...safety labels before operating this machine 2 Only a trained person is to be permitted to operate this machine Training should include instruction in operation under normal conditions and emergency s...

Страница 5: ...k 3803 g 4 5 16 Washer Black 3804 h 2 4 Swivel Caster 3808 i 2 4 Swivel Caster W Brake 3809 j 4 Caster Mounting Bolt 5 16 18 X 2 75 3807 k 4 Caster Shoulder Bolt 2 225 X 371 3812 l 4 Lock Nut Nylon 37...

Страница 6: ...5 XM4400 Cart Assembly Exploded view of Cart Assembly Shows Cross bar assembly and hardware...

Страница 7: ...or assembly 3352 and then assemble the bottom cross bar See figure 1 2 Then fit and assemble the cross bars to the left side frame end in by inserting the metal dowel pin into the pilot holes of both...

Страница 8: ...hole on the top side of the new cart frame ends Secure using a Black Washer and Black Nylock nut The threaded stem must be flat or flush on the top of the nylock nut Do not over tighten the Nylock nu...

Страница 9: ...by inserting the wheel into the caster frames and secure with the caster bold and nut which were provided with the casters See figure 9 10 Note Left side of stand has locking caster in front and non...

Страница 10: ...and keep your back straight to prevent over stressing and possible injury to your back Remove the packaging from around the machine Position the machine ends over the top bars on the cart On the under...

Страница 11: ...eck the area to the rear of the machine where laminated items will exit A flat surface is desired for items to exit onto Be sure to clean the area so items do not gather dust Machine Mounting Instruct...

Страница 12: ...ing normal operation the machine should always be switched to forward mode The main reason for using the reverse setting would be to remove an installed roll of material Emergency Stop Button The Emer...

Страница 13: ...eed problems wrinkles and other assorted troubles will occur 5 Carefully align the two films being fed into the nip If not you will obtain poor results Economizing with film There are many ways to eco...

Страница 14: ...13 Machine Rollers Idler Bars and Supply Roll Locations Web Path Diagram for Loading Laminate Laminate Path Adhesive Path Adhesive Roll Mask Roll Laminate Roll Laminate Roll...

Страница 15: ...tarter section by the leading edge Route over the bottom idler bar adjacent to the lower rubber roller Make sure the starter film is inserted squarely between the two rubber rollers Use the foot pedal...

Страница 16: ...he machine Ensure that the film is exiting under the cutter bar assembly Run material through the machine until all wrinkles go away Material amount will vary depending on loading accuracy Expect to r...

Страница 17: ...to prevent non warranty damage please observe the following precautions 1 Clean only when needed with recommended cleaning solution Isopropyl alcohol rubbed lightly on the rollers is good cleaning sol...

Страница 18: ...g the leading edge of your document is flat is very important as a small wrinkle at this point may continue through an entire document Lay the item flat on the feed tray and slightly stretch the leadi...

Страница 19: ...s 3 Pull material tight to apply tension to film when cutting 4 To cut the material pull the blade along the edge of the machine to cut the material 5 Apply force down the length of the material to fu...

Страница 20: ...aightness feed the items into the machine next to each other with a gap in between them in case your item is not straight This will prevent the items from overlapping It is very important to ensure th...

Страница 21: ...tly Tray or paddle not flat Ensure paddle is pushed forward completely after document is loaded aligned and has begun lamination Do not press down on tray during feeding of documents Check for adhesiv...

Страница 22: ...o the socket The Power button is on The green light should be on The emergency stop has been released The control mode foot auto is correct The fuse located in the rear of the machine is not blown Sta...

Страница 23: ...6 5cm DL4300 300 2 Sided Standard Use Laminate 300 ft 91 4m X 42 In 106 6cm LAT3801 300 1 Side Standard Use Laminate 1 Side High Tack Adhesive 300 ft 91 4m X 38 In 96 5cm Daily Clean the rolls Inspect...

Страница 24: ...cause damage Use the minimum amount of pressure necessary to clean the rolls You can destroy the silicone layer on the rolls by pressing to hard or scrubbing too long in one spot 4 Exercise care when...

Страница 25: ...then pressing the foot pedal to advance the material about 4 100mm through machine To stop the feed of material Lift your foot off of the foot pedal Next pull about 8 200mm from the top roll down and...

Страница 26: ...gligence loss of profit or other incidental or consequential damages arising out of the use or inability to use the equipment EXCLUSIONS TO THE WARRANTY This warranty specifically does not cover 1 Dam...

Отзывы: