XVision XC960S30 Скачать руководство пользователя страница 12

XC960S30

12

www.xvision.com

1. Product Overview

5. Menu Setting

To access the camera menu, when the camera is on, use the command ‘CALL 95 preset location’. When the 

menu has appeared, you will be presented with the following options:

•  System Information

•  Camera Settings

•  Aux Settings

•  Scan Settings

•  Title Settings

•  Alarm Settings - Not supported (we recommend usgin our XSDA-2 for alarm in and out functions)

•  Language Settings

•  Default Set

After the main menu has appeared, you can use the ‘up’/’down’ buttons on the speed dome controller or 

the ‘up’/‘down’ key on the DVR to navigate on the menu.

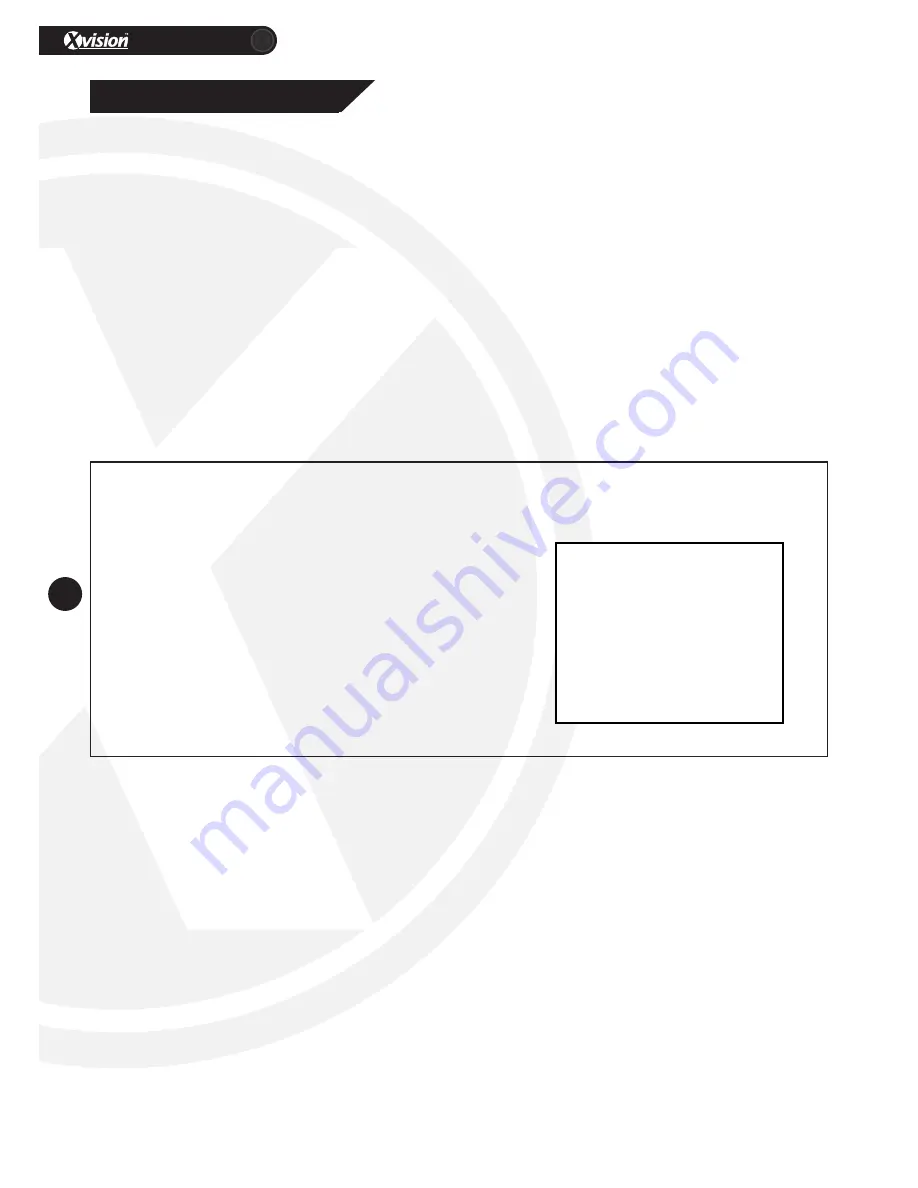
5.1 System Information 


Option: Ver / ADDR / BPS / PROT

This option allows you to view the system information from version number, speed dome address, 

baudrate and protocol.

Version No.: Version number of the camera

Address: Set the dome address using the dial switch

Baudrate: Speed dome automatically sets the baudrate

Protocol: Speed dome automatically sets the protocol

Exit: Save / End and return to the previous menu.

VER:   

V1.02S

ADDR:  

000

BPS:   

AUTO

PROT:   

AUTO

EXIT

Содержание XC960S30

Страница 1: ...me User Manual Version 1 Thank you for purchasing the XC960S30 camera from Xvision Please ensure that you read and understand this User Guide before operating the camera Please store this User Guide in an easily accessible location HD 960H ...

Страница 2: ...eset Functions 8 4 2 Keyboard Operation 10 4 2 1 Preset Location Scan 10 4 2 2 Area Scanning 10 4 2 3 Start Area Scanning 11 4 2 4 Pattern Scanning 11 5 Menu Setting 12 5 1 System Information 12 5 2 Camera Setting 1 13 5 3 Camera Setting 2 13 5 4 Auxiliary Setting 14 5 5 Scanning Set 14 5 6 Title Set 15 5 7 Alarm Linkage 16 5 8 Language Setting 16 5 9 Default Setting 16 6 Specification 17 ...

Страница 3: ... not place this equipment near a heat source to avoid risk of fire 4 Please do not store install and use this product in danger areas with inflammable or explosive substances 5 Please make sure the power is turned off when installing the product 6 Please ensure that you install the camera in an area with good ventilation 7 When installing the camera please make sure that it does not face any objec...

Страница 4: ... and tilting Auto Iris Auto Focus 30x Zoom Lens Viewing Angle between 1 60 Maximum 256 Presets 50m Number Plate Recognition Designed for Wall or Ceiling Mount Weatherproof IP66 Rated 1 2 Package Contents The packaged box for the XC960S30 comes with the following items XC960S30 Camera Bracket Installation Pack Including Screws to attach camera to bracket and green RS485 terminal block Power Supply ...

Страница 5: ... drill a hole through the wall for the wires to go However if placing through the bracket you can just feed through the side or bottom shown below 3 Drill the holes in the wall where you have made the marks and insert the wall plugs if required 5 Then re attach the main camera bracket to the base To do this use a cross head screw driver and turn the screws clockwise 4 Now thread the cable from the...

Страница 6: ...XC960S30 6 www xvision com 2 1 Connections BNC Socket for Video DC Socket for Power RS485 Terminal for Speed Dome Control ...

Страница 7: ... can be set in 2 ways 1 Address Dial Switch To do this adjust the dial switch on the camera to the desired address 2 Soft Address To set by soft address you will need to go to the OSD Menu For more information please go to section 5 6 on page 14 Please see the table below to see how to set the address on the camera ...

Страница 8: ...1 45 CALL Set the right boundary of area scanning 1 46 CALL Set the left boundary of area scanning 2 47 CALL Set the right boundary of area scanning 2 48 CALL Set the left boundary of area scanning 3 49 CALL Set the right boundary of area scanning 3 50 CALL Set the left boundary of area scanning 4 51 CALL Set the right boundary of area scanning 4 52 CALL Operating area scanning 1 53 CALL Operating...

Страница 9: ...ip 78 CALL Close vertical flip 79 CALL Start guard function 80 CALL Close guard function 81 CALL Start privacy shelter grid 82 CALL Close privacy shelter grid 83 CALL Turn on backlight compensation function 84 CALL Turn off backlight compensation function 85 CALL Turn on image freezing function 86 CALL Turn off image freezing function 87 CALL Start image mirror function 88 CALL Stop image mirror f...

Страница 10: ...an There are a total of 4 preset routines and 32 preset locations can be set To set the preset location 1 Execute the command of setting a preset location 2 Call the desired set option to the preset location 3 Then wait for the length of time you wish that preset point to stay in that position 4 Call the next routine you want to set a preset location to 5 Execute the command of setting a preset lo...

Страница 11: ...reset location 52 55 which will operate the scanning path 1 4 respectively The dome will then rotate from left to right at the speed you have set 4 2 4 Pattern Scanning To set the pattern scanning function follow the steps below 1 Call the preset location 56 to open the setting 2 To set your pattern you can use the up down left right wide tele near far close and open buttons These will set the dom...

Страница 12: ...gs Default Set After the main menu has appeared you can use the up down buttons on the speed dome controller or the up down key on the DVR to navigate on the menu 5 1 System Information Option Ver ADDR BPS PROT This option allows you to view the system information from version number speed dome address baudrate and protocol Version No Version number of the camera Address Set the dome address using...

Страница 13: ...Next Go to the next camera setting submenu Exit End and return to the previous menu Save Save the settings and exit the submenu CAM TYPE XF S ZM SPEED FAST WB MODE AUTO WB RGAIN 000 WB BGAIN 000 EXPOSURE 07 B LIGHT OFF FREEZE OFF NEXT EXIT SAVE 5 3 Camera Setting 2 The camera setting option allows you to adjust wide dynamic mode wide dynamic level mirror image function day night setting image effe...

Страница 14: ...t Set the time act to none preset scan pattern scan or preset ect Power Action Set the camera to perform an action when it is powered Set to none perform preset scan pattern scan or preset ect Exit End and return to the previous menu Save Save the settings and exit the submenu 5 3 Camera Setting 2 CONTINUED Minimum Focus Adjust the minimum focus from 1cm 10cm 30cm and 100cm Last Page Go to the pre...

Страница 15: ...Title Y Title This option allows you to set the title of the camera and position the camera title on screen Area No Set the area number 1 4 X coordinates X position of the title on the screen 0 29 Y coordinates Y position of the title on the screen 0 14 Title Set the camera title To do this use the joystick on the speed dome controller or arrow keys on your DVR to navigate To exit either press the...

Страница 16: ...Set alarm linkages on the zone location scans 0 4 To do this select 1 to set an alarm for zone scan 1 For no alarm select 0 Alarm Output Turn the alarm output on or off Exit End and return to the previous menu Save Save the settings and exit the submenu ALARM IN 1 IN TYPE NO ARM STA DISARMING PRESET NO 00 PST SCAN 00 PATT SCAN 00 ZONE SCAN 00 ALARM OUT OFF EXIT SAVE 5 8 Language Setting Option Lan...

Страница 17: ...otation Speed 360 0 1 160 per second Vertical Rotation Speed 0 90 0 1 120 per second Baud Rate 2400 4800 9600 19200 bps Protocol Pelco D Pelco P Power Supply DC 24V 2000mA In the next version this camera will be 12V 5000mA Operation Temperature 35 C 60 C Dimensions in mm WxHxD 210x350x210 Weight Kg 4 0 Weatherproof IP66 For more information please contact our technical team Contact details are on ...

Страница 18: ...XC960S30 18 www xvision com 1 Product Overview Notes ...

Страница 19: ...XC960S30 19 www xvision com ...

Страница 20: ...e warranty excludes products that have been misused including accidental damage and damage caused by normal wear and tear In the unlikely event that you encounter a problem with this product it should be returned to the place of purchase Manufactured exclusively for Xvision UK Unit 2 Valley Point Beddington Farm Road Croydon Surrey CR0 4WP www xvision com www xvision com HD 960H ...

Отзывы: