XTCERA X-MILL 500 Скачать руководство пользователя страница 7

9

10

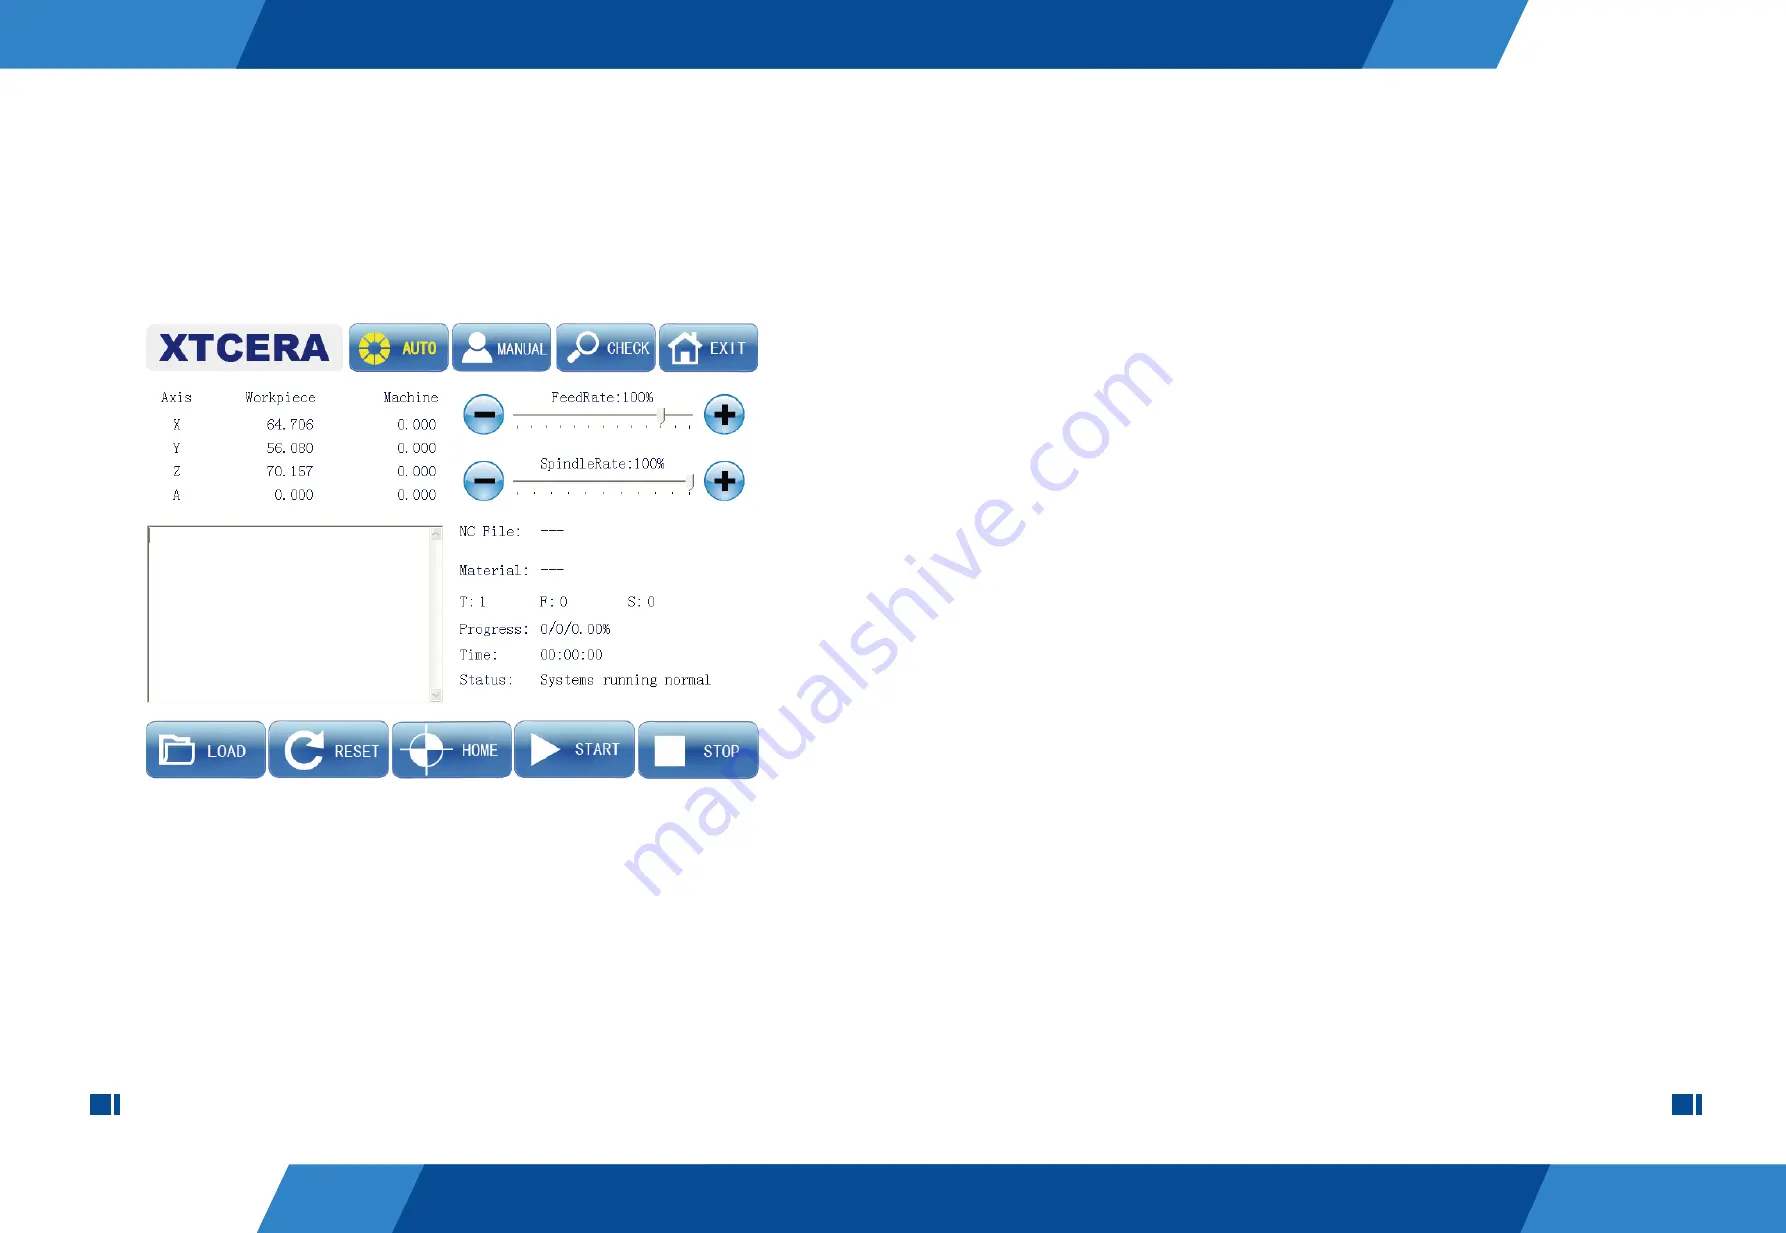
   3. As shown in the above figure, you can adjust the feed rate and spindle rate under 

“AUTO” mode. Click the ‘+’ or ‘-’ button to adjust the feed rate to about 50%, and the 

spindle rate to about 30%. Pay attention that it is the rate adjustment under auto mode 

rather than the rate adjustment under manual mode.     

   4. Click “START” button to start the pilot run and auto processing, and the button will 

change to “pause”. Observe the equipment action and interface prompts, until the 

processing is finished without any abnormality. 

   2. Click “load” button and select the test processing file for pilot run. Load the file 

after confirmation. The relevant information of the processing file will be displayed after 

successful loading, such as the file name, material type, processing grade. For the 

specific meaning of the processing file information, please refer to Appendix II. 

   5. Click “START” button again to start the auto processing. If you click “pause” button 

during the processing, the milling process will stop at the current point, the system will 

stop processing and return to the reference point automatically. When you click “START” 

button, the system will continue to run, starting from the paused point. If you click “stop” 

button during the processing, the system will not remember the current point, and the 

system will start from the beginning point when you resume milling again.

   6. You can repeat the actions in step 5 to observe if the functions are normal. Now the 

pilot run and test are completed. 

3-2 PROCESSING AND RUNNING

    1. Start the software and click “home” to conduct the mechanical homing operation 

when the system initialization is completed without exception prompt. 

   2. Click “First reference” under manual mode, and each axis will return automatically 

to the position suitable for loading/unloading disc. Attach the work piece for processing 

to the clamp and tighten the locking screw. 

   3. Load the proper processing file, as done in the pilot run operation. The system will 

automatically select the processing strategy according to the file information. Adjust the 

federate and relevant auxiliary functions, and click “START” after confirmation to exe-

cute the auto processing. 

   4. If you need to suspend the operation during the processing, click “pause” button. If 

you need to stop the processing, click “stop” button. If any exception appears during 

the processing, the system will automatically interrupt the current processing and main-

tain the information of the current line. After troubleshooting, you can continue the 

interrupted processing by clicking “START”. 

Figure 3-1

Содержание X-MILL 500

Страница 1: ...X MILL 500 500 Address 4th Floor 1st Building 2nd Area Honghualing Industrial Park Nanshan District 518055 Shenzhen China Tel 0086 755 8600 1804 Fax 0086 755 8600 1486 E mail xtcera xianton com Web e...

Страница 2: ...fety of operators and the machine it should be operated by professional operators If you have any questions please contact us in a timely manner and our professionals will always be ready to help you...

Страница 3: ...ur and has eight burs The maximum speed of spindle can be up to 60000 rpm which is extremely strong accurate and reliable The machine has strong adaptability and selects different processing strategie...

Страница 4: ...llation Considerations 1 Open the packing box and check that the appearance of the equipment is damaged External dimension 720x850x860 mm Weight 225 kg Power supply voltage Single phase AC 220V 50 Hz...

Страница 5: ...loor 2 2 EQUIPMENT COMMISSIONING 1 Turn on the equipment power switch The lighting lamp of the processing area and the screen will turn on 2 Run the XMILL220 and click MANUAL button to enter the manua...

Страница 6: ...d tight the protection bar and click COLLET Then take out the protection bar and put T1 the biggest bur into it Check if the NO behind T on the screen is 1 or not like picture below If the NO is 1 the...

Страница 7: ...point If you click stop button during the processing the system will not remember the current point and the system will start from the beginning point when you resume milling again 6 You can repeat th...

Страница 8: ...e reference position 3 Use left hand to hold tight the milling bur before loosen the spindle chuck to avoid any injury from the ejected bur same as picture below Please remember the equip ment shall n...

Страница 9: ...sed by bumping 3 No residual dust is allowed on the edge of the material when it is installed Be sure to clean it in order to avoid the breakage caused by uneven force during the installation 4 When t...

Страница 10: ...s with clean tissue in order to avoid any exception alarm caused by dust buildup 4 2 SPECIAL NOTES 1 If you use our equipment to process products other than the above mentioned mate rials please make...

Страница 11: ...nse or even cause system crash 7 Do not move the equipment after it is installed If it is necessary to move it please contact us You can only apply force to the bottom plate during the movement No for...

Страница 12: ...adjusted and vacuum can be manually started and shut down CA Custom Wax high efficiency processing mode where the rate cannot be adjusted and the vacuum is started WA Wax Class A Wax conventional pro...

Отзывы: