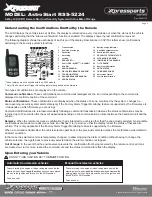
Using your Remote Control
C
ONFIRMATIONS
SENT BY REMOTE CONTROL
C
OMMANDS
B
UTTON
C
ONVENIENCE
S
ECURITY
S
tart
S
TOP
L
OCK
/
A
RMING
*
P
ANIC
(B
UTTON HELD FOR
>
4
SEC
.)
OR
U
NLOCK
/
D
ISARMING
*
T
RUNK
(B
UTTON HELD FOR
>
4
SEC
.)
A
CTIVATE
/
C
ANCEL
A
UX
1
/
S
TATUS
A
CTIVATE
/
C
ANCEL
A
UX
2
/
V
EHICLE SELECTION
(B
UTTON HELD
1.5
SEC
.)
HIS BUTTON IS LOCATED
ON THE BACK OF THE REMOTE
Ö
Ê
ö
L
EGEND
:
DISPLAYED ICONS (BLACK)
:
HIDDEN ICONS (GRAY)
*
C
OMMANDS FOLLOWED BY AN ASTERISK
(*)
APPLY ONLY TO COMMAND
UNITS EQUIPPED WITH A SECURITY SYSTEM.
T
T
HIS COMMAND TERMINATES THE RUNTIME
Ö
Ê
ö
,
PANIC MODE AND ALARM
STATUS (ONLY IF THE FACTORY ALARM TRIGGER MONITORING FEATURE IS
SUPPORTED BY THE FIRMWARE).
REARMING DELAY.
S
TART CONFIRMATION CAN TAKE FEW SECONDS EXCEPT IF THE ENGINE IS
ALREADY RUNNING.
SECOND TIME DURING
EMPORARY VALET MODE IF ACTIVATED A
Refer to the vehicle user manual for more information on
confirmations emitted by your vehicle (i.e. the horn, parking
lights and siren). These confirmations are different for each
vehicle, depending which Bypass is used.
Refer to the vehicle user manual for more
information on confirmations emitted by
your vehicle (i.e. the horn, parking lights
and siren). These confirmations are
different for each vehicle, depending on
which module/firmware is used.
Programming the Features of the Remote Control
P
ARAMETERS
S
ETTINGS
B
UTTONS
D
ISPLAY
/
R
EMARKS
Lock
/
1
BEEP
Keyboard Un/Lock
Unlock
/
2
BEEPS
Disabled
/
1
BEEP
Mute
Enabled
/
2
BEEPS
Enabled
/
1
BEEP
Status confirmations
Disabled
/
2
BEEPS
Trunk
Motion sensor*
Glass breakage sensor*
Tilt sensor*
Auxiliairy sensor icon
Ultrasonic sensor*
1
BEEP
2
BEEPS*
3
BEEPS*
4
BEEPS*
5
BEEPS*
Upon "Status" command
Upon any command
T
HE DISPLAY LIGHTS
-
UP
FOR
3
SECONDS
Back-light
Never
BACK
-
LIGHT SHUTS OFF
Number of vehicle
1 – 4 (Default setting : 2)
1 2
3 4
L
EGEND
:
DISPLAYED
ICON
(BLACK)
:
MASKED
ICON
(GRAY)
:
DEFAULT SETTING
* These settings are not available with the XL202 module.
To access the remote control programming mode, press the “
P
” button located on the back of the remote and hold it for 5
seconds. The remote beeps once to indicate entering programming mode.
Page 2
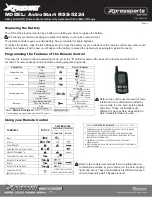
Replacing the Battery
The LCD of the 4-button remote has a battery icon telling you when to replace the battery.
We strongly recommend keeping a replacement battery in your glove compartment.
The remote controls require one AAA battery. See your dealer for spare batteries.
To replace the battery, slide the latch sideways and remove the battery cover on the back of the remote control case, remove old
battery and replace it with a new one. Make sure the battery is placed the right way (see pictogram inside the cover).
2-Way LCD (XRT) Remote Start and Security System with One Mile of Range
Rev.: 20091103
© 2009 Directed Electronics. All rights reserved.
MODEL: AstroStart RSS-5224


