background image

www.xprgroup.com

11

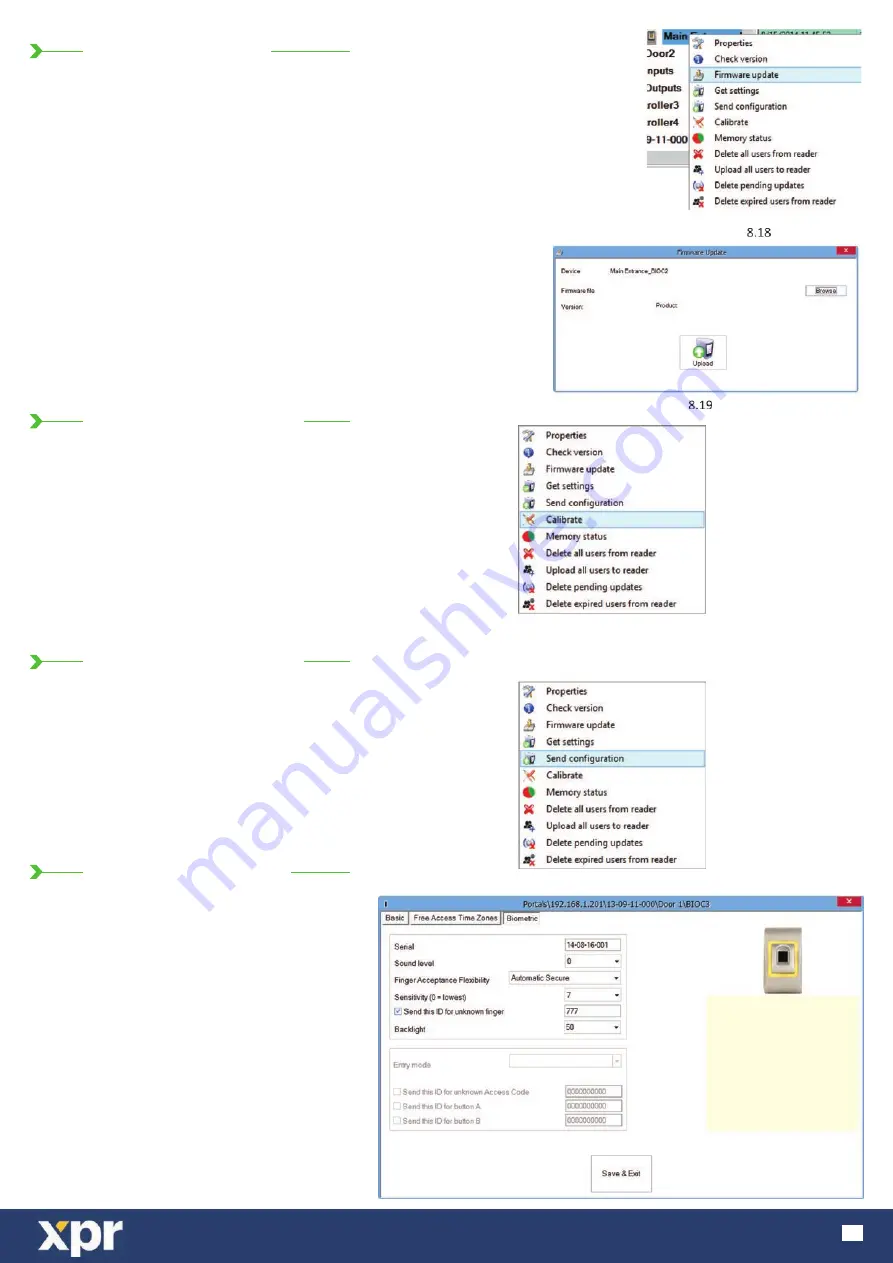
8.6 FIRMWARE UPDATE

8.8 SEND CONFIGURATION

8.7 SENSOR CALIBRATION

8.9 ADVANCED SETTINGS

Right-click on the reader and select Firmware update menu (8.18)

On the Firmware update window, click on the Browse button (8.19). The

default location of the firmware files installed with PROS CS is in the folder

“Firmware”.

Select the firmware file with a “xhc” extension.

Click on the Upload button

Important: Wait for the update end message. Do not turn off the reader, the

software or any communication device in between during the entire process.

· Right-click on the reader and select the Send

configuration menu

· See the events panel to check the configuration flow

Note: The biometric reader gets its settings

automatically. This function is used if the reader was off

line while making the changes.

Right click on the biometric reader and select

“Calibrate” and wait for confirmation message.

Note: It is recommended to do a calibration while

commissioning the reader and in cases when there are

problems with reading the fingers

Send This ID for:

Unknown Finger sends the desired Wiegand when 

an unknown finger is applied.

Click on the Save & Exit button

Sound level:

Sound level of the device (ON or OFF)

Backlight:

Backlight of the device (ON or OFF)

Finger Acceptance Flexibility:

Accepted tolerance. The recommended value is

“Automatic Secure”.

Sensitivity:

Bio-sensor sensitivity, the recommended value is 7,

most sensitive.

Содержание BIOC3 V1

Страница 1: ...www xprgroup com 1 BIOC3 V1 Biometric Reader EN USER S MANUAL v b1...

Страница 2: ...BIOMETRIC READER 8 2 ENROLLING FINGERPRINTS FROM A READER 8 3 ENROLLING FINGERPRINTS FROM DESKTOP READER 8 4 DELETING FINGERPRINTS 8 5 UPLOADING THE FINGERPRINTS TO THE BIOMETRIC READERS 8 6 FIRMWARE...

Страница 3: ...ply 9 14V DC Operating Temperature 0 C to 40 C non condensing Dimensions mm 92 x 51 x 25 Housing Moulded Aluminium Colour Silver Red Green Dark Grey Blue White BIOC3 is a Wiegand biometric reader for...

Страница 4: ...line A B is used for fingerprint transfer and reader settings The Biometric readers must be powered from the controller If you use different power supply for the biometric reader connect the GND from...

Страница 5: ...at this can be possible reason for errors in communication with PC software The cable must be twisted and shielded with a min 0 2 mm2 cross section Connect the ground 0V of each unit in the RS 485 Lin...

Страница 6: ...with each other with a RS485 and with the PC Software through a Converter The RS485 Line should be configured in the form of a daisy chain NOT in a form of a star Keep the stubs from the RS485 back b...

Страница 7: ...cting the type a third tab will appear Biometric Go to that tab and put the serial number of the Biometric Reader 8 3 Important Note The serial number of the reader can be found on a sticker inside th...

Страница 8: ...nrolled 7 Click on Save New and the fingerprint will be sent automatically to all Biometric Readers where that user has access i e to all the readers according to the Access Level assign to that user...

Страница 9: ...ic Readers where that user has access i e to all the readers according to the Access Level assign to that user If the reader is off line the fingers will be sent upon the connection is established bet...

Страница 10: ...Delete one or more fingerprints Select the User and open the Biometric tab Go to the fingertip that needs to be deleted right click and select Delete for one finger or Delete All for all fingers of t...

Страница 11: ...on menu See the events panel to check the configuration flow Note The biometric reader gets its settings automatically This function is used if the reader was off line while making the changes Right c...

Страница 12: ...nt and transfer PIN Code length configuration 1 to 8 digits and PIN Code transfer Wiegand Output Configuration The Wiegand output of the Biometric reader can be customized bitwise Right click on Porta...

Страница 13: ...s added on top of the event table If reader is online right click on reader and select Upload configuration Right click on the reader and select Properties Check at event table if configuration was su...

Страница 14: ...on Save New and the fingerprint will be sent automatically to all Biometric Readers where that user has access i e to all the readers according to the Access Level assign to that user Example If the...

Страница 15: ...Delete one or more fingerprints Select the User and open the Biometric tab Go to the fingertip that needs to be deleted right click and select Delete for one finger or Delete All for all fingers of t...

Страница 16: ...To setup custom Wiegand format Select Wiegand menu from Settings At Wiegand setup window select one from customs Wiegand Set Wiegand parameter Click on Save button Wiegand settings are out of scope fo...

Страница 17: ...roximately 100 us microseconds Time between two data bits approximately 1 ms millisecond Both data lines D0 and D1 are high Description for the 26 bits Wiegand format Each data block consists of a fir...

Страница 18: ...magnetic fields like radio transmitting antenna Do not place the device near or above heating equipments If cleaning do not spray or splash water or other cleaning liquids but wipe it out with smooth...

Страница 19: ...www xprgroup com 19...

Страница 20: ...www xprgroup com 20 This product herewith complies with requirements of EMC directive 2014 30 EU In addition it complies with RoHS2 directive EN50581 2012...

Отзывы: