background image

Operating Instructions

The LED display screen on the control panel of the product illuminates to display what 

function you have selected when the fan is operating. 

a.  Turning on/off the fan: 

Gently press “Standby” button 


on the soft touch button

control panel or the wireless remote control.  

b.  Adjusting and Selecting Speed:

 3 contant speeds can be selected by pressing the 

button   either on the control panel or on the remote. Each time you press this 

button the speed will cycle from I to II to III and back to ‘I’ again. Where “

I

” = Low 

Speed, “

II

” = Medium Speed and “

III

” = High Speed.

c.  Oscillating function:

 The product oscillates in an arc from left to right and back 

again continuously thus circulating the air flow over a wider area. To start the tower 

fan oscillating simply press the oscillating button   on the control panel for less 

than 2 seconds or the   button on the remote and the   symbol will light up on 

the control panel. Press this button a second time to stop the oscillating. 

d.  Variable Blower Function Selection:

 The product can be set to automatically vary 

the speed output to simulate different breezy conditions. It will normally run in 

constant blowing mode at whichever speed you selected (see “b.” above). To select 

a variable blower speed function you can simply press the   button on the remote 

or press and hold the dual control button   on the control panel for at least 2 

seconds. There are two selections available:

1.   The first mode activated will be the ‘natural breeze’ selection and the   symbol 

will light up on the control panel. In this mode the fan speed will continuously 

and randomly vary between speed levels (including off) to simulate variable 

wind conditions. 

2.  Pressing the   on the remote a second time or pressing and holding the dual 

control button 


on the control panel again for atleast 2 seconds


activates ‘night 

time’ selection and the   symbol will light up on the control panel. In this mode 

the fan speed varies automatically between speed levels (including off) at a less 

noticeable rate than the ‘natural breeze’ selection. 


-

Pressing the   button a third time for more than 2 seconds will change it back 

to constant normal blowing mode. 

e.  Runback Timer function: 

The product can be set to switch off automatically after 

running for one of the four user selectable runback periods i.e. 1 hr, 2 hr, 4 hr or 8 hr.

To activate the runback function just simply press the timer   button


-

Press once and the timer is set to 1hr runback


-

Press twice and the timer is set to 2hr runback


-

Press 3 times and the timer is set to 4hrs runback


-

Press 4 times and the timer is set to 8 hrs runback


-

Press a 5th time and the timer function is switched off. 

Содержание XPP

Страница 1: ...5 This product complies with all the required European and UK Product Safety Electromagnetic Compatibility and Environmental Standards They are fully compliant with the LVD EMC RoHS and Eco Design Directives and Regulations ...

Страница 2: ...ities or lack of experience or knowledge if they have been given supervision or instruction concerning the use of the appliance in a safe way and understand the hazards involved Children shall not play with the appliance Cleaning and user maintenance shall not be made by children without supervision WARNING To avoid the risk of accidental strangulation from the supply cord all children and vulnera...

Страница 3: ...appliance DO NOT use the appliance in an area where there are likely to be flammable or explosive fumes or liquids DO NOT place any heavy objects on the appliance or any object against the product when operating IMPORTANT Should the appliance fail to operate please check the fuse in the plug is intact and confirm that the circuit breaker fuse at your distribution board is operating before contract...

Страница 4: ...the overlap bosses on the bottom with cable exit with their sockets on the other half dropping into place and pressing together Bring the assembled base up to the bottom of the tower and line up the small pillar on the top of the raised centre of the base with the matching hole in the base socket location of the tower fan pull the cable through fully so it doesn t interfere with them fitting toget...

Страница 5: ...ariable blower speed function you can simply press the button on the remote or press and hold the dual control button on the control panel for at least 2 seconds There are two selections available 1 The first mode activated will be the natural breeze selection and the symbol will light up on the control panel In this mode the fan speed will continuously and randomly vary between speed levels inclu...

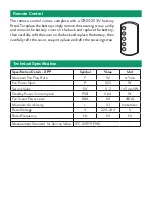
Страница 6: ...attery then carefully refit the cover snap into place and refit the securing screw Specification Details XPP Symbol Value Unit Maximum Fan Flow Rate F 9 2 m min Fan Power Input P 32 3 W Service Value SV 0 3 m min W Standby Power Comsumption PSB 0 64 W Fan Sound Power Level LWA 64 dB A Maximum Air Velocity c 4 1 meters sec Rated Voltage V 220 240 V Rated Frequency Hz 50 Hz Measurement Standard for ...

Страница 7: ... appliance Wipe with a dry cloth to remove dust and a damp cloth not wet to clean off stains Be careful not to allow moisture into the appliance Use a vaccum cleaner to remove and fluff which does accumulate Recycling For electrical poducts sold within the European Community At the end of the electrical products useful life it should not be disposed of within household waste Please recycle where f...

Страница 8: ...your Xpelair product for anything other than normal domestic household purposes in the country where it was purchased Caused by any misuse abuse or negligent use of the Xpelair product including but not limited to any failure to use it in accordance with the Operating Instructions supplied with the product Caused by any failure to assemble install clean and maintain your Xpelair product in accorda...

Отзывы: