background image

12

43

Main Menu

18

04

3.Source Adjust

In the main menu, press SOURCE in the 
monitor, the sub menu will appear as follows:

You can adjust all of the items to ON or 
OFF, press the corresponding button to set. 

If one of them was set OFF, that function 
is null. For example, to set the TV OFF,
press SOURCE can not activate reception 
of a radio. But can not set the current play-
back OFF.

4.System Adjust

After selecting SYSTEM, the sub menu will
appear as follows:

In this menu you can adjust CLOCK 
SYSTEM, KEY BEEP and so on.

2.Audio Adjust

After selecting AUDIO, the sub menu will
appear as follows:

You can adjust VOLUME, BALANCE, FAD 
BASS, TREBLE, For example, press FAD, 
the setting menu will appear as follow: 

Press        and       to adjust the desired FAD
level, press EXIT to exit this menu.

Note:

*  Adjusting the other options perform the same 
    operation.

CLOCK SYS

KEY BEEP

MONI FLEX

EXIT

EXIT

FADE F4

VOLUME

BALANCE

BASS

FAD

TREBLE

EXIT

OFF

ON

ON

ON

ON

OFF

Note:

*  If the item can not be set "ON", then this model 
    does not contain this function.

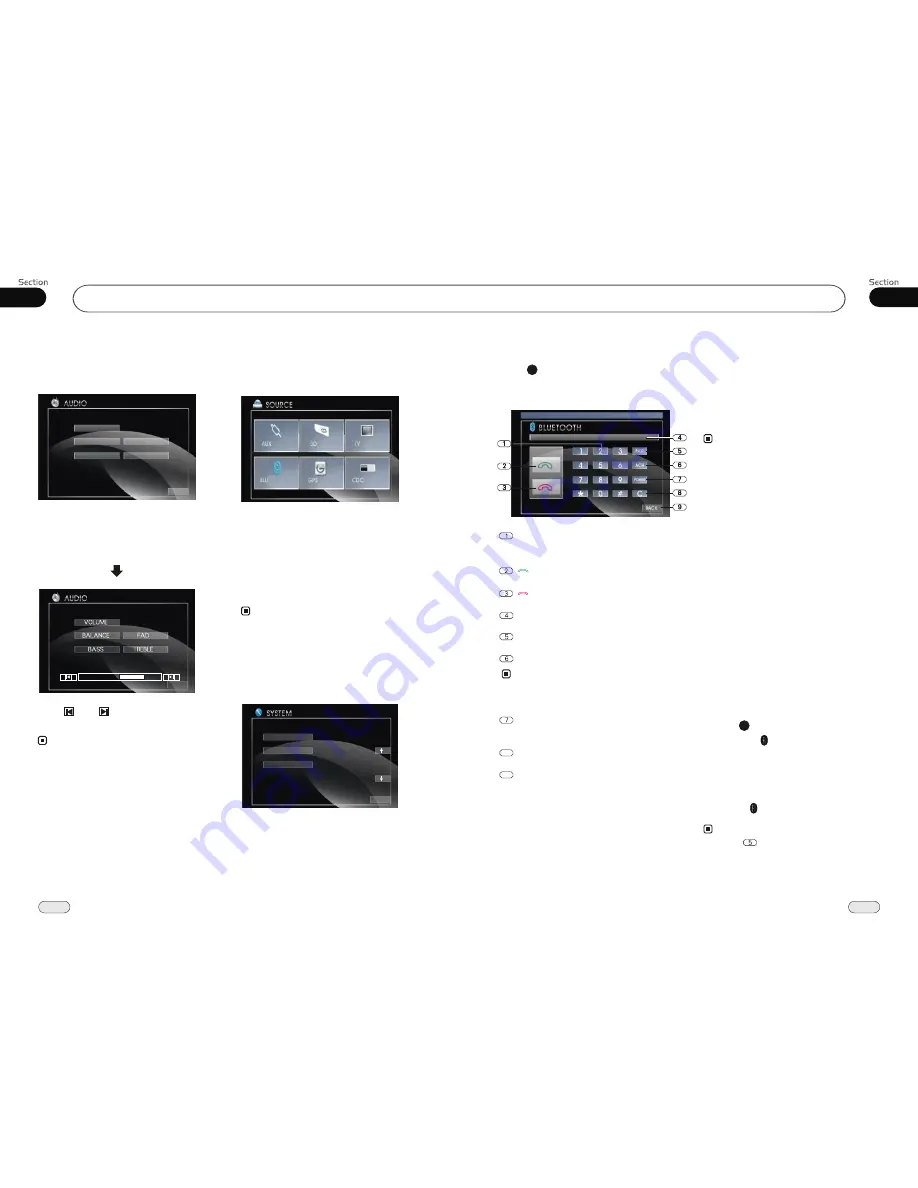
Bluetooth Operational Interface

Press          BT or BLUET in the following 
interface to open the bluetooth operational
interface: 

28

Dail, re-dial, answer a phone.

Hang up, refuse a phone.

Number Show

PAIR

C (clear)

8

POWER

Press it to turn on or turn off the bluetooth function.

To input the phone number.

Number Buttons

BACK 

9

Using a Bluetooth Wireless 
Connection

The device can be dialed wirelessly in
bluetooth status. Before using the bluetooth
function, please turn on your cellphone blue-
tooth function. 

Pairing Your Unit and Bluetooth

Phone 

The device supports handsfree profile,
headset profile,   A2DP( Audio Advanced
Distribution profile)and AVRCP(Audio
Video Remote Control profile). Follow
the pairing instruction for the first time
use, after that the unit will connect auto-
matically.

Note:

*   To provide the best sound without or little
     distorted sound(the cellphone or network
     brings).

*   Full duplex conversation.
*   Bluetooth ver2.0 compliant.
*   Please dial-up the device before connecting
     bluetooth.

Pairing in Handsfree Mode

1. Press       PAIR, 

PAIRING

 shows on the 

    screen and     is blinking.
2. To get into 

CELLPHONE CONNECTION

    to search fixtures;
3. If the cellphone has connected,

PAIR 

   SUCCESS

 appears and then 

CONNECT 

   in order,      will from blue to red. 

29

Note:

*   Press           in the monitor also performs the 
     same function.

ACH (audio change)

Note:

*   Some of phone can just switch the audio from 
     the unit to the phon.

Bluetooth Mode

Содержание XOD1840BTNAVI

Страница 1: ...SLIDEDOWN INDASH MONITOR SLIDEDOWN INDASH MONITOR SLIDEDOWN INDASH MONITOR English Version...

Страница 2: ...s 22 Repeat Playing 22 Pause the Playback 22 Skip backward forward 23 System Switch 23 Slow Motion Playback 23 Increase Picture Size 23 On Screen Display 23 Setting the Playback Time 23 Changing the V...

Страница 3: ...Bluetooth Wireless connection 43 Pairing Your Unit and Bluetooth Phone 43 Pairing in Handsfree Mode 43 Cellphone Pairing Mode 44 Bluetooth Connection and Disconnection 44 Using the Unit as a Handsfree...

Страница 4: ...of the magnetism of the unit Do no put the credit card cassette or w atch around the unit or they would be broken or some information in them lose To lest disturb the video frequency keep far away fro...

Страница 5: ...isc Recorded material Sound and moving pictures Sound and moving pictures Sound only Sound only Size of disc MPEG 4 Sound and moving pictures 01 5 Before You Start 13 56 GPS Operation Stopovers In thi...

Страница 6: ...Route Stop navigation Menu icon Compass Speed Current time Move icon Moving to next distance Zoom out On the navigation screen as left the route will be shown in blue and the white arrow will indicat...

Страница 7: ...he options of the best rapid driving Bicycle Indicates the section of highway which forcycling in and which forbidden cycling in Motorcycle Indicates the section of highway which for motor cycling in...

Страница 8: ...1 press Settings to open a menu as Picture A 3 There are general settings map settings route settings and volume adjustment Change General Settings In the condition of Picture A 3 press General Setti...

Страница 9: ...ets Address In the condition of Picture A 2 press Presets icon to show the presets address list as Picture A 2 4 Press the desired address to open an editing menu Picture A 2 Press Navigate to enter n...

Страница 10: ...back to and select the bookmark address again Press On Map to show the point on map press or to show the previous or next bookmark address information and also can play other common operation Press B...

Страница 11: ...tion DVD Player Section 60dB Dynamic Range 60dB Signal to Noise Ratio Numberofchannel 2 channels Max Power Output 45W X 4 DVDSignalSystem AUTO PAL NTSC 40Hz to 16KHz Frequency Response Optional Option...

Страница 12: ...ce by POI search In the condition of Picture A 1 3 there are 8 POI types for searching So you can select type that you need and the display will show a sub directory Press POI type or that you need to...

Страница 13: ...ains those letters or words by itself and you only need to choose the name in list Picture A 1 2 Zip Code Setup In the interface of Picture A 1 1 press Zip code icon to open a small keyboard to input...

Страница 14: ...onnecting Wire x1 Steel Bar x 1 p 4 Screws M 5 x 5 p 5 Screws M 5 x 20 p GPS Operation Speed Time Compass Menu icon The next place Zoom Out Cursor Zoom In Select Mode and Trace Mode Select Mode and Tr...

Страница 15: ...n only be operated by the head unit Remove the front panel at first and then Press RESET button in the panel w object such as a ball the unit to initial status ith a pointed point pen to set 8 Press V...

Страница 16: ...ess MUTE button to enter the night mode press it again to switch to the normal mode 3 Note Insert a SD Card Press REL after turning the unit on then insert a common SD card into SD slot when the TFT s...

Страница 17: ...ction and Disconnection When established bluetooth connection between this unit and the cellphone bluetooth icon on the display appears in red Press PAIR to turn off bluetooth con nection and appears...

Страница 18: ...cetoopenthebluetoothoperational interface 28 Dail re dial answeraphone Hangup refuseaphone NumberShow PAIR C clear 8 POWER Press it to turn on or turn off the bluetooth function To input the phone num...

Страница 19: ...Selector 2 Press on the remote control to select the TV stations upwards press to select stations downwards Press in the monitor also perform the same function Note 2 27 Frequency Searching Briefly pr...

Страница 20: ...you can using GOTO button on the remote control to select a station s frequency directly in radio mode EXIT LOCAL AREA LOCAL GOTO FREQ EUROPE U S A EXIT LOCAL AREA LOCAL GOTO FREQ EXIT LOCAL AREA LOC...

Страница 21: ...ST in the monitor to adjust the clock CLOCK SYS KEY BEEP MONI FLEX EXIT CLOCK EXIT SAVE CLOCK EXIT 00 00 00 Tuner EXIT LOCAL AREA LOCAL GOTO FREQ Goto FREQ 2 Press GOTO and the monitor shows FREQ then...

Страница 22: ...ss ST button on the remote control MO NO mode or STEREO to select mode MO ST Selector Stereo reception is charged when stereo appears It is switched to MONO mode mono appears when It is only valid on...

Страница 23: ...c ates it features multi angle scenes The number in the mark indicates the number of angles from which scenes were shot It is invalid to pressing ANGLE during fast forward fast reverse or pause 3 7 No...

Страница 24: ...the disc DVD SETUP MENU Notes Press to the pervious one press SETUP or press to move the cursor on then press ENTER to exit the menu setup MP4 DIVX During MP4 AVI MPEG4 playback first press GOTO and m...

Страница 25: ...e unit will automatically switch on if a disc is loaded press SOURCE to start the playback 1 Pause the Playback During playback press MP4 AVI MPEG4 button to suspend the playback Press it again to ret...

Страница 26: ...peat time disp Press to select the options press ENTER to set the status Then press NUMBER BUTTONS or to set the current status track This function is operated by using remote control the 2 Note 23 Se...

Страница 27: ...tch between play and stop Note Press or on remote control to perform fast reward or fast forward Skip backward forward F F F REW the playback 20 Note 2 X 4 X 8 X 16X Press CLEAR to clear the mistake i...

Страница 28: ...it or and in the monitor the same function performs 21 Note DuringVCD CDplayback firstpress toreturntothebeginningofthe currenttrack press againwithin3 secondstoplayprevioustrack press toplaynexttrack...

Страница 29: ...e DiscMenu Parental Password Default Auto Eng Eng Eng Change 2 3 4 5 6 7 8 Off G PG PG 13 PGR R NC 17 Adult English French Spanish Chinese Japanese Korean Russian Thai Stop Playing During MP3 SD playb...

Страница 30: ...ote The default setting is single Repeat Press CLEAR to clear the mistake input 22 Number Buttons Press one of Number Buttons 0 9 to select a track to play automatically 23 This function is operated b...

Отзывы: