


18
HRS 8520
Engl
ish
First steps
First Time Installation
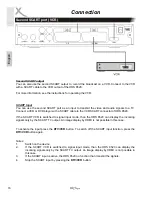
After all connections have been made properly, switch on TV and make sure the receiver is
connected to the Main Power. Press Power button to switch receiver on.
If you are using the receiver for the first time or restored to Factory Default, the Main Menu will
appear on your TV screen.
1.
OSD Language
2. Dish
Setup
Navigate with the arrow keys
UP
and
DOWN
or
LEFT
and
RIGHT
.
OK
activates an option and
EXIT
leaves a setup menu.
OSD Language
Choose a language.
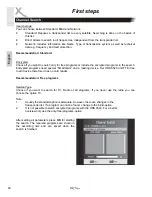
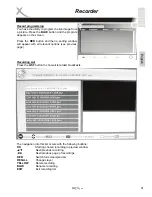
Dish SETUP
Before beginning the setup you should get straight
about your satellite system. There are many different
options.
The menu is structured in a satellite list (Left) and
further options (Right).
1.
Simple connection of satellite and receiver (from page 19)
2.
Direct connection of satellite dish and receiver by using Tone burst (from page 21)
3.
Using multiple satellites via DiSEqC 1.0 (from page 21)
4.
Using multiple satellites via DiSEqC 1.0 and Tone burst (from page 22)
5.
Using multiple satellites via DiSEqC 1.1 (from page 22)
6.
Using multiple satellites via DiSEqC 1.2 (from page 23)
7.
Using multiple satellites via DiSEqC 1.3 (from page 24)
8.
Using Single Cable Distribution - Unicable (from page 25)