background image


21 

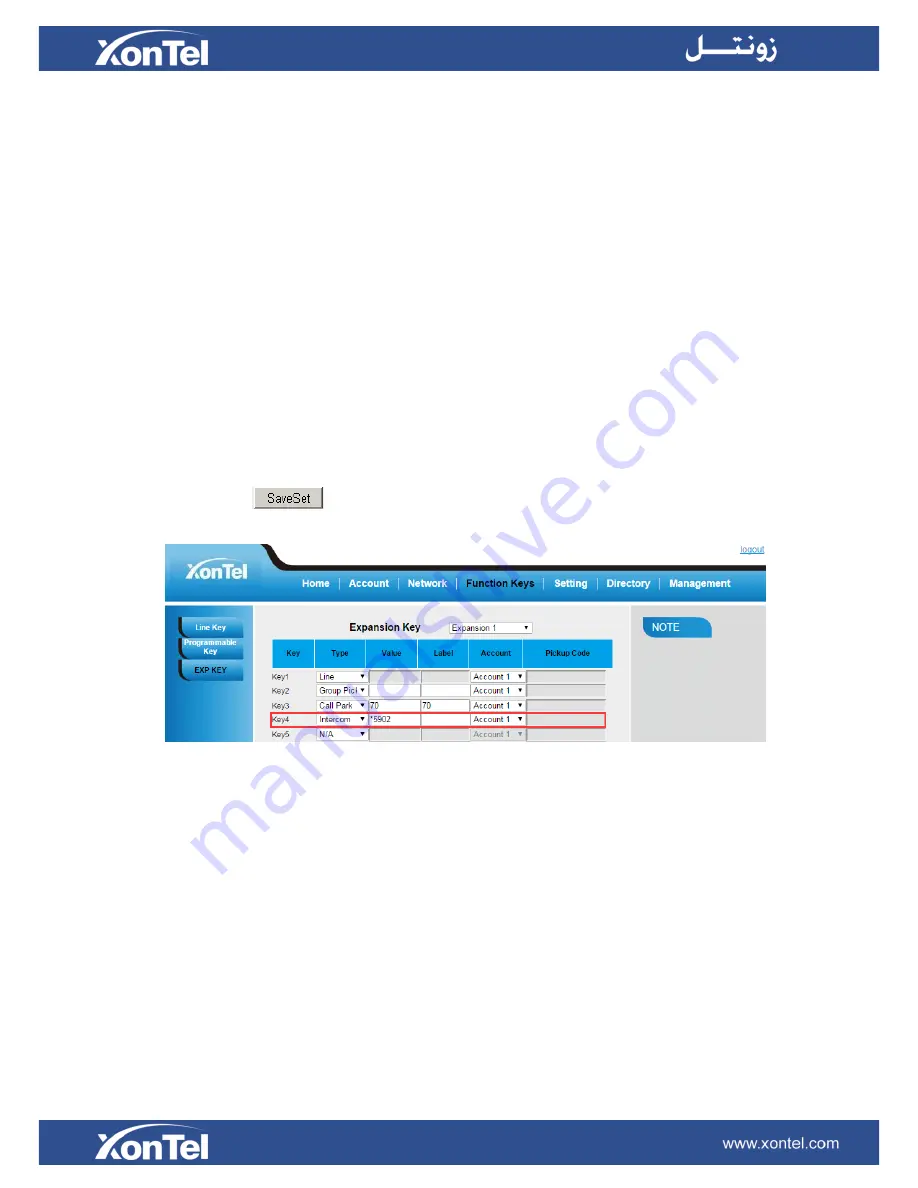
Intercom


When use the intercom feature, you can quickly get access connect to the configured Expansion. 


To configure Intercom feature via Web Interface 


1.


Click Function keys  

→ 

EXP Key. 


2.


Select the wanted Key and select Intercom as the Type. 


3.


Enter the intercom codes followed by desired number in the Value field. 


4.


Filled the Label displayed on LCD. 


5.


Select the Account. 


6.


Click the  

  to save the configuration. 


If you want to achieve the intercom feature, you must enable the “Allow Auto Answer By 

Call-Info” 


1.


Click the account 


2.


Select the desired account from the pull-down list of Account in the Account field. 


3.


Click the advanced 


4.


Enable the “Allow Auto Answer By Call-Info” 


5.


Click the button to save the configuration. 

Содержание XT-23EXP

Страница 1: ...1 XonTel XT 23EXP Expansion Module User manual...

Страница 2: ...ave the right to alter modify or use as commercial means without the express written permission of XonTel Safety cautions To use the device follow the instructions in this manual To use the power adap...

Страница 3: ...8 3 Connect the IP Phone and Power 9 Getting Familiar with Expansion Module 10 Hardware Components Preview 10 Icon Preview 11 Features Configuration 13 Screen Saver 13 Line 13 Speed Dial 14 BLF 15 BLF...

Страница 4: ...ord 30 Paging 31 Public Hold 32 Private Hold 32 Hot Desking 33 ACD 33 Zero Touch 34 URL 34 MultiCast Paging 35 Upgrade 36 IP Phone upgrades the expansion module FW 36 Expansion module gets the fw46 ro...

Страница 5: ...5 Getting Started Packing List The package contains the following parts please check if all the items are not missed 1 The Expansion module device 2 The Stand...

Страница 6: ...6 3 Connecting Sheet 4 Power adapter 5 Ethernet cable Connecting Cord...

Страница 7: ...7 6 Quick installation reference 7 Quick installation reference...

Страница 8: ...8 Expansion Module Installation 1 Connect the expansion module and IP Phone 2 Attach the Foot stand...

Страница 9: ...ept Expansion Modules on the PC Port This setting can be found in the phone menu under Settings Advanced Settings Network PC Port or in the web GUI under Network PC Port 2 Our expansion modules must b...

Страница 10: ...10 Getting Familiar with ExpansionModule Hardware Components Preview...

Страница 11: ...view Icon Description Line Registered succeed Line Unregistered Line Ringing Speed Dial BLF BLF Ringing BLF Talking Voice messages Pick up Call Park Intercom Paging DTMF Prefix XML Group Local Group X...

Страница 12: ...13 LDAP Broadsoft Group Conference Forward Transfer Hold Line on Hold DND Redial Call Return SMS Record Recording Group Listening Shared Line Other Functions...

Страница 13: ...ick to save the configuration Line It works same as Line keys Line support three Mode Default lock and float Default mode If the phone has a incoming call it means that the phone will not jump to the...

Страница 14: ...Select the wanted Key and set as Line 6 Select the Account 7 Click to save the configuration Speed Dial With this feature you can dial one directory by press the definite key To configure Speed Dial f...

Страница 15: ...nking red press the BLF key to pick the phone up directly 3 When the monitored line is calling or in a conversation the light is steadyred To configure a BLF key by web 1 Click Function keys EXP Key 2...

Страница 16: ...face 1 Login and click Account 2 Click Advanced and then fill the Eventlist BLFURL Note This feature is not available on all servers For more information contact your system administrator After settin...

Страница 17: ...Account 3 4 Click to the configuration Voice Message To configure Voice Mail feature via Web Interface 1 Click Function keys EXP Key 2 Select the wanted Key 3 Enter the desired voicemail feature code...

Страница 18: ...3 Enter the pickup code and followed the desired phone number in the Valuefield 4 Filled the Label displayed on LCD 5 Select the Account 6 Click the to save the configuration Group Pickup With this f...

Страница 19: ...on hold and continue the conversation from another phone To configure the Call Park via Web interface 1 Click Function key EXP Key 2 Select the desired Key and select Call Park in the Type 3 Enter th...

Страница 20: ...m codes followed by desired number in the Value field 4 Filled the Label displayed on LCD 5 Select the Account 6 Click the to save the configuration If you want to achieve the intercom feature you mus...

Страница 21: ...k Setting Preference 2 Select On for Keypad DTMF Tone 3 Click to the configuration To configure the DTMF via Web interface 1 Click Function keys EXP Key 2 Select the desired Key and select DTMF in the...

Страница 22: ...1 Click Function key EXP Key 2 Select the desired Key and select Prefix in the Type 3 Fill the value with number that you want to set as prefix 4 Enter Label displayed on LCD 5 Click the to save the c...

Страница 23: ...l group key to access the pre defined contact group in the local directory quickly XML Group When use the XML Group feature press the key and enter the Remote Contacts interface quickly To configure t...

Страница 24: ...ve the configuration Broadsoft Group When use the BroadSoft Group feature press the key and enter the Remote Contacts interface quickly To configure the Broadsoft group via Web interface 1 Click Funct...

Страница 25: ...rward key press this key under the idle status the IP phone will turn to the Always Forward interface and you can set the Forward to number then when there is any call to the Expansion number will be...

Страница 26: ...y 2 Select the desired Key and select Transfer in theType 3 Enter the Value with the number that wanted transfer to 4 Enter the Label displayed on LCD 5 Click the to save the configuration Hold The ke...

Страница 27: ...erface 1 Click Function keys EXP Key 2 Select the desired Key and select Group listening in the Type 3 Enter the Label displayed on LCD 4 Click the to save the configuration DND If the key is configur...

Страница 28: ...yed on LCD 4 Click the to save the configuration Redial If the key is configured as Redial key you can redial the last placed call from the IP Phone To configure Redial via Web Interface 1 Click Funct...

Страница 29: ...eb Interface 1 Click Function keys EXP Key 2 Select the desired Key and select Call Return in the Type 3 Enter the Label displayed on LCD 4 Click the to save the configuration SMS To configure SMS via...

Страница 30: ...keys EXP Key 2 Select the desired Key and select Record in the Type 3 Enter the Label dispalyed on LCD 4 Click the to save the configuration URL Record The phone sends HTTP URL request to trigger a r...

Страница 31: ...n LCD 4 Click the to save the configuration Paging With this feature you can call a phone or a group directly To configure the Paging via Web interface 1 Click Function keys EXP Key 2 Select the desir...

Страница 32: ...the Type 3 Enter the Label dispalyed on LCD 4 Click the to save the configuration Private Hold The key can be configured as a private hold key During a conversation all members belonging to that part...

Страница 33: ...e desired Key and select hot desking in the Type 3 Enter the Label dispalyed on LCD 4 Select the Account 5 Click the to save the configuration ACD To configure the ACD via web interface 1 Click Functi...

Страница 34: ...he Zero Touch via web interface 1 Click Function keys EXP Key 2 Select the desired Key and select Zero Touch in the Type 3 Enter the Label dispalyed on LCD 4 Select the Account 5 Click the to save the...

Страница 35: ...on LCD 4 Click the to save the configuration MultiCast Paging To configure the MultiCast Paging via web interface 1 Click Function keys EXP Key 2 Select the desired Key and select MultiCast Paging in...

Страница 36: ...xpansion module FW on your phone are as follows 1 First enable Upgrade EXP Firmware option from Management Auto provision Upgrade EXP Firmware If set this option to Yes the IP Phone will get fw46 rom...

Страница 37: ...ically get the expansion module FW from the phone and automatically restart to finish the upgrade 4 After upgrade please check whether the FW show on the phone status is same as the FW show on the Web...

Отзывы: